Sitecore User Group Conference Europe 2025 has just concluded. It was held over two days in Antwerp city, Belgium last week (3-4 April 2025) and I was one of the lucky attendees. In this blog post, I will be sharing my experiences and key takeaways from the conference.
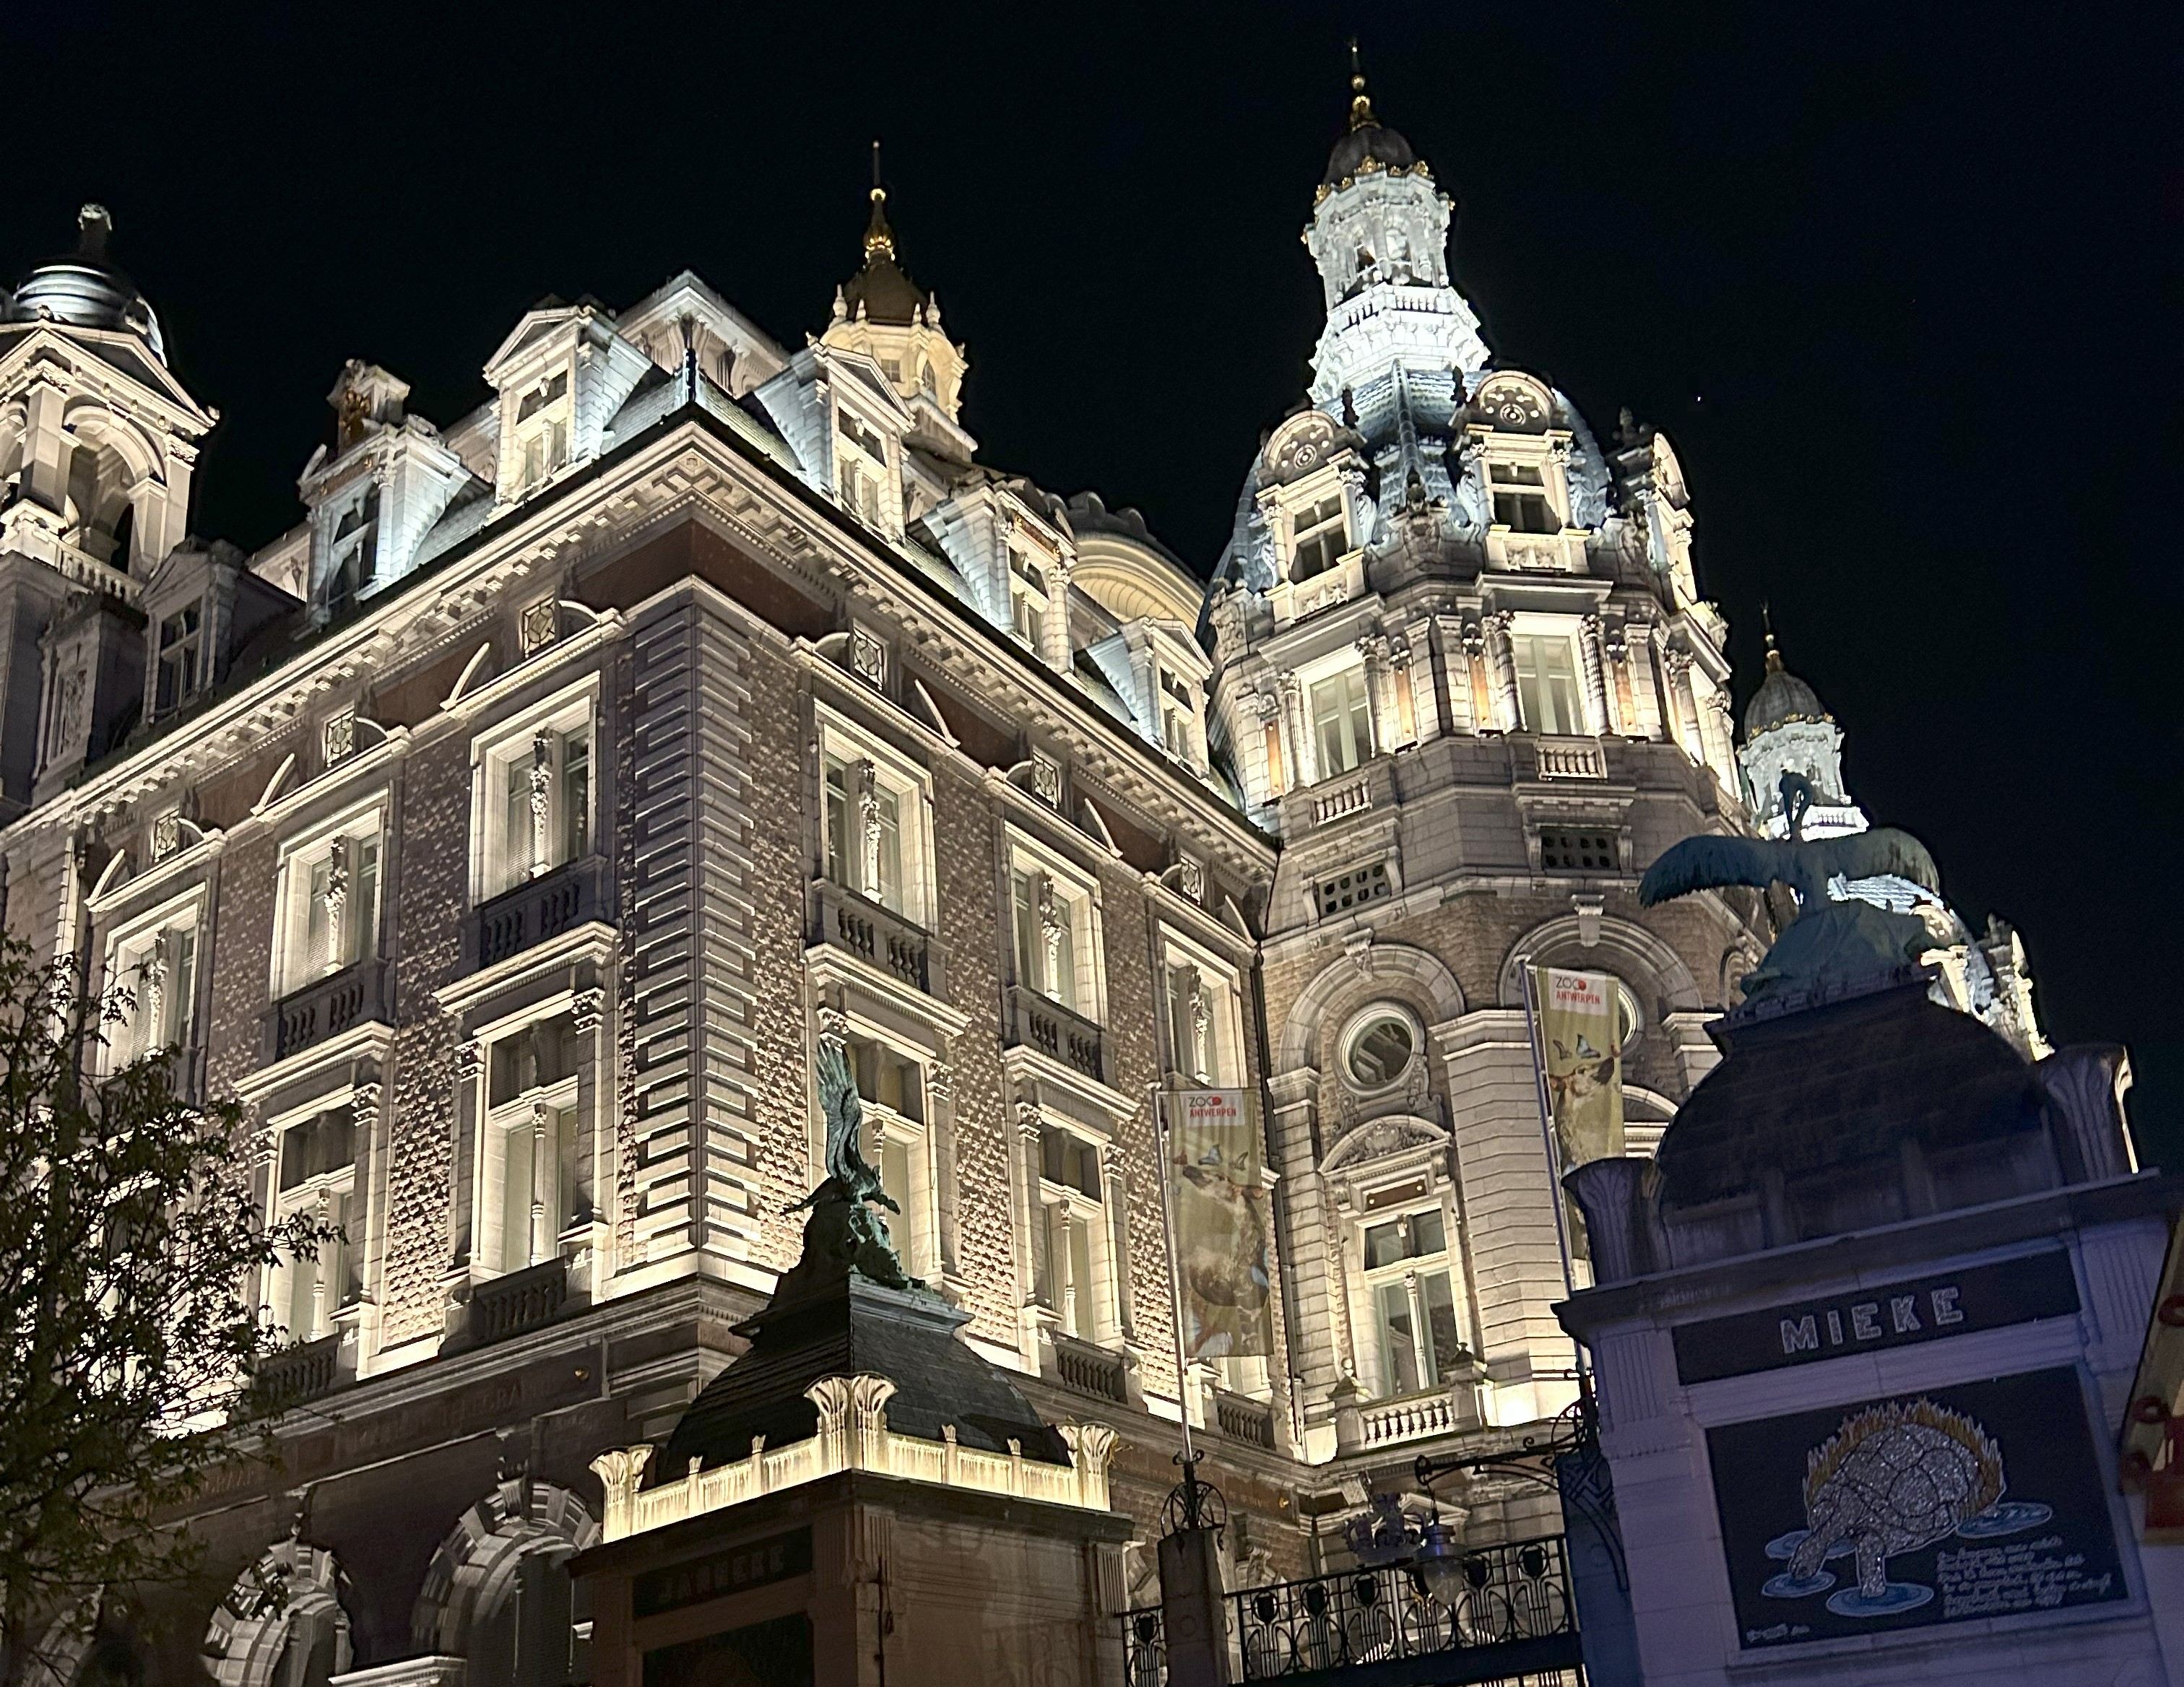
Firstly, I would like to thank the SUGCON organizers and the Sitecore community for making the event such a success. The choice of venue was spot on! Held in A Room with a ZOO – Antwerp, Belgium, the venue was most accessible via train seamlessly connected to the adjacent Belle Époque international station, which links to the European rail network. And right next to the Antwerp Central Station, the most beautiful station in the world. The food and hospitality were top notch, with variety of Belgian cuisine and desserts on the menu.
Secondly, the event schedule was the best you could have asked for. It catered for both developers and marketers alike, with keynotes from Sitecore leadership team, Sitecore product updates, great Sitecore community contents and demos alike. This year SUGCON also provided an accompanying SUGCON app to help personalise your sessions, keep track schedule and the room switches! Whether it was the usual ad hoc chit chat along corridors with other attendees, over lunch and dinner everyone was engaged. Including a Community Scavenger hunt app powered by Deckle, that kept everyone engaged and exploring the venue with many prizes won by those on top of the leaderboard at close of the event!
Keynote: Powering the Future of Sitecore Together
- Dave O’Flanagan (CEO, Sitecore)
- Roger Connolly (CPO, Sitecore)
- Danny Robinson(CTO, Sitecore)
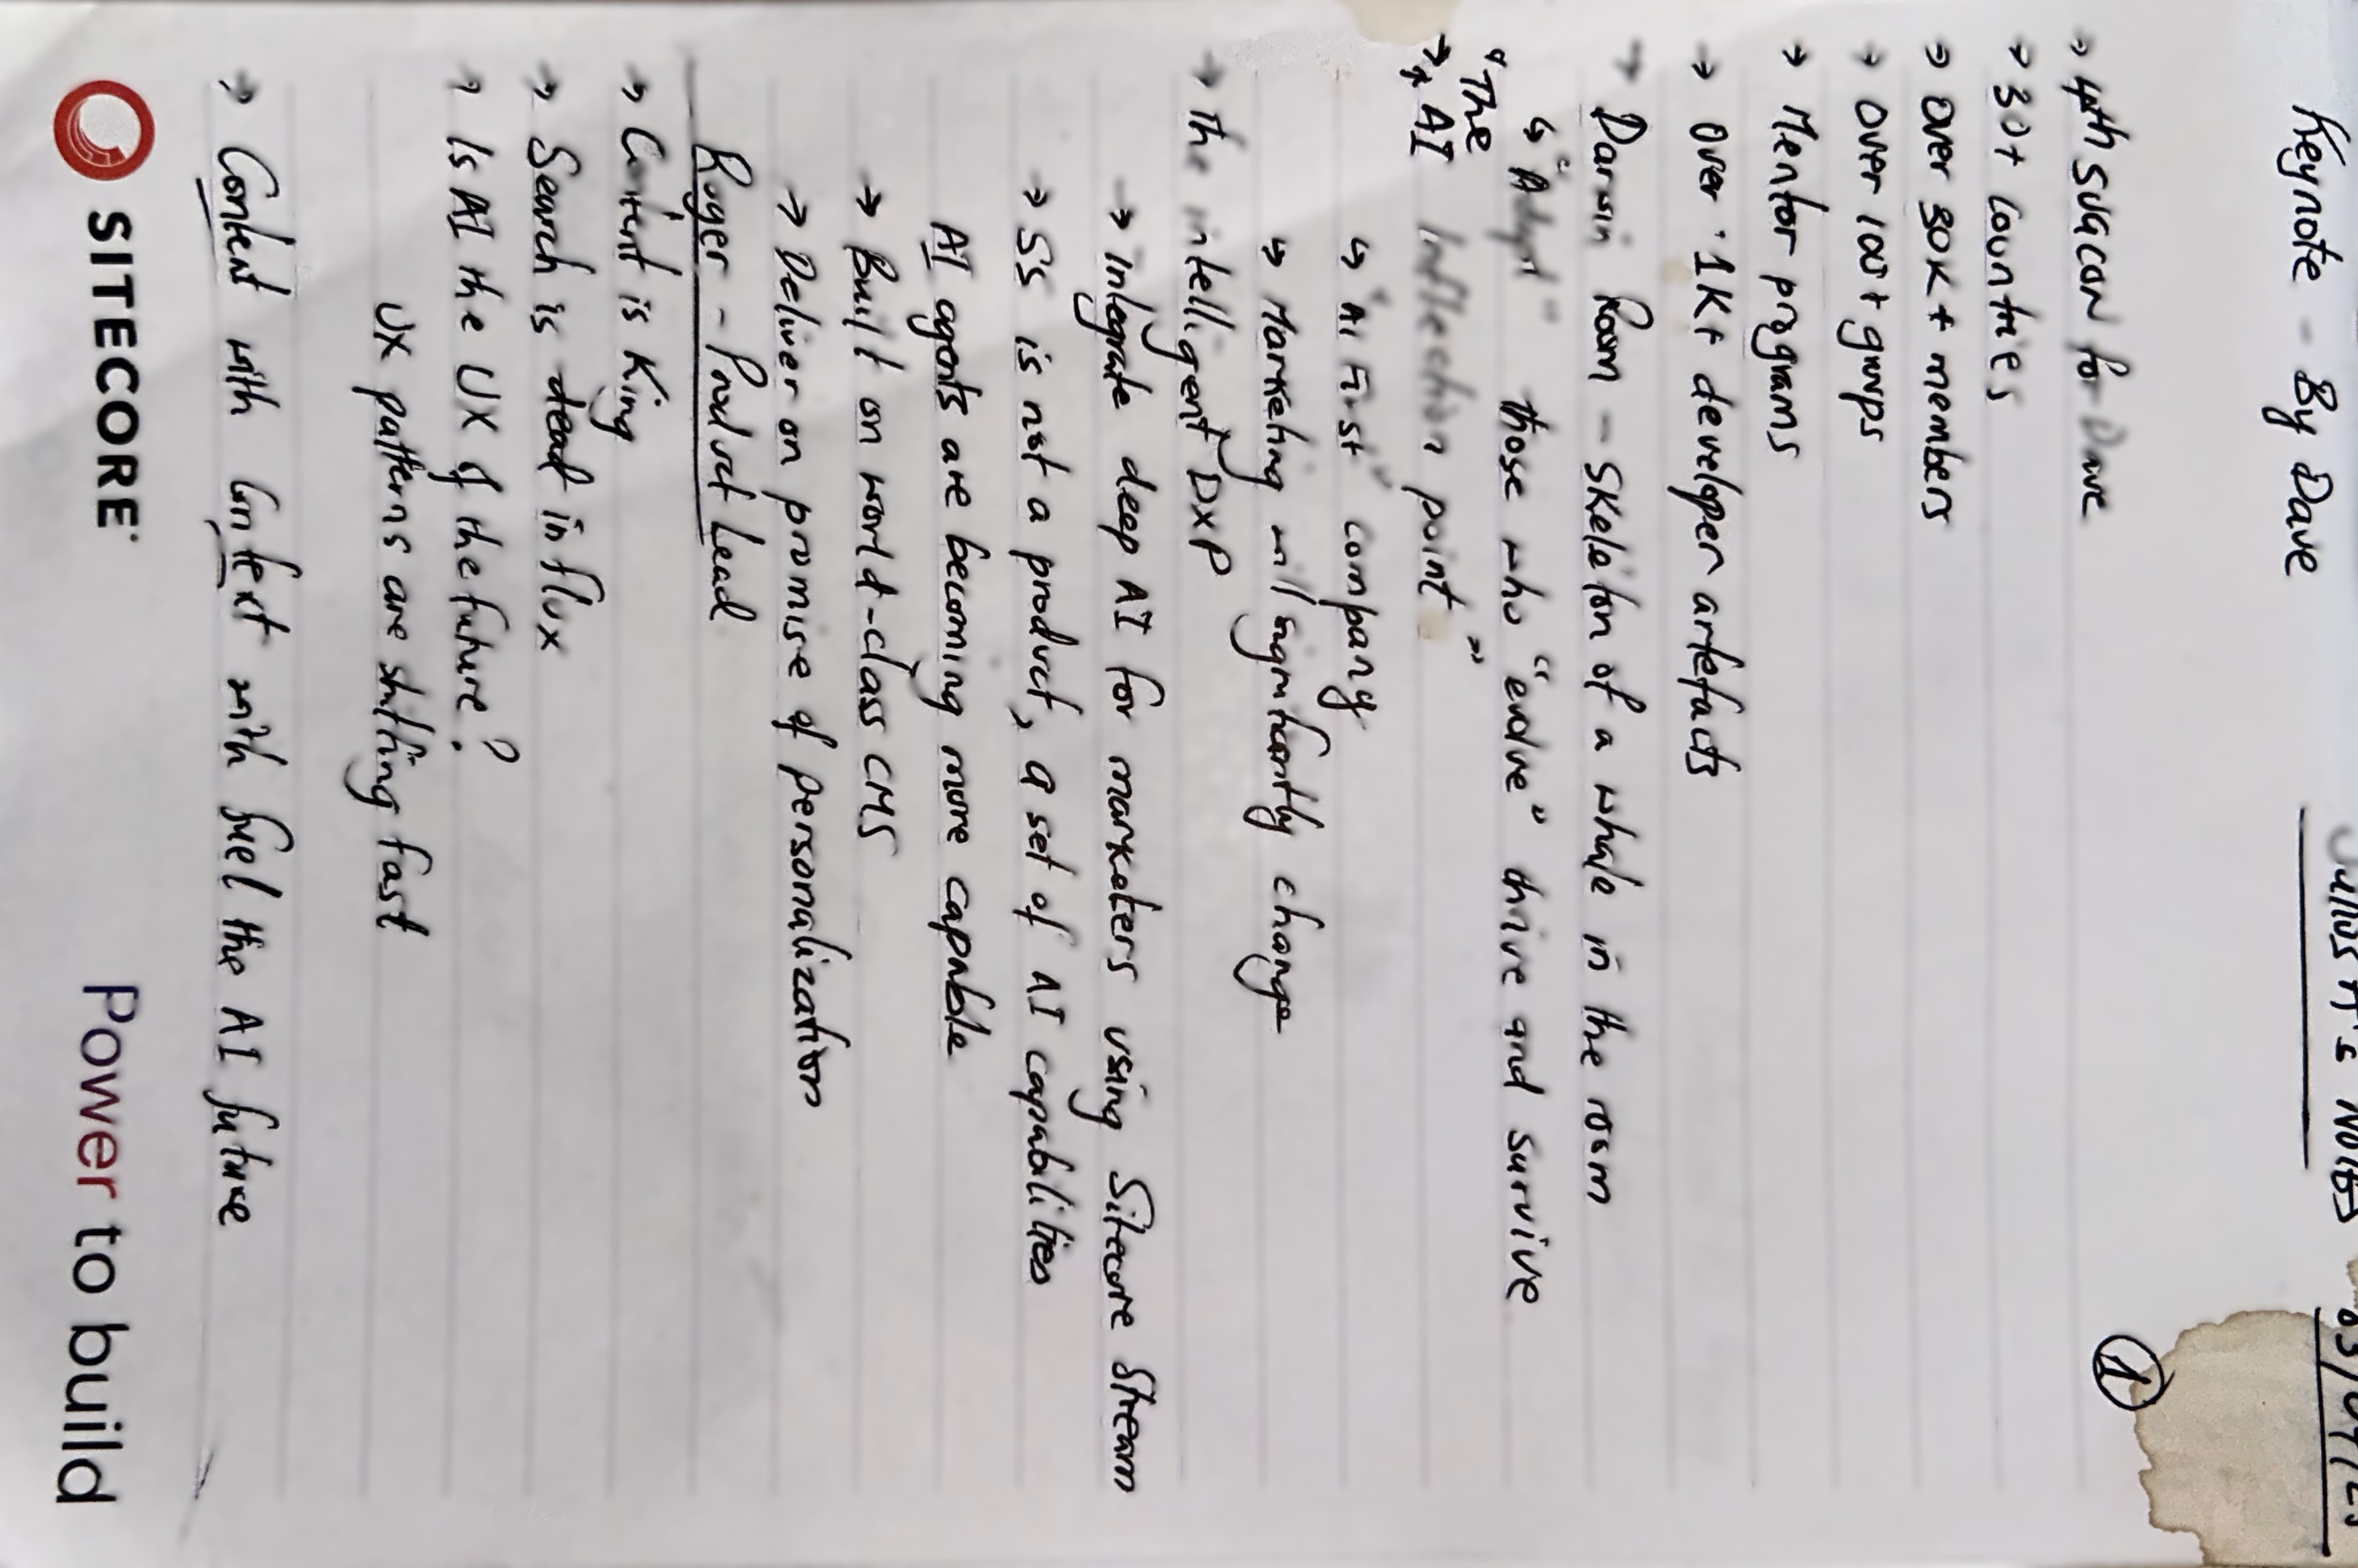
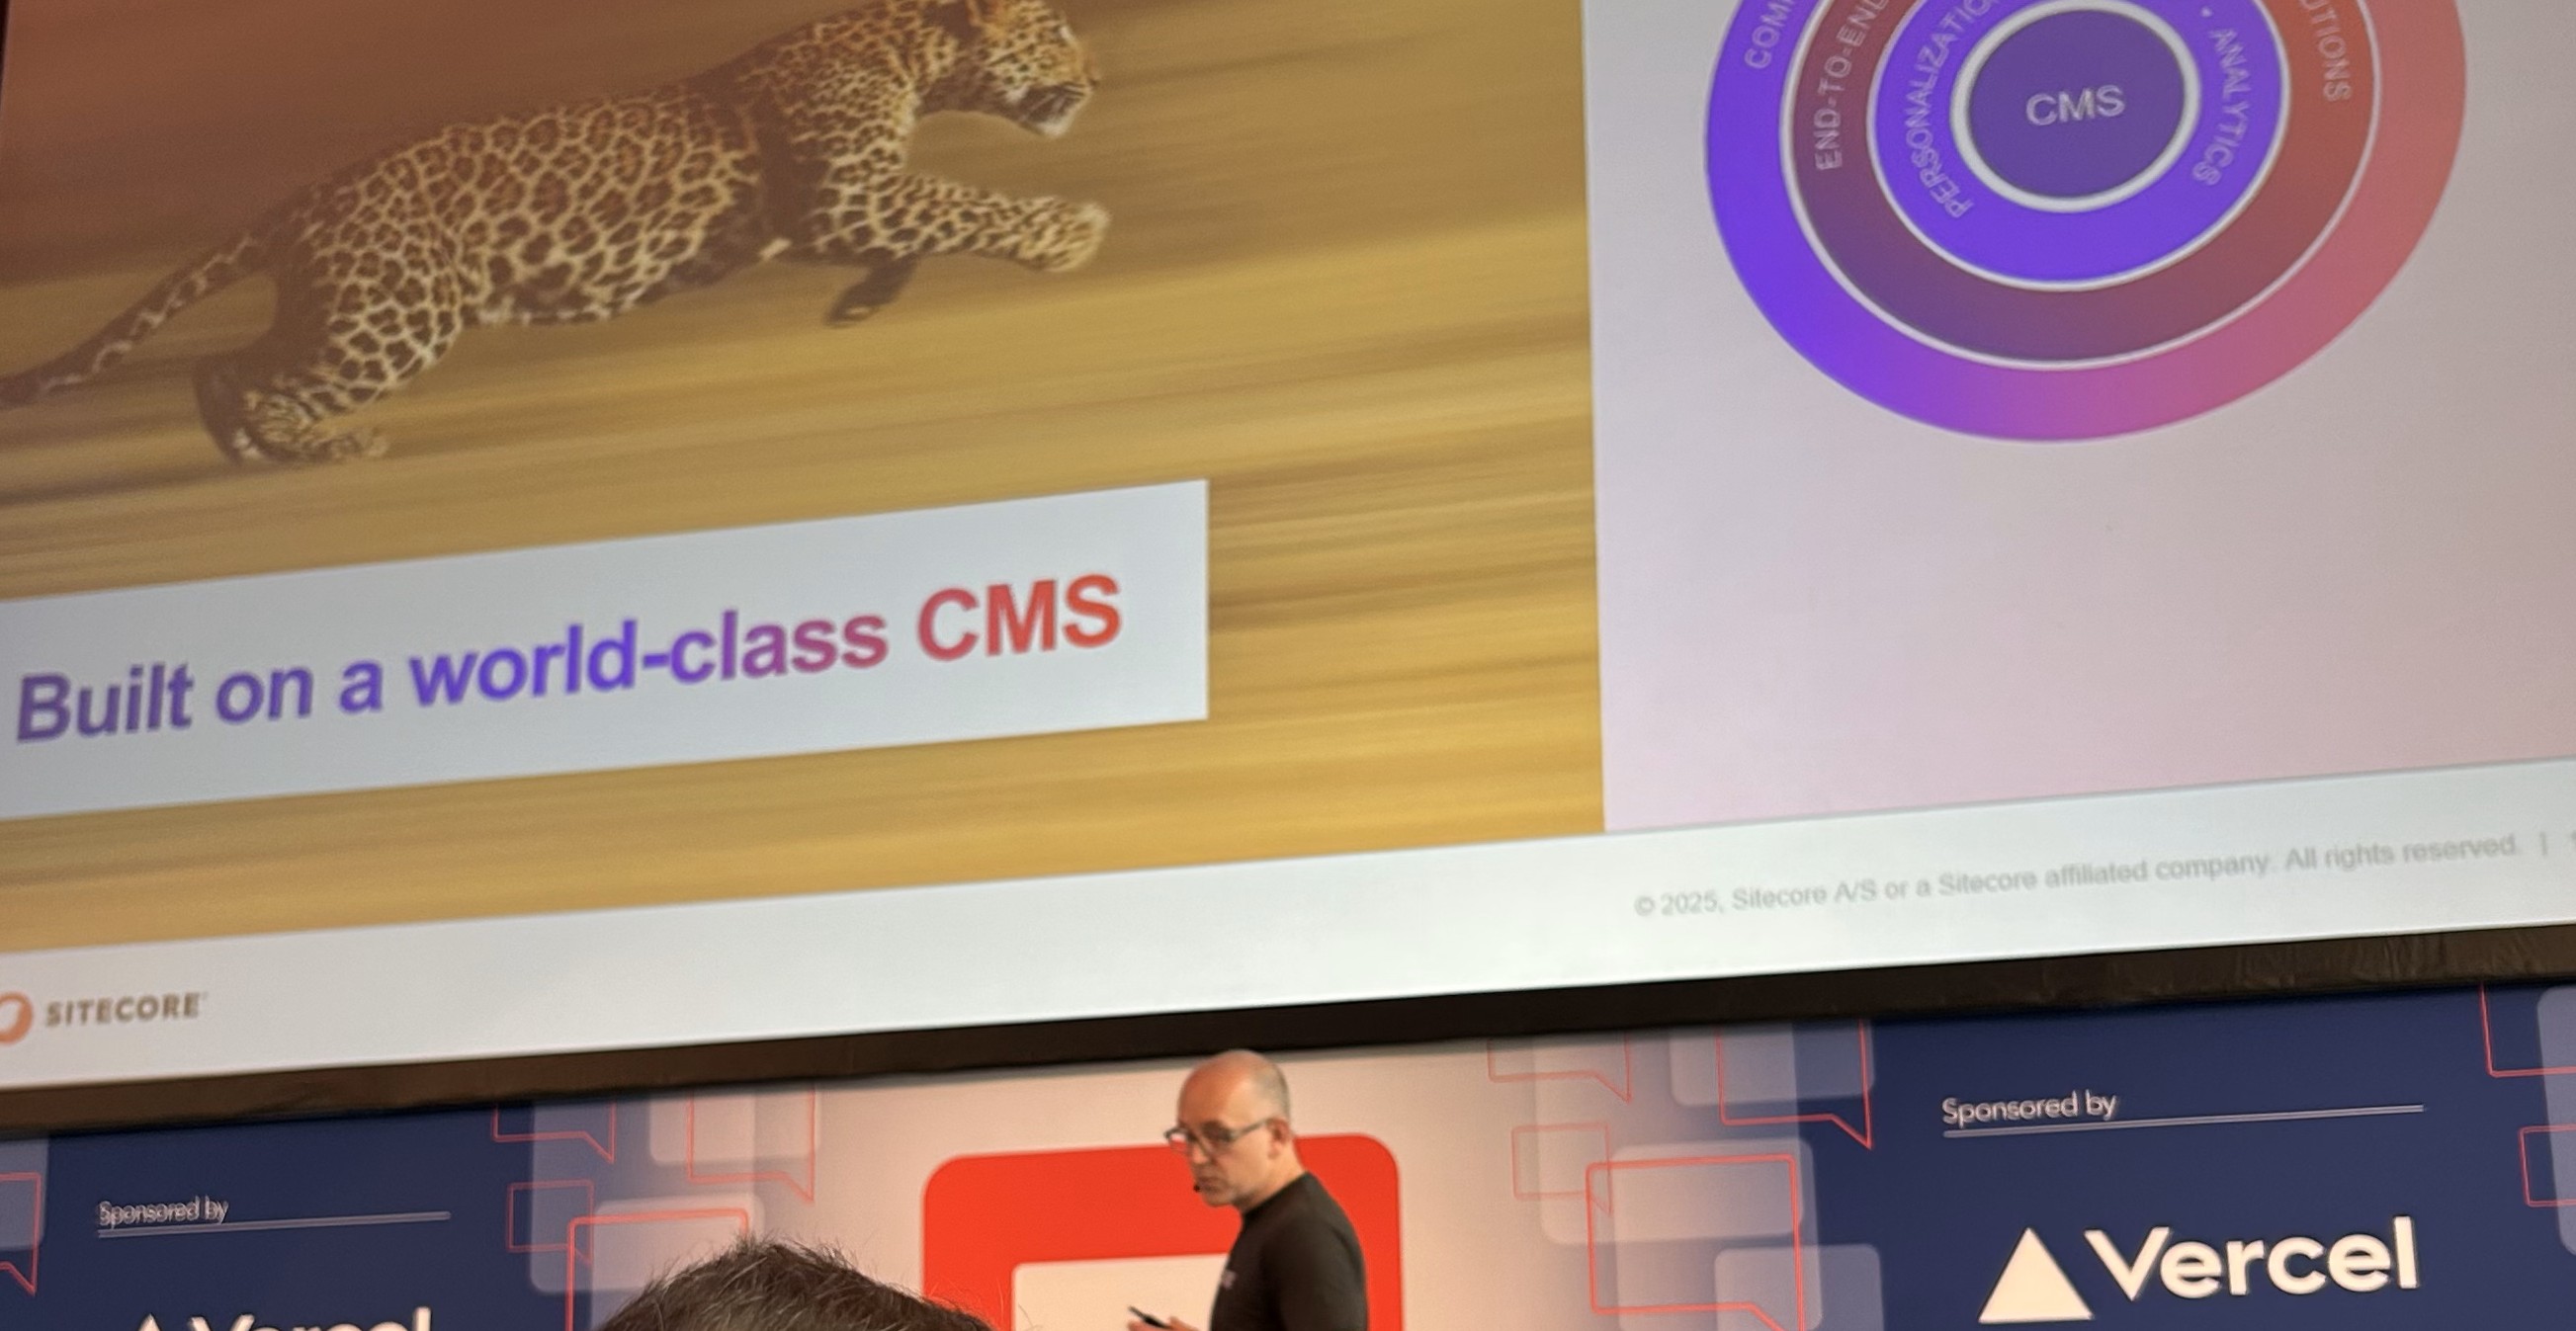
Keynote from Dave: This was Dave’s 4th SUGCON, and his first as Sitecore CEO. Dave shared stats that highlighted the key role our Sitecore community in success of Sitecore, such as 100+ user groups with over 30k members across 30+ countries, producing over 1k+ developer artefacts. Keynote was held in the “Darwin Room” which had a huge skeleton of a whale provided a great backdrop of his “Adapt” messaging. He reminded us, to echo famous Darwin mantra, that those who “evolve” and “adapt” thrive and survive. We are at what he called “The AI Inflection point”. His key message was he’s very much building Sitecore as an “AI First” company going forward. We will see marketing significantly change, let’s embrace the “The Intelligent DXP” built on a world-class CMS that is underpinned by AI (Sitecore Stream). With AI capabilities already being infused across Sitecore products and as AI agents are becoming more capable, Sitecore can deliver on their promises such as personalisation.
Keynote from Roger: Roger swiftly picked on from where Dave left and his messaging revolved around Content with Context will fuel the AI future. Content is King. Simple. He challenged whether “Is AI the UX of the future?” as we are seeing UX patterns shifting fast. With AI capabilities already being infused across Sitecore products, you can use Sitecore Stream with DXP 10.2+ and XM Cloud to generate content. As well as Contextual AI tagging and Visual Search in Content Hub which solves the metadata and retrieval main issues he sees within Content Hub. He also touched on the changing face of Search in the AI age and showcased the AI-powered A/B/n testing, personalisation and language translation tools available to us now.
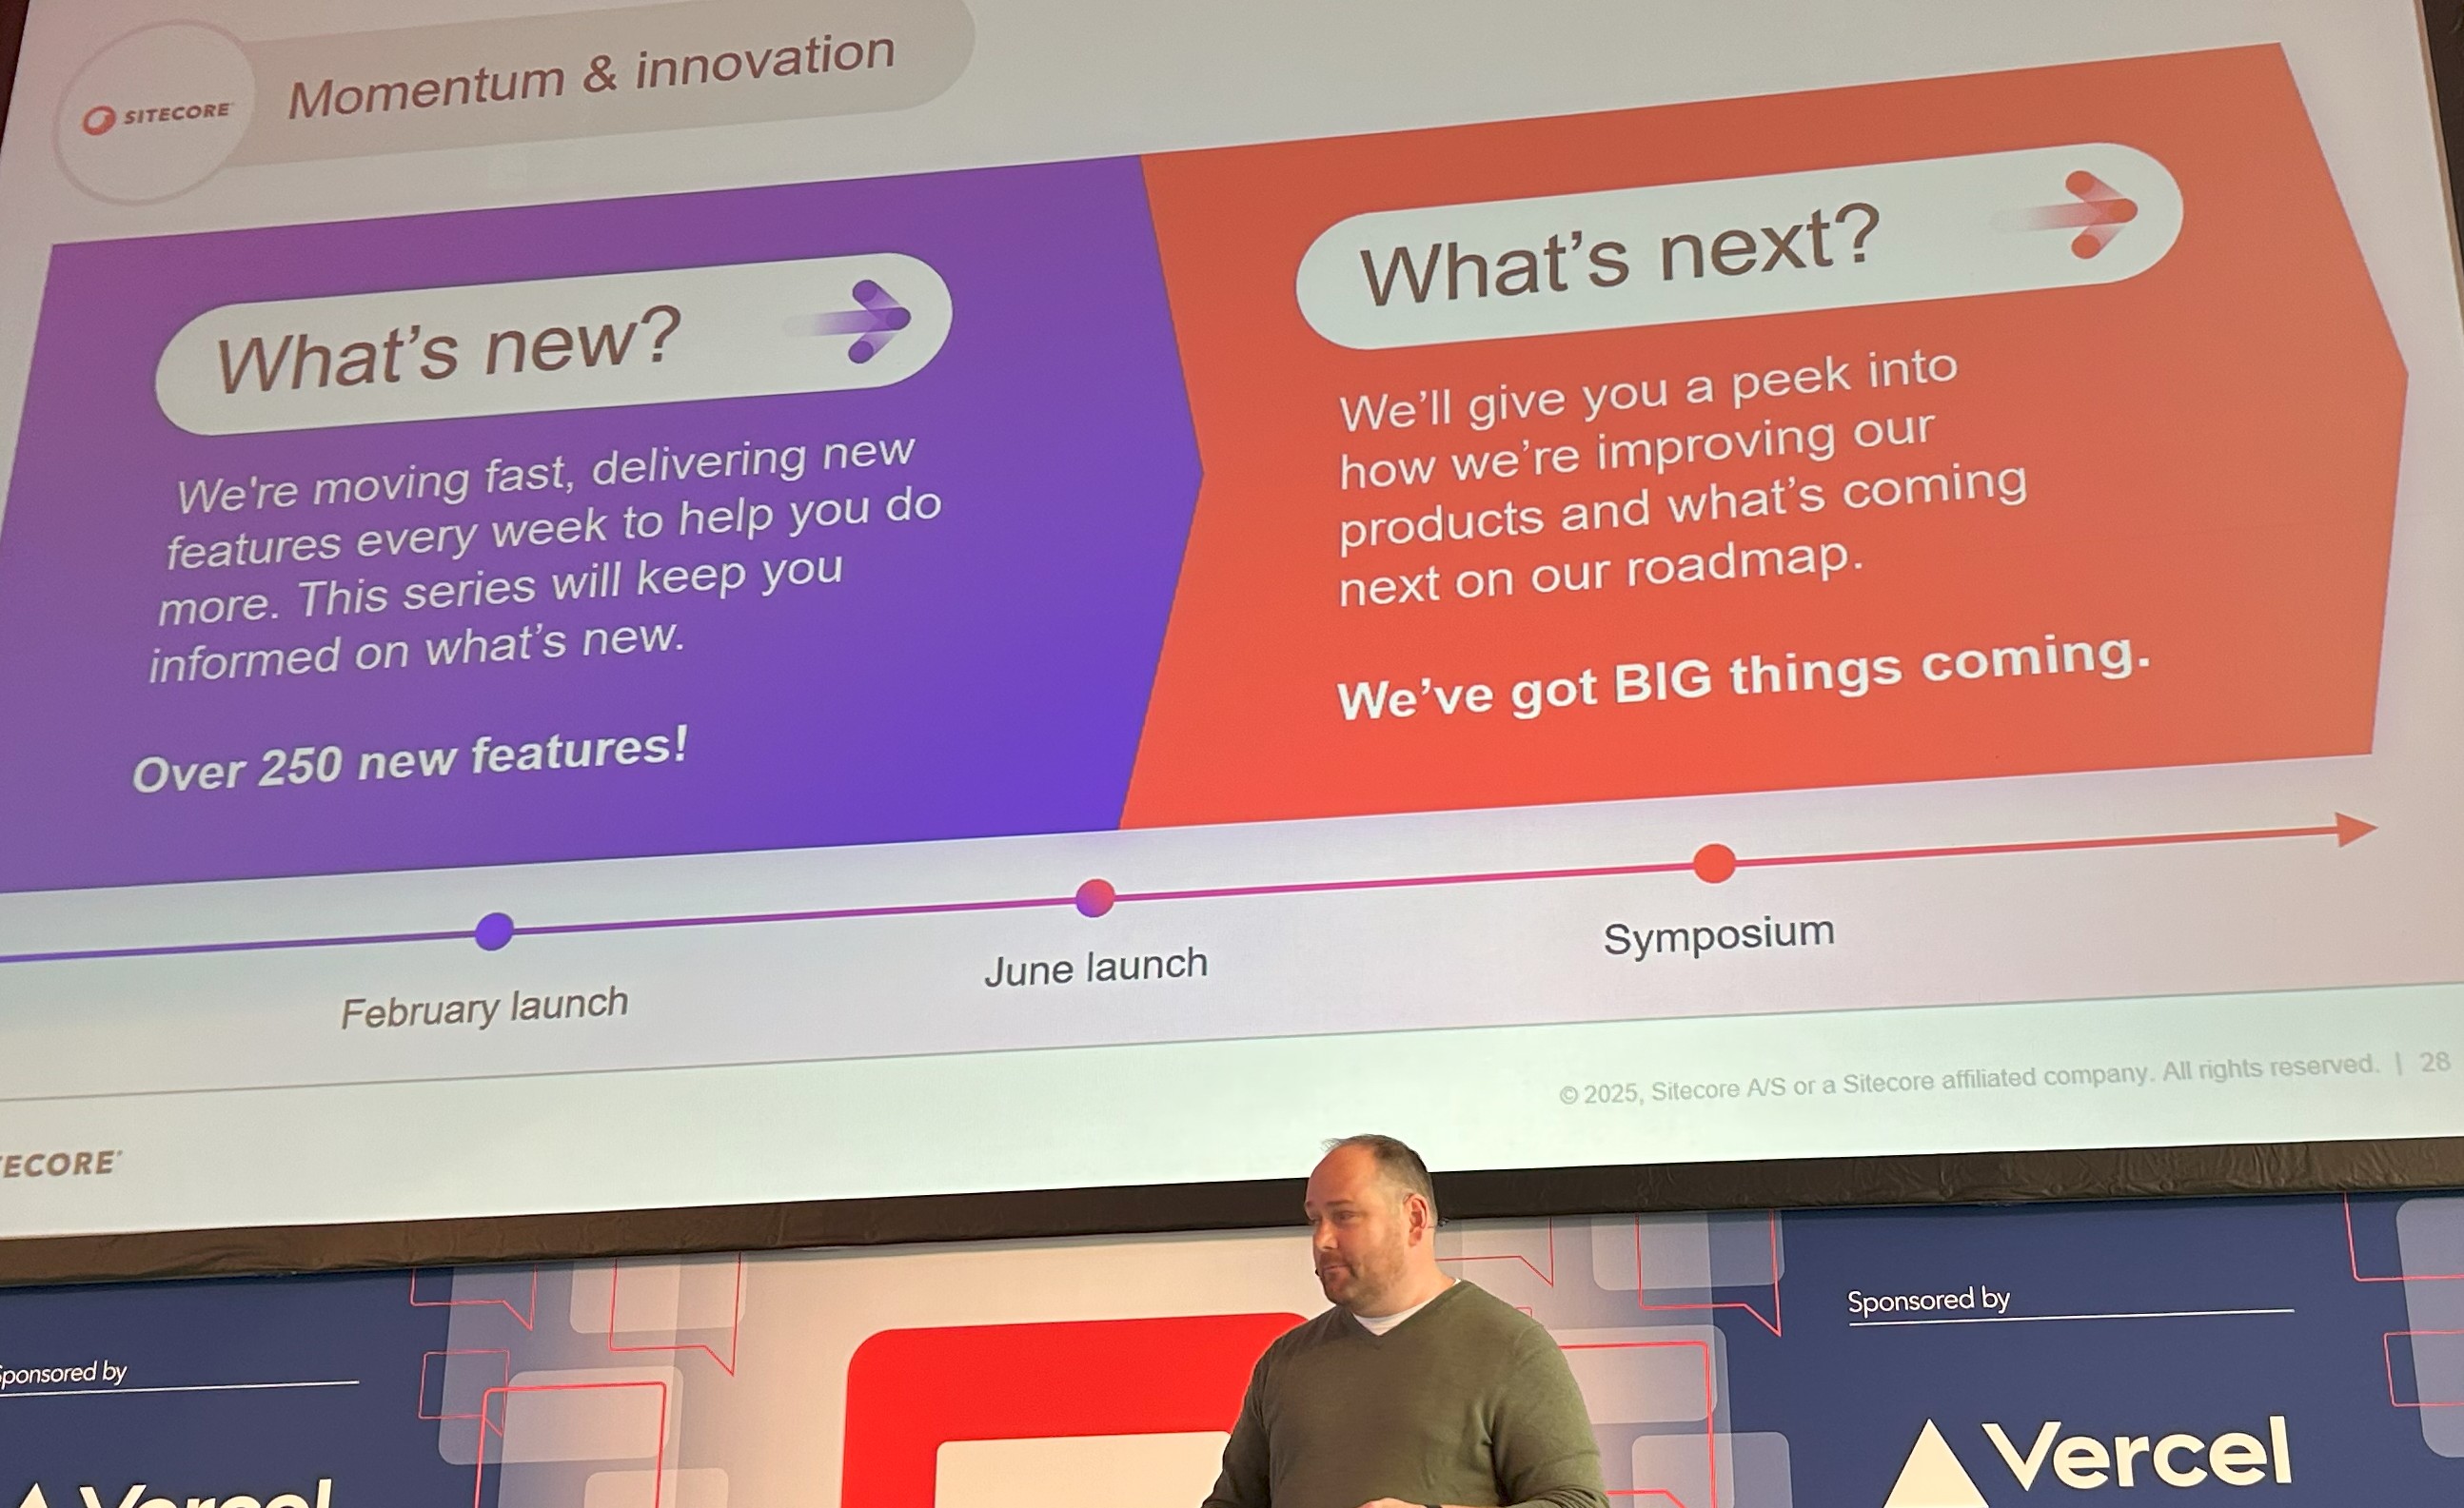
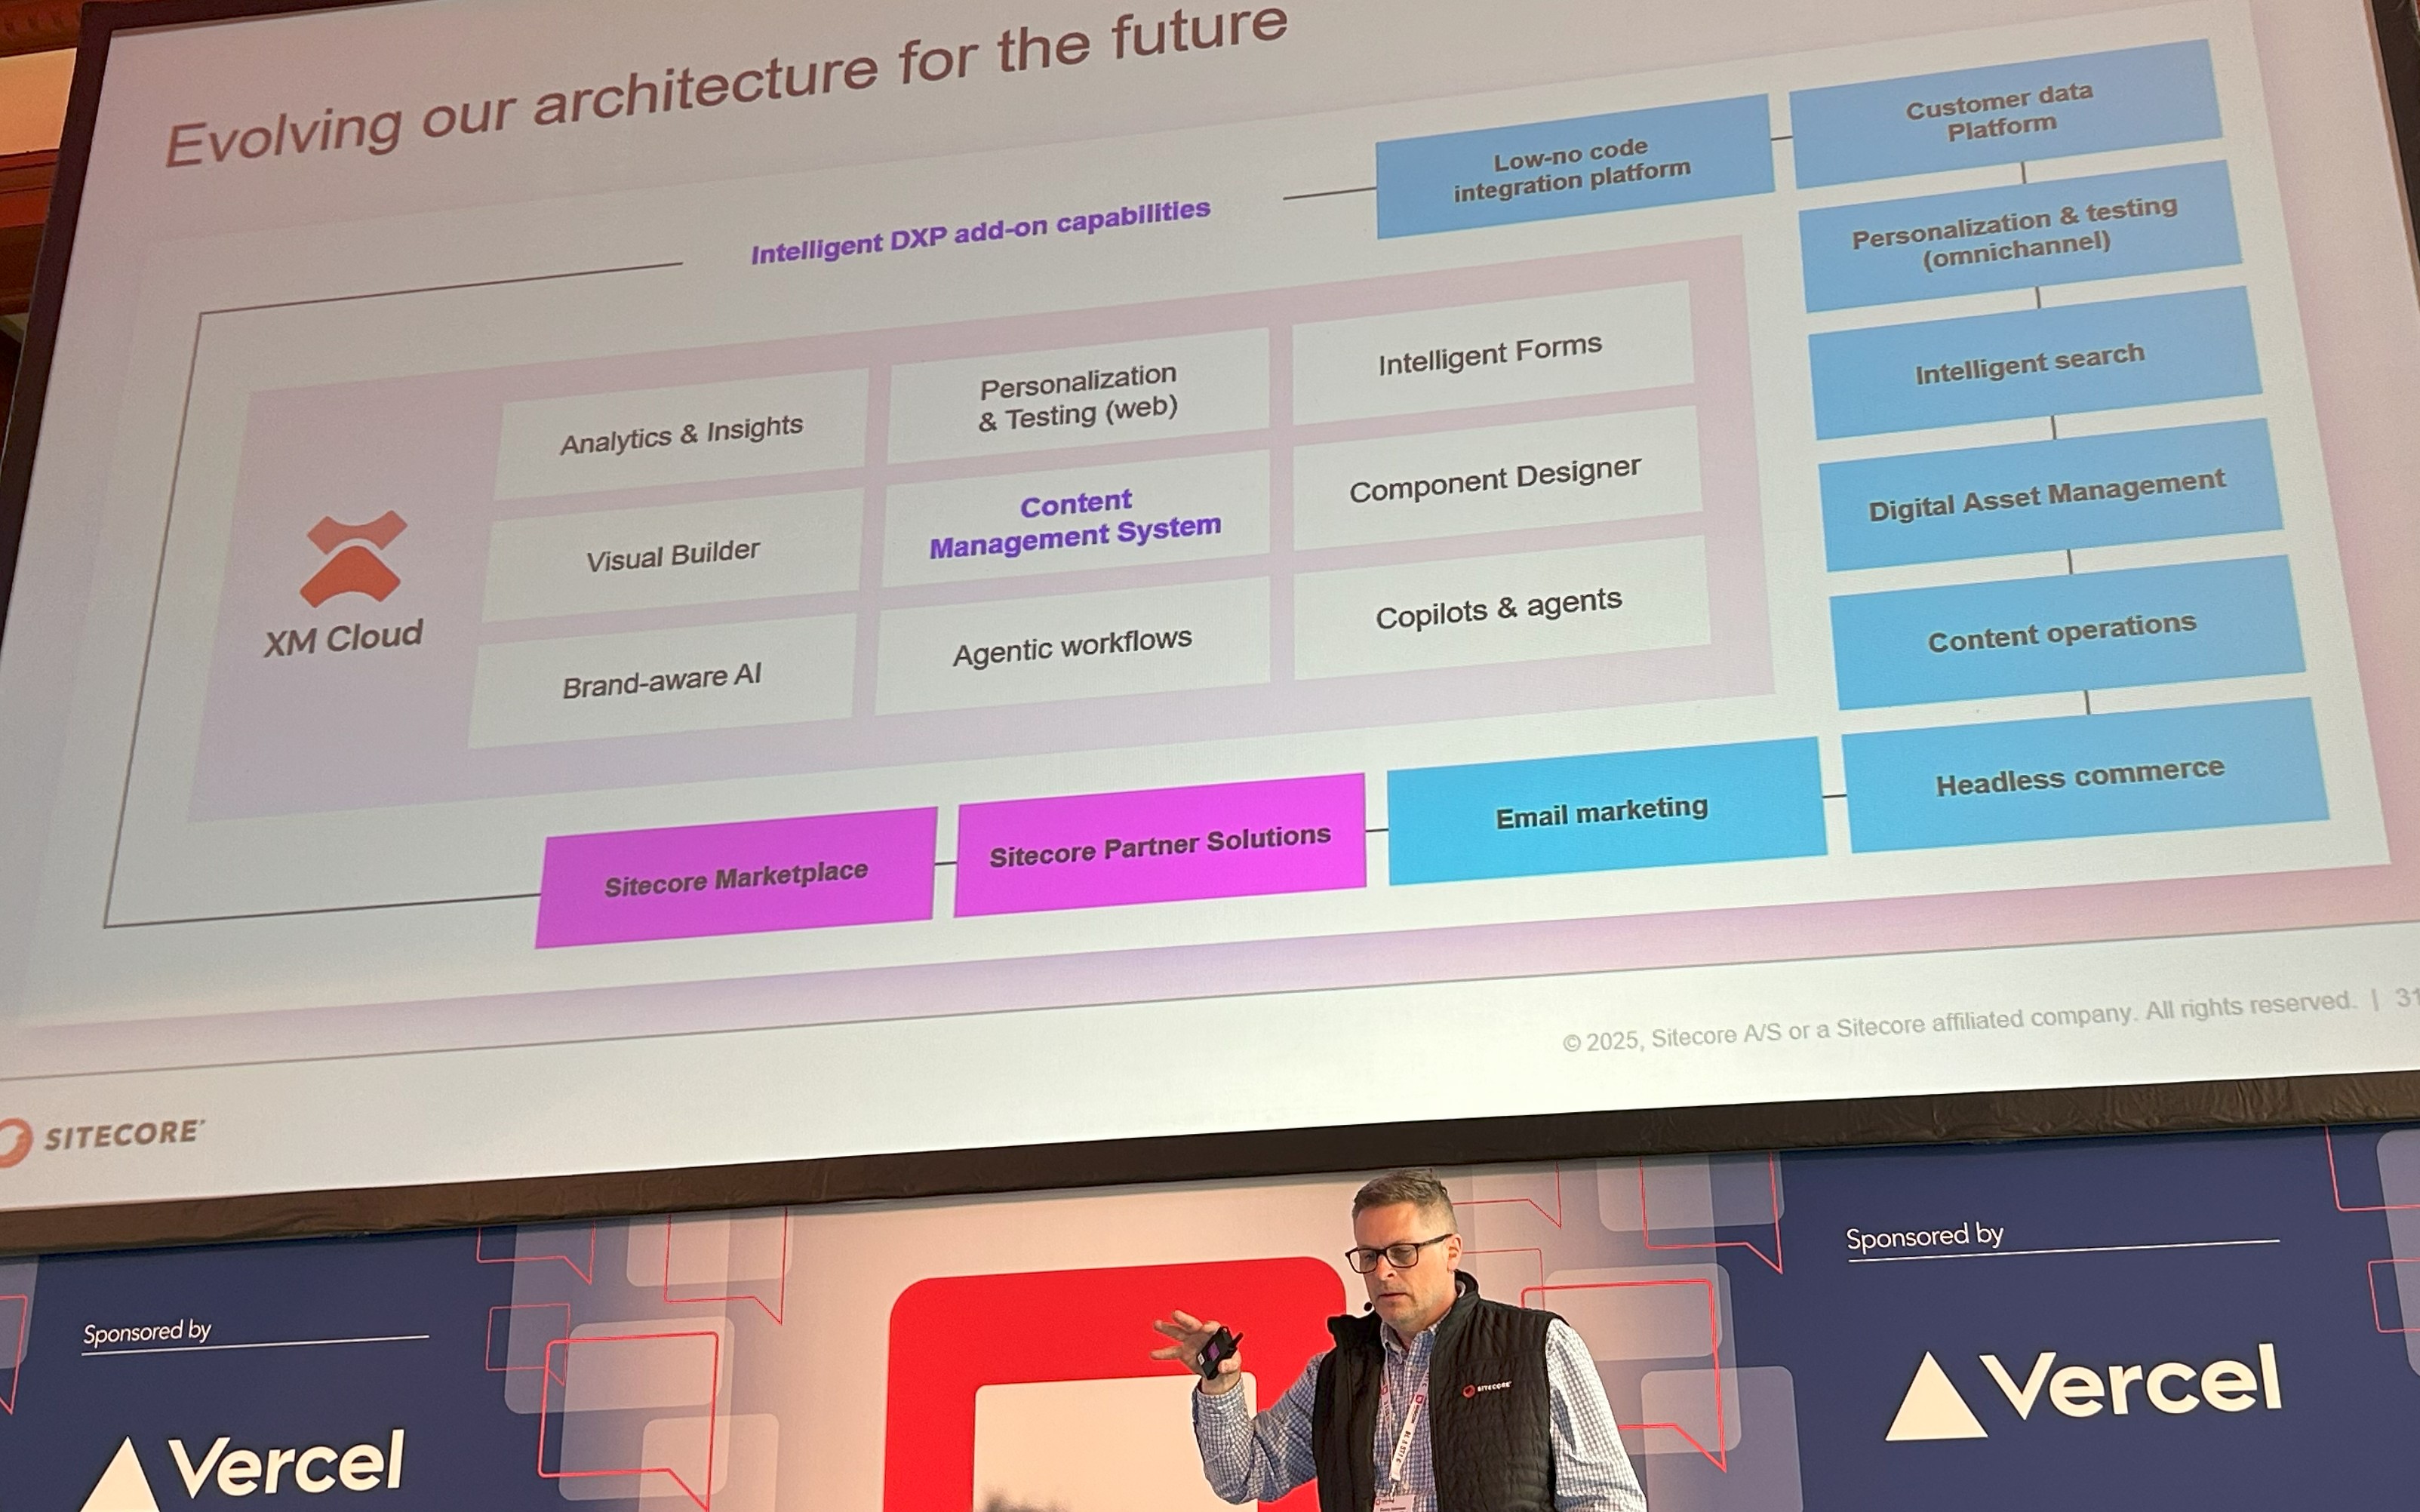
Keynote from Danny: Last but not least, Danny shared his vision and roadmap with his key messaging also revolving around Innovating faster with AI. He re-emphasized Dave’s “Intelligent DXP” by showcasing how he is evolving the architecture for the future. He is also very much driven in improving developer experience by enabling developers with tools and SDKs they need. He sees this as ground-up, embedded AI capabilities, federated content, AI-powered site creation and bringing Sitecore Stream to all products. He promised that on June 4th, 2025 he will be making a significant future innovation announcement, so keep an eye on that date.
Key product roadmaps and announcements
Throughout the conference, we were given key product roadmap announcements.
a) Delivery on the promise, Sitecore Stream set of AI capabilities are available now.
Sitecore Stream in itself is not a product, but a set of AI capabilities that are already being infused across Sitecore products.
- Available now on DXP 10.2+
- Available now on XM Cloud
- Available now for A/B/n testing/personalisation
- Available now on Content Hub for Contextual AI metadata auto tagging and AI Visual Search
b) Sitecore’s Marketplace & Developer program
We had two separate sessions around Sitecore Marketplace. First session by Liz Nelson (Product Lead of XM Cloud) and Spyros Misichronis (Marketplace Architect, Sitecore) where they showcased the Sitecore XM Cloud Marketplace Apps, which she called an “Extensibility Umbrella” comprising of a Public Portal and Developer Marketplace.
- Developers can now leverage the CLI, SDK on GitHub to build extensions to integrate with XM Cloud APIs.
- Developers can embed features into Pages directly or creating standalone tools.
- Developers can build applications that enhances functionality and streamline workflows
Spyros Misichronis demonstrated a live demo of building a sample Marketplace App leveraging the developer tooling.
The second session was by Krassi Eneva and Justin Vogt (Product Managers from Sitecore) who took a deep dive into more detail and showcased different use cases for Sitecore’s Marketplace and Developer program. Sitecore Marketplace brings the following benefits: faster time to value, flexibility & extensibility and growth & enablement.
- Contribute to the community or build for your use cases. Sitecore is providing three models for this
- Custom Single Tenant – Built for a specific organization & available right away
- Custom Multi Tenant – Build for selected number of organizations & partner managed
- Public – Available to any Sitecore customer or partner
- What can you build? This is about what experience can you tailor for your end-users and not what type of apps. Scope is wide and covers creation of the following:
- apps to the Sitecore portal
- apps within XM Cloud
- apps within custom touchpoints such as panels in Page Builder in context of a page, fields editor and panels within sites dashboard
- Early Access Developer Program – Sitecore’s Marketplace Early Access Program is currently in progress and Sitecore is actively working with the following:
- Technology Partners
- Sitecore Partners
- Internal Sitecore teams
- Individual community members
- Is this like an App store we are used to? Similar analogy if you like. You are responsible for testing your own apps, responsible for supporting them in the marketplace. Apps once submitted will undergo review process before approval to Sitecore’s marketplace
This was a major announcement that brings a solution to plug in gaps currently available in XM Cloud as result of moving from Platform DXP. They demonstrated cool apps like copying content between XM Cloud environments, leveraging third party content translations within XM Cloud UI among others. Interesting space to keep an eye on.
c) XM Cloud Content (previously known as “Content Service”)
Alistair Deneys (System Architect, Sitecore) session focused on showcasing the progress made with the Enterprise-grade, innovative headless “CMS” which we now know will be called XM Cloud Content. He set context by giving the brief history and evolution of CMS from the monolith old days, through headless and a look at the future as XM Cloud Content. He also introduced the XMC Content Architecture, diving into domain models covering the following:
- Content Types define structure
- Taxonomies define classification
- Content is stored in Content Items
- Fragments allow composition. He highlighted the preference for composition over inheritance in the design
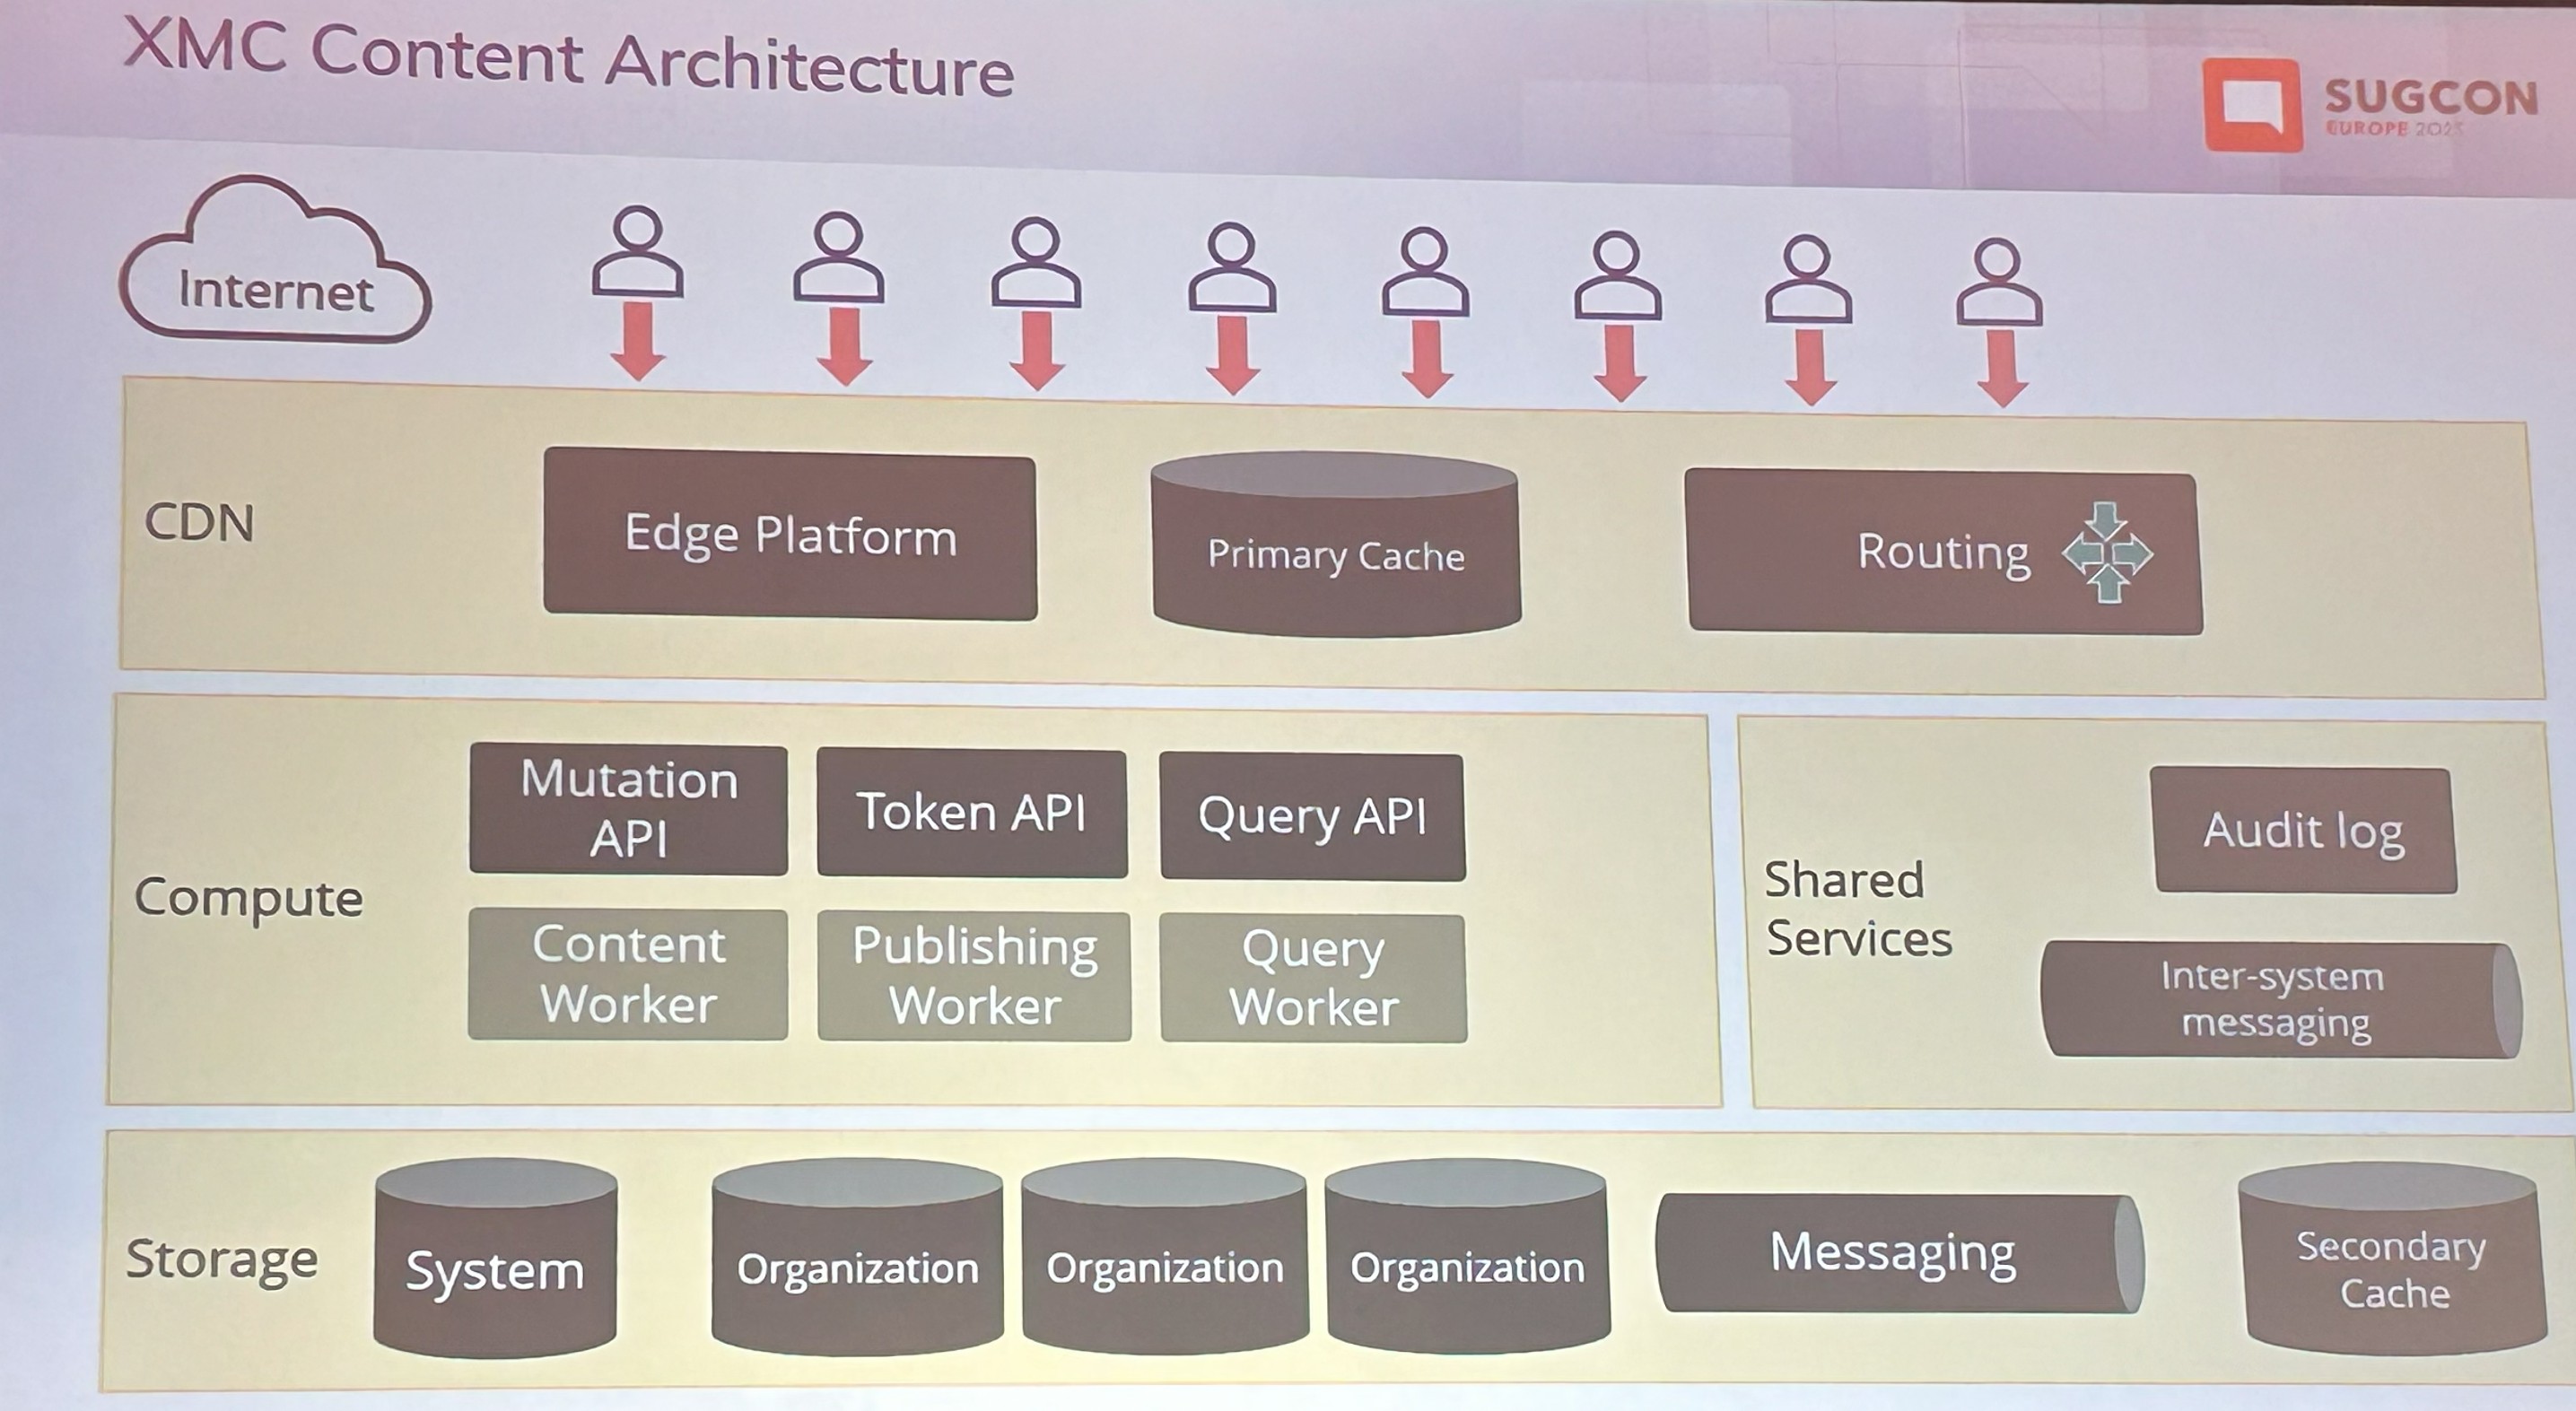
He gave a live demonstration of the core set of APIs that underpin XM Cloud Content, walking through various scenarios on how you can build content using API-first.
Some of the key capabilities from XM Cloud Content are:
- Entity lifecycle – Draft/Published/Archived
- Worksets – new concept of publishing
- Content Delivery – GraphQL endpoints includes tenant name. “IsDirectQuery=false” keeps query cleaner. Persisted queries, restrict query tokens to specific persisted queries, schema pinning
- Fragments with composition over inheritance enables re-usability of set of fields thus a mechanism of delivering “system functionality and extensions”
- Separate queries for “Pages” content, say, articles, news, etc
- Query Token security enhancements such as disabling of Introspection
- Content management capabilities: environment merging, availability & archive dates on content items, more field types, content collections among others
- Sitecore Change Logs are running from XM Cloud Content
Developers will be excited with XM Cloud Content, although what was demonstrated is still in early development. Watch this space and future announcements.
d) Modernizing the JSS SDK and Starter Kits for XM Cloud
Liz Nelson (Product Lead of XM Cloud) and Christian Hahn (Technical Product Manager) unveiled groundbreaking updates to the JSS SDK and starter kits, designed to simplify workflows, eliminate legacy complexity, and enhance flexibility.
Welcome the “new” one. In summary, in the new solution
- Split responsibilities
- Only get what you really need
- Reduce complexities and sizes
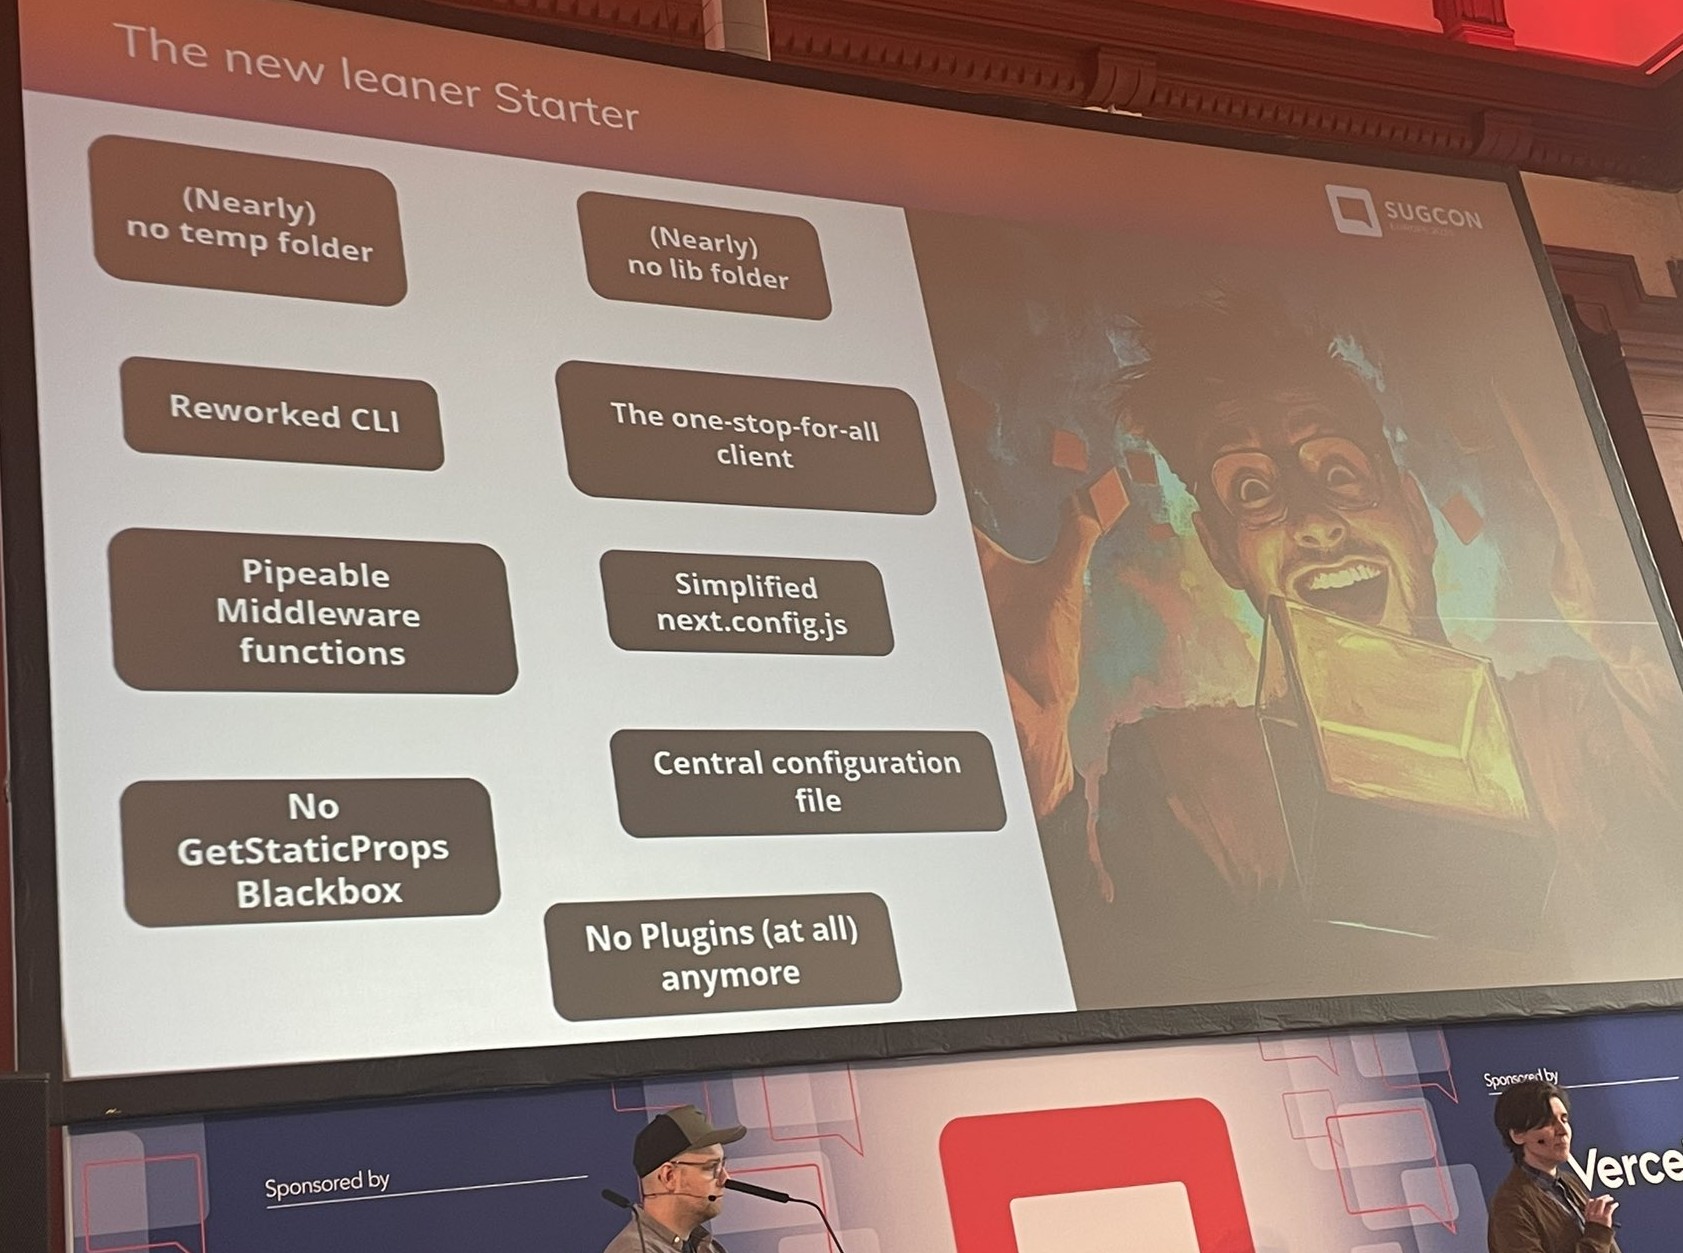
Some of key improvements shared in the session
- disk size of the starter kit site folder reduced from 8MB down to 600KB
- almost halving the bundle size
- overall improvements in First Contentful Paint FCP metric of 200 milliseconds
- editorial performance gains, with about 10x as many UI components can be added to an editable page
The SDK and documentation are available now, and currently in “Beta” but confident developers can start building new projects. Watch this space for announcements on the final releases which will be soon.
e) June 4th, 2025 – Future Innovation Announcement
Look out for an announcement from Danny Robinson(CTO, Sitecore) in June 4th
f) November 3-5, 2025 – Sitecore Symposium Orlando 2025
Sitecore Symposium 2025 is back and will be held at Walt Disney World Dolphin Resort, Orlando, the week of November 3, 2025. Ready to start your submission and step into the spotlight at Sitecore Symposium 2025 in Orlando, they are currently calling for speakers.
Key highlight sessions
With a total of about forty (40) sessions, it is impossible to attend them all. Below are some of my key highlight sessions that I attended. I will complete the list in a follow up blog post.
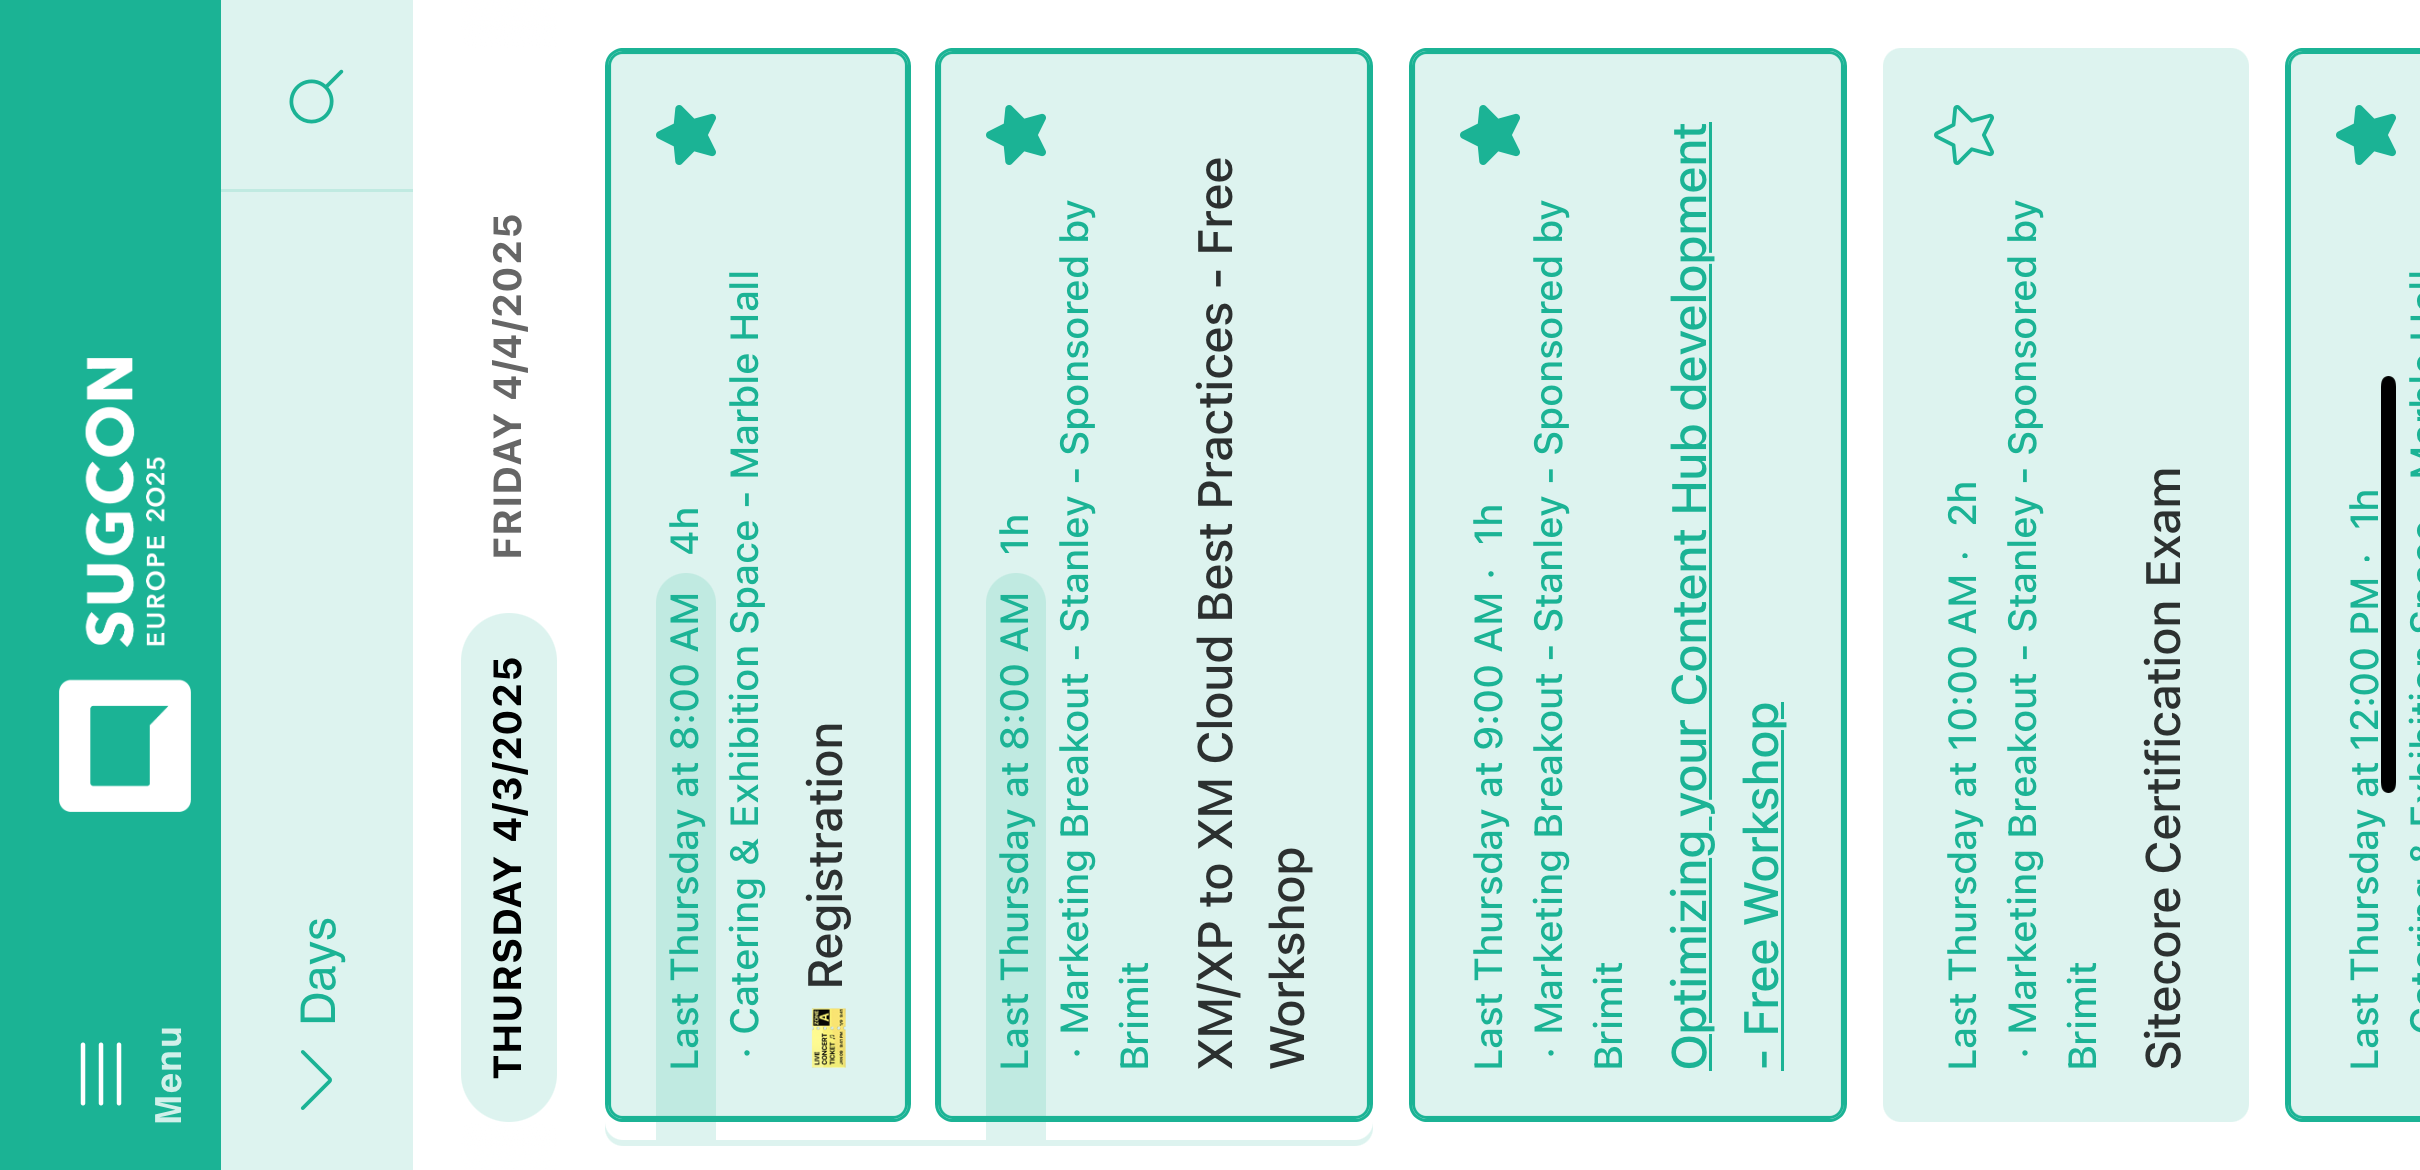
Session: XM/XP to XM Cloud Best Practices – Free Workshop
Summary: This was an early bird free workshop sponsored by Brimit which covered the best practices, decisions and considerations when migrating to XM Cloud. If you thinking of making the move, this session amplified what a migration path could look like. Sitecore provides XM/XP Migration Navigator as well and you can reach out directly to them.
Session: Optimizing your Content Hub development – Free Workshop
Summary: Another early bird free workshop sponsored by Brimit highlighting the productivity gains by leveraging Content Hub CLI in your workloads. A live CLI demo for developers and key takeaways in terms of best practices and optimising Content Hub DevOps journey.
Conclusion and Next steps
I observed a positive sentiment overall during the conference. There was positive energy and buzz throughout, and this was echoed in various social media posts as well. I look forward to reading and reviewing more feedback from other attendees. SUGCON Europe is a key event in our calendar and there is already talk about next year! We are also looking forward to SUGCON ANZ later in the year and Sitecore Symposium back again in Orlando during November 2025, with call for speakers now open.
You can continue with part 2 where I am covering more key highlight sessions.
Please give us any feedback or comments.


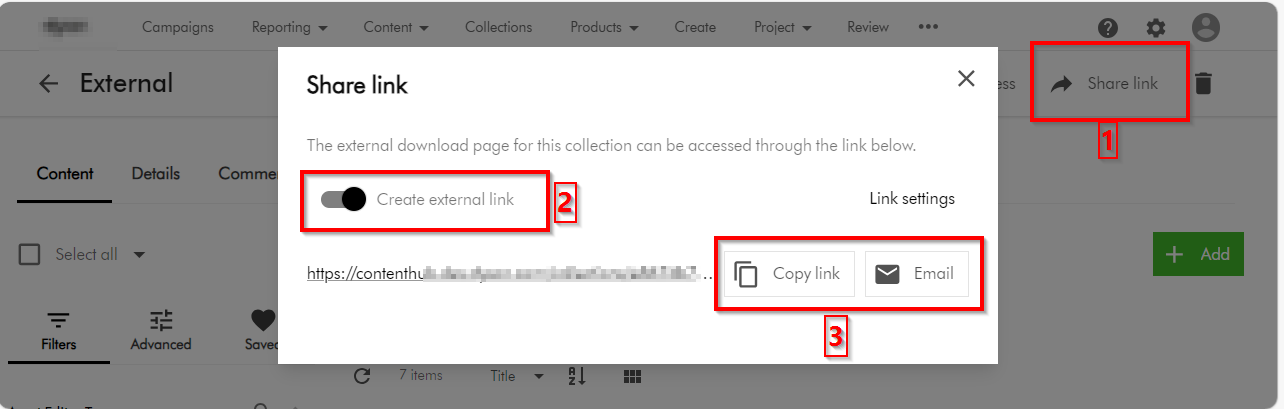
 .
. button, which should prompt for emailing details. You can alternatively use the Copy link button to copy the URL and share it as well