Sitecore Symposium 2020 highlights part one

In this series of blog posts, we will revisit the recently concluded Sitecore Symposium 2020 where I will examine my key takeaways from the event.

This year saw the biggest Symposium ever with more than 5,500 people registering across more than 70 countries. I somehow managed to get myself an All-Access ticket, which I got as reward for being a speaker during the event.

Having an All-Access ticket meant you had access to all Live, Featured and On-Demand sessions. As of the time of going to press, you can still access the Video On-demand which is very cool in case you need to re-play any of the sessions you might have missed.

In this blog, I will start with revisiting the sessions presented by the Avanade teams.

Highlights from Sessions by Avanade

At Avanade, we are a Sitecore Platinum partner and this year we proudly sponsored the Symposium 2020 event as Connector Sponsors.

Our teams were available round the clock in the Partner Pavilion where we engaged attendees in the Virtual Chats covering the following areas:

  • Avanade Industry Sales Accelerators
  • Headless Digital Experience Accelerator
  • Accelerate Business with Avanade – Here’s How

Attendees had a chance to also watch our webinars below:

On the other hand, we had our speakers running the following sessions during the Symposium:

Bringing life-changing hearing health to a global audience with Demant

This Digital & Business Transformation session saw Christian Bennich our Digital Marketing Lead in Avanade Nordic interviewing Troels Kjær Rasmussen the Head of Customer Facing Applications, Demant Group.

I really enjoyed this session as it captures what we do best at Avanade, your digital transformation partner. In the session, Troels describes how 5 years ago, Dermant Group had a challenging Business landscape with aggressive acquisitions, branding equity and other technology challenges. This impacted their Total Cost of Ownership too. Fast forward to today, the Avanade partnership has helped “Establish one strategic platform that could cater for the combined needs of the entire group”. Worth mentioning that at the core of this transformation journey is the Microsoft Azure cloud and Sitecore Experience platform.

The key takeaways from Troels includes to always aim for long term success through a repetitive model of: Realize, Learn, Scale.

I would highly recommend watching this session on-demand for the full interview.

Defining new ways to transact with Sitecore Experience Commerce 9 and Azure IoT

This Experience-focused Commerce on-demand session was presented by Benjamin Adamski, Solution Architect, Avanade and Boris Brodsky, Director of Architecture, Avanade.

During the session, Boris and Benjamin outlined the case for IoT as there is marketplace expectations for seamless and automated commerce to extend into the physical world.

Armed with staggering statistics, the Avanade duo put forward a compelling case for taking IoT seriously:

  • it is estimated that there will be 1.9 Billion 5G Cellular subscription by 2024
  • it is estimated that more than 75 Billion IoT devices will be connected to the web by 2025

Some of the key takeaways include driving the business outcomes with IoT and Connected Commerce leveraging:

  • Automated checkouts
  • Personalised discounts
  • Smart Shelves/Inventory Management
  • Automatic Supply Chain Management

This is one of those session you will want to replay and replay again, as Boris and Benjamin go on and on How to implement IoT with Sitecore leveraging Headless Sitecore Experience Commerce.

Even the losing experience is a win!

This Featured Sitecore Fundamentals session was presented by Andy Leonetti, Digital Strategist, Avanade and Leah Feldman, MarTech Strategist, Avanade.

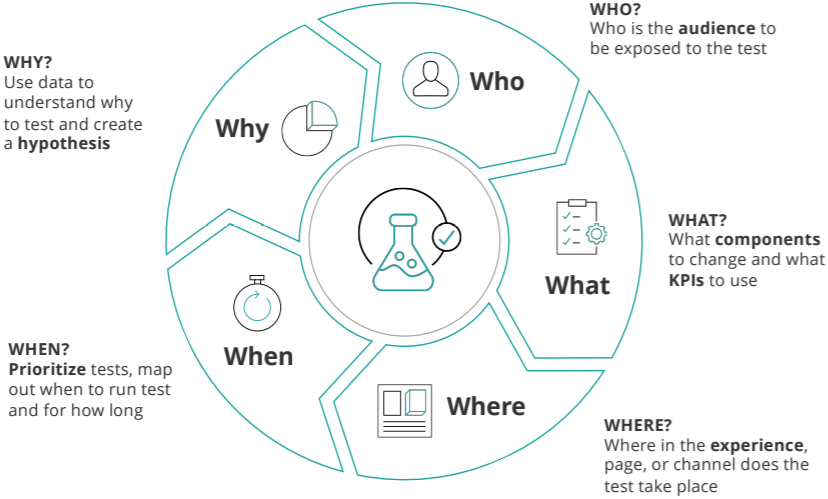
Tapping into Andy’s 10+ years with Customer Engagement and plenty of Digital Marketing experience from Leah, the Avanade duo put together “Your guide to experimentation” with Sitecore experiences.

This session tells the story behind the framework for testing and optimising the Microsoft Partner Network that will inspire you to get testing if you are not already!

Key takeaway for me is how easy it is to leverage out-of-the-box Sitecore Experience Optimization capabilities to test and learn.

Andy and Leah summarised their session with the pointers below:

  • Make it valuable – align experiments to organisational business outcomes
  • Define & measure – define your experimentation inputs
  • Set up & run – set up your test using your measurement inputs
  • Share results – determine the experiment winner and communicate results
  • Take it to next level – Utilize Engagement value scale and generate impactful experiment ideas
  • Make it repeatable – Create a process for your team to follow and optimise

Use Sitecore Host plugin architecture to transition on-prem Active Directory workloads onto Azure

I have previously blogged about my session and how I prepared for it. You can revisit the post here.

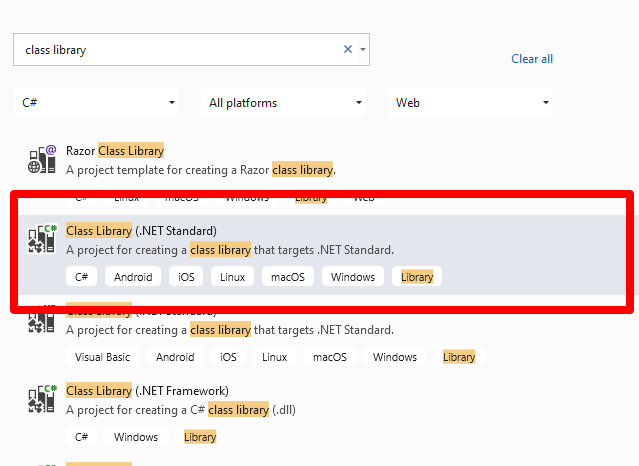
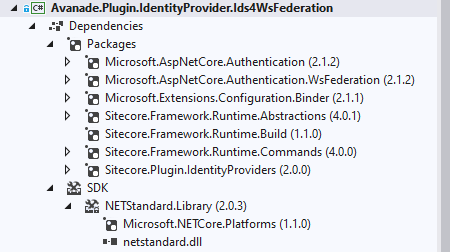
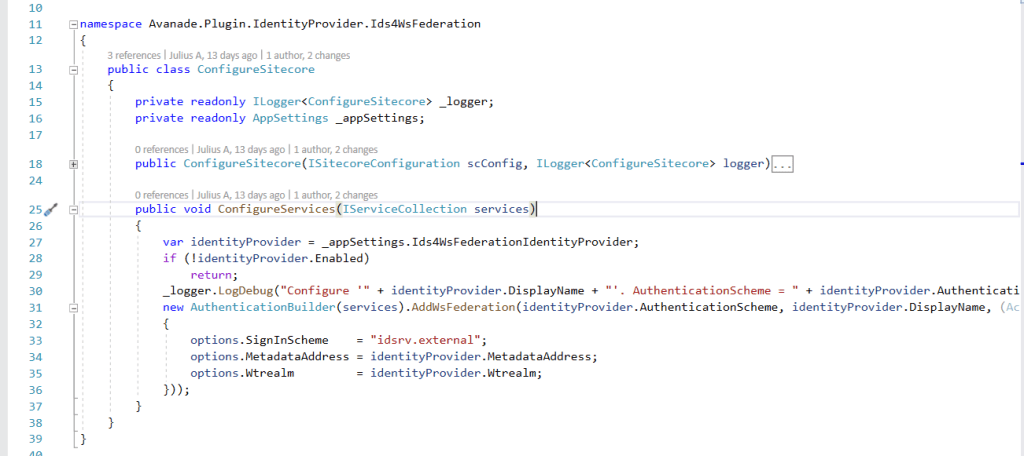
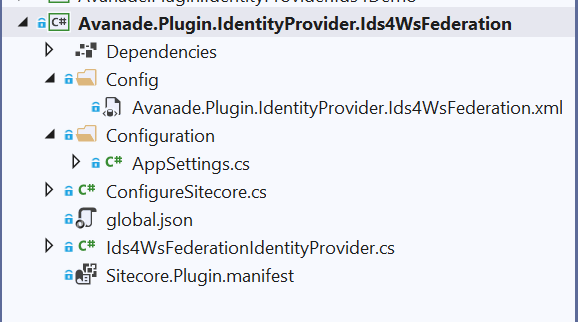
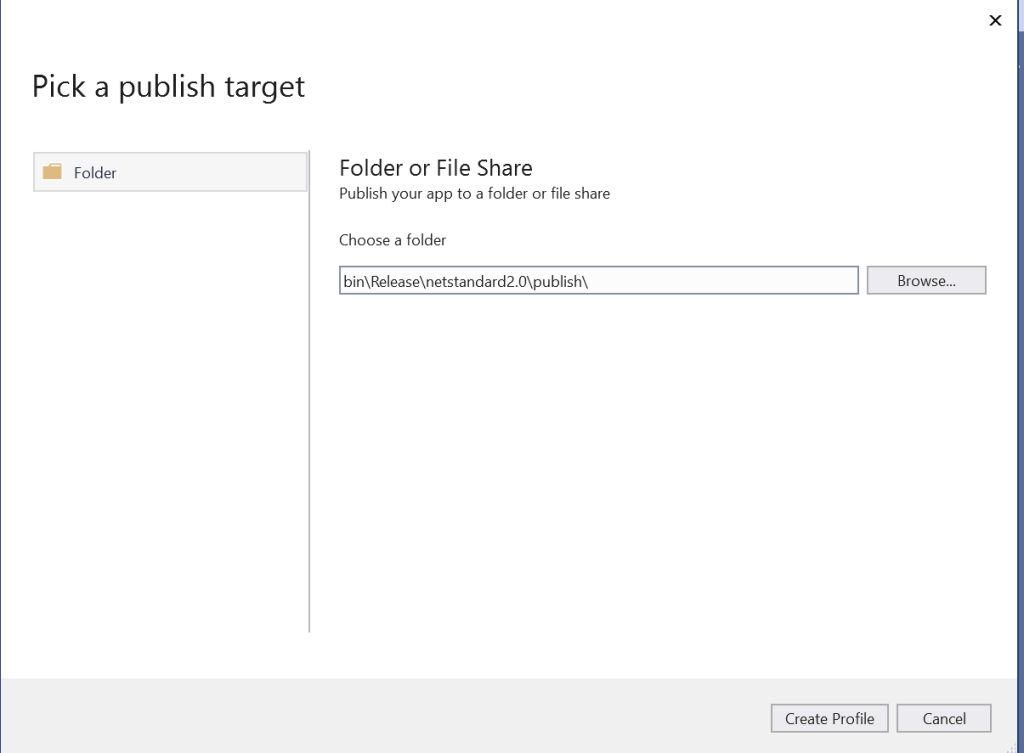
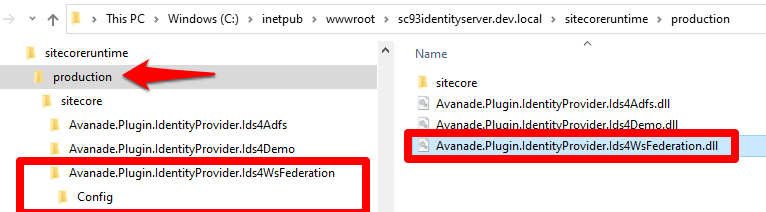
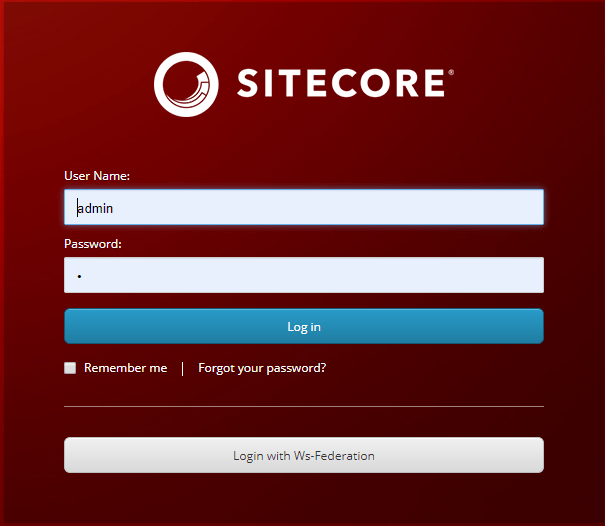
My session was themed Problem Solving Through Technology, and I discussed how you can leverage the Sitecore Host architecture to resolve the issue of deprecated Sitecore AD module as you transition into the cloud.

Key takeaways from my session is how easy and quick to leverage Sitecore Host architecture to create custom Sitecore Identity host plugins, including free sample code samples

Conclusion and Next Steps

This concludes part one of this series of blog posts revisiting the recently concluded Sitecore Symposium 2020. Until next time, keep watching!

Sitecore Host part four

Creating and Extending Sitecore Host Plugins

Sitecore identity reference architecture

In this four part series of blog posts, we will examine in detail the Sitecore Host platform and what benefits this brings to Sitecore Experience Platform. We will also have a closer look at Sitecore Host Applications as well as the Sitecore Host plugins. I will encourage you to please read through these blog posts starting with part one, through part four. I have also provided links below if you would like to jump and have a peek on the other parts as well. All code snippets referenced in the blog posts can also be found on my public Github repo using the link provided below.

  1. Sitecore Host part one – Introduction to Sitecore Host, Sitecore Host applications and Sitecore Plugins
  2. Sitecore Host part two – Sitecore Horizon 9.3
  3. Sitecore Host part three – Sitecore Identity Server
  4. Sitecore Host part four – Creating and extending Sitecore Host Plugins (this post)
  5. Code samples in my Github Repository

You can define a Sitecore Host Plugin as a feature or functionality that is dynamically loaded into Sitecore Host. As you will see later on, a plugin can contain Code, Configuration, Commands and Content. A plugin can also depend on another plugin, and therefore plugins are always loaded in a dependency order.

Definition of a Sitecore Host Plugin

Creating a Visual Studio Project

Ensure you have installed Visual Studio version 2017 and above. To create a Sitecore Host Plugin in Visual Studio, follow the steps below:

  • Create a Class Library project targeting .NET Standard 2.0 framework, as shown below. Simply filter project templates by language preference, platform and project type. There is also a text box where I have filtered by “class library”
Visual Studio 2019 – create new project dialog

Select the highlighted template and then assign the project a uniquely identifiable name (this will be the plugin unique name). After you have successfully created your project, it is time to verify the Target Framework has been set correctly. This can be done by viewing the project properties as shown below.

  1. Right-click on the project name
  2. Select the properties menu item

Which should open the dialog shown below. Adjust appropriately if this is different in your case.

Visual Studio – .NET Standard 2.0 target framework
  • Then create a global.json file at the root of the project. This will specify the version of Sitecore.Framework.Runtime.Build package, which is required when creating plugins. It provides MSBuild targets to support creating Sitecore plugins

{
“msbuild-sdks”: {
“Sitecore.Framework.Runtime.Build”: “1.1.0”
}
}

  • Edit the csproj file and add this line below after the Project node

The final csproj file should look like the one below

  • Then add necessary references to required Packages, such as shown below.
  • You will notice I am additionally referencing Microsoft.AspNetCore.Authentication.WsFederation package needed for Web Services Federation functionality for ASP.NET core applications.
Sitecore Host packages references required

Sitecore Identity Ws-Federation subprovider Plugin

Now that we have a Visual Studio project for a Sitecore Host Plugin, we are going to create a external provider to allow us to use Ws-Federation protocol such as Active Server Federation Services (ADFS) with Sitecore Identity Server.

Define Plugin Configuration

The Sitecore Identity Server Plugin requires an XML based configuration based on Sitecore Identity Server template as shown below. In your Visual Studio project, create a solution folder named “Config“. Then add an XML file using the naming convention {Plugin_name}.xml where {Plugin_name} is the name of this project. So in our case, we will name it Avanade.Plugin.IdentityProvider.Ids4WsFederation.xml

In this configuration we will define the following:

  • “Sitecore:ExternalIdentityProviders:IdentityProviders:Ids4WsFederation” – the configuration section name. Please note Ids4WsFederation is the section name for the xml tag.
  • AuthenticationScheme – this is IdS4-Ids4WsFederation The second part Ids4WsFederation much be same as the section name for the xml tag (by convention)
  • DisplayName – This is the caption for the Login button that will appear on Sitecore Identity login page
  • Enabled – This is the flag that enables the subprovider when set to true
  • MetadataAddress – This is the Ws-Federation or ADFS publicly accessible Metadata Universal Resorce Identifier (URI) of your ADFS instance.
  • Wtrealm – This is the Ws-Federation or ADFS Relying Party URI as configured on your ADFS instance.
  • ClaimTransformations – This section is used to place transformation rules for how source claims from Ws-Federation or ADFS will be mapped into Identity Server normalised claims. Sample claim transformations have been provided in the source code in my public GitHub Repo

Mapping Plugin Configuration into C# models

In your Visual Studio project, create a class named Ids4WsFederationIdentityProvider.cs that inherits from the Sitecore.Plugin.IdentityProviders.IdentityProvider. Notice the class name has a suffix of IdentityProvider as a recommended naming convention.

In this class we will define two properties of type string: MetadataAddress and Wtrealm. This are the additional properties we need from our configuration file above, the rest of the properties are defined in the base Sitecore.Plugin.IdentityProviders.IdentityProvider class.

Provide definition of ConfigureServices for the Plugin

As per Sitecore Host Plugin requirements, we need to configure services for the subprovider according to the instructions for this provider, and specify the SignInScheme  setting as idsrv.external

To use authentication middleware, we must have an object of the type Microsoft.AspNetCore.Authentication.AuthenticationBuilder

To initialise this object, we must use 

new Microsoft.AspNetCore.Authentication.AuthenticationBuilder(services) 

instead of services.AddAuthentication()

Notice how we use AuthenticationBuilder(services).AddWsFederation() pipeline below, which is available to us via the Microsoft.AspNetCore.Authentication.WsFederation package we referenced earlier.

Below is the full code listing of the required implementation

Configure Services code listing

Define Sitecore.Plugin.manifest file for the Plugin

Finally we need to define the Plugin manifest file, which looks like the screenshot below.

Sitecore.Plugin.manifest file definition

The manifest file defines the following properties for the plugin

  • PluginName – Unique and identifiable name for the plugin
  • AssemblyName – This is the name of the Class Librabary
  • Version – The assigned semantic version number of your plugin
  • Dependencies – a list of other plugins your plugin depends on. In our case, this is depending on Sitecore.Plugin.IdentityProviders version 4.0.0-r00257
  • Tags – This is by default set to “Sitecore”

Your final Visual Studio Project structure should be similar to the one shown in the screenshot below. This code is also available on my public Github Repo

Building your Plugin Nuget package and deploying it

You can manually publish your project to generate a Nuget package for your plugin.

Right-click your project in Visual Studio, then choose Publish… menu item. Follow the steps to publish the code to a staging folder.

And then you will publish a standard Nuget package located within publish sub-folder shown below:

Deploying your Plugin Manually

Plugins are distributed as Nuget packages. To add a plugin to a host application so that it is loaded at runtime, the plugin must be unpacked and have its assets copied to the correct locations.

Create an environment folder

If you do not have one already, you need to create an environment folder under the sitecoreruntime folder. A Sitecore Host application will default its environment to Production. Unless a different environment is supplied at startup (via the –env command) it will look for the production folder first:

For example:  hostapp/sitecoreruntime/production

Create a plugin folder

You need to create a folder for the plugin (in our case name it Avanade.Plugin.IdentityProvider.Ids4WsFederation) . This is where the plugin manifest, assets and configuration are located. This is located inside the sitecore folder, which is inside an individual environment folder

The sitecoreruntime/<env>/sitecore folder does not override files in the hosts sitecore folder. This is a unique folder used for loading plugin assets.

Runtime environment folders cannot contain a sitecoreruntime folder of their own.

Unpack plugin data from a Nuget package and deploy it

We have our plugin named Avanade.Plugin.IdentityProvider.Ids4WsFederation.1.0.0.nupkg

Unpack the plugin contents. You will notice our package contains special sitecore directory in the root of the nupkg package with additional things inside it. Everything else is the standard Nuget structure.

Copy the contents of the Nuget sitecore folder to the plugin folder you created previously (for example,  sitecoreruntime/production/sitecore/Avanade.Plugin.IdentityProvider.Ids4WsFederation).

Our plugin package contains a lib folder, copy the assets from the correct target framework to the root of the sitecoreruntime/<env> folder (for example, sitecoreruntime/production/*.dll)

Our plugin package contains a content folder, copy the assets from this folder to the plugin folder created previously (for example,  sitecoreruntime/production/sitecore/Avanade.Plugin.IdentityProvider.Ids4WsFederation)

The final folder structure will looks similar to this below

Ws-Federation subprovider in Action

After successful deployment of this plugin to your instance of Sitecore Identity server, you should see the Login screen below.

Please note you will need to re-start your IIS to pick the plugin changes.

SI with additional provider for ADFS

Troubleshooting plugin

If you encounter any issues with your ADFS plugin, it is possible that the claims mappings have issues. Please refer to the Claims Troubleshooting section on previous blog post for some tips on resolving potential issues.

Conclusion

In this blog post, we examined creating and extending Sitecore Host plugins. We walked through the process of creating your .NET Core project in Visual Studio. We also walked through the actual code samples required to extend the Sitecore Identity with a new subprovider for Ws-Federation (ADFS). The code samples used in this blog post is also available  in this GitHub Repo 

This is the final blog post of this four-part series. I hope you found it useful and given you some motivation to go and start creating cool Sitecore Host Plugins.

Please feel free to leave us your feedback and/or comments below.