Context
If you are already leveraging enterprise observability in your enterprise, this blog post is about how you can plug your Content Hub data to gain actionable insights. If you are not, then this blog post can help you start your journey towards embracing enterprise observability, plug your Content Hub data to gain insights.
In today’s complex IT landscape, enterprise observability goes beyond traditional monitoring by aggregating data from diverse sources to provide deep, actionable insights. Your Sitecore Content Hub platform is an upstream data source that you can plug in. You can push your Content Hub data such Assets, Projects, raw events and reporting logs—turning raw data into meaningful, proactive decision-making insights about your content supply chain. You can understand, for example, how your assets are being utilized, download footprints among more actionable insights.
Reference Architecture
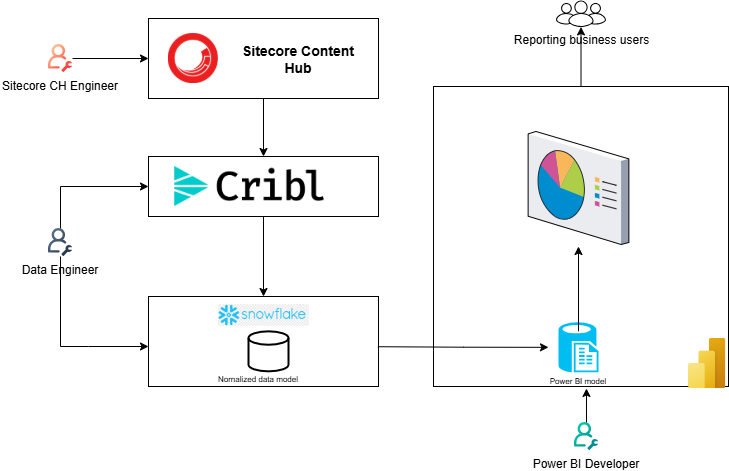
I have shared a reference architecture at the top of this blog, which you can adopt for your use cases. Broadly you will need the following architectural components so you can push data from Content Hub into your observability platform and its visualization.
1. ETL Tooling
You will need tooling that will connect to your Content Hub instance to extract the data. Typically this tooling will provide capabilities to allow you to also transform and load the data to your target data lake. This process is known as Extract-Transform-and-Load(ETL).
Tooling such as Cribl and others are perfect for this. These tools and techniques perform an ETL (extraction, transformation, and loading) type functions on the raw data and shape it into a format suitable for analysis.
I will recommend working with Data Engineers with specialist skills in ETL to help with this process.
2. Data lake tooling
A data lake is commonly referred to as a data warehouse architecture, provides the capability to read and write data in a cloud object storage. This is the central repository where data from your various sources gets aggregated at scale.
Data will be extracted from Content Hub, transformed and loaded into a Snowflake database for example. This is where it all comes together. The data lake tooling will allow you to create a logical data model to help with analysis of your data. I will recommend working with Data Engineers with specialist skills in ETL and Data lake to help with this process.
3. Reporting UX tooling
You will need to turn your data into visuals. This architecture component is a user-friendly report-creation tool such as Microsoft Power BI
How to extract data from Content Hub
Content Hub provides a REST API for querying data held within your instance. All objects in Sitecore Content Hub are modeled as resources that represent the state of objects at the time of a request. Standard HTTP requests and responses are used to query and manipulate object states and standard HTTP headers are used to augment the request and response
All data is sent and received as JSON.
Authenticating and securing REST APIs
Access to the REST API is restricted to authenticated users. You can authenticate requests using these three options:
- An ASP.NET Forms Authentication ticket set via a cookie.
- A custom header
X-Auth-Tokencontaining the token retrieved by using the Authenticate resource. - A new generated token created by using the Create token or Create token using OAuth.
Tips and tricks: Query vs Scroll REST APIs
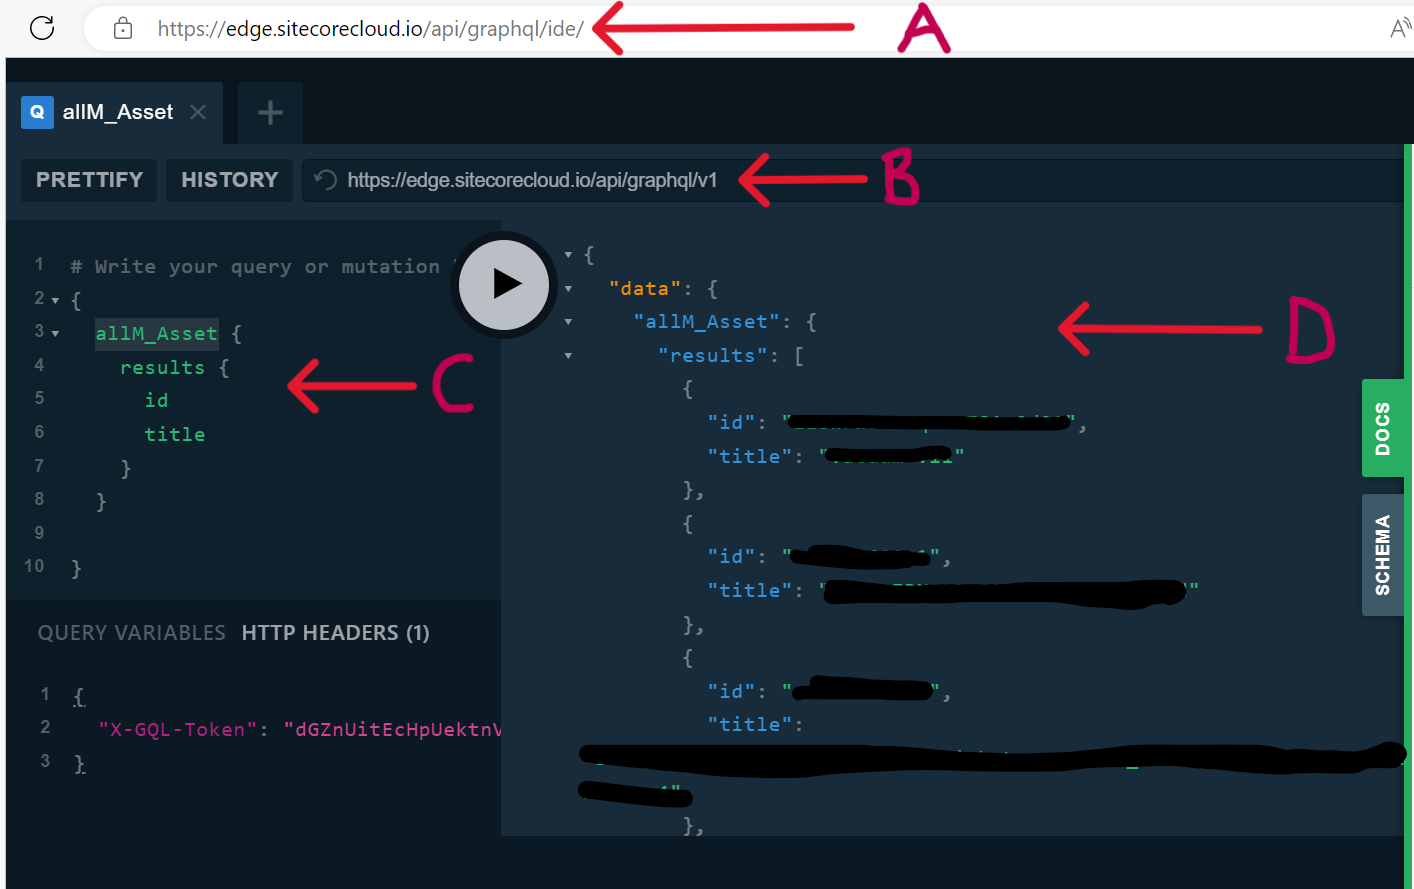
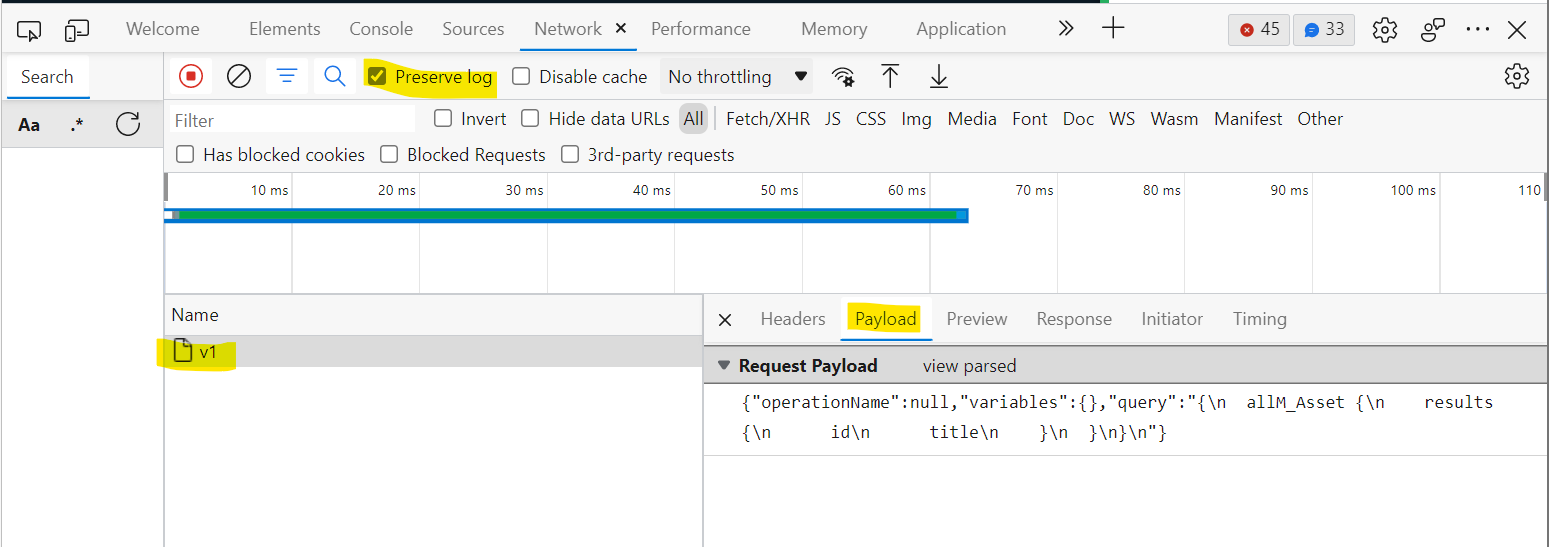
Querying API provides the most flexibility in terms of filtering data for specific entities using specific indexed metadata fields. This is a GET request type, and you access is such as shown below
GET http://<HOSTNAME>/api/entities/query/For example, you can query all M.Asset entities by using the Definition.Name property as shown below
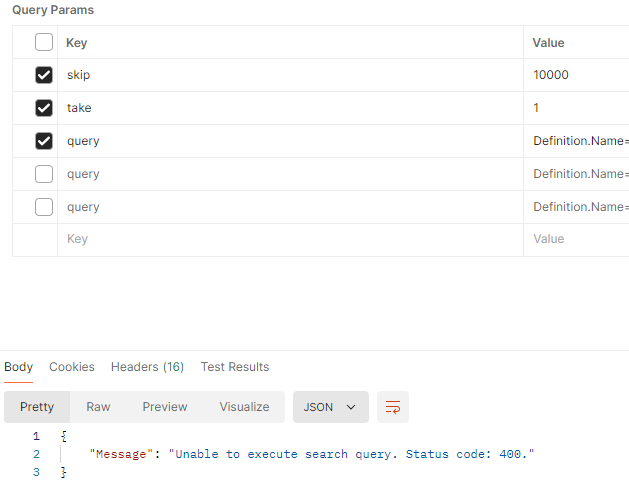
GET http://<hostname>/api/entities/query?query=Definition.Name=='M.Asset'Due to deep paging restrictions, you can only retrieve up to 10,000 results. Any attempt to get more results results in an error message “Unable to execute search query. Status code:400” as shown below
Scroll API can be used to retrieve a large number of results (without the limitation seen in Querying API). Scroll only supports the GET method. The only difference with the Querying API is the paging arguments. This is also a GET request type, as shown below
GET http://<HOSTNAME>/api/entities/scroll/This is the API I will recommend to be leveraged in scenarios when extracting all results from a single query from Content Hub into your Observability platform.
If you have concerns around data volumes and performance concerns for your Content Hub instance, reach out to your Sitecore Customer Technical Support for further guidance
Next steps
In this blog post, I have at a reference architecture that you can adopt to plug your Content Hub data into your Observability platform. I explained the various components of the architecture including some of the tooling you can leverage for your ETL and data warehousing and visualizations. I finished with strategies you can leverage to extract Content Hub data leveraging the Querying and Scroll APIs.
I hope my approach helps you address similar scenarios in your use-cases. Please let me know if you have any comments above and would like me to provide further or additional details.