This is a white paper I wrote sometime back on how to leverage ADFS within your standard .NET web application. You will find it useful, especially when transitioning your on-premises .NET web application into the cloud.
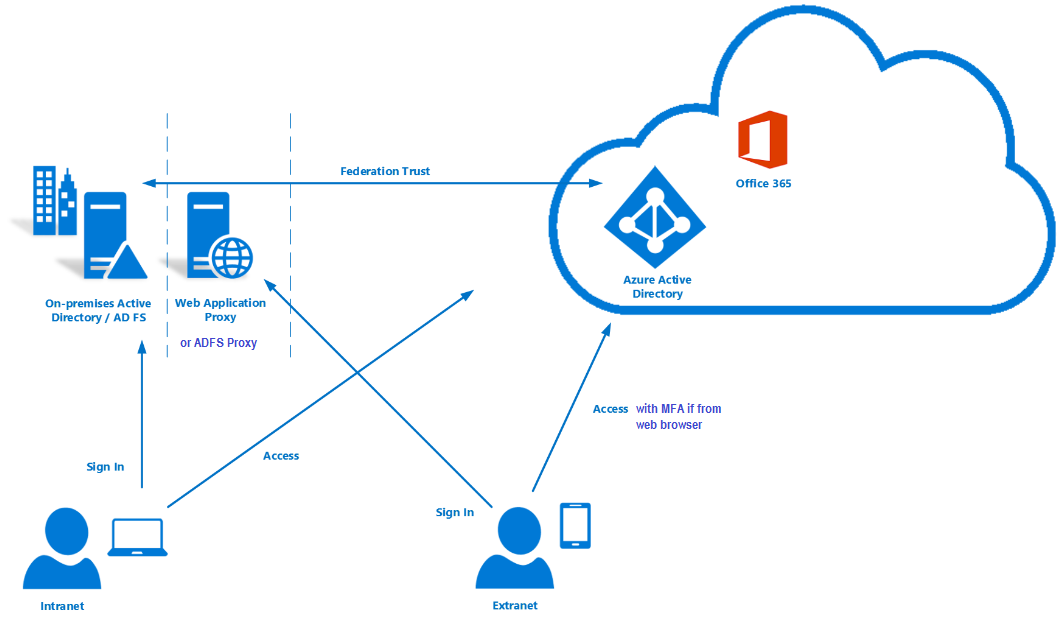

This is a white paper I wrote sometime back on how to leverage ADFS within your standard .NET web application. You will find it useful, especially when transitioning your on-premises .NET web application into the cloud.

Faced with deprecated AD module, let us look at possible upgrade options to Sitecore version 9.3 or 10 to for your Sitecore Identity Management
If you choose to stop using on-premises AD with your Sitecore instance, THEN:
If you choose to keep your on-premises AD with your Sitecore instance. THEN you will need to make it work with latest Sitecore 9.3 or 10. To achieve this:
Depending on your cloud transformation strategy, this is probably what you should be considering at some point
We have a couple of options here such as using Azure AD Connect or Azure AD connect Health to help with the transformation. I will also recommend working with your digital transformation partner to explore further options.
Sitecore Identity Server is your answer going forward!
You can now watch the accompanying videos on my YouTube channel. You can also read on detailed step-by-step guide on creating an ADFS plugin. Stay tuned for more posts!

In this four part series of blog posts, we will examine in detail the Sitecore Host platform and what benefits this brings to Sitecore Experience Platform. We will also have a closer look at Sitecore Host Applications as well as the Sitecore Host plugins. I will encourage you to please read through these blog posts starting with part one, through part four. I have also provided links below if you would like to jump and have a peek on the other parts as well. All code snippets referenced in the blog posts can also be found on my public Github repo using the link provided below.
You can define a Sitecore Host Plugin as a feature or functionality that is dynamically loaded into Sitecore Host. As you will see later on, a plugin can contain Code, Configuration, Commands and Content. A plugin can also depend on another plugin, and therefore plugins are always loaded in a dependency order.
Definition of a Sitecore Host Plugin
Ensure you have installed Visual Studio version 2017 and above. To create a Sitecore Host Plugin in Visual Studio, follow the steps below:
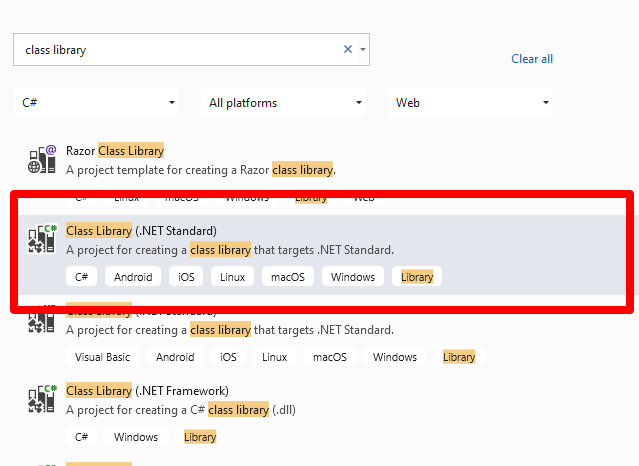
Select the highlighted template and then assign the project a uniquely identifiable name (this will be the plugin unique name). After you have successfully created your project, it is time to verify the Target Framework has been set correctly. This can be done by viewing the project properties as shown below.

Which should open the dialog shown below. Adjust appropriately if this is different in your case.

{
“msbuild-sdks”: {
“Sitecore.Framework.Runtime.Build”: “1.1.0”
}
}
The final csproj file should look like the one below

Now that we have a Visual Studio project for a Sitecore Host Plugin, we are going to create a external provider to allow us to use Ws-Federation protocol such as Active Server Federation Services (ADFS) with Sitecore Identity Server.
The Sitecore Identity Server Plugin requires an XML based configuration based on Sitecore Identity Server template as shown below. In your Visual Studio project, create a solution folder named “Config“. Then add an XML file using the naming convention {Plugin_name}.xml where {Plugin_name} is the name of this project. So in our case, we will name it Avanade.Plugin.IdentityProvider.Ids4WsFederation.xml

In this configuration we will define the following:
In your Visual Studio project, create a class named Ids4WsFederationIdentityProvider.cs that inherits from the Sitecore.Plugin.IdentityProviders.IdentityProvider. Notice the class name has a suffix of IdentityProvider as a recommended naming convention.
In this class we will define two properties of type string: MetadataAddress and Wtrealm. This are the additional properties we need from our configuration file above, the rest of the properties are defined in the base Sitecore.Plugin.IdentityProviders.IdentityProvider class.
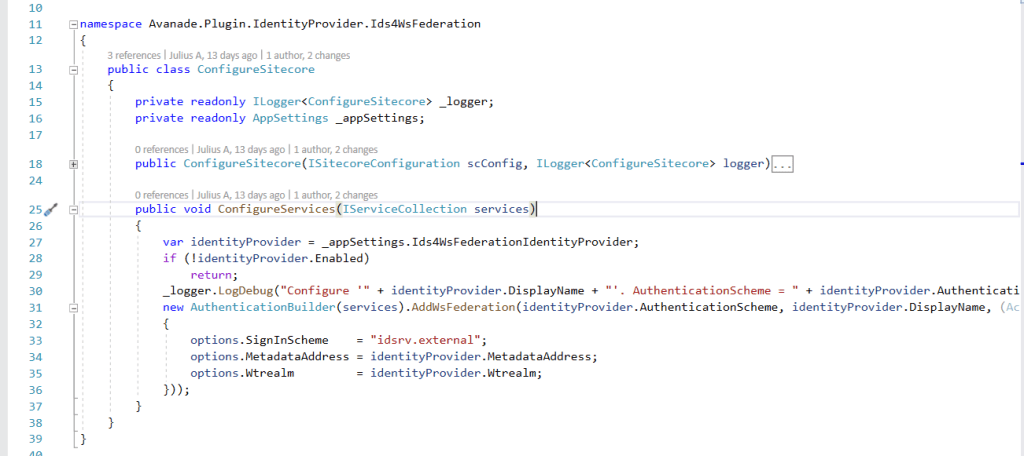
As per Sitecore Host Plugin requirements, we need to configure services for the subprovider according to the instructions for this provider, and specify the SignInScheme setting as idsrv.external
To use authentication middleware, we must have an object of the type Microsoft.AspNetCore.Authentication.AuthenticationBuilder
To initialise this object, we must use
new Microsoft.AspNetCore.Authentication.AuthenticationBuilder(services)
instead of services.AddAuthentication()
Notice how we use AuthenticationBuilder(services).AddWsFederation() pipeline below, which is available to us via the Microsoft.AspNetCore.Authentication.WsFederation package we referenced earlier.
Below is the full code listing of the required implementation
Finally we need to define the Plugin manifest file, which looks like the screenshot below.

The manifest file defines the following properties for the plugin
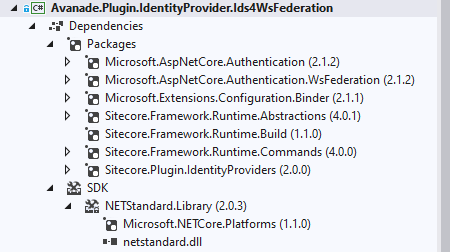
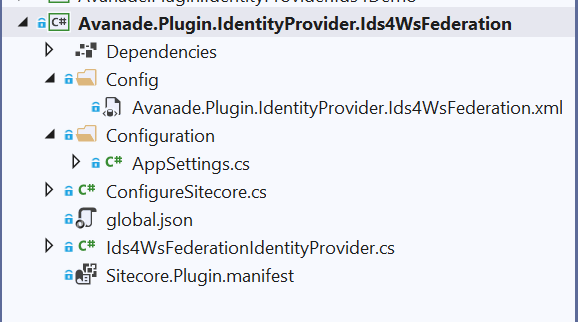
Your final Visual Studio Project structure should be similar to the one shown in the screenshot below. This code is also available on my public Github Repo
You can manually publish your project to generate a Nuget package for your plugin.
Right-click your project in Visual Studio, then choose Publish… menu item. Follow the steps to publish the code to a staging folder.
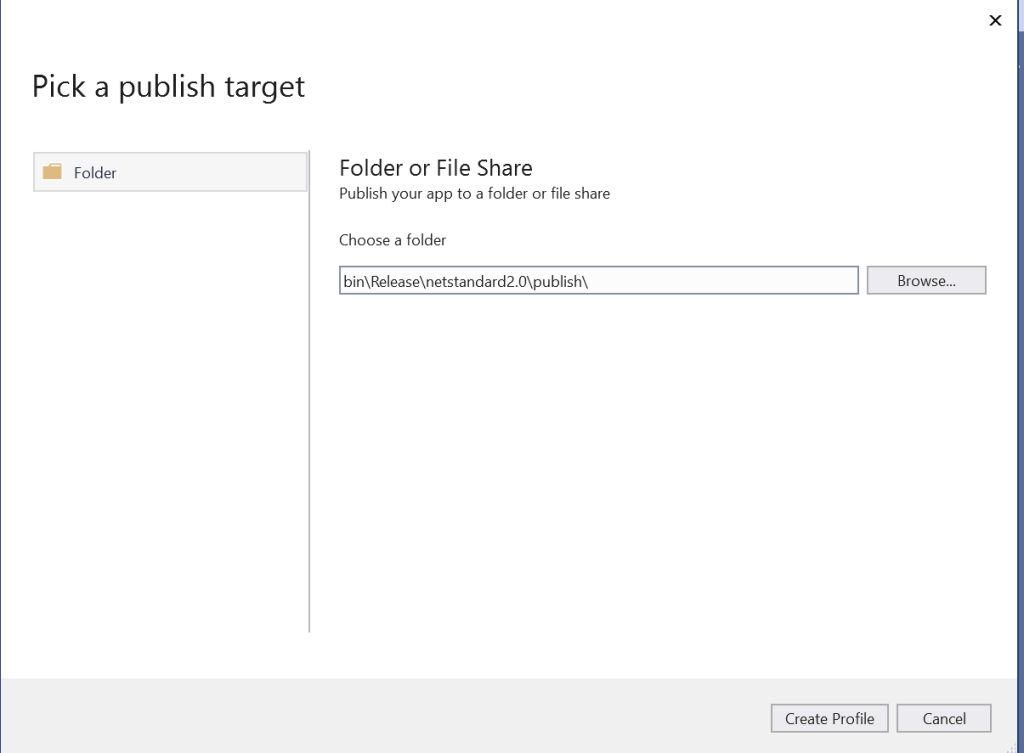
And then you will publish a standard Nuget package located within publish sub-folder shown below:

Plugins are distributed as Nuget packages. To add a plugin to a host application so that it is loaded at runtime, the plugin must be unpacked and have its assets copied to the correct locations.
If you do not have one already, you need to create an environment folder under the sitecoreruntime folder. A Sitecore Host application will default its environment to Production. Unless a different environment is supplied at startup (via the –env command) it will look for the production folder first:
For example: hostapp/sitecoreruntime/production
You need to create a folder for the plugin (in our case name it Avanade.Plugin.IdentityProvider.Ids4WsFederation) . This is where the plugin manifest, assets and configuration are located. This is located inside the sitecore folder, which is inside an individual environment folder
The sitecoreruntime/<env>/sitecore folder does not override files in the hosts sitecore folder. This is a unique folder used for loading plugin assets.
Runtime environment folders cannot contain a sitecoreruntime folder of their own.
We have our plugin named Avanade.Plugin.IdentityProvider.Ids4WsFederation.1.0.0.nupkg
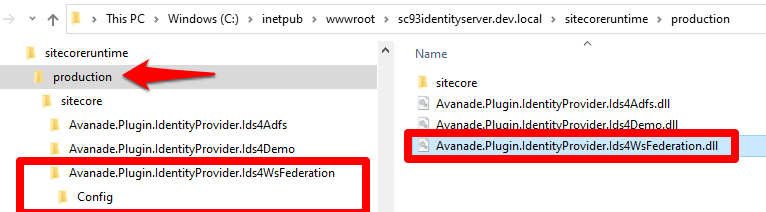
Unpack the plugin contents. You will notice our package contains special sitecore directory in the root of the nupkg package with additional things inside it. Everything else is the standard Nuget structure.
Copy the contents of the Nuget sitecore folder to the plugin folder you created previously (for example, sitecoreruntime/production/sitecore/Avanade.Plugin.IdentityProvider.Ids4WsFederation).
Our plugin package contains a lib folder, copy the assets from the correct target framework to the root of the sitecoreruntime/<env> folder (for example, sitecoreruntime/production/*.dll)
Our plugin package contains a content folder, copy the assets from this folder to the plugin folder created previously (for example, sitecoreruntime/production/sitecore/Avanade.Plugin.IdentityProvider.Ids4WsFederation)
The final folder structure will looks similar to this below
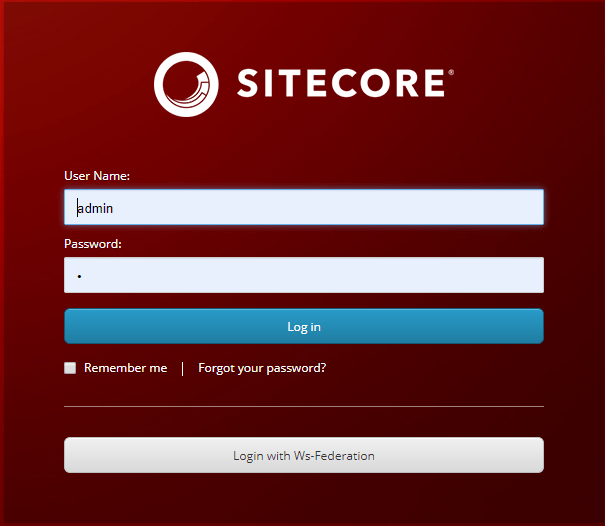
After successful deployment of this plugin to your instance of Sitecore Identity server, you should see the Login screen below.
Please note you will need to re-start your IIS to pick the plugin changes.
If you encounter any issues with your ADFS plugin, it is possible that the claims mappings have issues. Please refer to the Claims Troubleshooting section on previous blog post for some tips on resolving potential issues.
In this blog post, we examined creating and extending Sitecore Host plugins. We walked through the process of creating your .NET Core project in Visual Studio. We also walked through the actual code samples required to extend the Sitecore Identity with a new subprovider for Ws-Federation (ADFS). The code samples used in this blog post is also available in this GitHub Repo
This is the final blog post of this four-part series. I hope you found it useful and given you some motivation to go and start creating cool Sitecore Host Plugins.
Please feel free to leave us your feedback and/or comments below.
