My Sitecore contributions in 2023

It is that time of the year once again, where Sitecore MVP 2024 applications are open.

I have had a relatively productive year compared to 2022, and below is a summary of my contributions:

Content contributions

I believe I have created content that adds value mostly within Content Hub, Sitecore Experience Edge, Sitecore Personalize among the Sitecore composable stack. I believe I have produced content that meets expectations in terms of quality, quantity, and visibility and more importantly, add value to our community. This has been through blog posts (x14 Sitecore blogs in 2023, with a total views:  2400+ so far), code sharing via GitHub, reference Architectures, YouTube content among other social channels:

LinkedIn articles:

Sitecore Hackathon 2023:

Code and architectural artifacts:

Public speaking

I am an active member of Sitecore User Group London and been working with Alex Washtell to facilitate the event held at our Avanade offices back in February 2023. I was also a speaker on the event held at Sagittarius on 9th November 2023.

Engagement

Through my social profile, I have driven engagement throughout 2023 to amplify the content I have created.

Next steps

For 2024, I look forward keeping up producing content that meets expectations in terms of quality, quantity, and visibility. Keep up and drive further engagement of wider Sitecore community by leveraging my previous MVP credentials and strong social profile. I am putting myself forward for public speaking events throughout the calendar year. I intent to continue identifying any gaps and filling them, providing product feedback, improvements, and references

Stay tuned and best of luck with those submitting the Sitecore MVP 2024 applications

Sitecore personalize and mobile app projects series – part 4b

Sitecore Personalize APIs integration architecture

Introduction

On this series of blog posts, I am documenting my journey of delivering personalized content to end users of a mobile app.

Sitecore Personalize API Flow executions

As follow up to the previous blog post on Personalize APIs, let us look at how you can leverage the Personalize REST API flow execution service to automate running a flow for you experiments or experiences.

Experiences vs Experiments

Below is a summary key capabilities with experiences and experiments:

  • Experiences – Web allows you to add experience to your website and monitor performance.
  • Experiences – Full stack drives API triggered and interactive experiences.
  • Experiences – Flows export segments to external third-party systems for highly targeted campaigns
  • Experiments – Web runs A/B tests for your website
  • Experiments – Full stack runs A/B tests on API driven triggered and interactive experiences

Characteristics of API flow execution service

A flow execution service allows you to run a flow for either web-based or mobile apps, in order to deliver great personalization in real-time. A simple use-case will be trying to encourage your guest to add a product into their shopping basket.

Below are characteristics of a flow execution service:

  • Facilitates personalization in experiences and experiments, including interactive and web
  • Invokes real-time responses
  • Supports using decision models in interactive experiments to return the next best offer or action

How to send a flow execution request

Two options are available:

  • You can send a flow execution request using either the browserIdemail, or identifiers attribute. This flexibility is particularly useful when interacting with guests who have never been identified online and do not have a browserId attribute. You can use the email or identifiers attribute to execute a flow that uses a decision model to return the next best offer or action.
  • You can also send a flow execution request for an experiment or experience when you want to send the output of the decision model in real-time to an external system such as a marketing cloud. The browserId attribute is not relevant or captured by this type of external system, so we recommend using the email or identifiers attribute to execute the flow

Calling the Personalize API

You will typically initiate an asynchronous call using POST REST API.

Below is a sample request to achieve this.

HTTP POST
/v2/callFlows

This will run an interactive experiment over any web-based or mobile app. As expected, you will need to specify either browserId or email or identifiers

Flow execution request using browserId

HTTP POST {{apiEndpoint}}/v2/callFlows
{
    "clientKey": "{{ClientKey}}",
    "channel": "MOBILE_APP",
    "language": "en",
    "currencyCode": "EUR",
    "pointOfSale": "{{myPOS}}",
    "browserId": "{{ref}}",
    "friendlyId": "{{friendlyId}}"
}

Where:

  • {{apiEndpoint}} will be the base url to your Personalize tenant, .e.g., api-engage-eu.sitecorecloud.io
  • {{ClientKey}} will be your public Client key
  • {{myPOS}} will be your Point of Sale
  • {{ref}} will be your browserId 
  • {{friendlyId}} when you create an experiment or experience, Sitecore Personalize automatically creates an ID when you name the experiment or experience.

Next Steps

This completes this blog, where I have walked you through Personalize API Flow executions. I hope you find this useful, and feel free to leave me any comments or thoughts.

In my next blog, I will be looking at sharing more details on my Sitecore Personalize integrations with my mobile app project. Stay tuned.

Sitecore personalize and mobile app projects series – part 4a

Sitecore Personalize APIs integration architecture

Introduction

On this series of blog posts, I am documenting my journey of delivering personalized content to end users of a mobile app.

Sitecore Personalize APIs

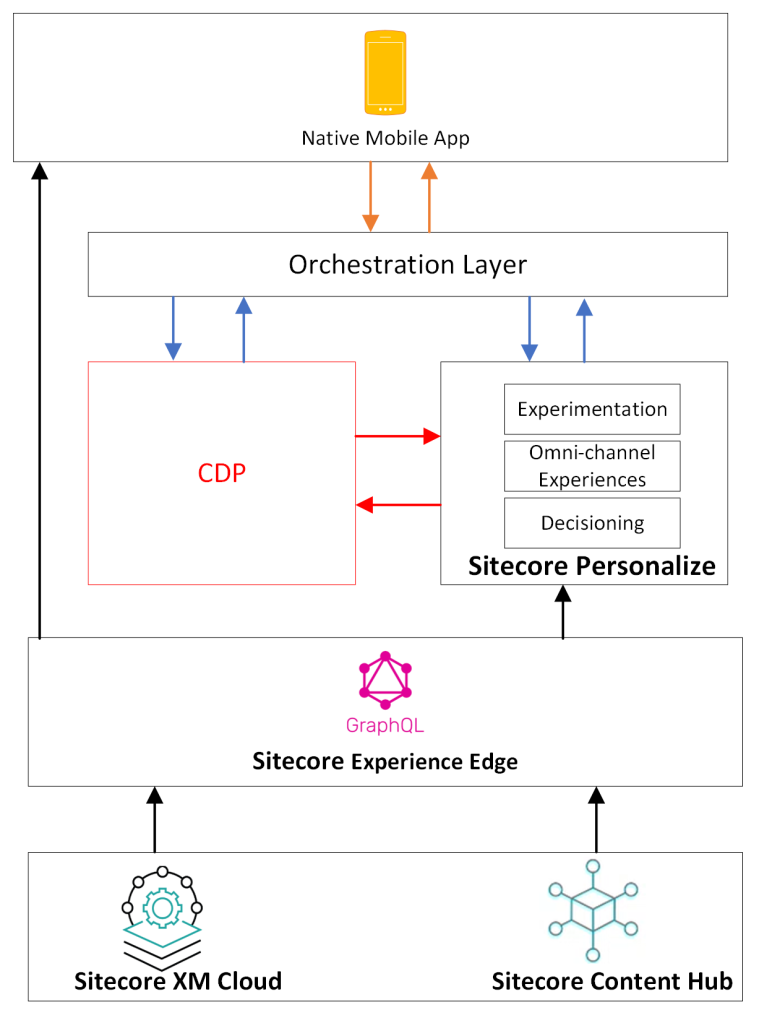
I have shared a reference architecture of the Sitecore Personalize APIs to demonstrate the different types as well as the recommended the integrations to your mobile app at the top of this page. We will now look into this in detail.

Orchestration layer

This architectural piece allows you to manage the integrations between your mobile app and Sitecore Personalize API. All it is a middleware or proxy layer that allows us to communicate with Personalize APIs. You can build this as a server-side application in any language of your choice. Alternatively, you could leverage Serverless capabilities such as Azure Function apps.

Below is a summary of the benefits:

  • Securely manage Client Keys and Client Secrets. The proxy layer protects your Client Keys and Secrets from potential malicious users of your mobile app.
  • Loose coupling – The orchestration layer means your mobile app is not strongly coupled with Sitecore Personalize APIs, making it easier to manage your mobile app releases and any changes to APIs.

Stream API

Stream API is designed to capture real-time, high velocity, and high-volume behavioral data. This includes both Browser and Event APIs

  • The Browser API provides capabilities to extend functionality and manage cookies that help identify guests. These Browser APIs are used for capturing and consuming data. They create, update, read, and delete data. This is the first API that you will make from your mobile app, to uniquely identify the guest/user.
  • The Event API provides capabilities for event driven processing, such as setting and sending custom events from your mobile app to Sitecore Personalize.

You will need a public Client key to access these APIs. You can get your key from your Sitecore Personalize tenant.

Interactive API

Interactive API is a set of REST APIs that provide synchronous interaction with CDP/Sitecore Personalize capabilities. These APIs support the CRUD operations that that you can operation on, say, guest profile data.

You will need a both public Client key and private Client secret to access these APIs by specify Basic Authentication token on the headers. You can get your keys and secrets from your Sitecore Personalize tenant.

You can access full documentation and how to send data with these events from Sitecore.

Mobile app integration

You will typically initiate an asynchronous call to Browser API (Stream API) to get a unique identifier.

Below is a sample request to achieve this.

HTTP GET
https://{{apiEndpoint}}/v1.2/browser/create.json?client_key={{ClientKey}}&message=

Where:

  • {{apiEndpoint}} will be the base url to your Personalize tenant, .e.g., api-engage-eu.sitecorecloud.io
  • {{ClientKey}} will be your public Client key

Below is the response, which will contain the unique browser ref

{
    "status": "OK",
    "version": "1.2",
    "client_key": "<your public client key>",
    "ref": "the unique browser ref guid",
    "customer_ref": "the unique customer ref guid"
}

Personalize API postman

Dylan Young has shared unofficial API Swagger definitions on his Git Hub. I will recommend you have a look to get started on your integrations.

Next Steps

This completes this blog, where I have walked you through Sitecore Personalize APIs and some security considerations to go with them. I hope you find this useful, and feel free to leave me any comments or thoughts.

In my next blog, I will be looking at sharing more details on my Sitecore Personalize integrations with my mobile app project. Stay tuned.

Sitecore personalize and mobile app projects series – part 2b

Introduction

On this series of blog posts, I am documenting my journey of delivering personalized content to end users of a mobile app.

Enabling Experience Edge for Sitecore XM

In this blog, I will cover integration between Sitecore Experience Edge and your Sitecore XM instance. Below is a reminder of our architecture.

Recap on Experience Edge for Experience Manager (XM)

Sitecore Experience Edge for Experience Manager (XM) is an API-based service from Sitecore that gives you globally replicated, scalable access to your Sitecore Experience Platform items, layout, and media.

Sitecore XM + Experience Edge architecture, adapted from Sitecore docs

Experience Edge for XM acts as a publishing target for your Sitecore content and media, and provides a GraphQL API that lets you deliver “Headless content”, which will be consumed by the Mobile app.

Getting Started with Sitecore XM Cloud

You can request for a demo from Sitecore, by filling and submitting this form available on Sitecore website. Sitecore Support team will then get back to you with details on how to access your Sitecore XM cloud instance.

Alternatively, you can request for an XM + Edge Demo from the Sitecore Demo Portal page. This is the Portal where you can also request the Sitecore Play! Summit and Sitecore Play! Shop demos. The XM + Edge Demo will come configured with an Experience Edge, ready to go.

Below are the steps to use:

Step-by-step guide to obtain XM + Edge Demo

  1. Logon to https://portal.sitecoredemo.com/. On the home page, click on “Quick Deploy”. This is the quickest way to get your demo instance based on Demo Team’s default configurations.
  2. This will open a modal, from which the user can:
    • select a demo template
    • select an instance name based on the guidelines described above, in the “Choosing an instance name” section
    • select a demo channel with preferred demo version
    • select a region to which the instance will be deployed to
  3. Instance names are valid under the following conditions:
    • The name must not already be used by another instance
    • The name must be at least 3 characters long
    • The name must contain only alphabetical characters or a hyphen
    • The name must start with a character (not a number or hyphen)
  4. In case the name is not valid, or the name is taken, an error message will appear after the name has been validated by the Demo Portal API
  5. Click on Deploy Now button to submit the information captured above
  6. The Demo provisioning process may take a couple of minutes. Grab a cup of tea or coffee while this runs. Finally, you will receive an email notification from get[at]sitecoredemo.com, similar to one below.
  7. You can follow the links in the email to access your instance. Alternatively, log on to https://portal.sitecoredemo.com/ and you will see the link on your dashboard

Accessing your Sitecore XM instance and Experience Edge instance

Opening your XM+ Edge Demo instance, you will get a landing page like one below

To access you XM instance, follow the URL in the section named Important Links This will open your Sitecore XM login page, and which you can access using the provided credentials To access your Experience Edge tenant, use the URL provided in the Edge Tenant section, plus the API key. You can see details on What is GraphQL in the other blog post in this series

Next steps

This completes this blog, where I have walked you through getting your Sitecore XM and Sitecore Experience Edge integration working. I hope you find this useful, and feel free to leave me any comments or thoughts.

In my next blog, I will be looking at integration between Sitecore Experience Edge and Sitecore Personalize.

Sitecore personalize and mobile app projects series – part 3

Introduction

On this series of blog posts, I am documenting my journey of delivering personalized content to end users of a mobile app.

Connecting Sitecore Personalize to Sitecore Experience Edge

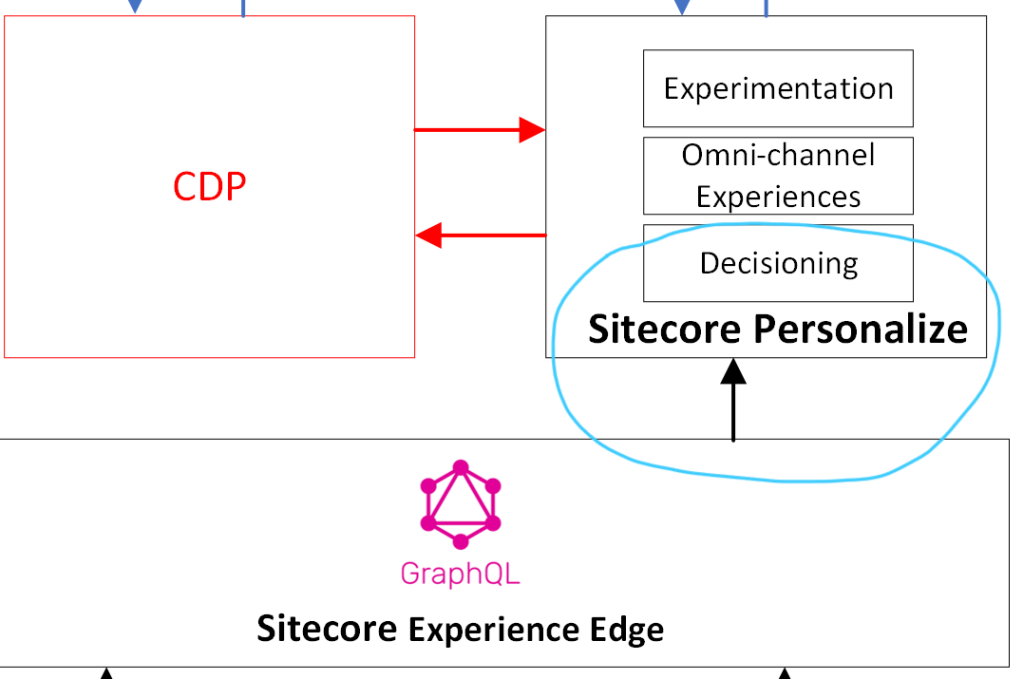
In this blog, I will deep dive into the integration between Sitecore Experience Edge and Sitecore Personalize part of the architecture, shown below. For the full reference architecture, refer to part one of this series.

Integrating Sitecore EE with Sitecore Personalize

What is Sitecore Personalize

Before we jump into how to integrate Sitecore Experience Edge with Sitecore Personalize, lets first look at what is Sitecore Personalize? Sitecore Personalize is cloud-native solution from Sitecore, for delivering tailored experiences to every customer, on any channel, and at scale.

Sitecore Personalize brings lots of value for marketers, including the following:

  • supports experiments that optimize experiences in any digital product, app, or channel
  • applies AI-driven digital decisioning capabilities to connect operational data
  • provides client-side personalization
  • reinforces decisioning and next-best actions and offers
  • provides inbound and outbound personalization

I will be focusing on the mobile app channel, with hope of exploring all the capabilities available to us.

Getting Started with Sitecore Personalize

Partner CDP Training Sandbox

If you are part of Sitecore Partner Programme, then you should already have access to a Partner CDP Training Sandbox. You can reach out directly to Sitecore Support to get your credentials to gain access to the tenant for your partner sandbox account.

Your Partner CDP Training Sandbox will have both Sitecore CDP and Sitecore Personalize. I will NOT be covering Sitecore CDP in this post. It is not part of my solution, but feel free to explore more about it.

Depending on your location, you will access your Partner CDP Training Sandbox using either of the following URLs:

  • app.boxever.com (Europe)
  • app-ap.boxever.com (Asia Pacific (APAC)
  • app-us.boxever.com (United States)

Request for a demo

You can also request for a Sitecore CDP demo from Sitecore by following the steps on the Request a demo page. This will require you to submit a form to Sitecore, after which you will get an invitation to sign up and access the Sitecore CDP demo tenant. Please note this will give you access to both Sitecore CDP & Personalize, at the time of this writing.

Sitecore Personalize – Navigation and Menus

The screenshots shared below are from my Partner CDP Training Sandbox, which has both Sitecore CDP & Personalize. If you are working with Sitecore Personalize only, these screenshots may have some differences for your case.

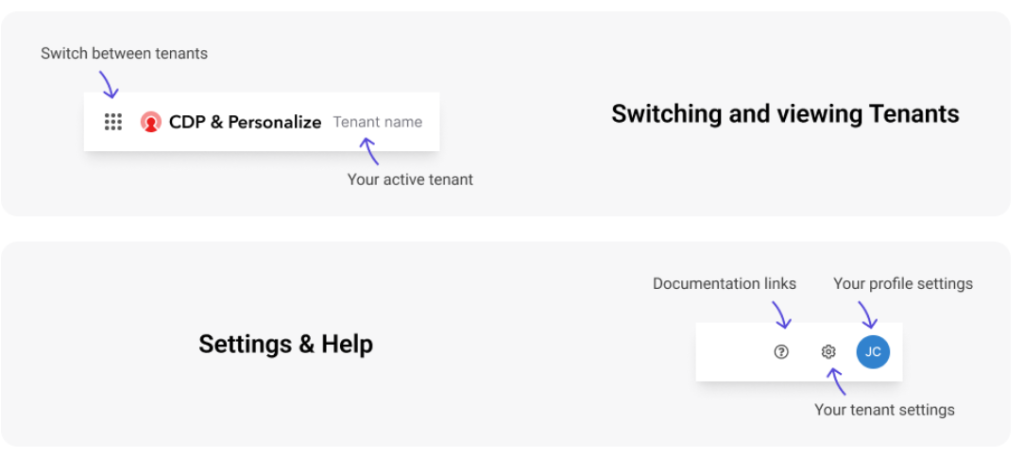
Click on the leftmost button, to the left of “CDP & Personalize” logo to switch between multiple tenants, as shown below.

Sitecore CDP & Personalize navigation menus

For documentation links, your tenant settings, and your profile settings, use the buttons to the right of the top nav menus, as shown above

Step by step on how to connect to Sitecore Experience Edge

To add a connection to Sitecore Experience Edge, use these steps:

  1. Use the Developer center top nav menu item, and click on Connections sub-menu item, as shown below.
  2. This will open the Connections page, shown below. Click on Add Connection button on the right-hand-corner to start the process
  3. This will launch an Add Connection dialog box, shown below
  4. Select the Data System category. This will open a 5-screen wizard form to capture the new connection details. The first screen is where you name and describe your connection, as shown below. Enter the Name, Description and choose an Icon, and click Next button to progress the wizard
  5. In the second wizard screen, you will specify the Authenticate method. Select None. So, no need to click on Test Authentication button. Click Next to progress the wizard to the Request screen
  6. On the third screen, you need to Configure Request details as shown on the screenshot below
    • Request URL
      • On the Request URL field, select a POST request, with URL of https://edge.sitecorecloud.io/api/graphql/v1  This will be your Sitecore Experience Edge Delivery API endpoint. It is a GraphQL endpoint that exposes your approved and published content.
    • Headers
      • Next, you need to add custom HTTP HEADER named “X-GQL-Token”, where you will specify the API Key required for your endpoint.
      • You can create this API Key from your Sitecore Content Hub instance, using the Manage -> API Keys page. Alternatively, you can create this programmatically using the Token API
    • Request
      • The easiest way to compose the request body is to make use GraphQL playground to compose your queries – taking advantage of schema discovery and auto-complete capabilities. As shown on the screenshot above, this is a simple query to list all approved and published assets with their Id and Title only. I grabbed this from the XHR request call on the  browser developer tools
    • Test Request
      • Now you can click on Test Request button, which should give you some Response, like the screenshot above. If you encounter any issues at this step, it is either you have a wrong API Key or a malformed GraphQL query. One tip is to ensure the  “query” part of the request has been formatted into a single line, as shown above.
      • Click Next button to progress the wizard to the fourth step, the Map screen
  7. We will revisit the map screen later on during this project. Skip this for now, by clicking on Next button to progress to final screen of this five-step wizard
  8. On the last Review & Save screen, you will see the summary of your details. If you are happy with everything, click on Save button to complete the wizard

You have now successfully established a connection with your Sitecore Experience Edge, and this will be available on your Connections list, for use in the future steps.

What is GraphQL

GraphQL is a query language for APIs that allows clients to specify exactly which data they want to fetch by making a single request and providing a query with the desired data fields.

Below is a screenshot of the GraphQL playground available using https://edge.sitecorecloud.io/api/graphql/ide/

Next Steps

This completes this blog, where I have walked you through getting your Sitecore Personalize connected with your Sitecore Experience Edge. I hope you find this useful, and feel free to leave me any comments or thoughts.

In my next blog, I will be looking at Sitecore Personalize capabilities, APIs and how to integrate it with the mobile app. Stay tuned.

Sitecore personalize and mobile app projects series – part 2a

Introduction

On this series of blog posts, I am documenting my journey of delivering personalized content to end users of a mobile app.

Enabling Sitecore Experience Edge for Sitecore Content Hub

In this blog, I will deep dive into the two blocks from bottom of my reference architecture, shown below.  I will specifically cover integration between Sitecore Experience Edge and your Sitecore Content Hub instance. For the full reference architecture, refer to part one of this series.

Enabling Sitecore Experience Edge for Sitecore Content Hub

Recap on Sitecore Experience Edge

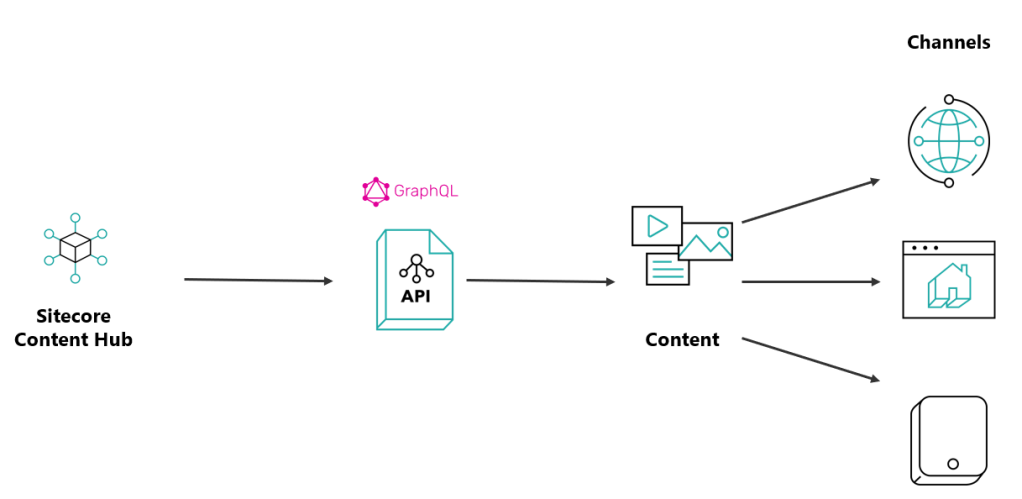
Sitecore Experience Edge for Content Hub is a set of services based on the Content as a Service (CaaS) model. It enables you to seamlessly deliver structured content across any channel that other applications and properties can easily consume
Sitecore Experience Edge - Content as a Service (CaaS)

Sitecore Experience Edge CaaS (Adopted from https://doc.sitecore.com/ch/en/users/42/content-hub/experience-edge–caas-intro.html)

Configure the publishing settings

To use the Experience Edge delivery platform, you must first enable the publishing settings and specify whether publishing is done automatically whenever there are changes or whether it is done manually.

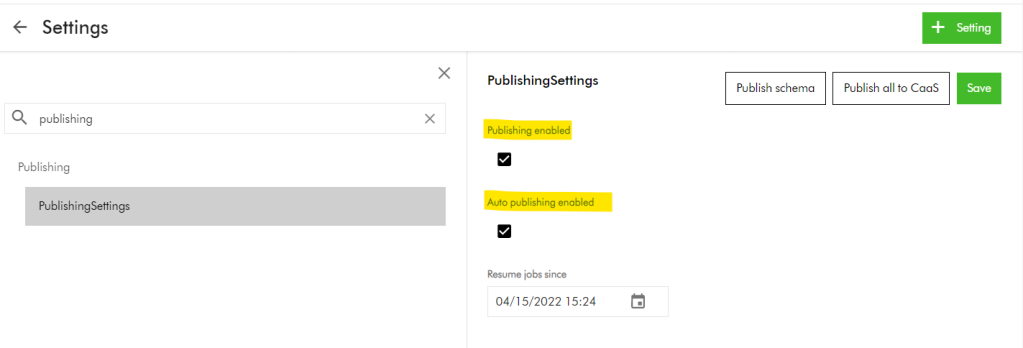
Below are the steps to accomplish this, in your Sitecore Content Hub tenant:

  1. On the menu bar, click Manage
  2. On the Manage page, click Settings
  3. On the Settings page, in the left pane, click PublishingSettings. You can also search using the search box
  4. In the right pane, select the Publishing enabled check box
  5. If you want to automatically publish the schema or entities when changes are detected, select the Auto publishing enabled check box
  6. Click Publish schema to publish changes to the schema
  7. Click Publish all to CaaS to publish all publishable entities
  8. Click Save
Sitecore Experience Edge - configure publishing settings

Publishable entities

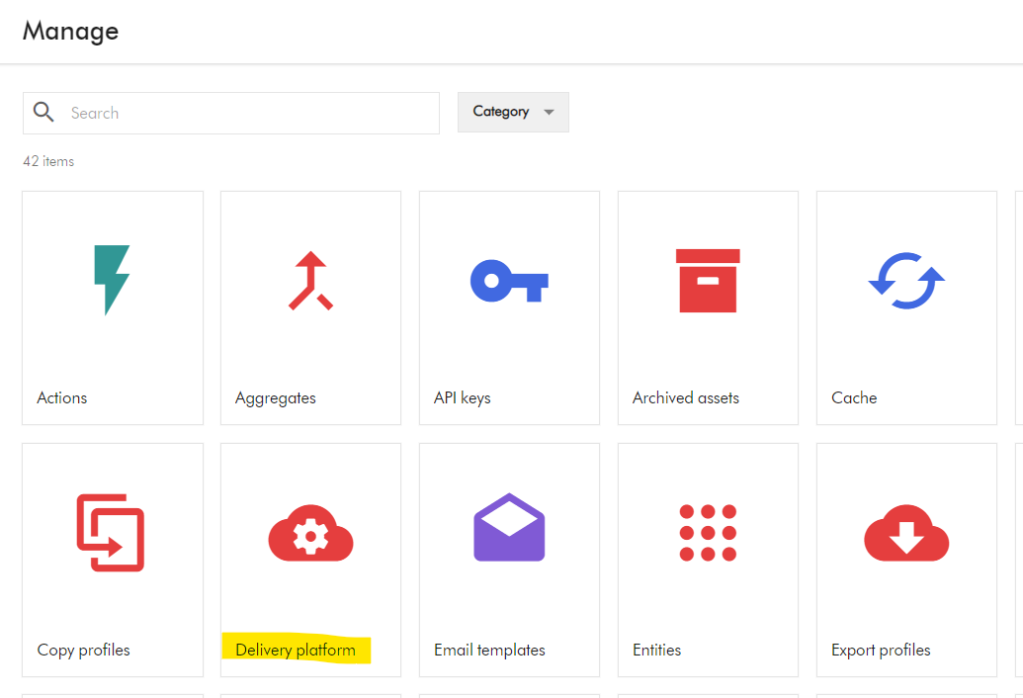
Once you have enabled Sitecore Experience Edge on your Content Hub instance, you will notice a Delivery Platform item is now added on your Manage screen, as shown below.

Sitecore Experience Edge - Delivery Platform icon on Manage screen

Click the Delivery platform icon above to navigate to the Delivery platform page, like the one shown below. On this page, you can choose which existing entities that you would like to publish or unpublish.

Sitecore Experience Edge Delivery platform page

You do this by clicking on the Icon next to your entities, which will launch a Delivery platform settings dialog box, similar to one shown below:

Sitecore Experience Edge - Delivery platform settings popup dialog

Enable Publish an entity definition

In the Delivery platform settings dialog box, turn on the Enable in delivery platform switch

Click Save & Publish.

Unpublish an entity definition

In the Delivery platform settings dialog box, turn off the Enable in delivery platform switch

Click Save & Publish

Verifying the Publish status

The publish status is now displayed next to the Delivery platform page title

Sitecore Experience Edge delivery platform publishing status

Next Steps

This completes this blog, where I have walked you through getting your Sitecore Experience Edge integration working. I hope you find this useful, and feel free to leave me any comments or thoughts.

In my next blog, I will be looking at integration between Sitecore Experience Edge and Sitecore Personalize. Stay tuned.

Sitecore Personalize and Mobile App projects series

Background

I recently started working on a project that primarily delivers content to end-users via a native mobile app. One of the key requirements I am working on is to deliver personalized content to end users of this mobile app.

This is my first opportunity to work with Sitecore Personalize in depth.

Wearing my architectural hat, and without re-inventing the wheel, I sought to look out for some reference architecture that I could build on.

There seems to be a lot of existing official Sitecore docs on Sitecore Personalize for both business users and developers. I will advise you will need some patience and time to go through the docs which have quite a lot of content.

If you prefer watching videos instead, the Sitecore Discover channel has done some justice to this topic too, especially the content from Dylan Young.

As much as the docs are very well written and the content is quite useful, I found myself jumping a bit to piece together my solution. This can be frustrating especially when Personalizing a Mobile App should be a common use-case you could imagine.

I have decided to document my journey on this project, so that I can share with you any learnings, tips, and tricks for Personalizing Native Mobile apps.

Mobile App Personalization reference architecture

Above is a reference architecture I have come up with for my solution.

At a very high level, my mobile app will consume content that is delivered on the Sitecore Experience edge. Sitecore Experience Edge is a set of services based on the Content as a Service (CaaS) model. It enables you to seamlessly deliver structured content across any channel that other applications and properties can easily consume.

The origin of this content published on the Sitecore Experience Edge could be either Sitecore Content Hub or Sitecore XM cloud. Sitecore Content Hub is a strategic enterprise solution that provides you with a variety of features centered around digital assets and marketing content.

Sitecore Personalize will leverage the Decisioning model, Omni-channel Experiences and Experimentation capabilities to provide all the required personalized content in the mobile app. This includes copy content, imagery and other media. I will be sharing step by step details on how to achieve this.

Sitecore Personalize can integrate with a Customer Data Platform (CDP) of choice, which I have left open for now. Please note I could decide to go with Sitecore CDP solution here too. The key feature here is to ingest customer profile data, to input into our Personalization decisioning engine.

I have introduced an Orchestration layer between my mobile app and the Sitecore Personalize, mainly for some security considerations that I will cover in detail a bit later in this blog series.

I will let you review and digest this high solution level architecture. Please leave me your initial thoughts and comments.

Next steps

In my next blog, I will deep dive into the two blocks from bottom of my reference architecture.