Introduction
We previously looked at how to leverage action scripts to simply how to access content and linked assets with a single web API call. In this blog post, we follow up with a deep dive into the code and logic within the action script itself.
The script
The first part of the script is shown below.

- Line 1 to 5 has all the required libraries being used in the script
- Line Line 7 & 8 has logic for extracting the id of the content item, which we are gathering the data in this script. Data from the web API request is specified in Context.Data, which is a JToken. The script expects it to be a JObject containing a contentId property.
- Line 10 to 14 contains logic for checking whether the content id could not be extracted from the data. In which case, a response http status-code 400 (bad request) together with a user-friendly error-message is returned. This is done with help of helper function SetError, as shown below:

- Line 16 to 19 contain the EntityLoadConfiguration we are going to use when loading the assets linked to our content item. Only Filename, Title and Description as well as AssetToSubtitleAsset relation will be loaded in our use case.
- Line 21 to 24 similarly contain the EntityLoadConfiguration we are going to use when loading the content item (our blog post content type). Blog_Title, Blog_Quote, Blog_Body as well as CmpContentToMasterLinkedAsset & CmpContentToLinkedAsset relations will be loaded here. CmpContentToMasterLinkedAsset relation holds the link to the master image associated with this item. CmpContentToLinkedAsset relation has the assets linked with this item, such as the video asset.
- Line 26 to 31 contain the logic for loading the content (Blog post), by leveraging MClient.Entities.GetAsync function and specifying the content id and the EntityLoadConfiguration already defined above. We have a check on line 27 whether the content entity was actually found, and return a response http status-code 400 (bad request) together with a user-friendly error-message, when none was found.
- Line 33 to 37 start preparing the output object for our script. We have created a new JObject which has the shown properties. We have added the values of properties Blog_Title and Blog_Quote and Blog_Body. We are going to add more properties as we walk through the rest of the script.
Second part of the script
The code listing from line 39 through to 83 has the logic for loading the video asset linked with this content item.

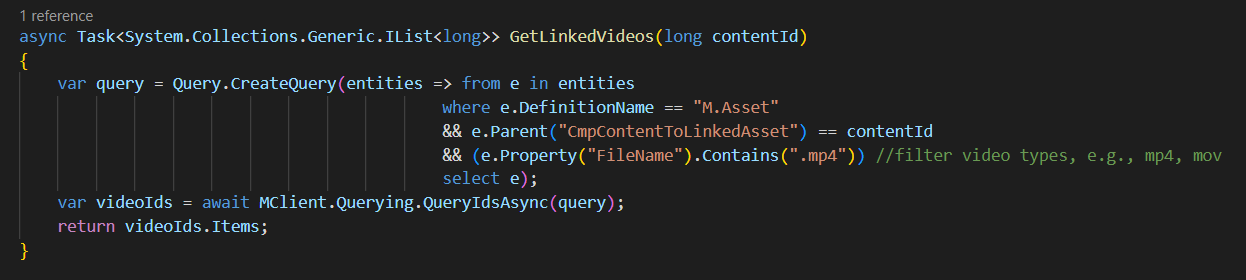
- Line 39 get the list of video asset ids by using a helper function GetLinkedVideos shown below. This function makes use of the LINQ query, which filters down only entities of type M.Asset which are linked to current content id (parent in the CmpContentToLinkedAsset relation). In my use case, I have used the file extension .mp4 to identify video asset (but you could use any other property or combination of properties to meet your specific use cases)
- Line 40 checks if our GetLinkedVideos found any video ids, in which case the rest of the logic will try and process them
- Line 42 extract the first video id that was found. I have used the MCient.Logger.Info method to log user friendly messages that helped me show which video ids were found. These message appear on the Action Script’s View Logs window.
- Line 45 to 46 contain the logic for loading the video asset entity, by leveraging MClient.Entities.GetAsync function and specifying the video asset id and the EntityLoadConfiguration already defined before in first part of the script. Line 46 checks to ensure the video asset was found, for us to do further processing
- Line 48 and 49 contains the logic for getting the video asset public link, which is required as part of the output from the script. On line 48, I am leveraging GetPublicLinks function, which I have defined as shown below. I am interested in the original rendition of my video asset. Please note that if the video asset does not have original public link generated, nothing will be retrieved.

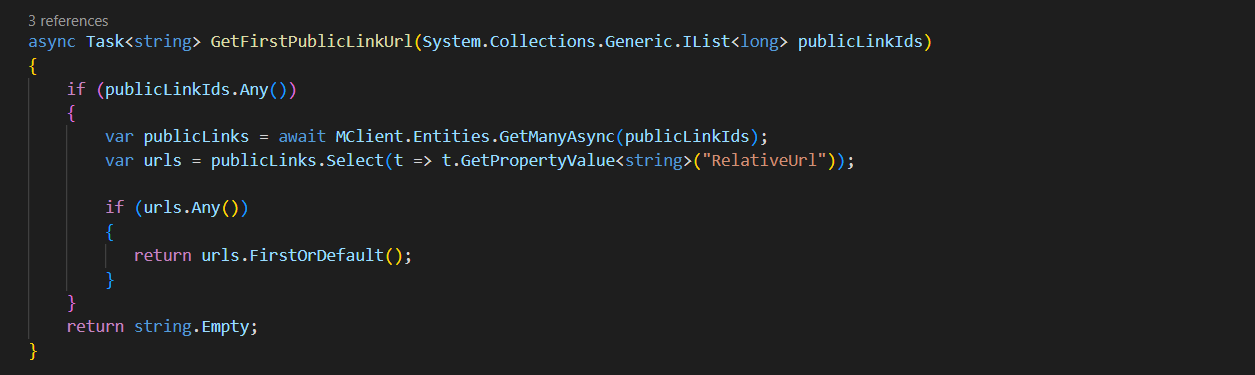
- Which is why the code on line 49 further makes use of a function named GetFirstPublicLinkUrl which helps load the M.PublicLink entity and inspect the RelativeUrl property, as shown below.
- Line 50 to 55 we are now creating a new JObject which has the shown properties as expected the output of the script. This object is added to videoAsset section of our main result object.
- Line 57 contain logic for getting the video asset subtitles. The AssetToSubtitleAsset is a IParentToManyChildrenRelation, so we get hold of subtitles using the Children property from this relation. In essence, a video subtitle is an asset in its own right. So the code listing from Line 59 is trying to load each of the subtitle asset and we are interested in the Title property as well as the Public Link (original rendition). This is now familiar to how we got public link for the video asset itself. We add each of these properties in a JArray, which in turn, is added to the result.
Part three of the script
In the last part of the script, we also get the master asset linked to our content item. In this case, we are interested in the asset Public Link, asset file name, Blog_Title and Blog_Body properties. We create a new JObject which has the shown properties as expected and added to the result object.
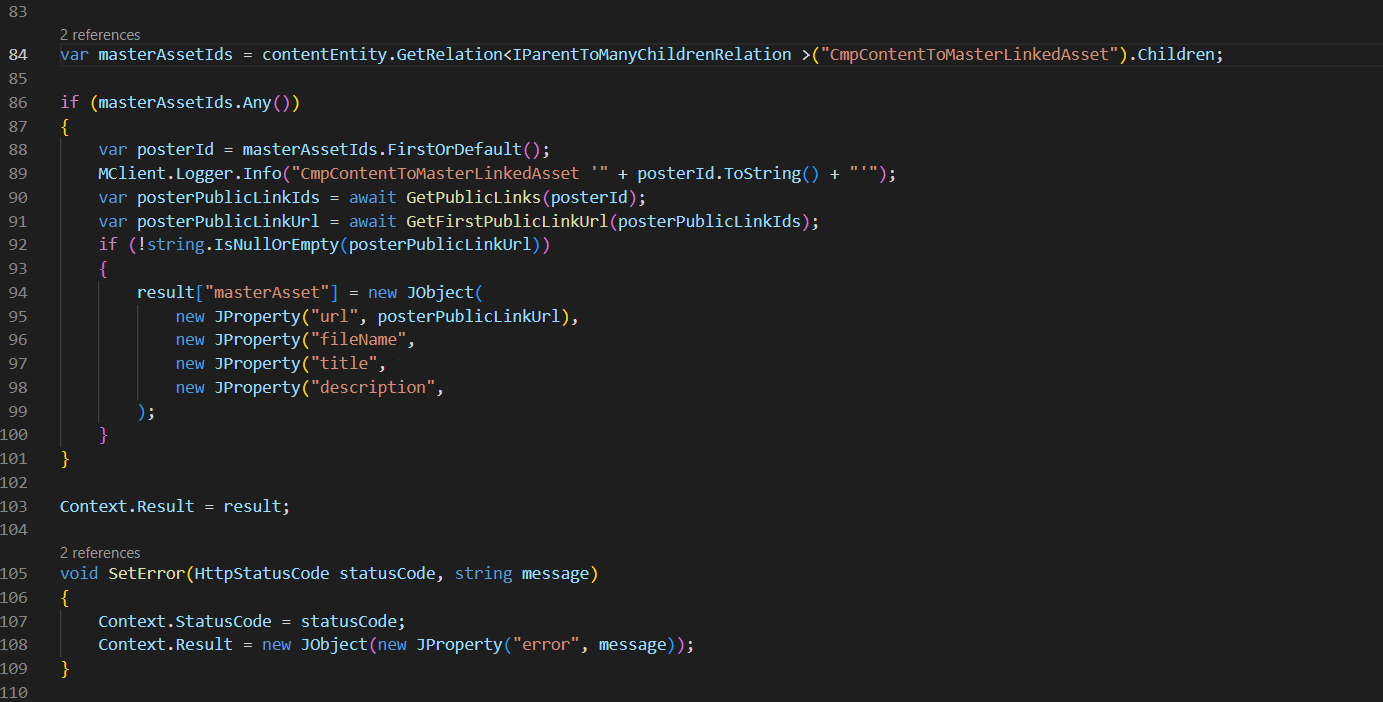
Line 103 stores our result object that we have been preparing onto the Context. This tells the script to return it to the user.
Final script output
The script output is similar to the one shown below.

This completes the code listing for this script.
Next steps
In this blog post, I have looked at the second part of the Content Hub Action Scripts for Web API use cases. We have taken a deep dive into the source code for the script, covering the various components and how they work together. For a practical use cases, look at my blog post on how I have created a custom connector for publishing video assets from Content Hub into Cloudflare Stream
Stay tuned and leave us any feedback or comments.