
Context
The Agentic studio in SitecoreAI brings human-AI collaboration into everyday marketing work, embedding AI directly into marketing workflows. Sitecore are doing a fantastic job behind the scenes to evolve, enhance and add new capabilities to SitecoreAI’s Agentic Studio.
With the March 30 2026 release, the Agentic studio focuses on working directly with your content, expanding how agents can be built and configured, and supporting larger workflows across multiple items and steps.
This release caught my eye, and I decided to dig deep into the nature of the updates to the agents, and try them first-hand with a practical agent.
In this blog post, I will be creating an agent using SitecoreAI’s Agentic studio,complete with screenshots for all the key steps involved. In particular, put to test working SitecoreAI pages and calling external APIs.
What are they key updates to agents?
- You can run agents directly on your content. Agents are structured to work with context, items, and tools as part of your day-to-day workflows. For example, agents can directly work with items like SitcoreAI pages, briefs, artifacts and CSV files
- Work with items – agents can run on items like SitecoreAI pages, briefs, artifacts, and CSV files. Agents process selected items across parameters (like languages) to generate outputs for each combination. They also enable content at scale from structured inputs, such as accounts in a CSV.
- Use built-in tools and features – chat interfaces across Agentic studio let you set context, skills, MCPs, and tools for each run, giving you more control over how the agent behaves.
- You have more flexibility to create and customize your own agents. You can define and configure agents and workflows to match your needs. Below is a summary verbatim from Sitecore release notes:
- Create standard agents – define standard agents with instructions, tools, skills, context, and output formats for a flexible, chat-style experience.
- Add new workflow actions – create workflow agents that support invoking standard agents, calling external APIs, and invoking Agent API tools.
- Manage skills and tools – a Settings page brings together tools, skills, schemas, templates, user management, and job tracking.
- Use agent skills – apply built-in agent skills such as campaign planning, competitive analysis, and CSV/text processing, or create your own.
- Reuse schemas and templates – JSON schemas and HTML templates are managed globally by admins and reused across agents.
- Test workflows – agent workflows can be tested with step-by-step visibility, including timing and error reporting.
Let us now put this to test – create an agent that invokes external API
Below we are going to create an X/Twitter Single Tweet Generator, a workflow agent that you can leverage to post on your X/Twitter.
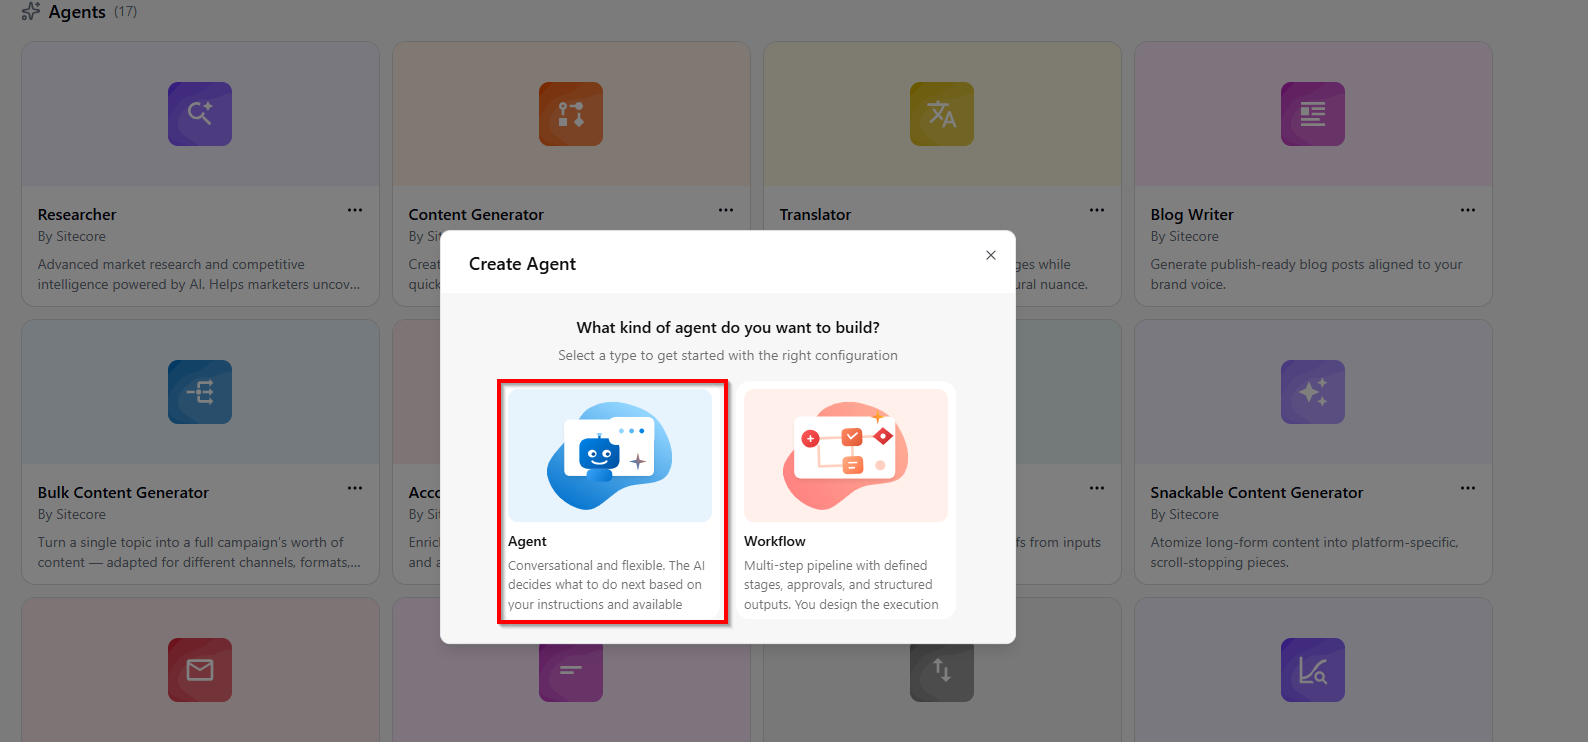
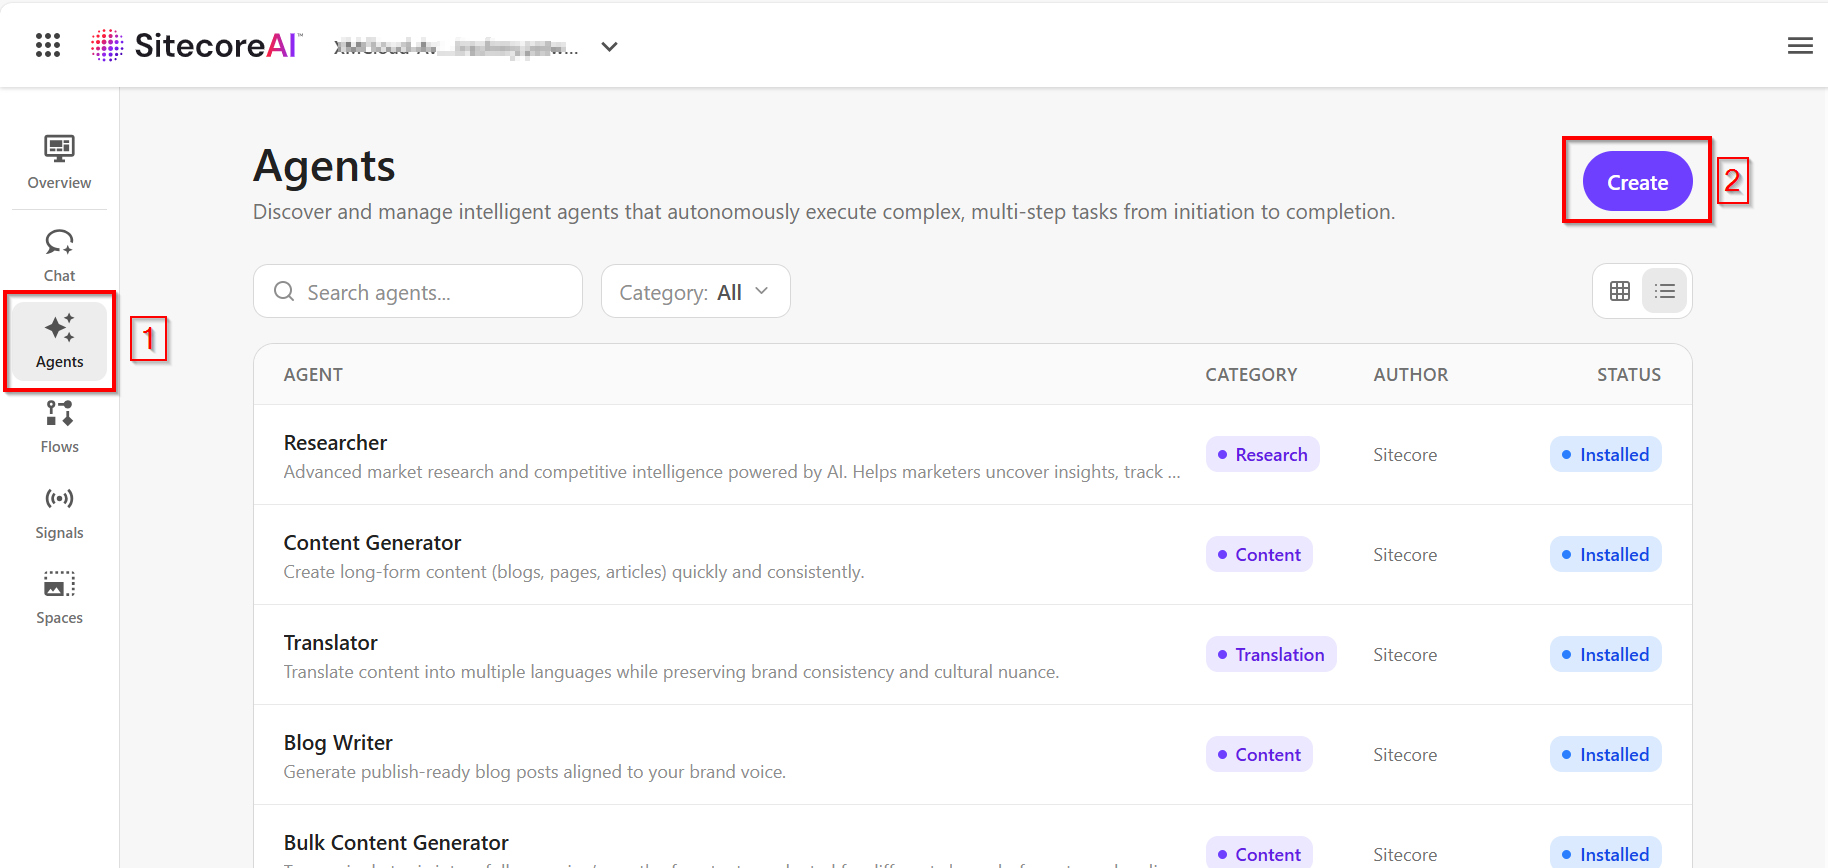
Step 1: In Agentic Studio, click on Create button.
Please note you need a “Builder licence” within SitecoreAI to create new Agents.
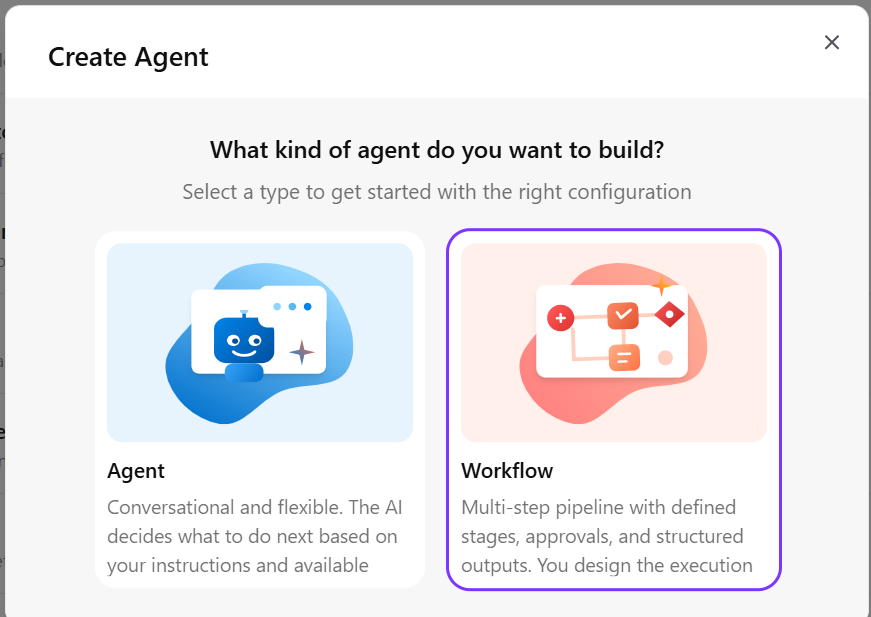
- On the Create Agent popup, select Workflow option
Step 2: Define the overivew.
- On the New Workflow overview page, specify the workflow agent configuration, as shown below
- Workflow ID – Unique identifier for this workflow (cannot be changed after creation)
- Name– Display name for this workflow
- Description – a short summary of what the agent does.
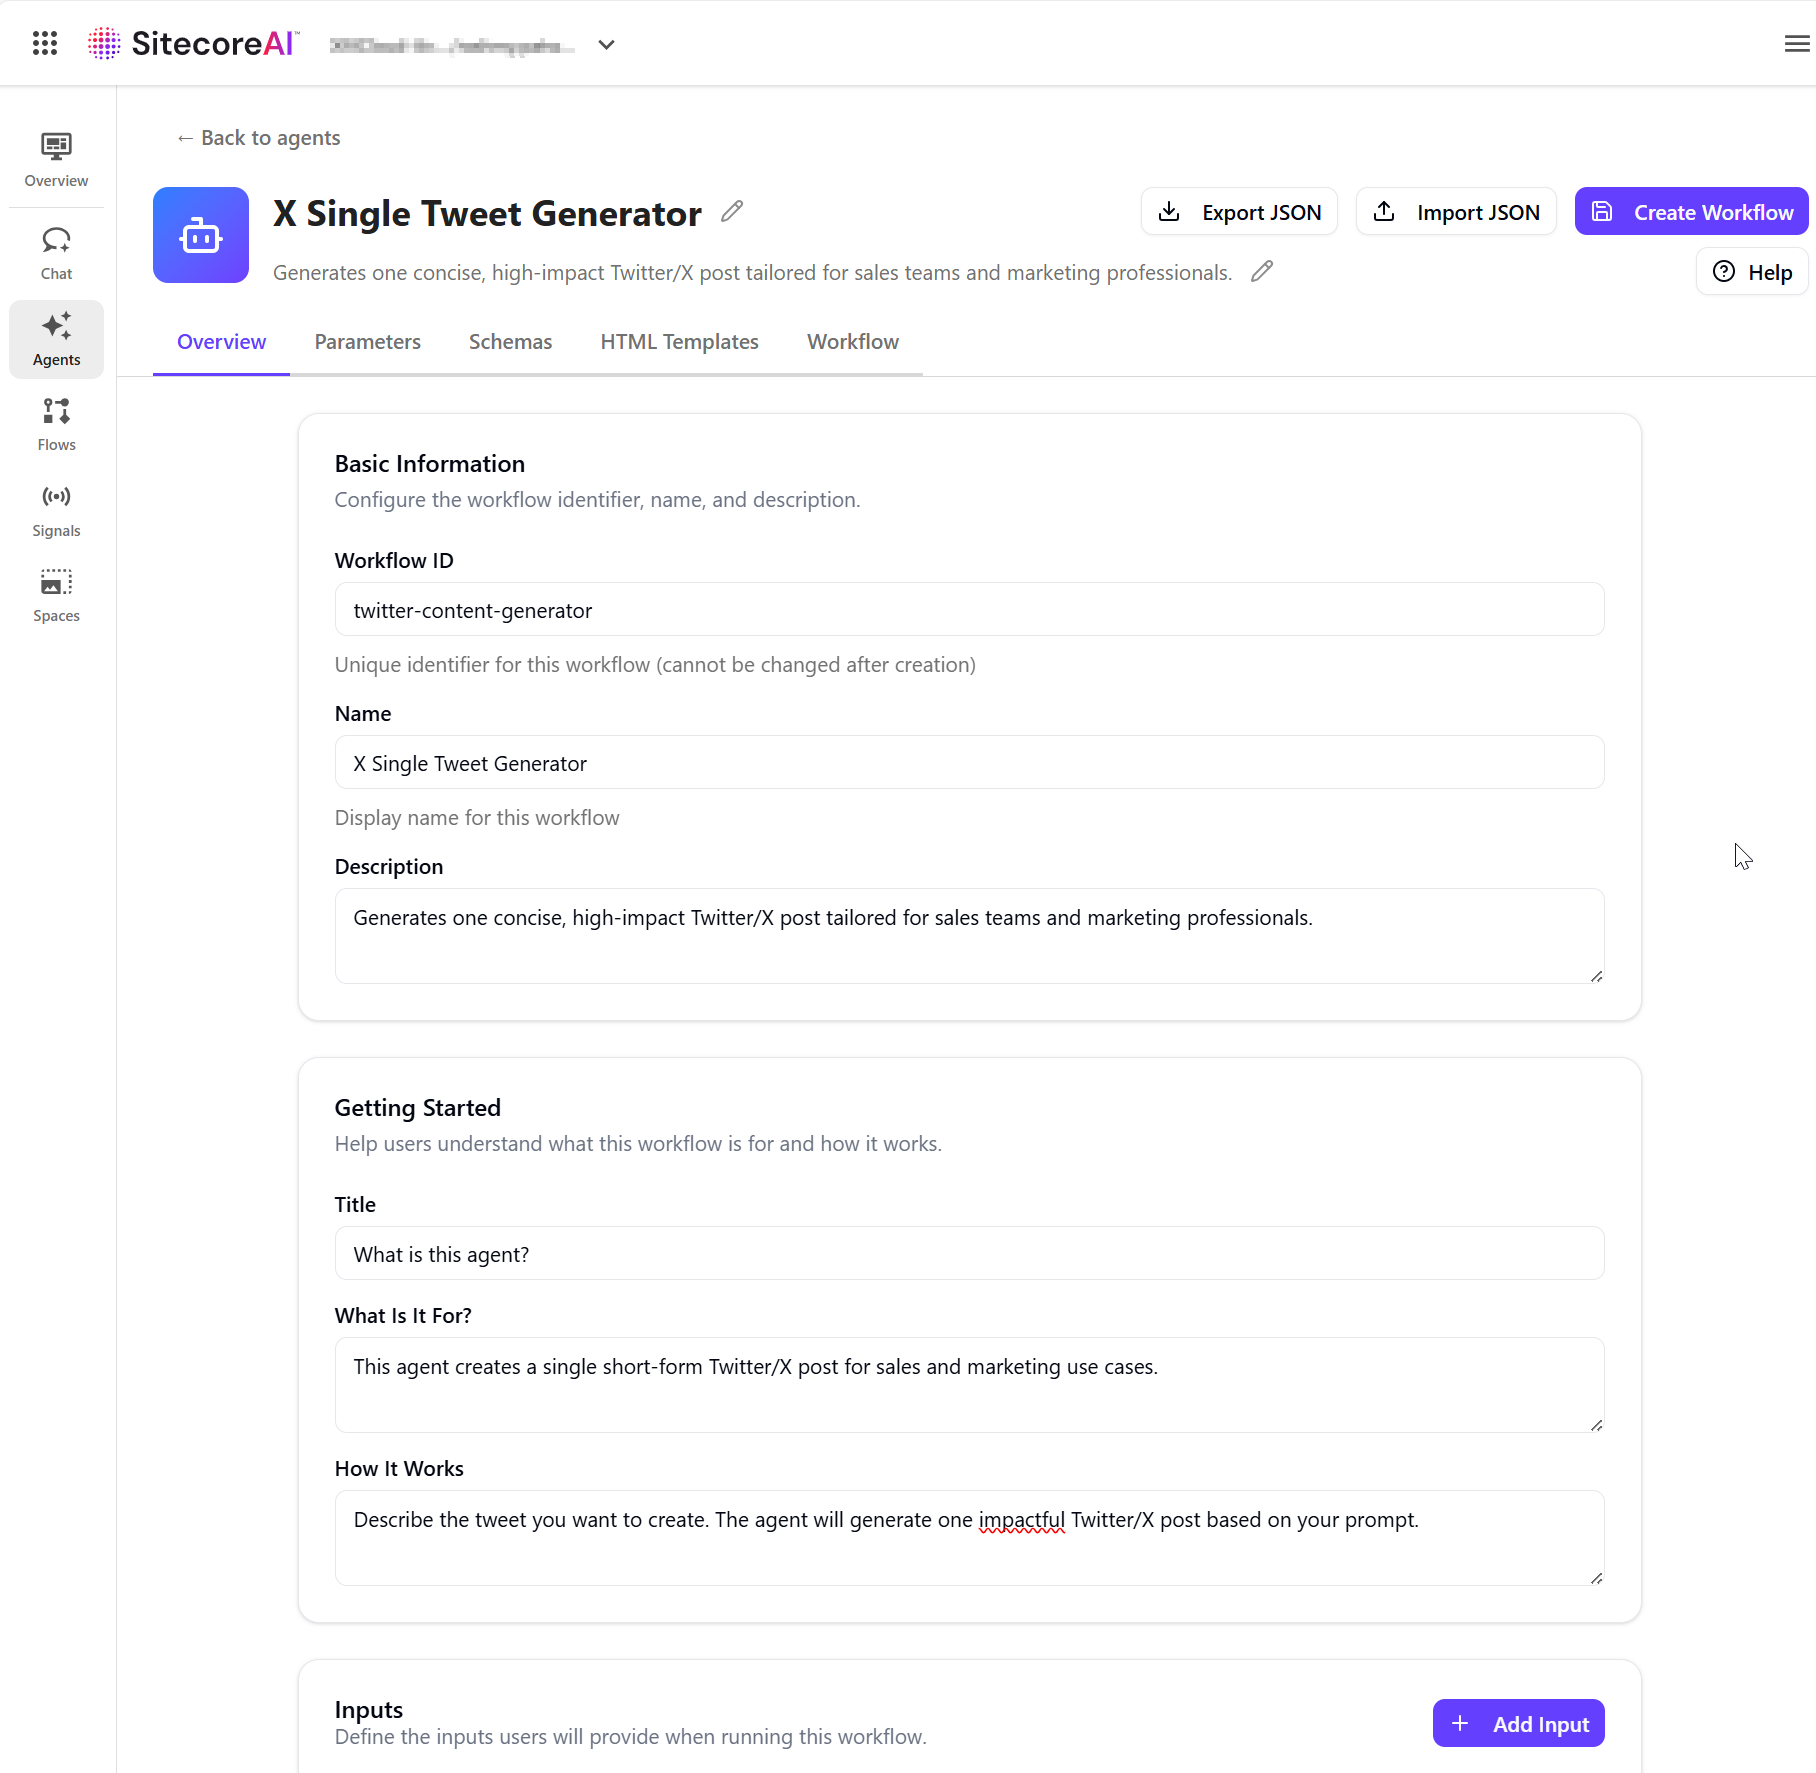
- In the Getting Started section, provide the content that appears on the agent run page:
- Title – a short heading.
- What is it for – the agent’s purpose.
- How it works – how inputs are used and what the agent generates.
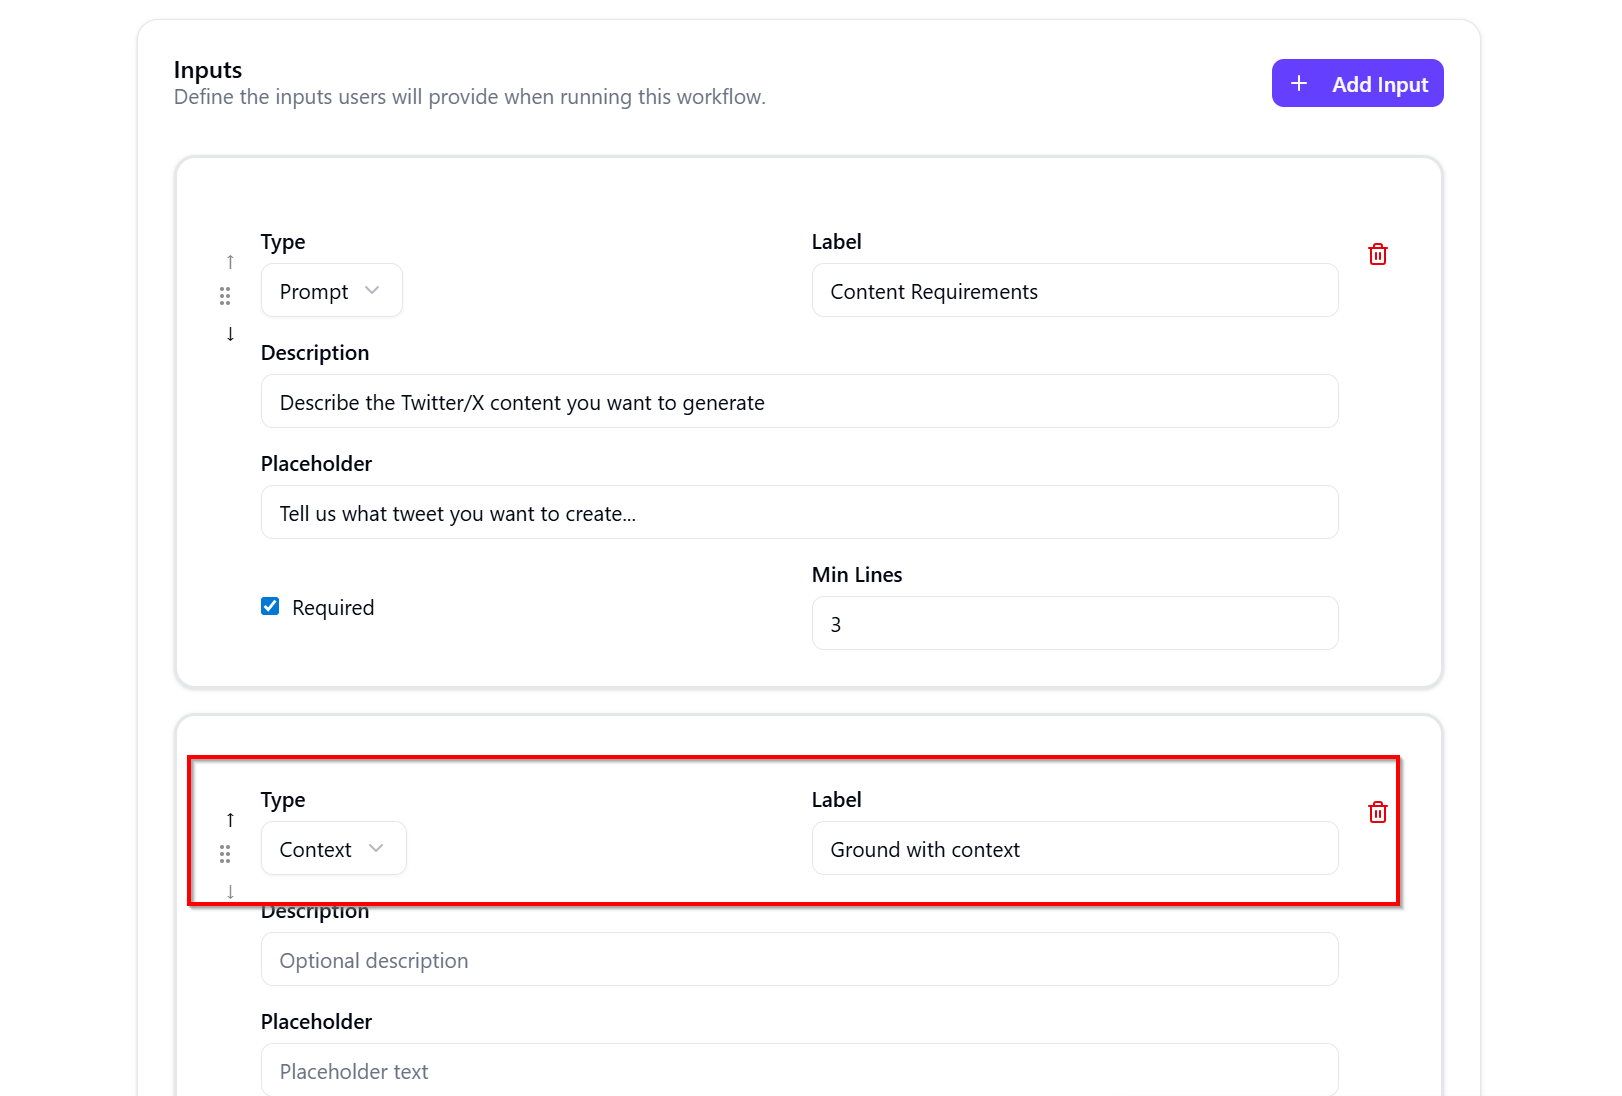
- In the Inputs section, click Add Input to define required user inputs:
- Type – the input type, such as Prompt.
- Label – the field name shown to users.
- Description – guidance for what uses should enter.
- Placeholder text – example content displayed in the field.
- Required – whether the input is mandatory.
- Min Lines – the minimum number of input lines.
- Important: Include input of Type Context to enable you to work with SitecoreAI pages for example. As shown below
- Click Create Workflow to save your changes.
Step 3: Configure the parameters
Parameters are needed to influence how the agent generates content. Parameters allow users to select options such as language, audience, or region, helping the agent adapt its output based on those selections.
We won’t need any parameters for this workflow agent
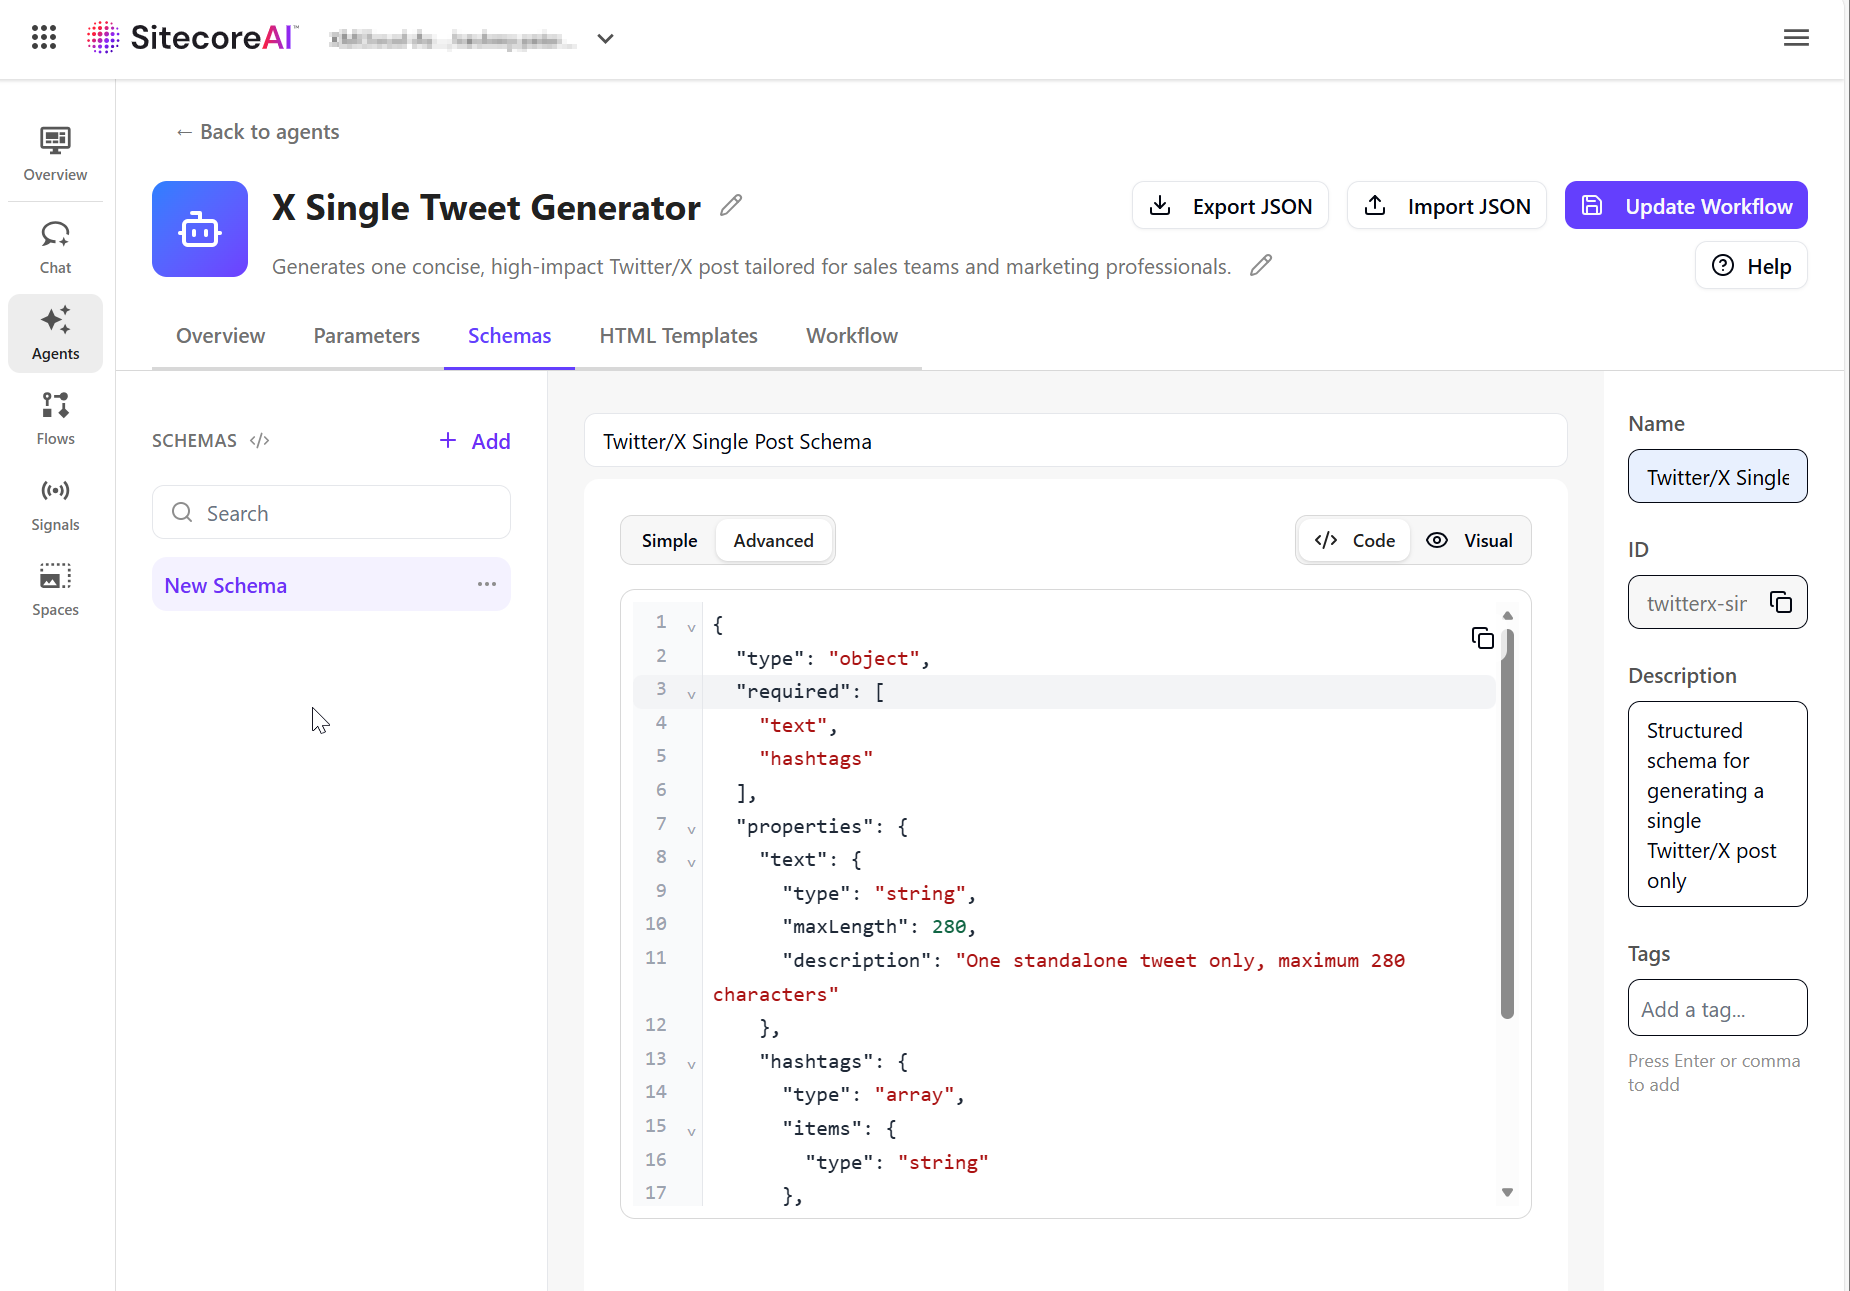
Step 4: Define a schema
To enforce a structured output, we will define a JSON schema. This ensures the agent produces consistent, structured output that can be validated and also re-usable.
- On the Schemas tab, click Add.
- In the right pane, provide the following:
- Name – the schema name.
- Description (optional) – what the schema is used for.
- Define the JSON structure for the output. You can use Simple mode or Advanced mode to define the schema manually using either the Code or Visual editor.
- Click Update Workflow to save your changes, as shown below
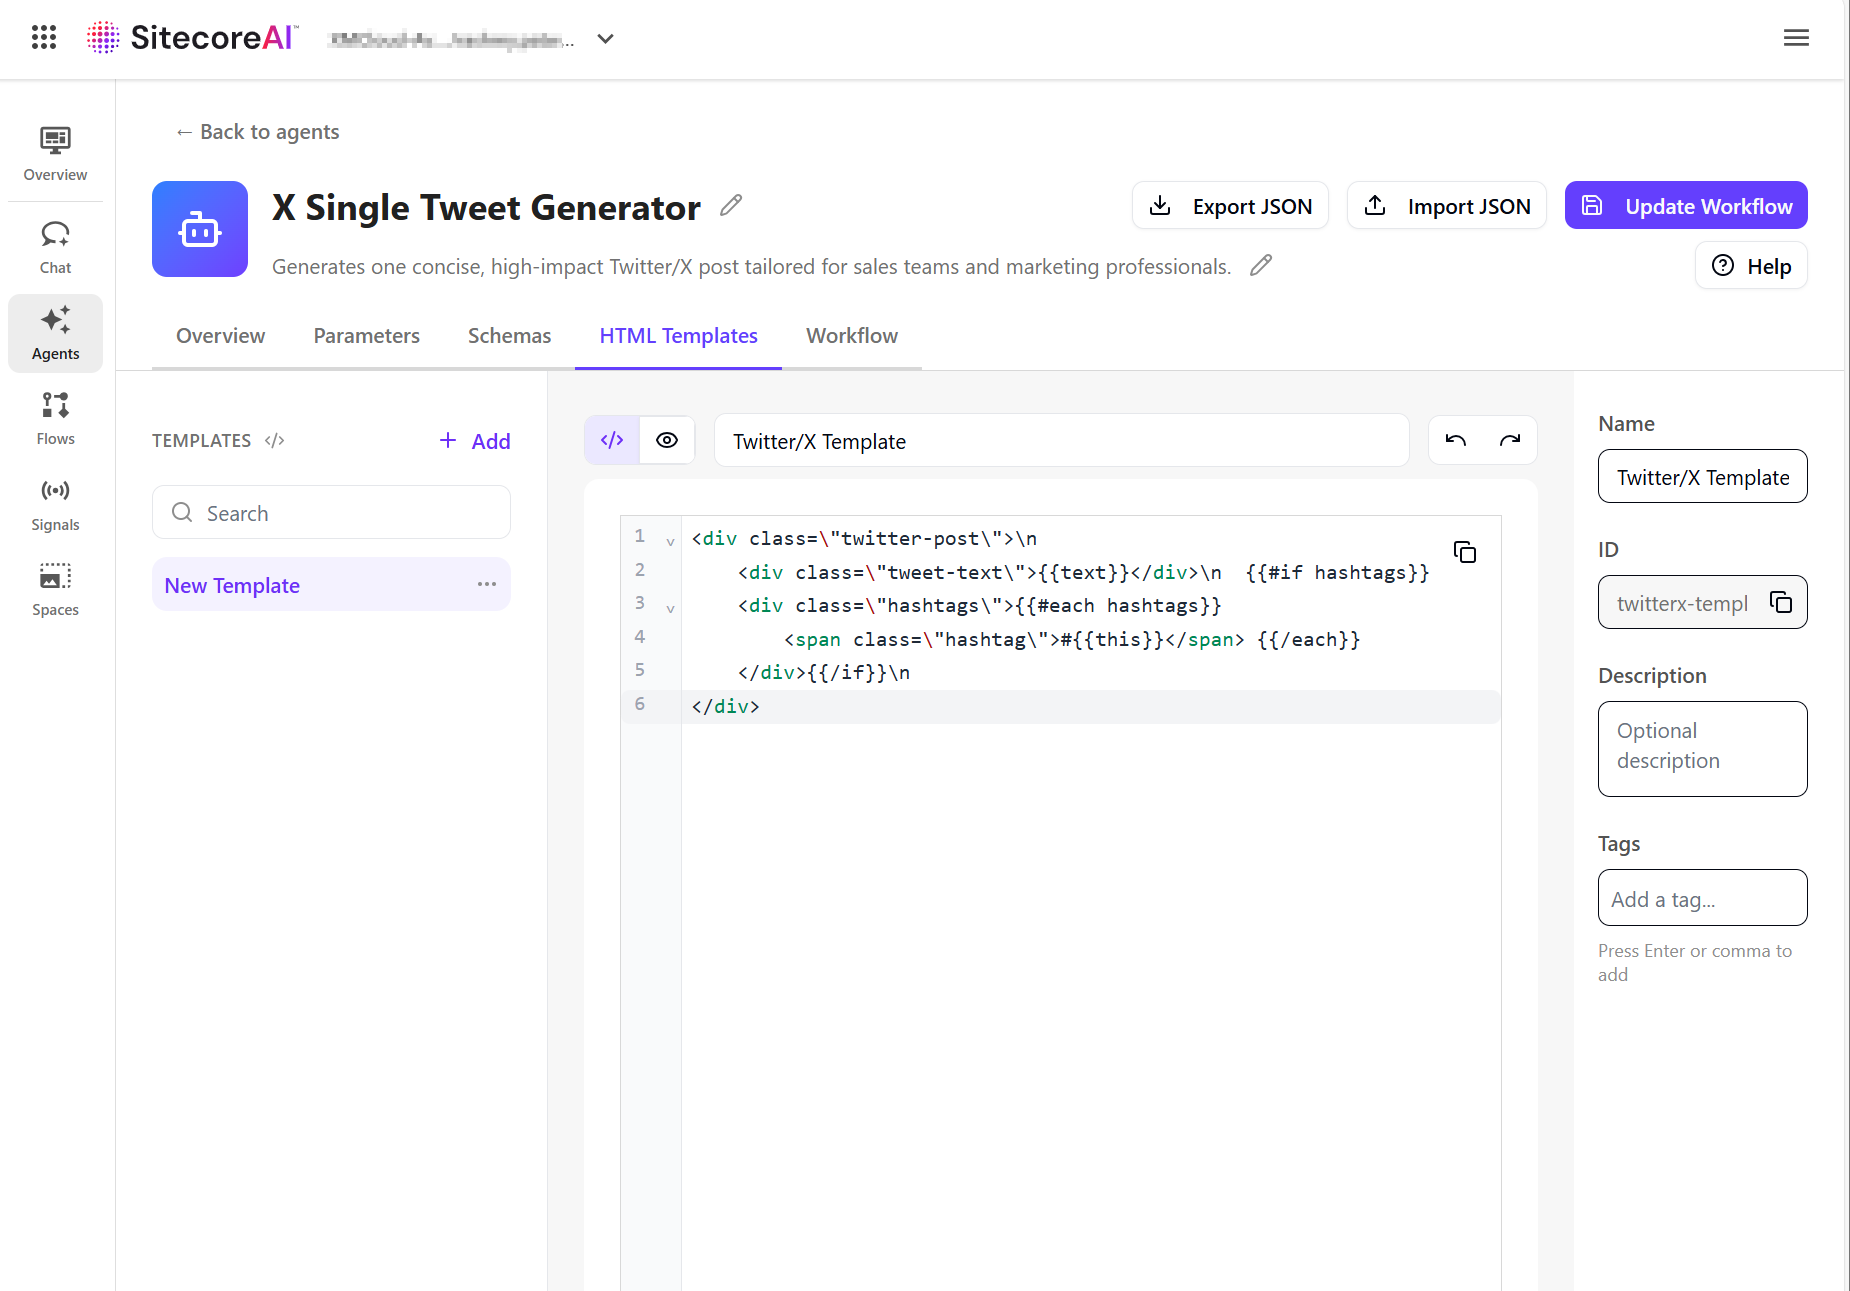
Step 5: Define an HTML template
Use the HTML Templates tab to define how the agent’s output is displayed. Templates use Handlebars syntax to map structured data into a layout.
- On the HTML Templates tab, click Add.
- In the right pane, provide the following:
- Name – the template name.
- Description (optional) – what the template is used for.
- Define the HTML structure using schema fields. Use Handlebars syntax to map values from the schema into the template in the Code editor.
- Click Update Workflow to save your changes, as shown below
Step 6a: Build and test the agent workflow
On the Workflow tab, design the sequence of actions that the agent will be executing. To build the agent workflow:
- On the Workflow tab, the canvas includes a Manual Trigger action as the starting point. Click Add Step to add a new action.
- In the right pane, on the Properties tab, the list of available actions appears. Select an action to add it to the canvas.
- Drag from the dot on one action to the dot on another to connect them into a workflow step. Actions run sequentially based on how they are connected.
- To configure the action, select an action on the canvas and adjust its settings in the Properties pane.
- Depending on the selection, you might need to configure the action’s inputs and output variables, system prompts, message templates, linked HTML templates and schemas, and artifact storage options.
- Repeat the process to build out your workflow as needed.
- To delete an action or connector, select it on the canvas and press Backspace.
- Below is the full workflow for our X Single Tweet Generator
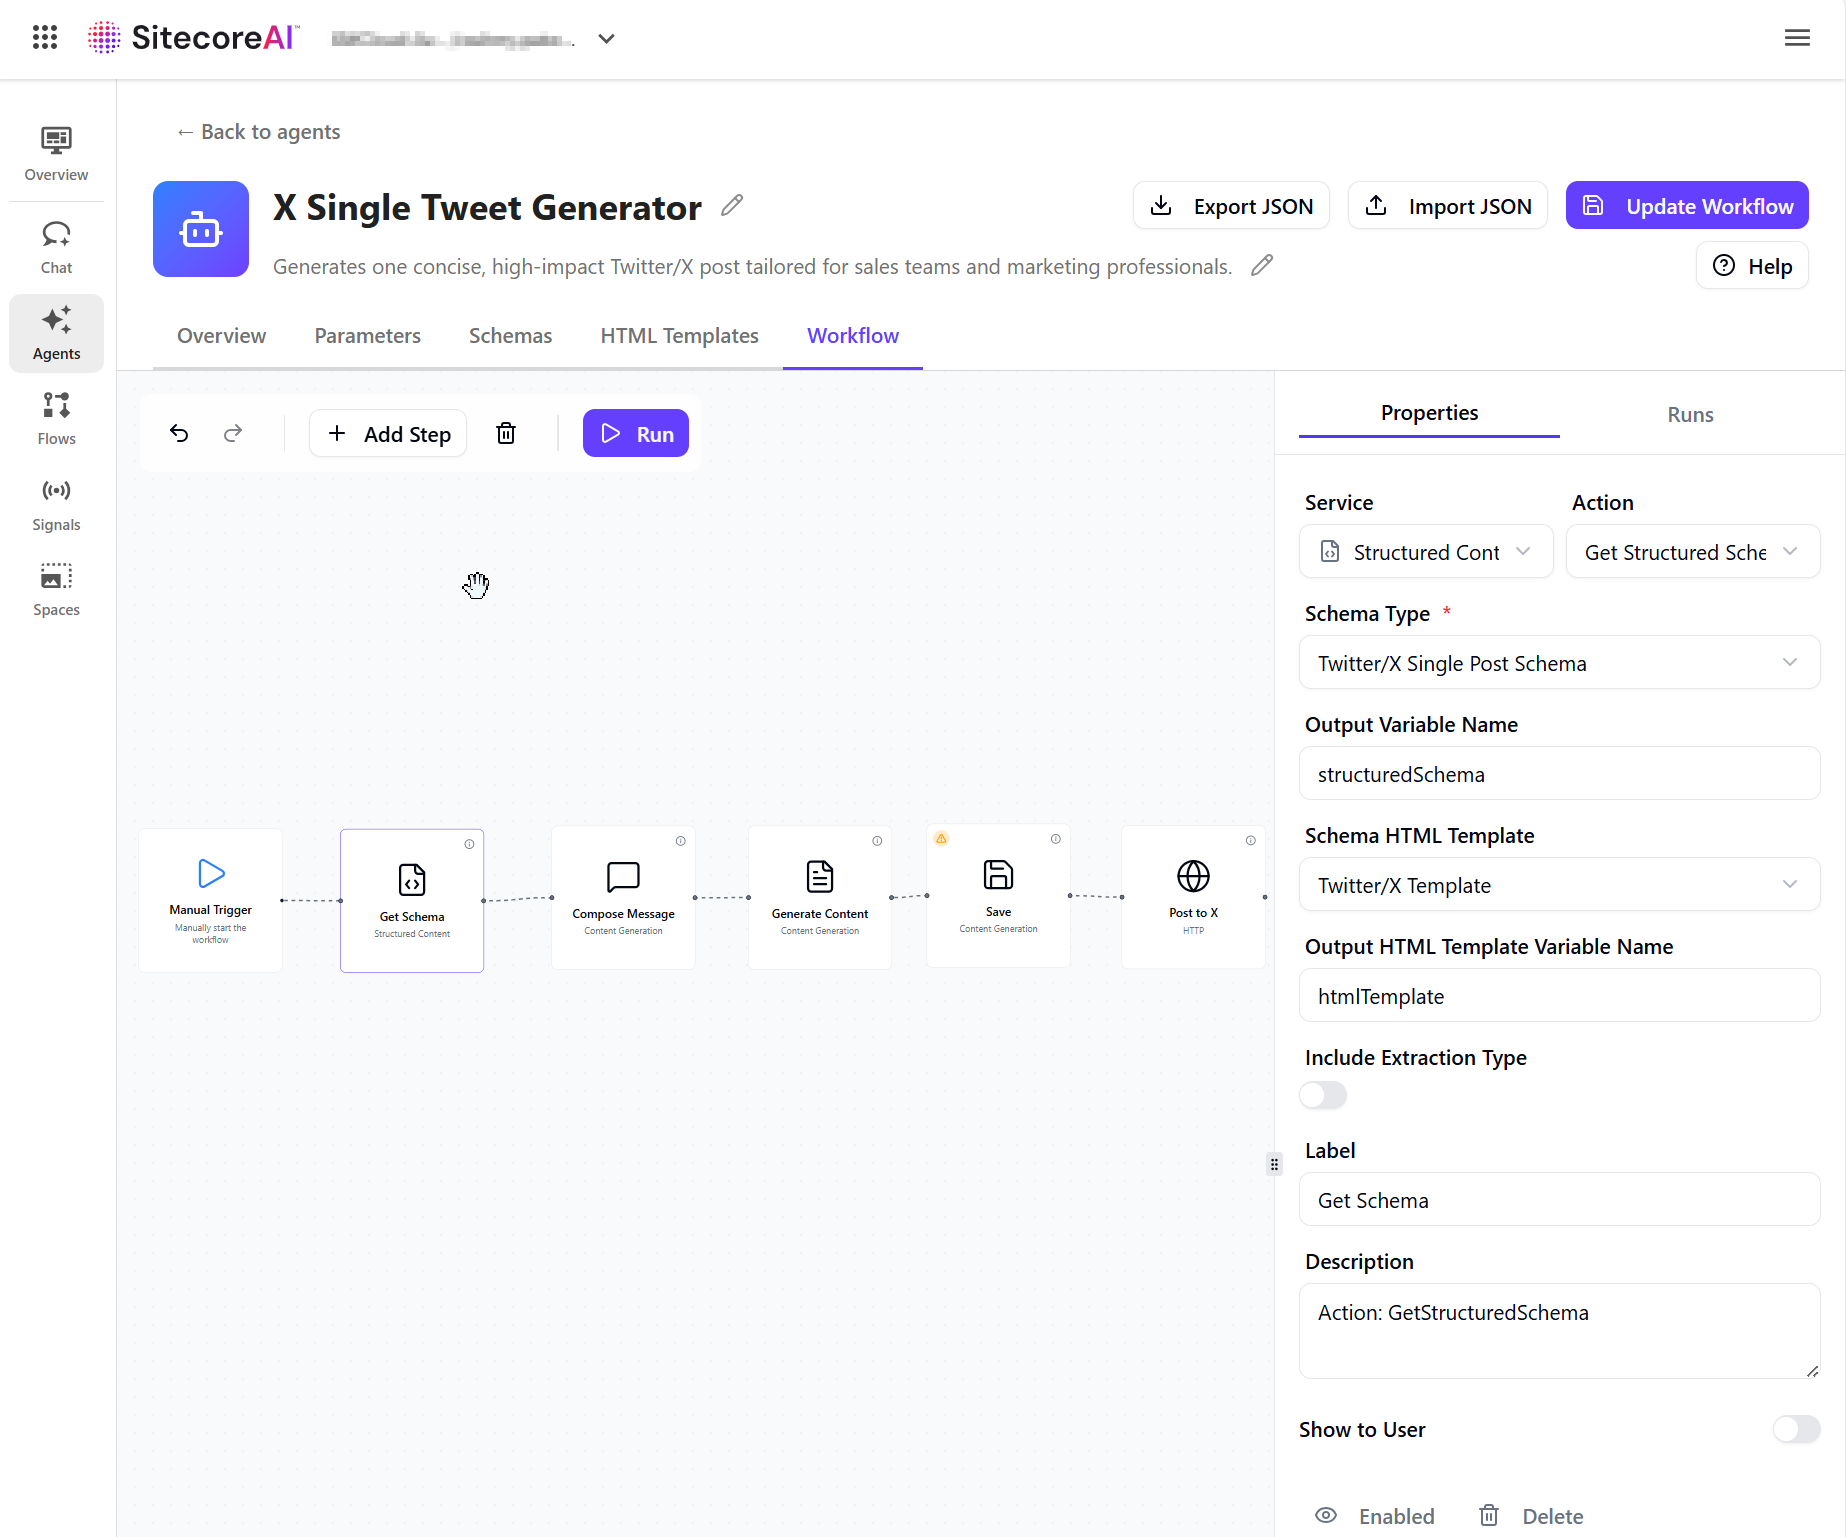
Step 6b: Configuring an HTTP Request action
An HTTP Request action is used to send generated content to an external endpoint. In our case, to push the Tweet to Twitter/X.
The HTTP Request action retrieves the generated tweet from the previous step and sends it to the specified endpoint as a JSON payload.
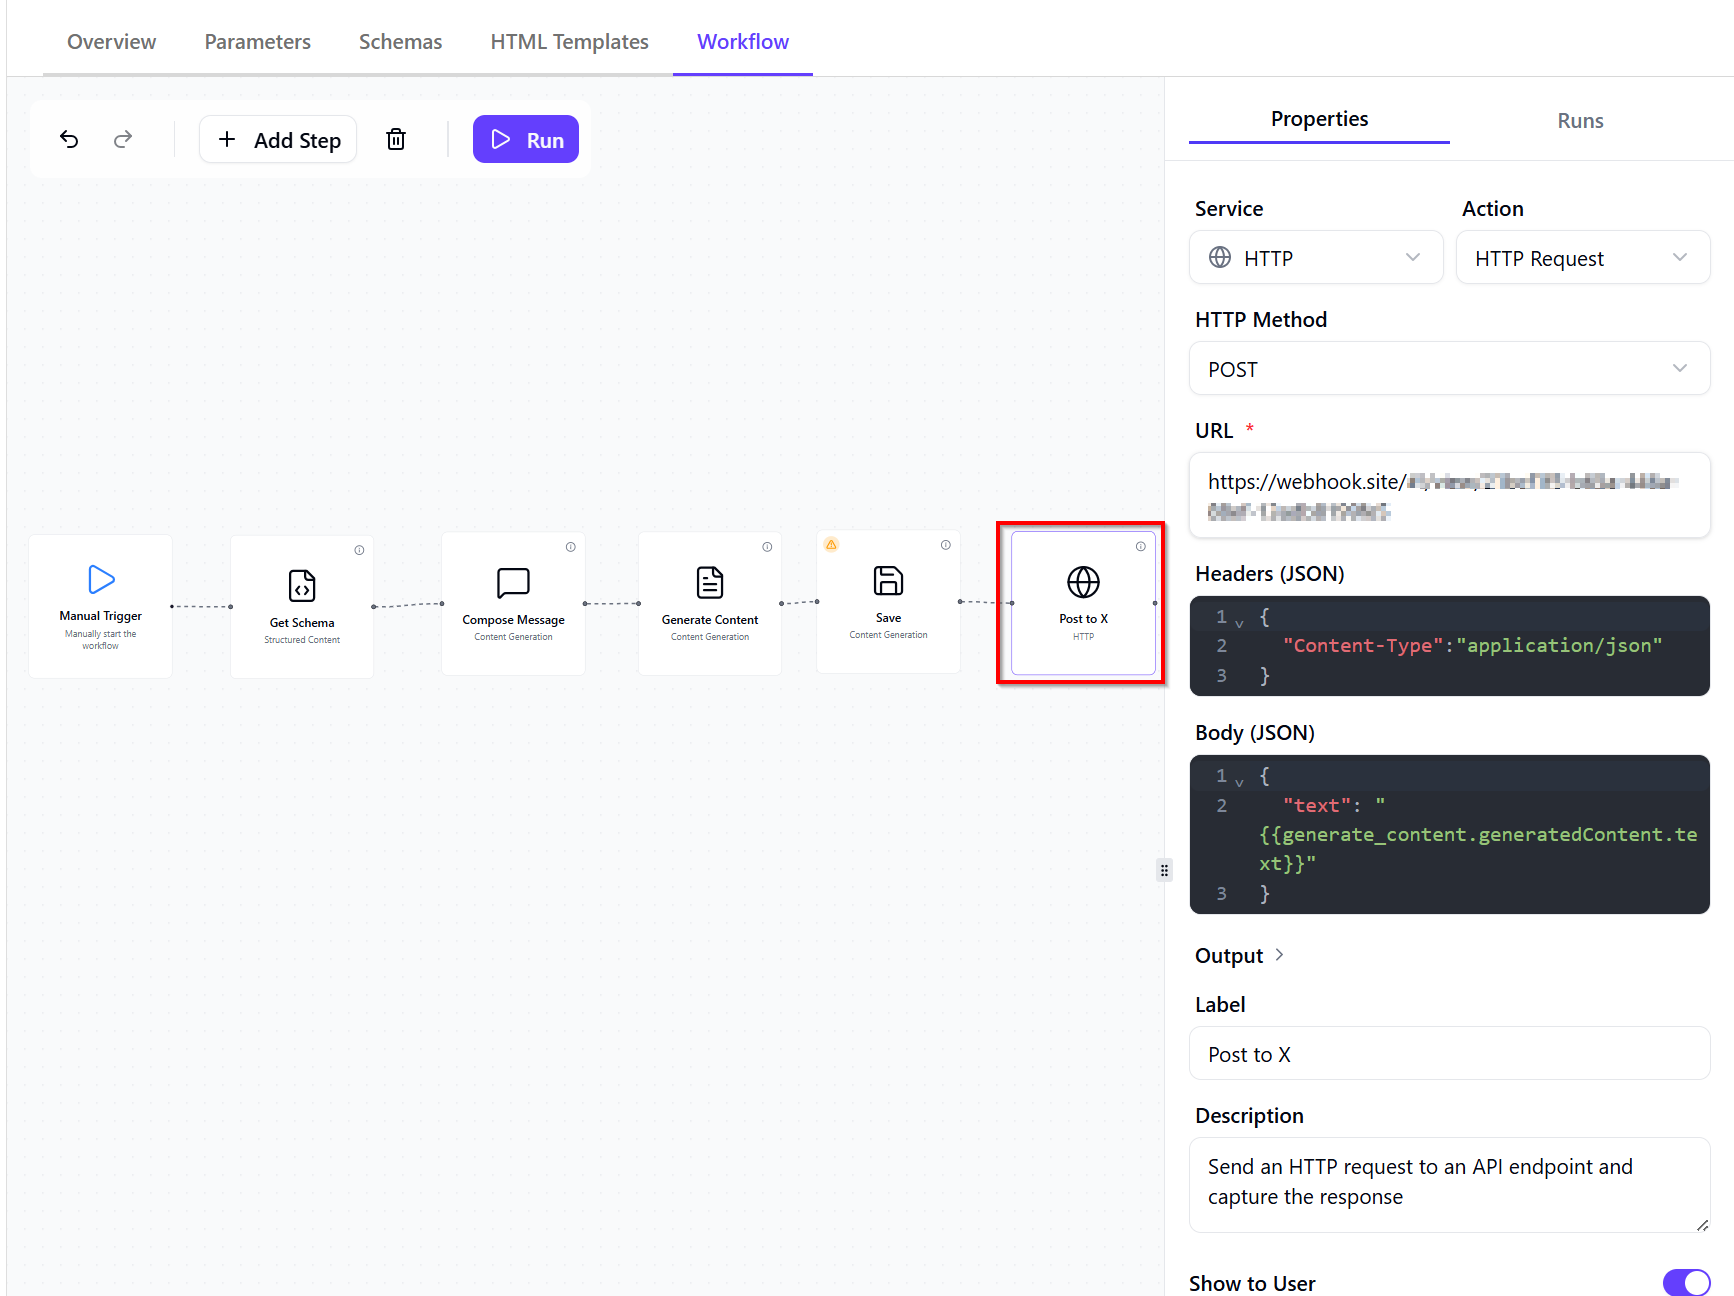
It has the following configuration as shown below:
- HTTP Method – POST (used to send the generated content to an API)
- URL – the destination endpoint where the request will be sent.
- Headers – define request metadata, typically including content type and authentication.
- Body (JSON) – the payload sent to the API. This is where you pass data from previous workflow steps using variables. Ensure the variable correctly maps to the output of the generation step.
Agent JSON – The full listing of the JSON of the this agent is available in this Gist for reference. You can import it into the workflow editor to test or explore further for your use cases.
Step 7: Testing the agent
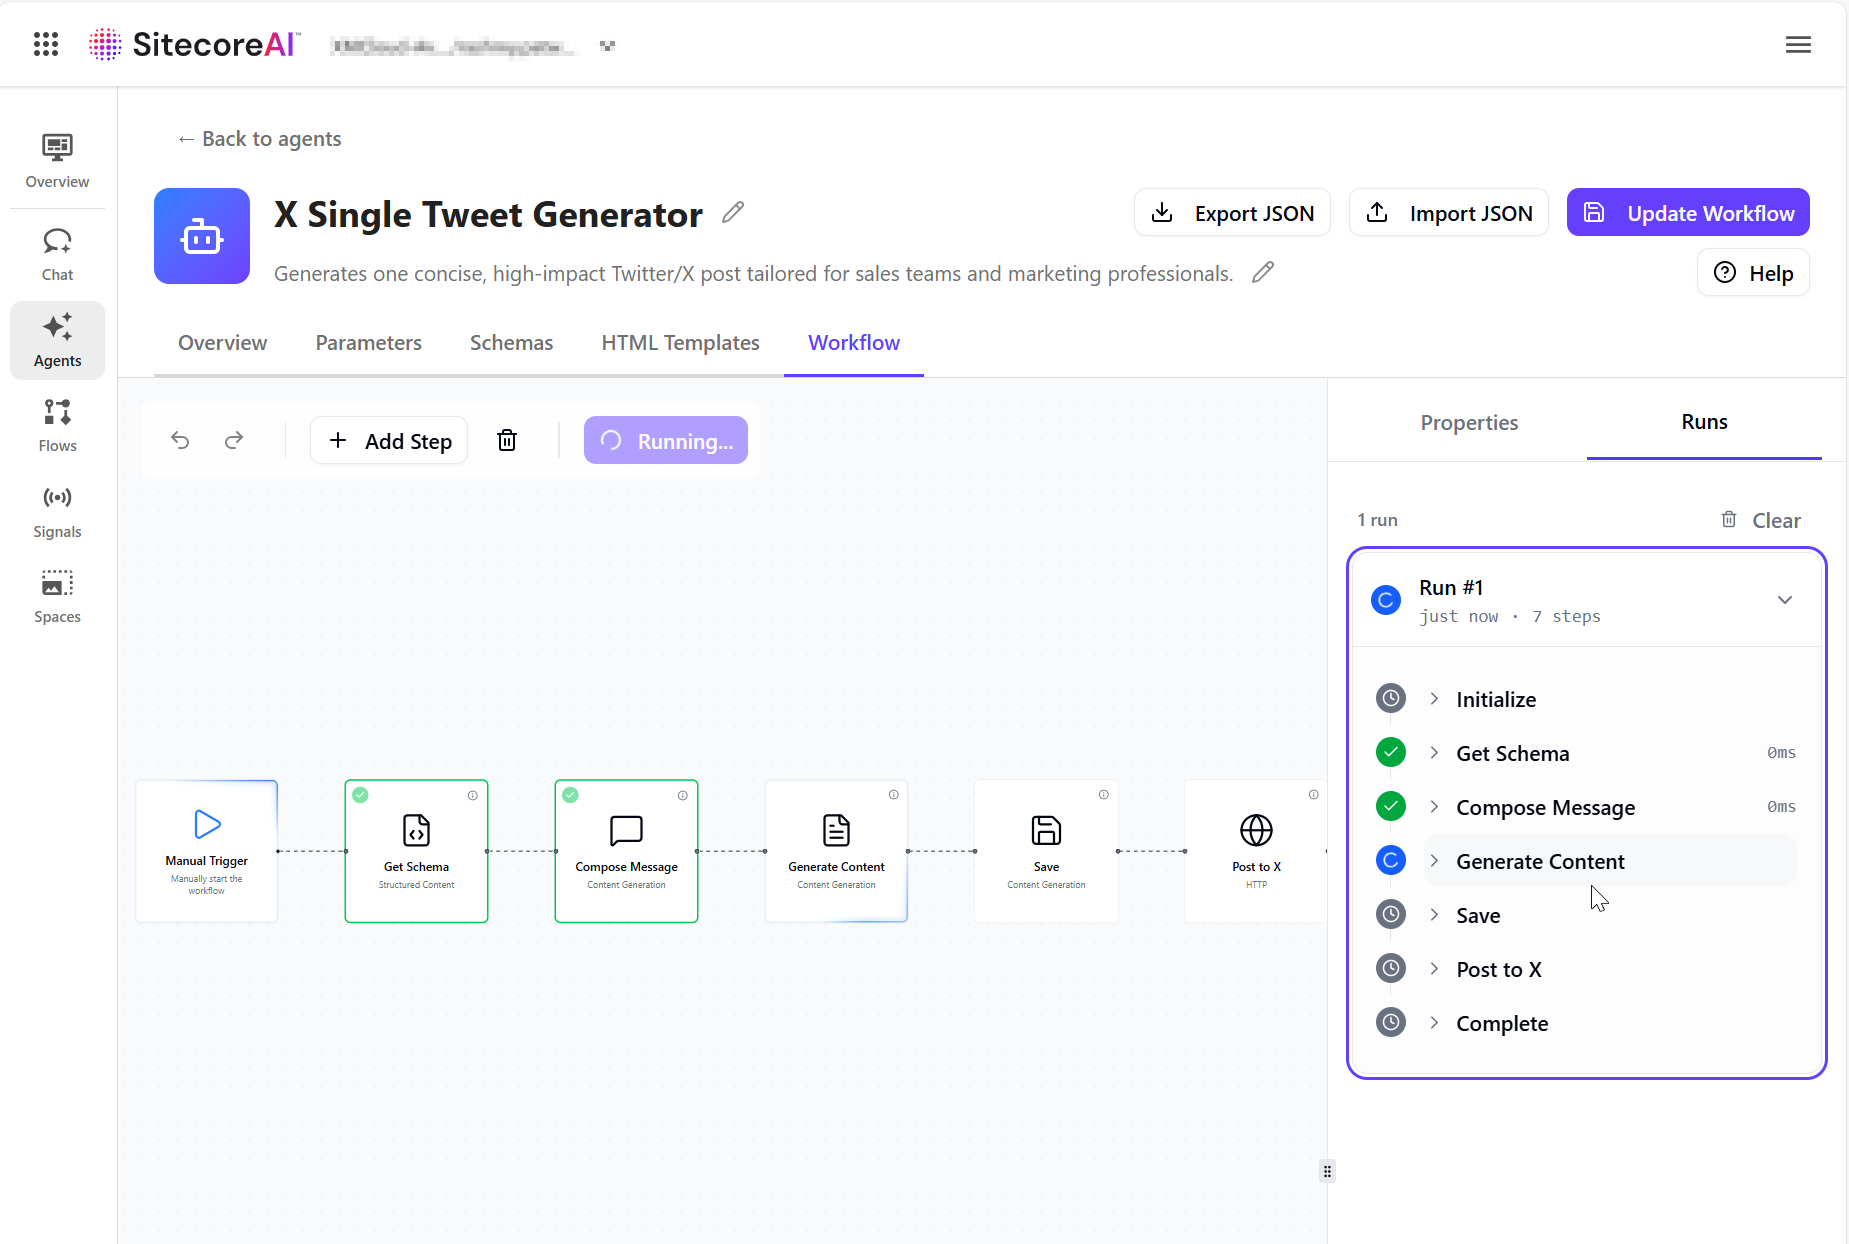
To test the agent, click on the Run button from the Workflow tab
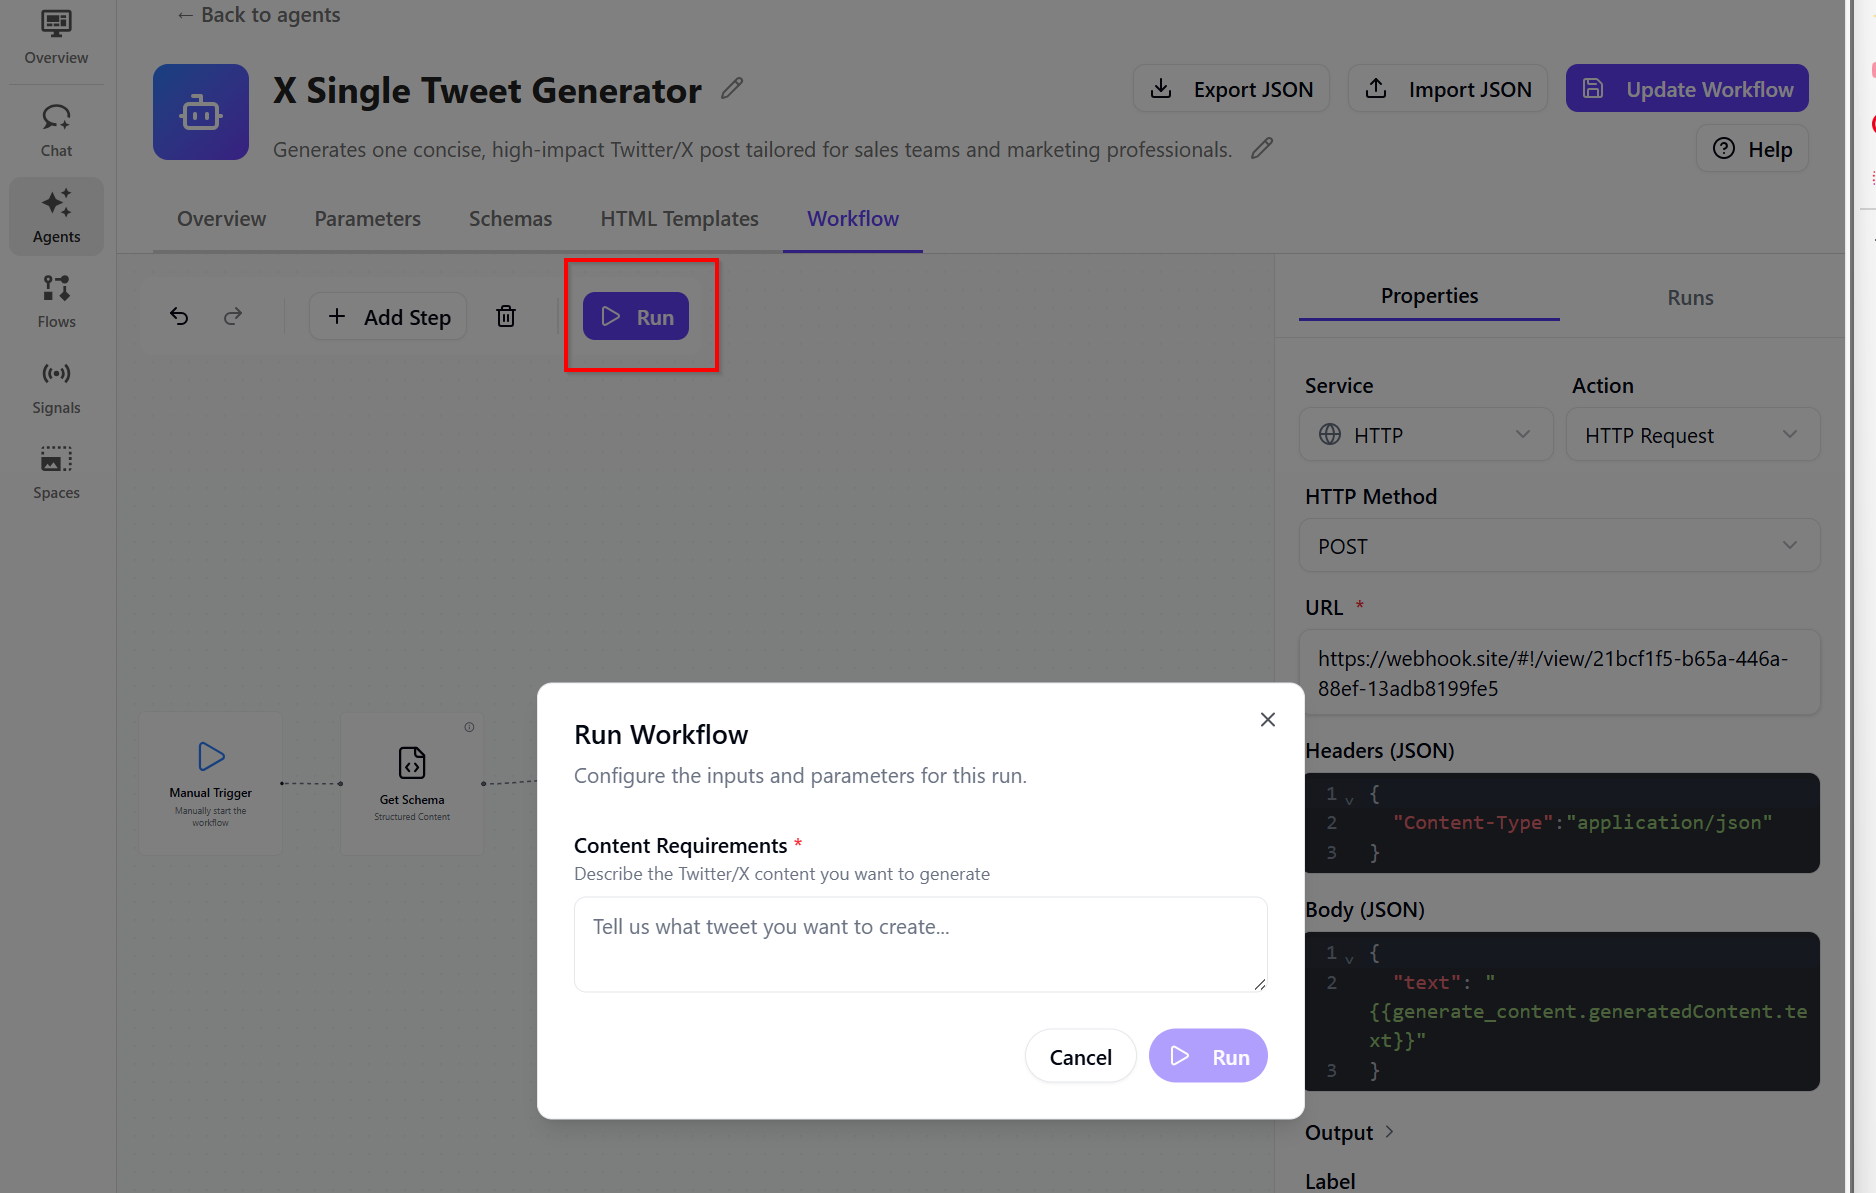
When successful, you will get a sample run similar to the one shown below:
Running agents using items
When running agents, you can provide two types of optional inputs: items and context.
Items are the inputs the agent acts on. The agent processes each item and generates outputs for it. Use items to define what the agent should process individually. This enables the agent to perform actions on specific content from SitecoreAI.
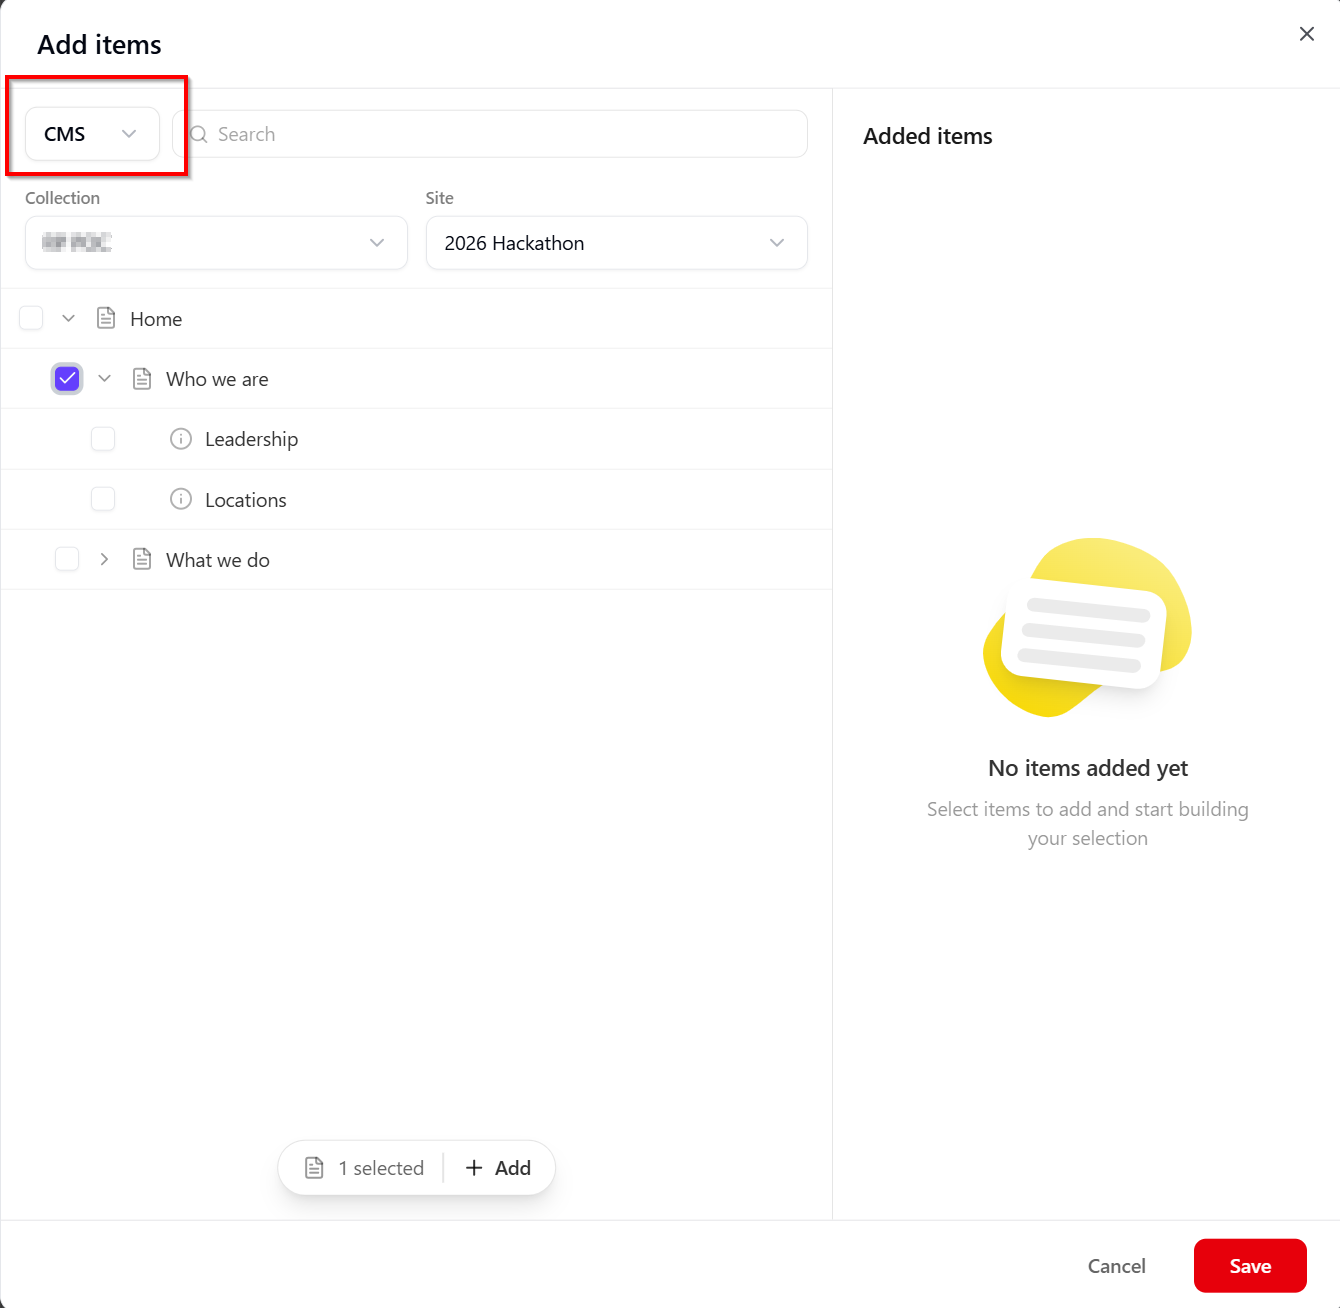
When running the agent, you have option to Add items as shown below
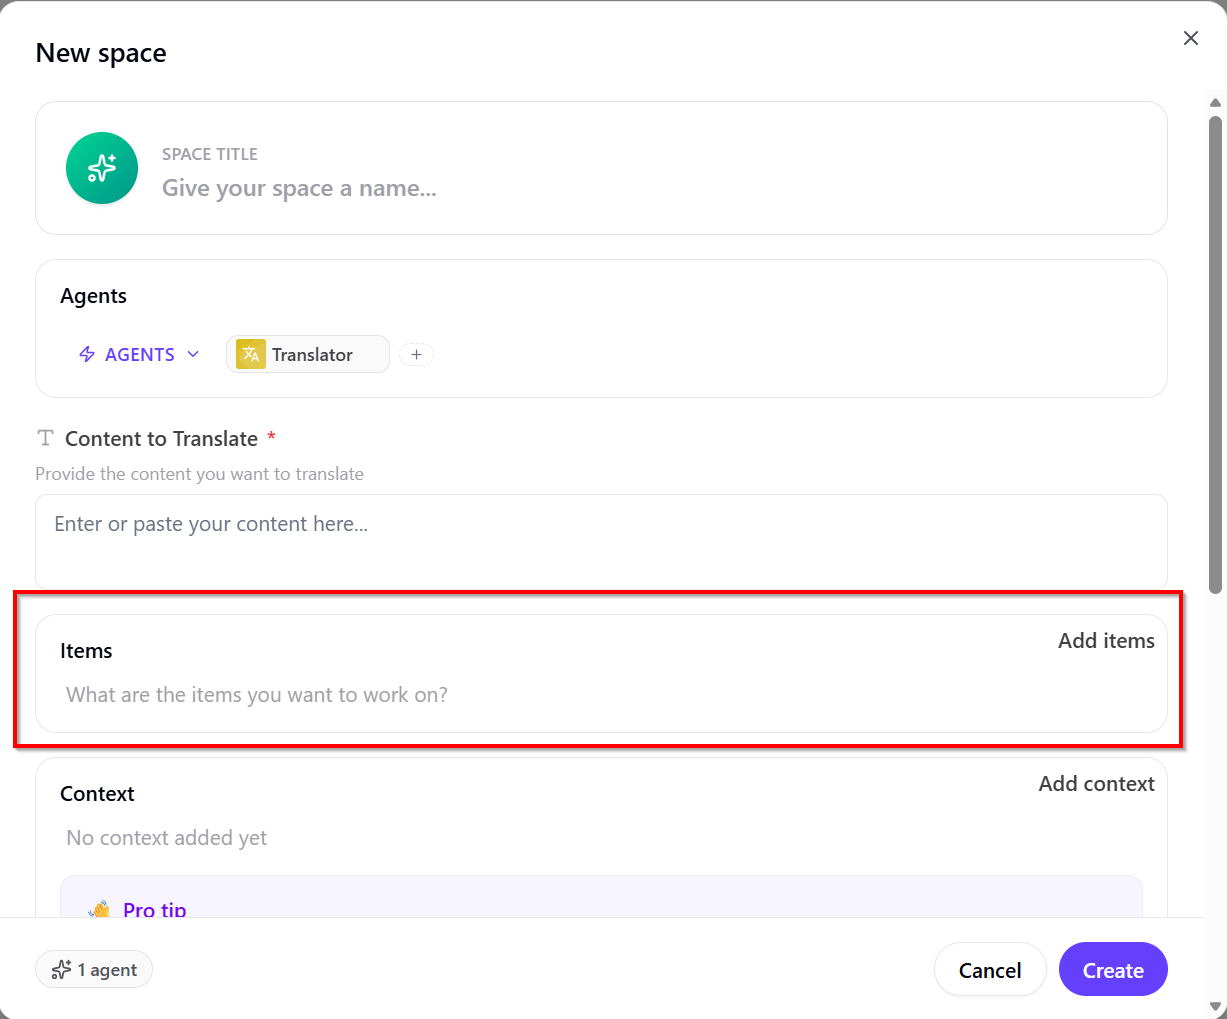
Clicking on Add items will allow to select SitecoreAI CMS content items, as shown below
Next steps
In this blog post, we looked in detail the March 30 2026 release of the Agentic studio, which you can read in full in the original bulletin. As Sitecore continues to bridge the gap between “AI as a tool” and “AI as a teammate,” the March update sets a high bar for the rest of 2026. Whether you’re ready to start chaining agents in the new Spaces or you’re curious about how those custom skills will streamline your specific brand voice, the future of content is officially autonomous. Feel free to leave us a comment or share any thoughts.
