Search experiences in SitecoreAI now support push sources – your step-by-step guide

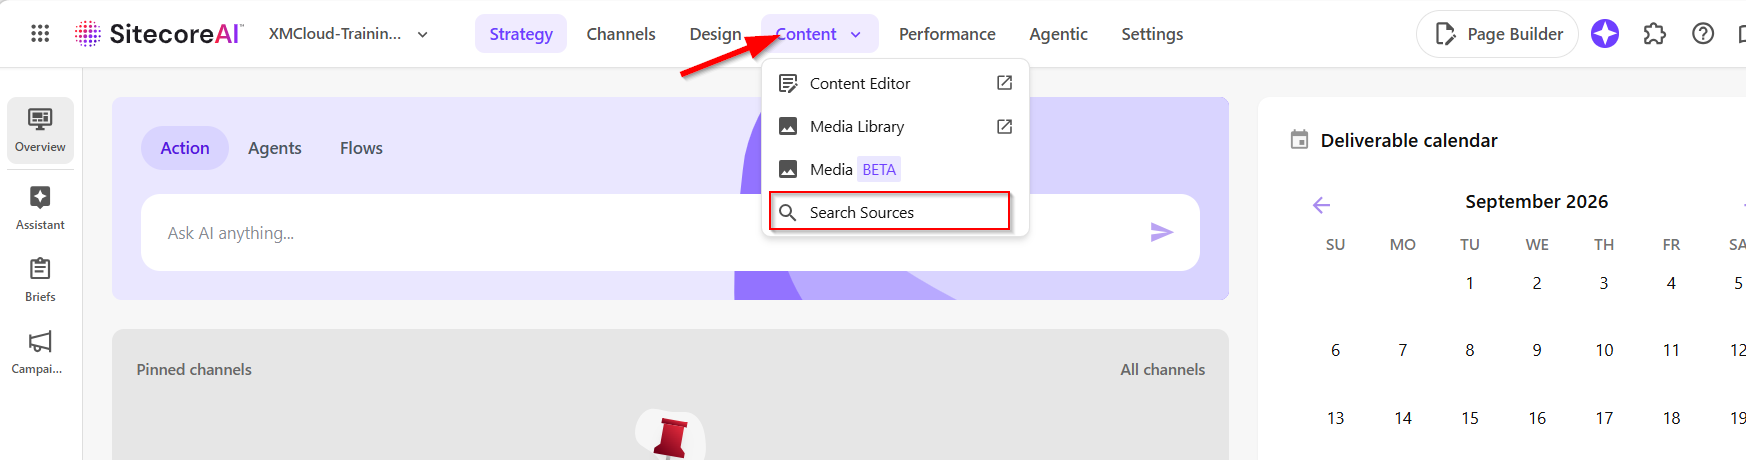
Screenshot of the Sitecore AI interface showing the Content dropdown menu with 'Search Sources' highlighted and a calendar on the right side.

Context

One of the challenges with search is that not all content lives neatly inside your CMS — and not everything can be crawled. With the introduction of Push Sources in SitecoreAI Search, there is now another option. Instead of relying on a crawler to discover and index content, we can submit documents directly to SitecoreAI Search using the Ingestion Service API.

Key Highlights & Use Cases

  • External Data Integration: Index content from third-party enterprise platforms, including external product catalogs, knowledge bases, and custom applications.
  • Real-Time Index Synchronization: Keep SitecoreAI search indexes cleanly synchronized with external source-of-truth databases.
  • Indexing Beyond Crawling: Render non-crawlable content, gated assets, or internal payloads searchable within SitecoreAI.
  • API-Driven Workflows: Build automated ingestion pipelines directly integrated into your existing CI/CD or data orchestration flows.

In this blog post, I will walk you through a step-by-step guide on how to set up push sources in SitecoreAI, submit payloads using the Ingestion Service API, and seamlessly connect your external content.

A product catalog example

For this walkthrough, I’m going to use a simplfied external product catalog. Let’s imagine we have a PIM containing:

Product ID
Product Name
Description
Category
Price
Product URL

The PIM remains the source of truth.

SitecoreAI Search is simply consuming a searchable representation of that information, as shown in the following JSON exampple:

{
"id": "product-1001",
"title": "Scrunch Running Shoes",
"description": "Scrunched running shoes for everyday training",
"category": "Footwear",
"price": "79.99",
"productUrl": "https://example.com/products/product-1001"
}

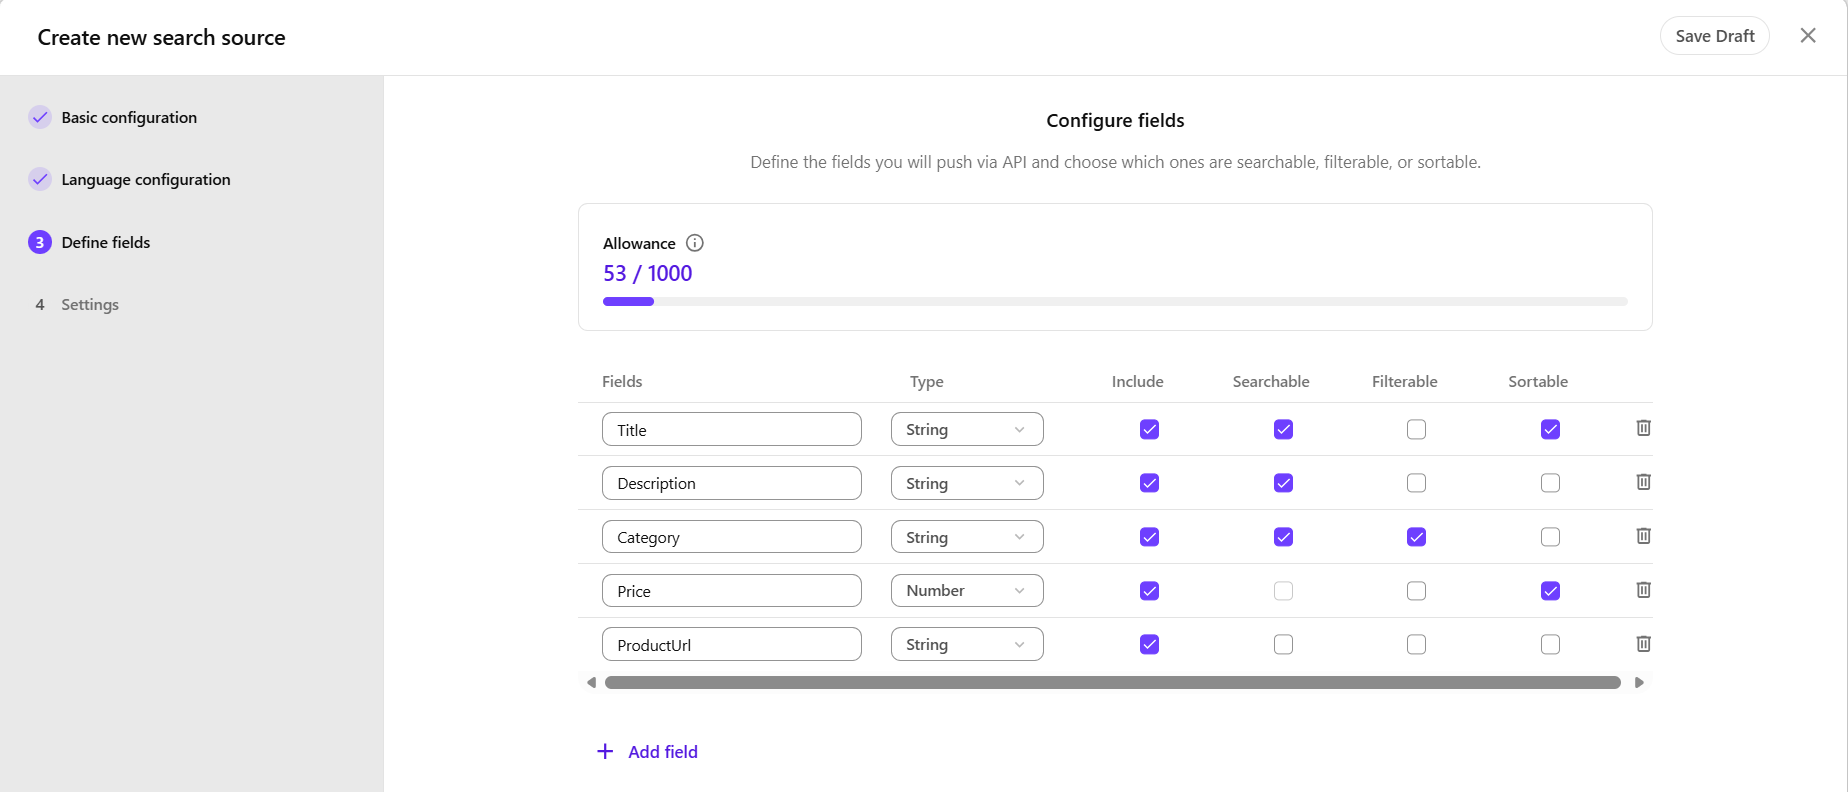
Our Push Source schema, therefore, will have these fields defined as follows.

Push Source schema

FieldDescription
idProduct ID
titleProduct name
descriptionProduct description
categoryProduct category
priceProduct price
productUrlProduct URL

Example Integration Reference Architecture

Below is sample integration reference architecture. This setup empowers developers and architects to take full, granular control over search index synchronization
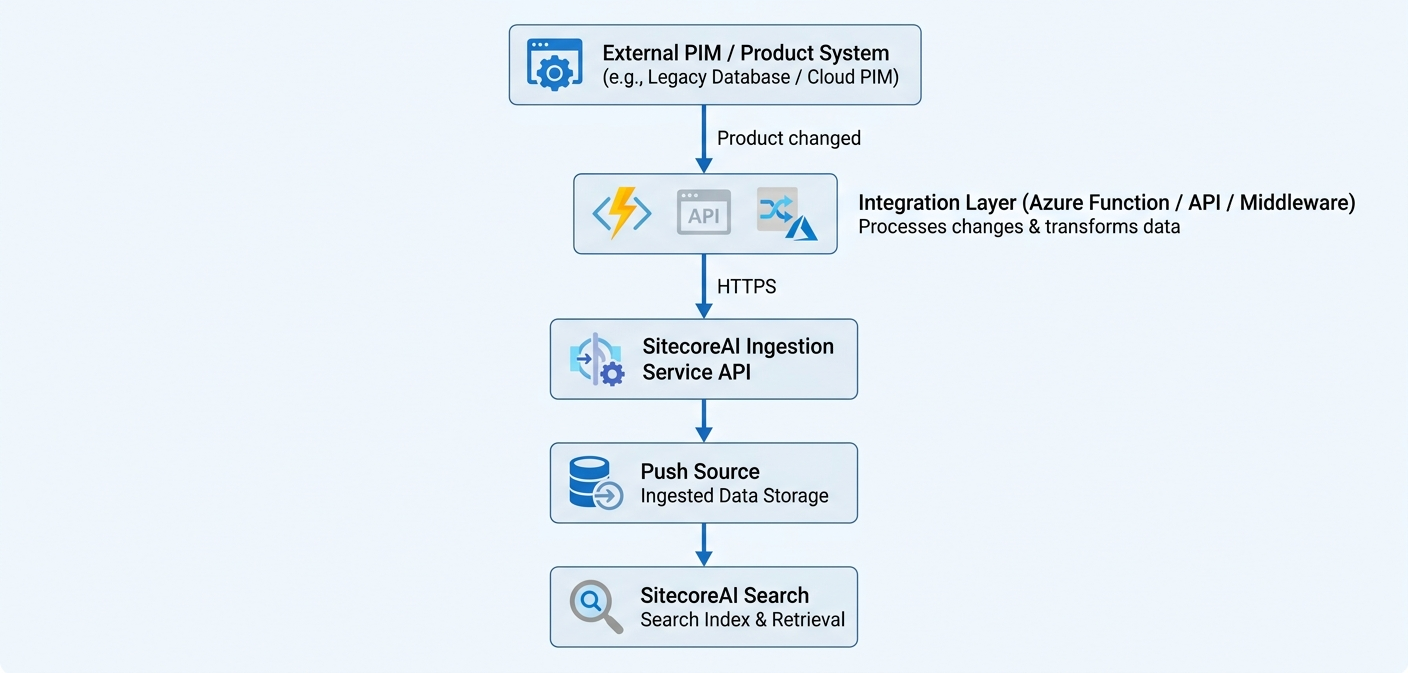
Diagram illustrating the data flow from an external Product Information Management (PIM) system to SitecoreAI, including integration, ingestion, and search processes.
  • External PIM / Product System represents your source of truth
  • Integration Layer: Your custom-built middleware—whether an Azure Function, bespoke API, or other service—actively listens for change events from the external system
  • Ingestion Service API: Once transformed, your integration layer makes an authenticated HTTPS call to the SitecoreAI Ingestion Service API
  • SitecoreAI Push Source: Real-Time, API-Driven Synchronization, Fine-Grained Content Control
  • SitecoreAI Search: the ultimate user-facing search experience

Step 1 – Creating the Push Source in SitecoreAI

In SitecoreAI, navigate to the Search Sources area and create a new source:

  1. On the menu bar, click Content > Search sources.
  2. On the Search Sources page, click Create Source.
  3. In the Create new search source dialog, click Push Source.
  4. In the Create new search source dialog, in the Source Name field, enter a name for your source.
  5. Optionally, enter a description of your source.
  6. Click Next step.
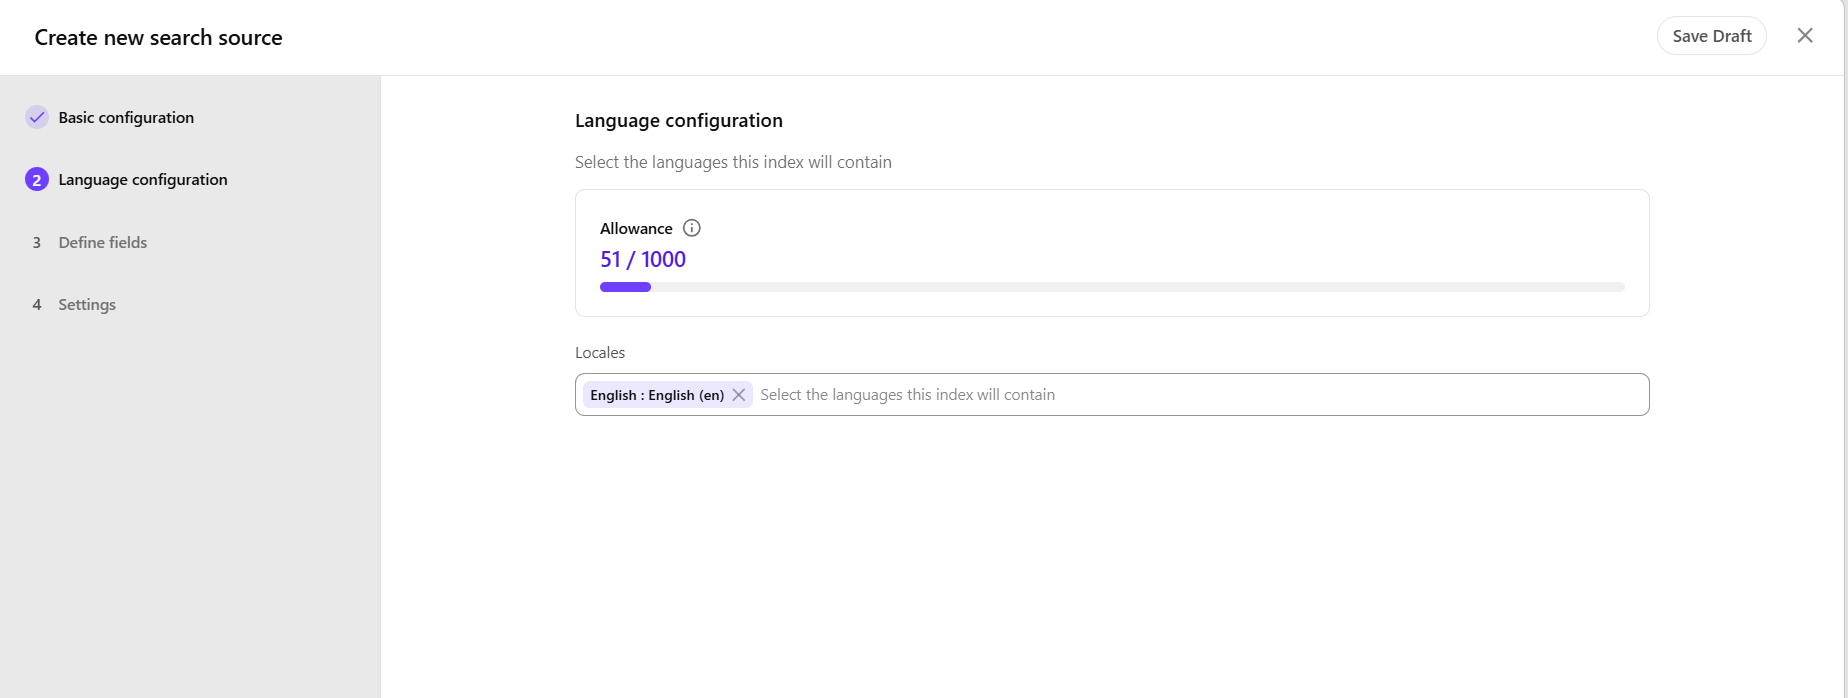
  7. Click the Locales drop-down list to choose the languages that this source will support, and then click Next Step.
  8. Configure the fields in your source and their behavior, and then click Next Step.
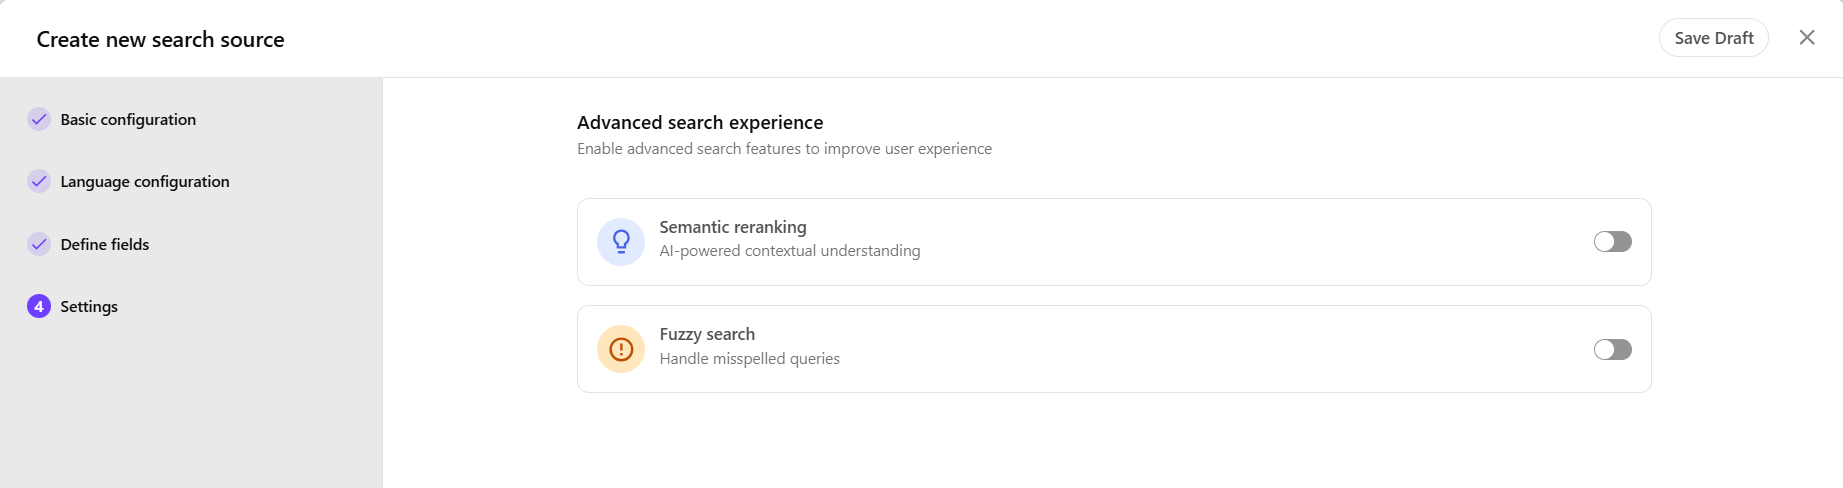
  9. Enable the advanced settings you want to use in this source and then click Save.
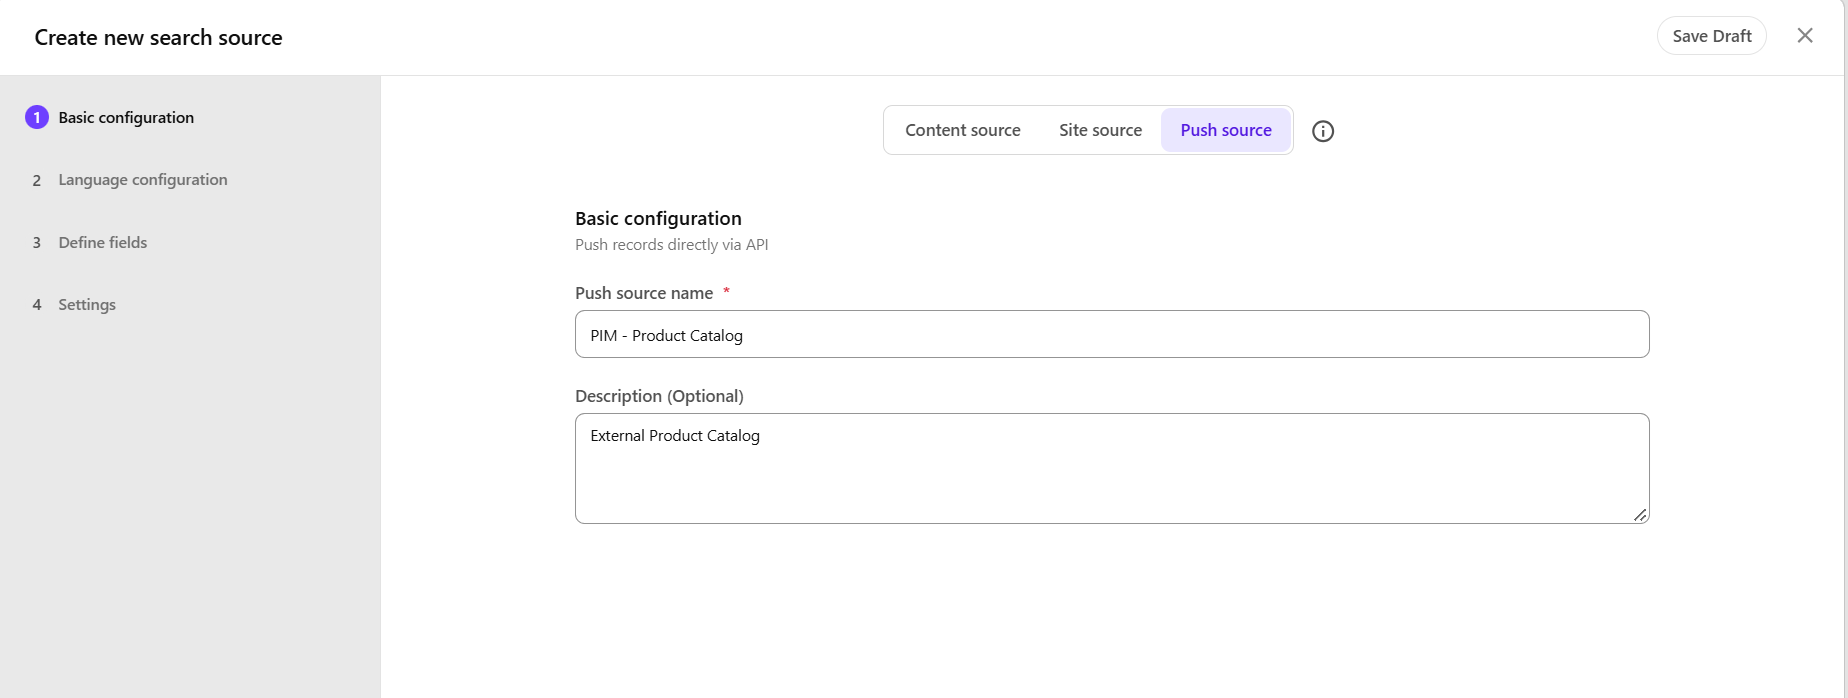
After the source is created, applications can ingest content by submitting authenticated requests to the Push API
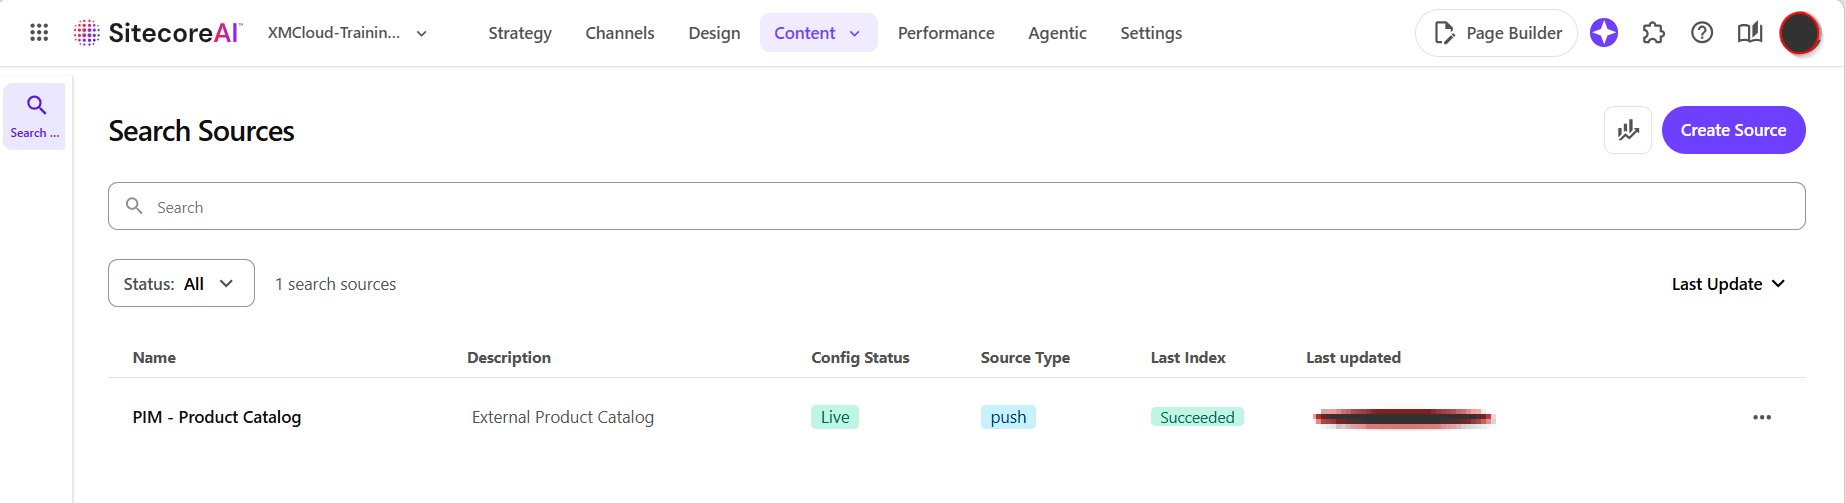
Screenshot of the Sitecore AI interface displaying the 'Search Sources' section, showing a product catalog with details such as name, description, config status, source type, last index, and last updated.

Step 2 – Verify the Push Source created

Clicking on a source allows you to view and edit that source’s configurations, including fields and rules.

To view the details associated with a source:

  1. On the menu bar, click Content > Search sources.
  2. Click a source.
  3. Click any of the following tabs:
    • Fields – displays the list of fields indexed by the source, and their configurations.
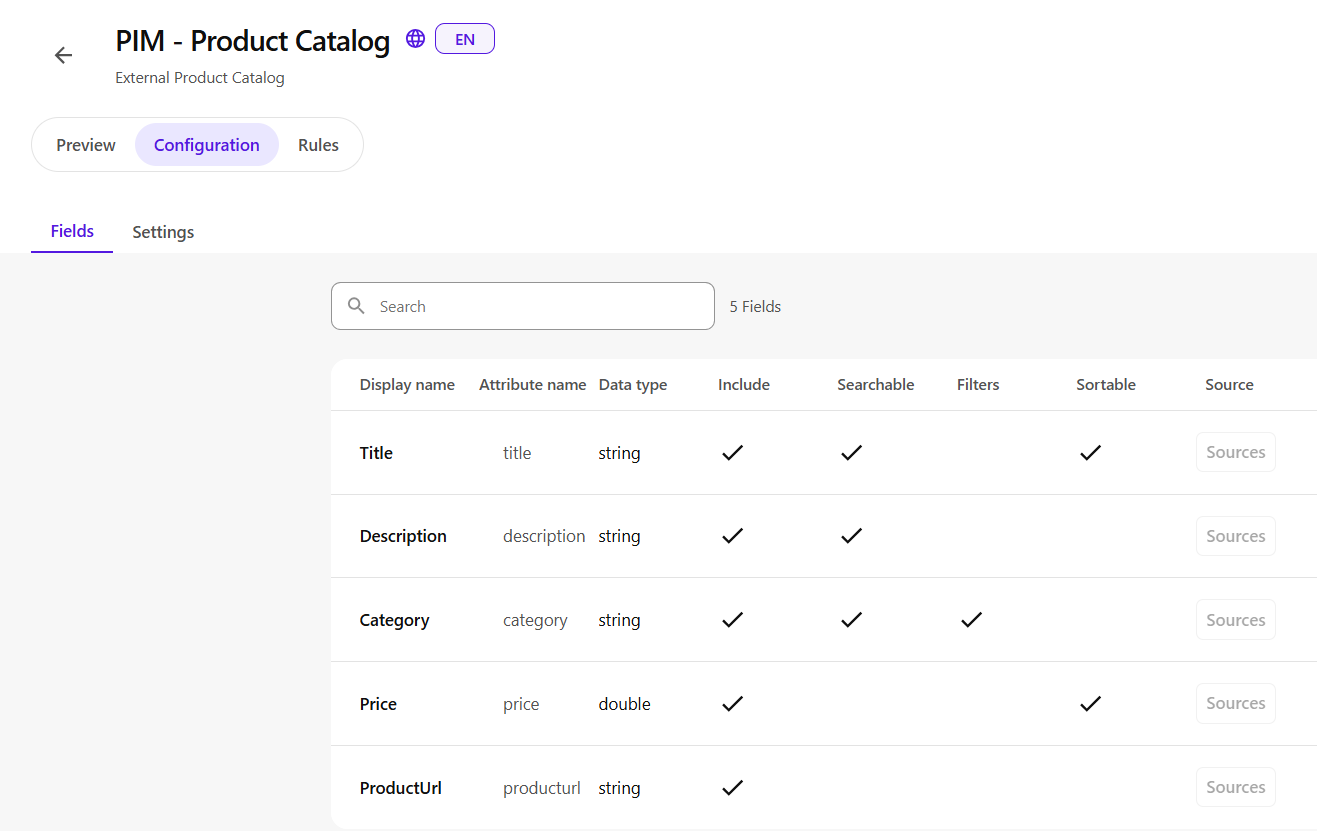
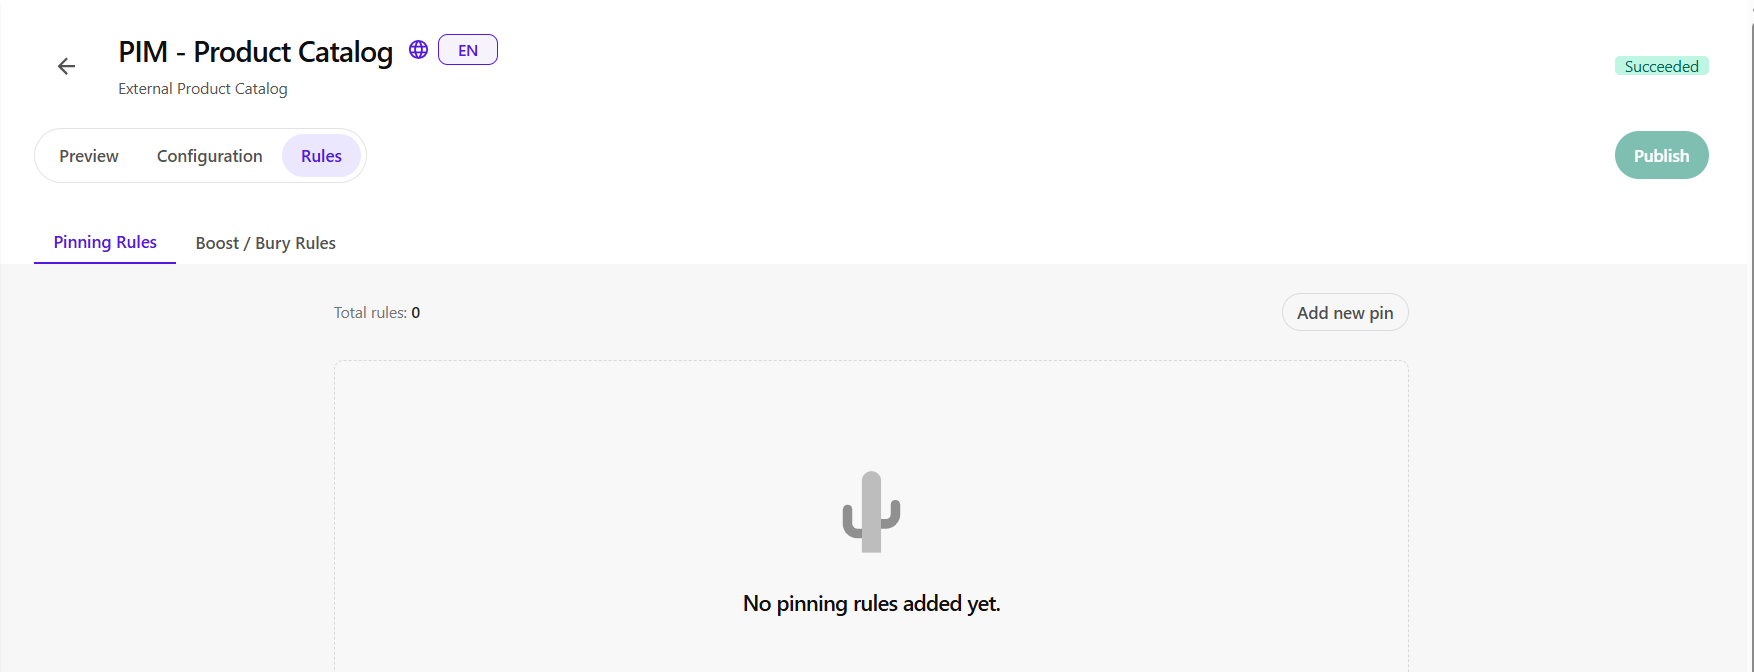
    • Pinning Rules – displays a list of pinning rules active on the source. Click Add a pin to create a pin rule.
    • Boost/Bury Rules – displays a list of boost and bury rules active on the source. Click Add new rule to create a new boost or bury rule.
    • Settings – displays the source settings, such as the source name, ID, and advanced settings.
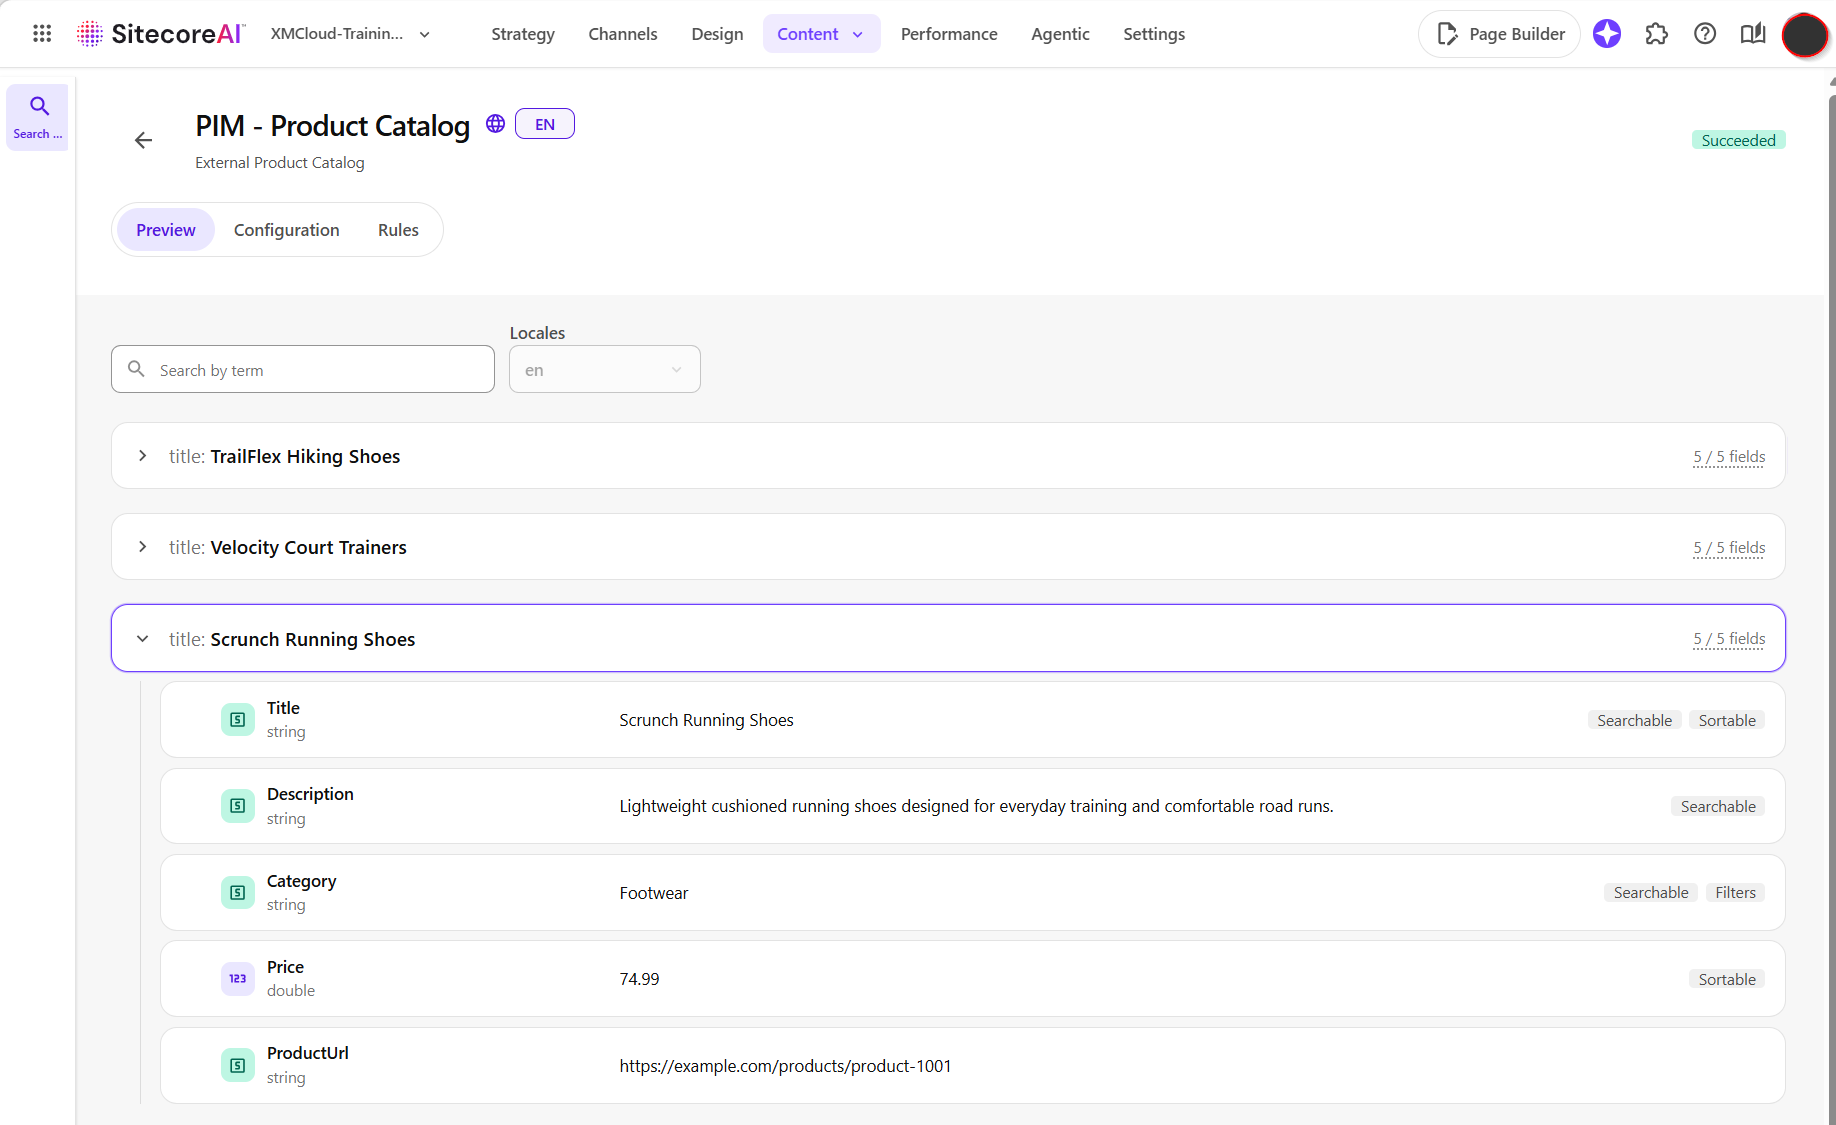
    • Preview – displays a preview of the content indexed in this source, and the number of fields that have been indexed for each item.

Screenshot of a product catalog management interface displaying the 'Pinning Rules' tab with a message indicating no rules have been added yet.

Step 3 – Generate API Credential

All Ingestion Service API requests require a static API key in the Authorization header:

Authorization: ApiKey <your-api-key>

To create an API key:

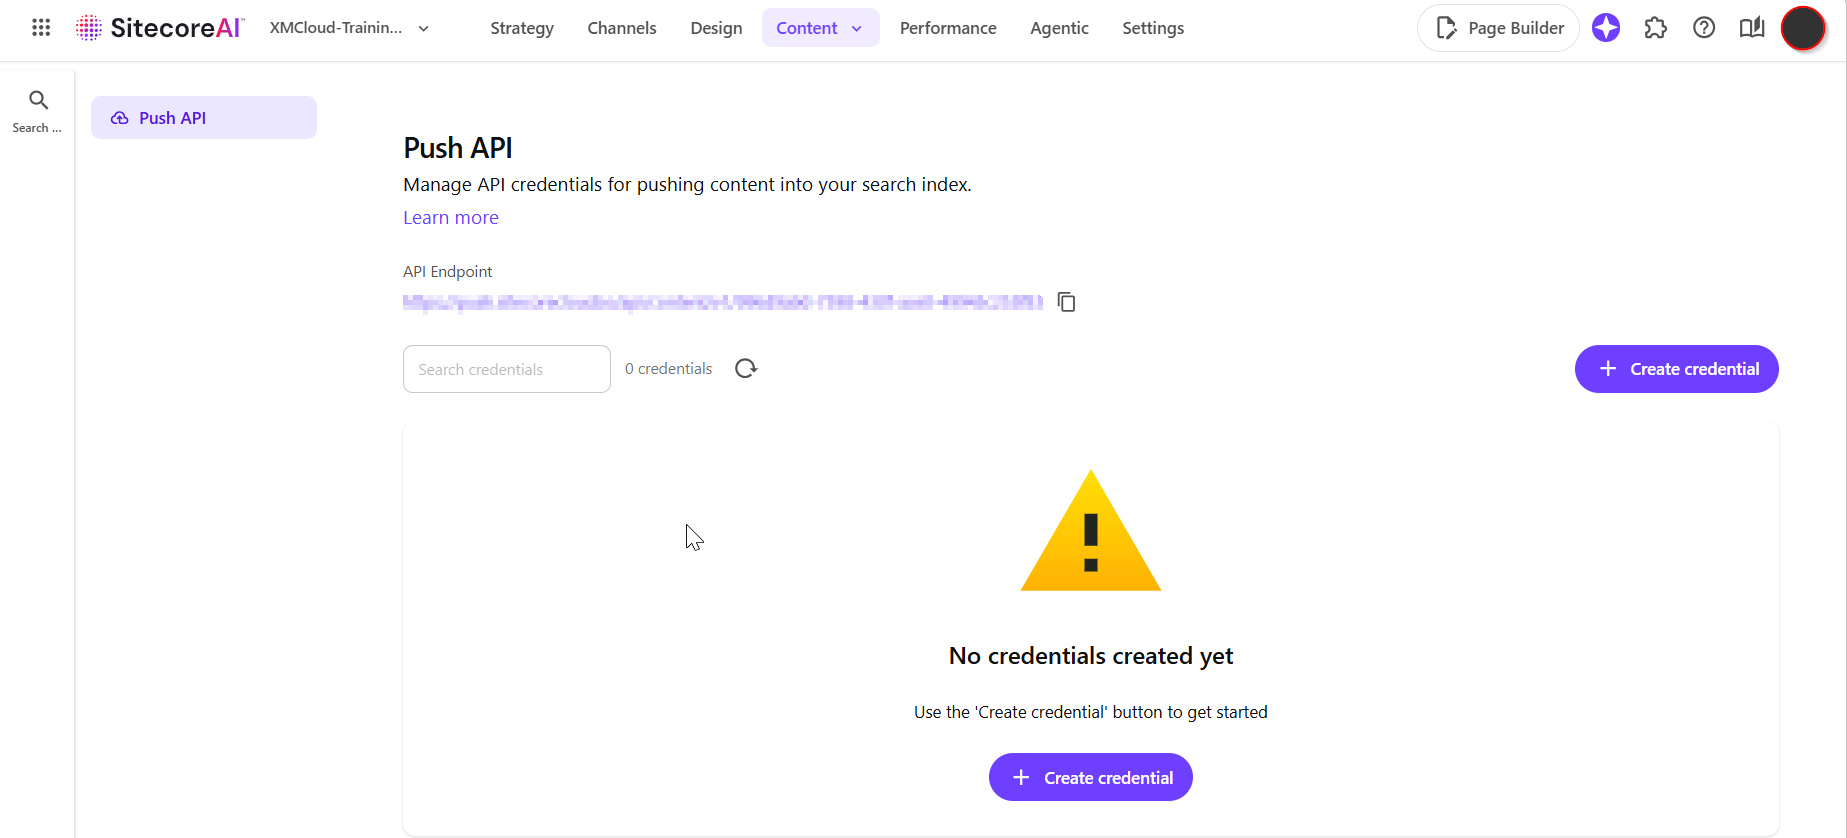
  1. In SitecoreAI, click Content > Search Sources > Settings.
  2. Click Create credential.
  3. Enter a name for the credential and an optional description.
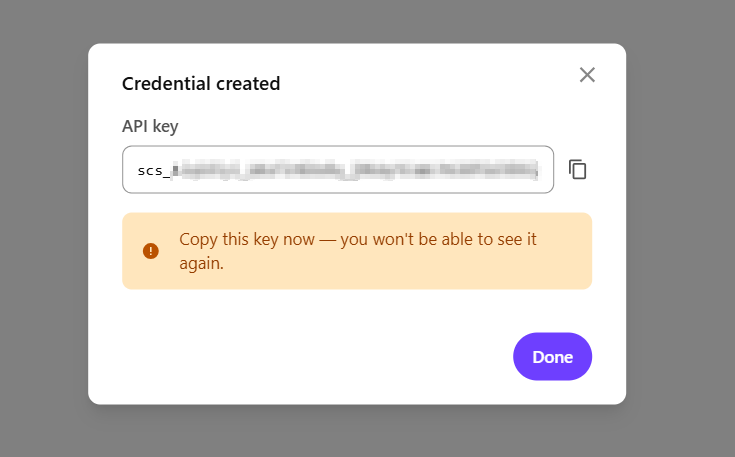
  4. Click Create, then copy the API key. The key is displayed only one time and cannot be retrieved after you close the dialog.
Step 4 – Understanding the API Endpoint

The Ingestion Service API endpoint follows this pattern:

POST {base_url}/v1/index/{config_id}/push

This endpoint submits document operations to create, update, or remove documents from a search source.

There are two values here that you’ll need from your SitecoreAI configuration:

base_url - API Endpoint value for the source, as shown is screenshot below
config_id - The identifier of the search source configuration.
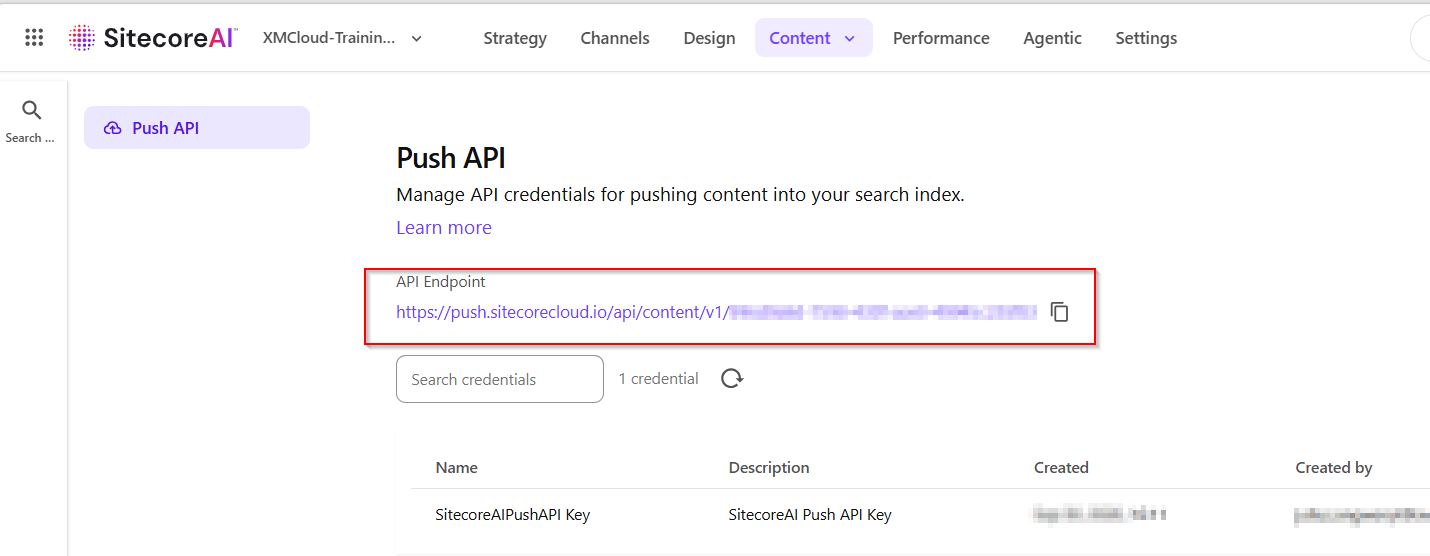
Sitecore AI Push API configuration interface displaying the API endpoint and related credentials.

Below is a sampe Authenticated API request

POST https://.../v1/index/abc123/push
Authorization: ApiKey xxxxxxxxx
Content-Type: application/json
{
...
Request Body
....
}

Step 5 – Build Sample First Payload

Now let’s create our first document.

Here’s our product:

{
“id”: “product-1001”,
“title”: “Scrunch Running Shoes”,
“description”: “Lightweight cushioned running shoes designed for everyday training and comfortable road runs.”,
“category”: “Footwear”,
“price”: “74.99”,
“productUrl”: “https://example.com/products/product-1001“
}

We then wrap the document in an ingestion operation.

Conceptually:

Request
|
+-- operations
|
+-- document

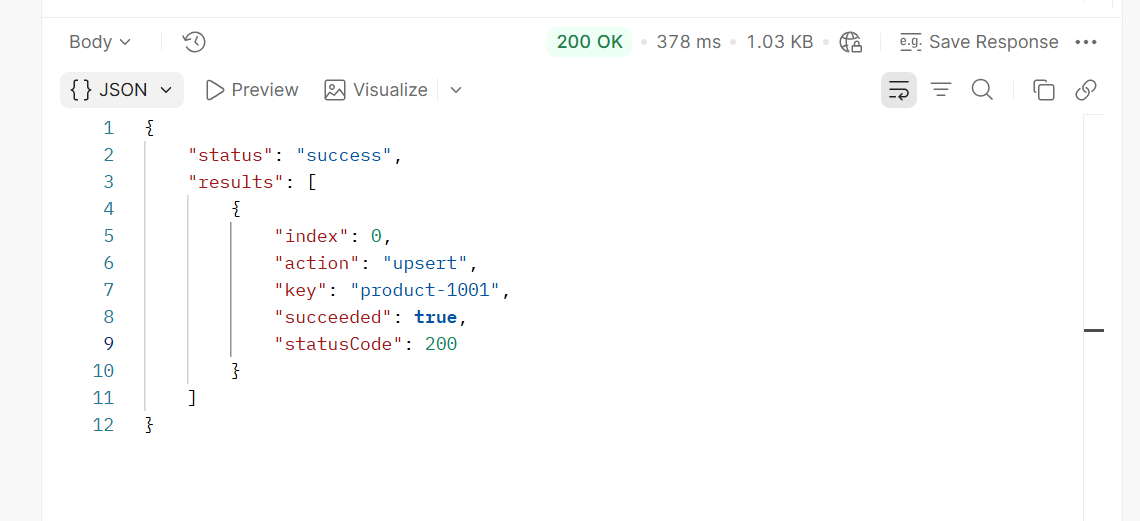
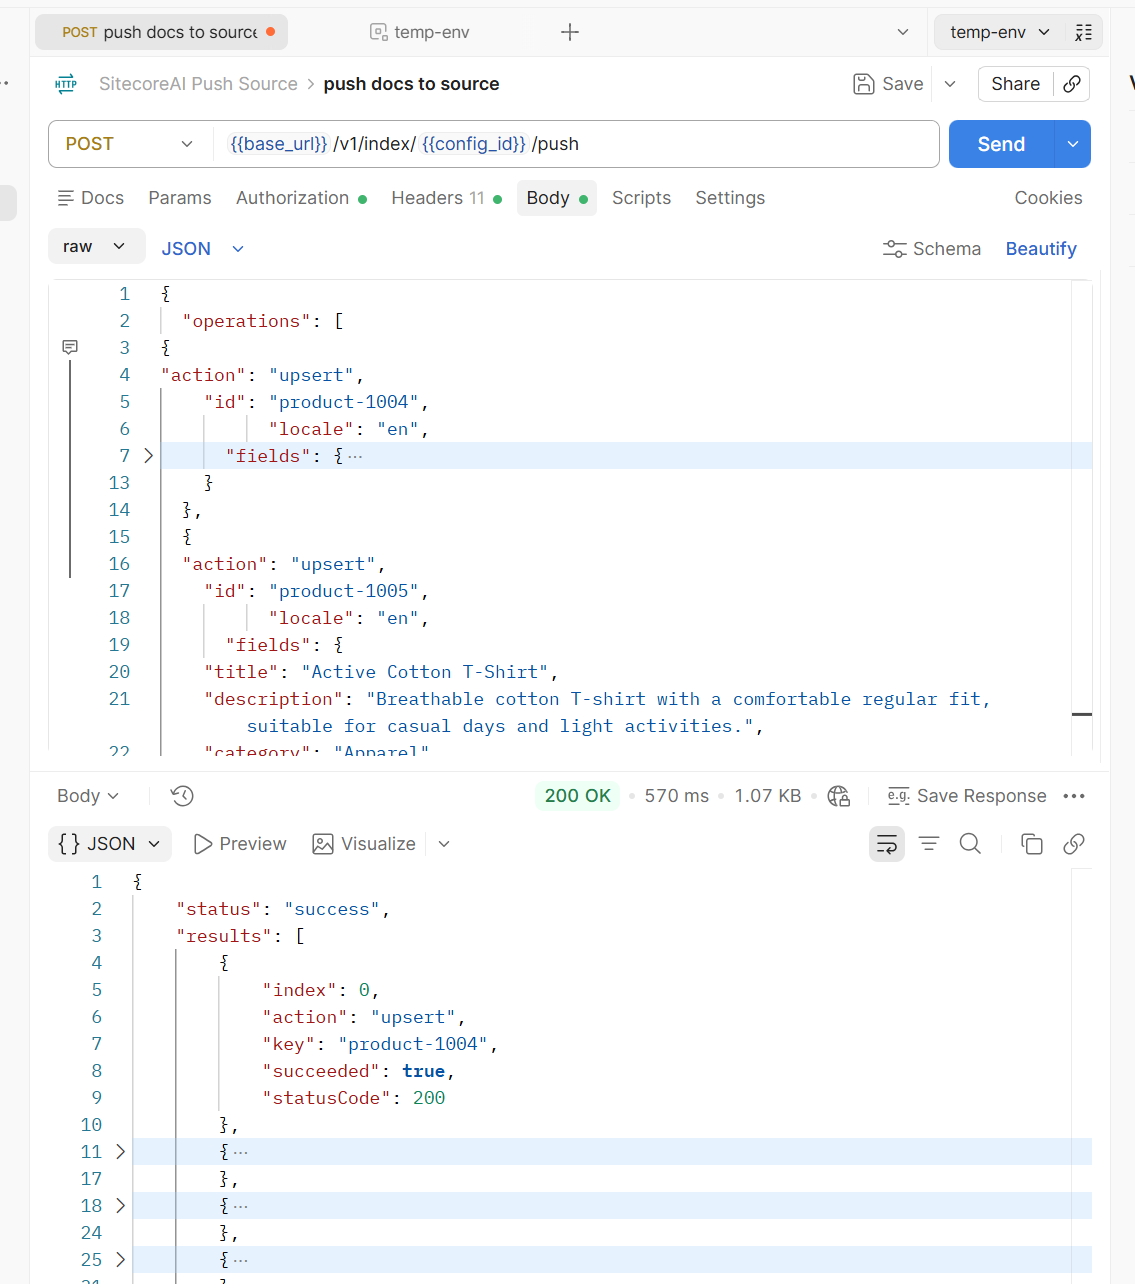
Testing with Postman – showing sample first payload
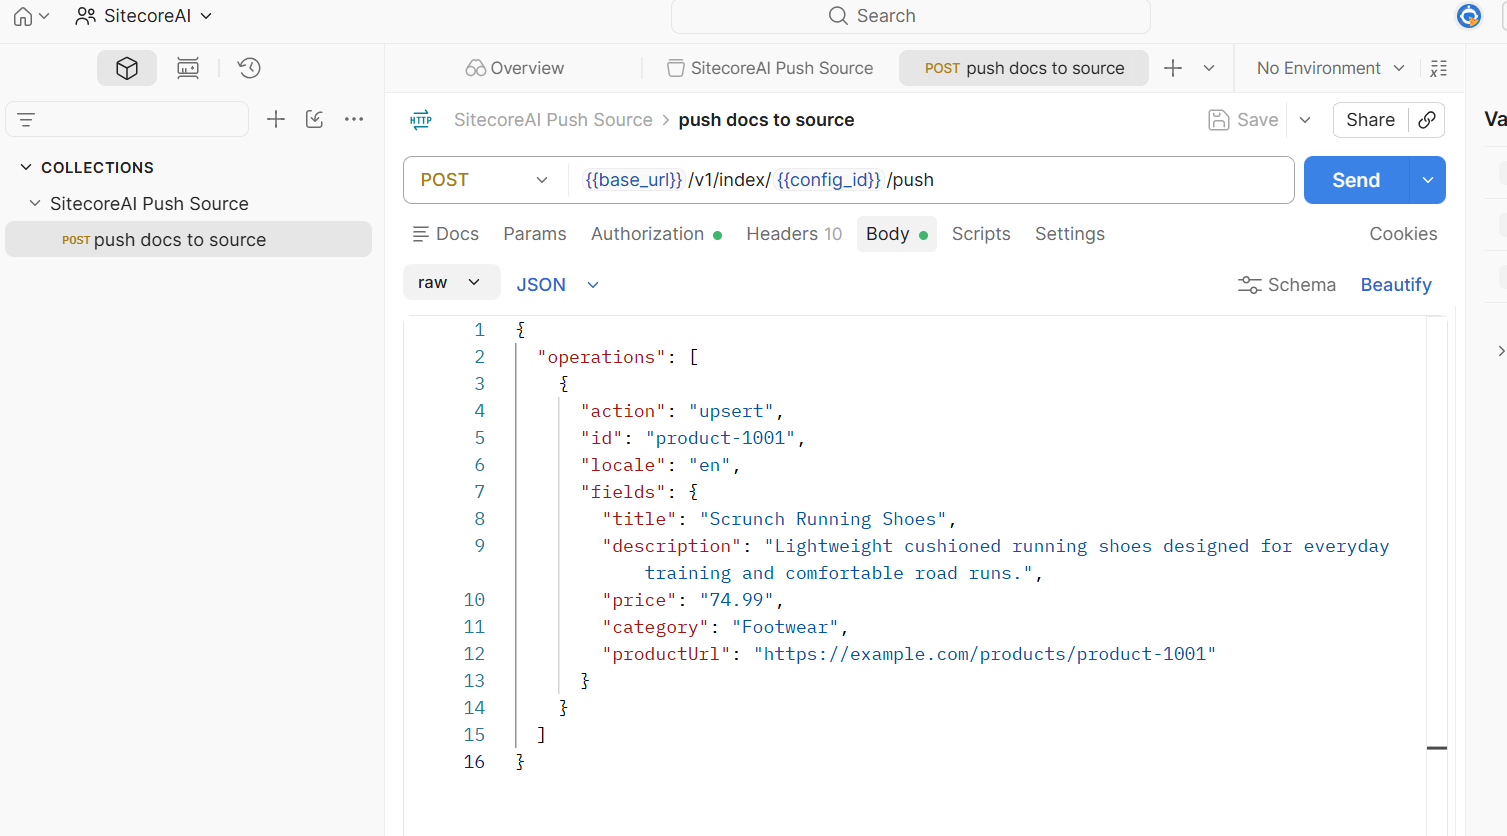
JSON request example for pushing product data, including title, description, price, category, and product URL.

Step 6 – Handling updates and deletes

An update from the PIM system will be propagated into SitecoreAI, conceptually:

  • The PIM raises an event.
  • Our integration receives it.
  • We transform the product.
  • Then send the updated representation to SitecoreAI.
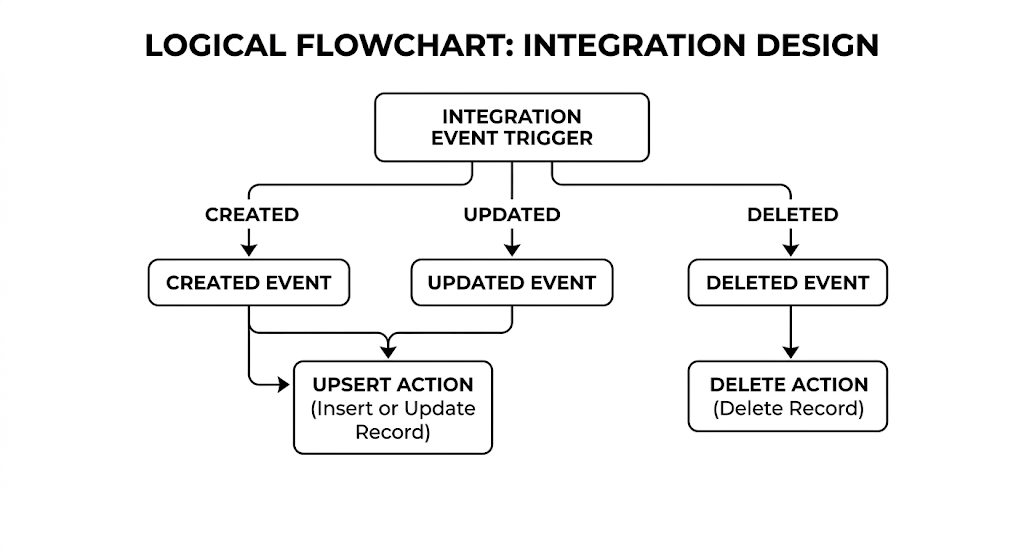
Logical flowchart illustrating integration design, showing event triggers for created, updated, and deleted events with corresponding actions.

When a product is removed from PIM, we will also need to delete it in SitecoreAI. So the integration should also understand:

  • CREATE
  • UPDATE
  • DELETE

Step 7 – Troubleshooting

When the API doesn’t work, I recommend working through the problem systematically.

a) 401 / authentication errors

Check the following:

API key
Authorization header
Environment
Source credentials

Make sure the header is:

Authorization: ApiKey ...

rather than assuming a bearer token is required.

Configuration error

Check the following:

config_id
Source exists
Source is published
Correct SitecoreAI environment

Schema / Data type errors

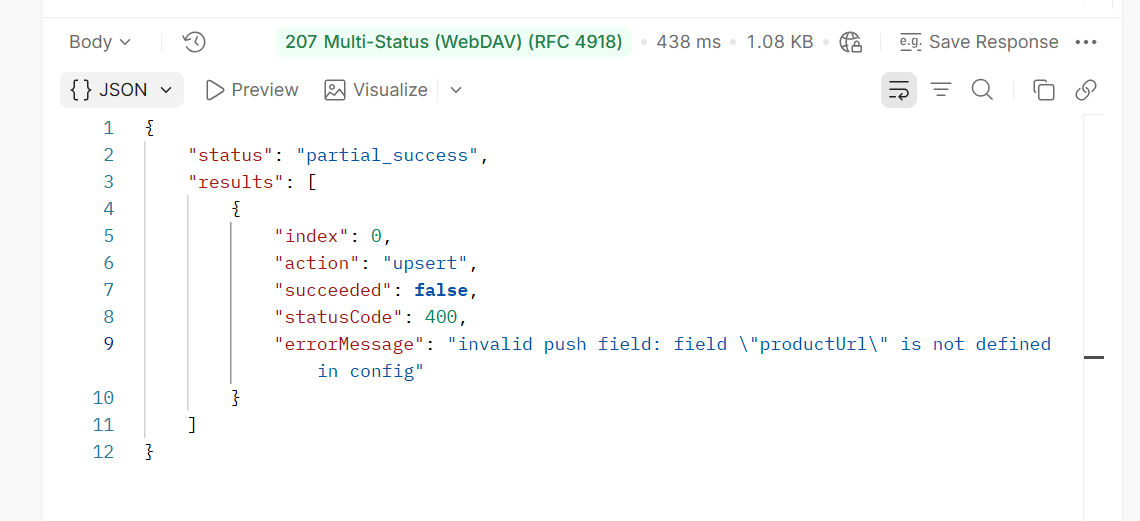
If SitecoreAI complains about a field, compare your payload with the source schema. Ensure the correct data types for field types.

Don’t assume that because a value looks like a number or date in your source system, the API expects exactly the same representation.

Final Thoughts

Push Sources are an interesting addition to SitecoreAI Search because they solve a very practical problem:

What do you do when the content you want to search doesn’t naturally live in Sitecore — or can’t be crawled?

Instead of trying to force everything through a crawler, we can explicitly push the content we want into the search index. For developers and architects, that opens up several possibilities:

  • External PIM integration
  • Product catalog search
  • Knowledge-base integration
  • Custom application data
  • Event-driven search updates
  • Non-crawlable content

And perhaps more importantly, it gives us control over the integration. We decide what gets indexed. We decide when it gets updated. And we decide how the external data is transformed before it reaches SitecoreAI Search.

For me, that’s where Push Sources become particularly interesting — not simply as another SitecoreAI feature, but as another integration pattern for building modern, composable search experiences.

Next steps

In this blog post, we looked at a step-by-step guide for setting up SitecoreAI Search Push Sources. We also looked at how to authenticate with the Ingestion Service API, prepare the payload, push external content into the search index, and troubleshoot some of the common issues you may encounter.

Push Sources provide a useful way to bring externally managed or non-crawlable content into SitecoreAI Search. They can also be a great fit for event-driven integrations where search content needs to be kept in sync with an external system.

Be sure to check out the SitecoreAI documentation and the Ingestion Service API documentation for further guidance and details on working with Push Sources.

Stay tuned for future posts, and feel free to leave us your comments and feedback as well.
Simplified Marketer MCP setup for Copilot Studio updated step-by-step guide

Context

I have previously created a step-by-step guide on how you can connect your Microsoft Copilot Studio agents to the Sitecore Marketer MCP for seamless access to Sitecore’s marketing features. You might recall at the time we had leveraged the OAuth workaround, which required manually adding a resource query parameter to the authorization URL

The good news is that, the workaround is no longer needed. In this blog post, I will walk you through a step-by-step guide, complete with screenshots for the simplified Marketer MCP setup for Copilot Studio. We will be leveraging the standard Model Context Protocol setup flow.

Pre-requisites

Before you begin, make sure you have:

  • A valid Sitecore account with required permissions
  • A valid Microsoft Copilot studio account with access permissions to Create agents and Create Custom Connectors
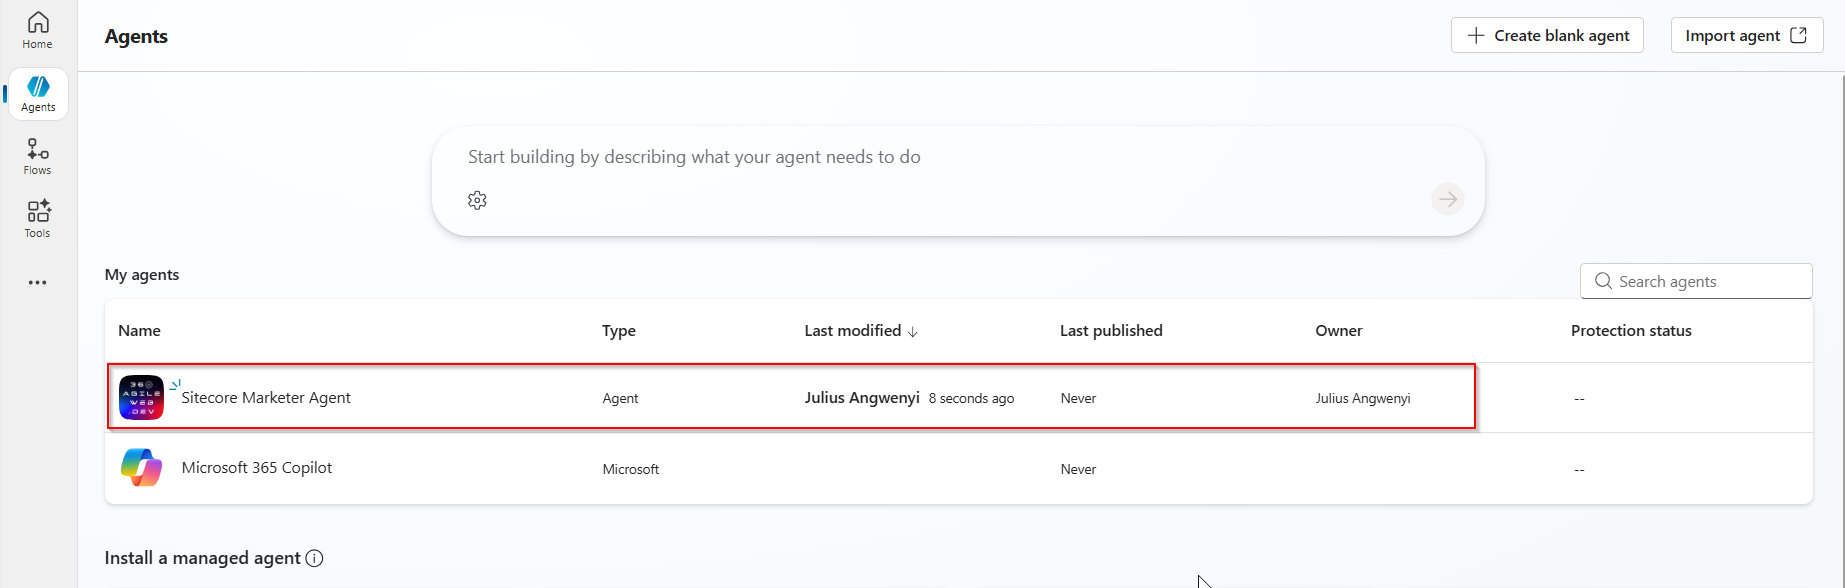
  • Create a new agent within Microsoft Copilot studio if you don’t already have one.

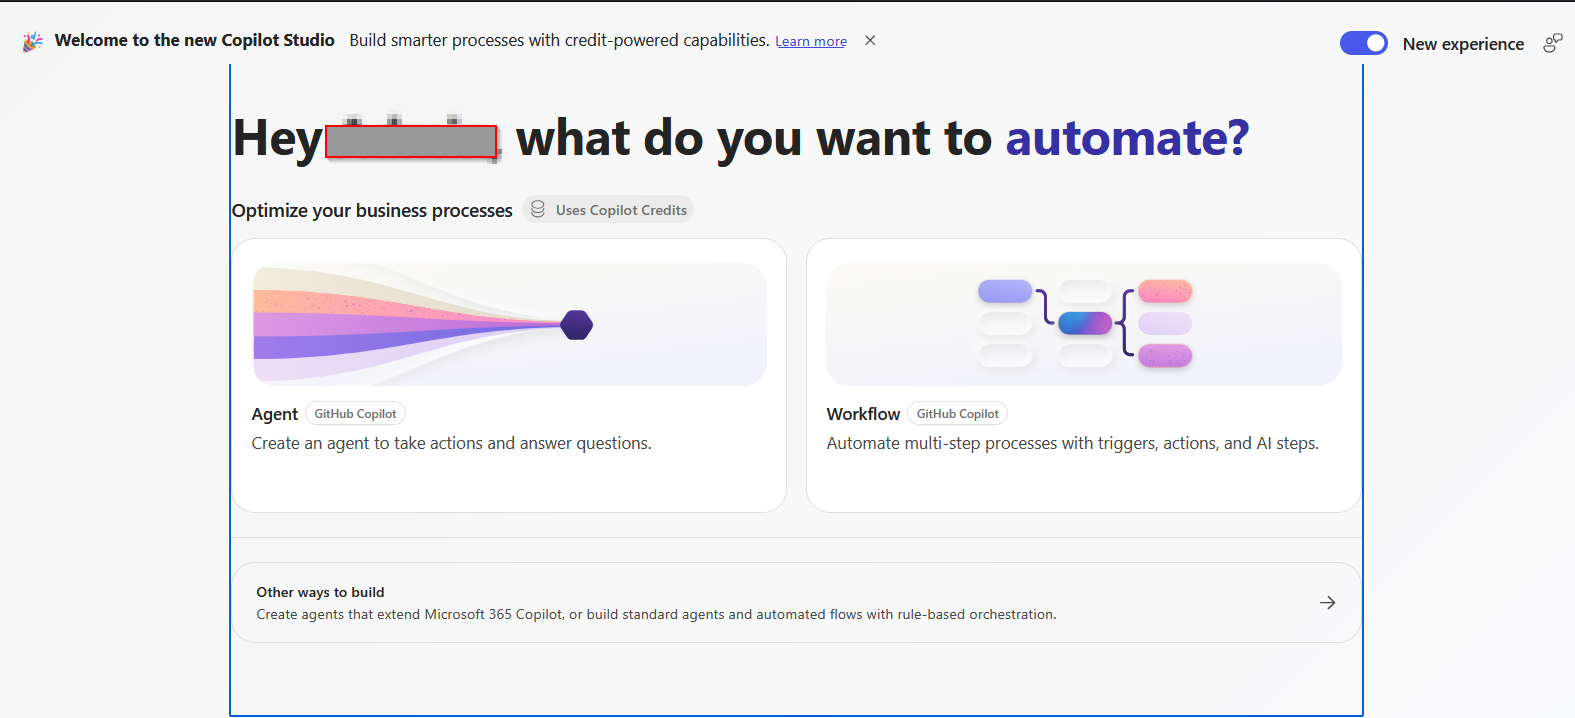
Step 1 – Add a tool to the agent

  • Open Copilot Studio and open an existing agent
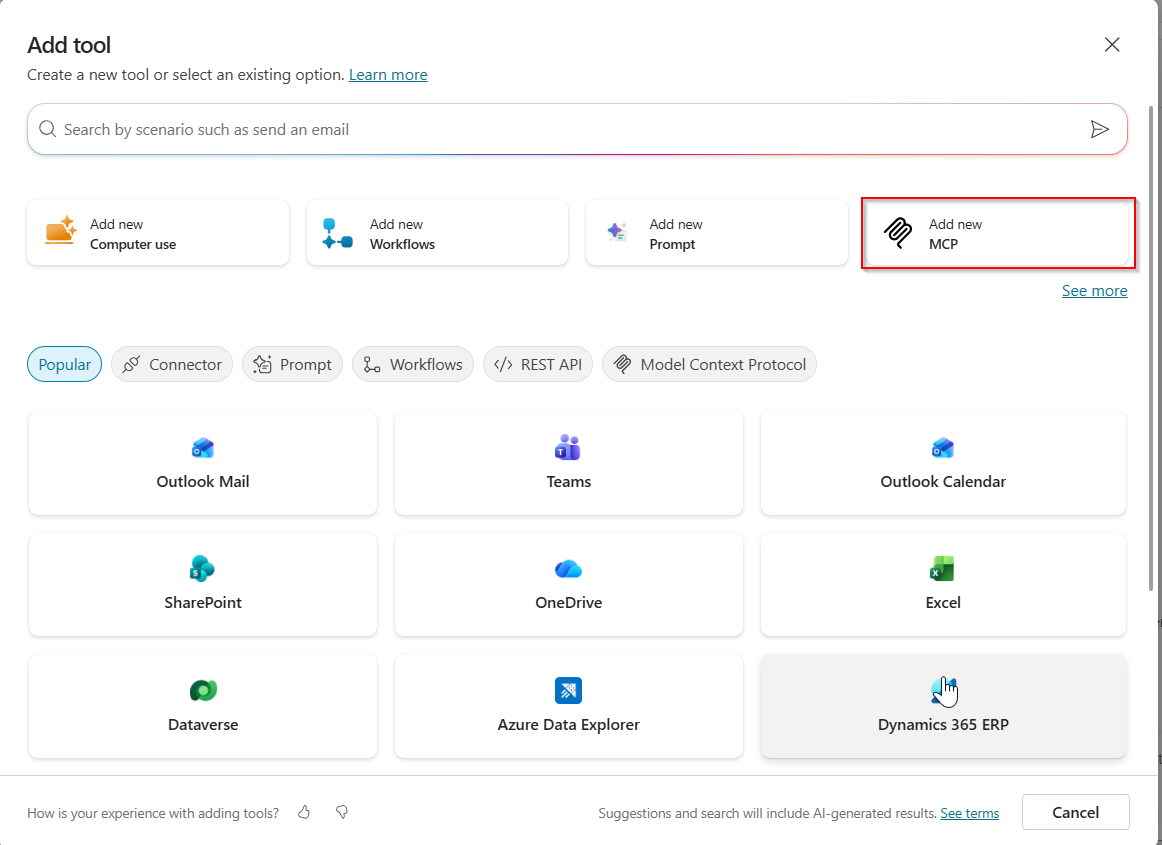
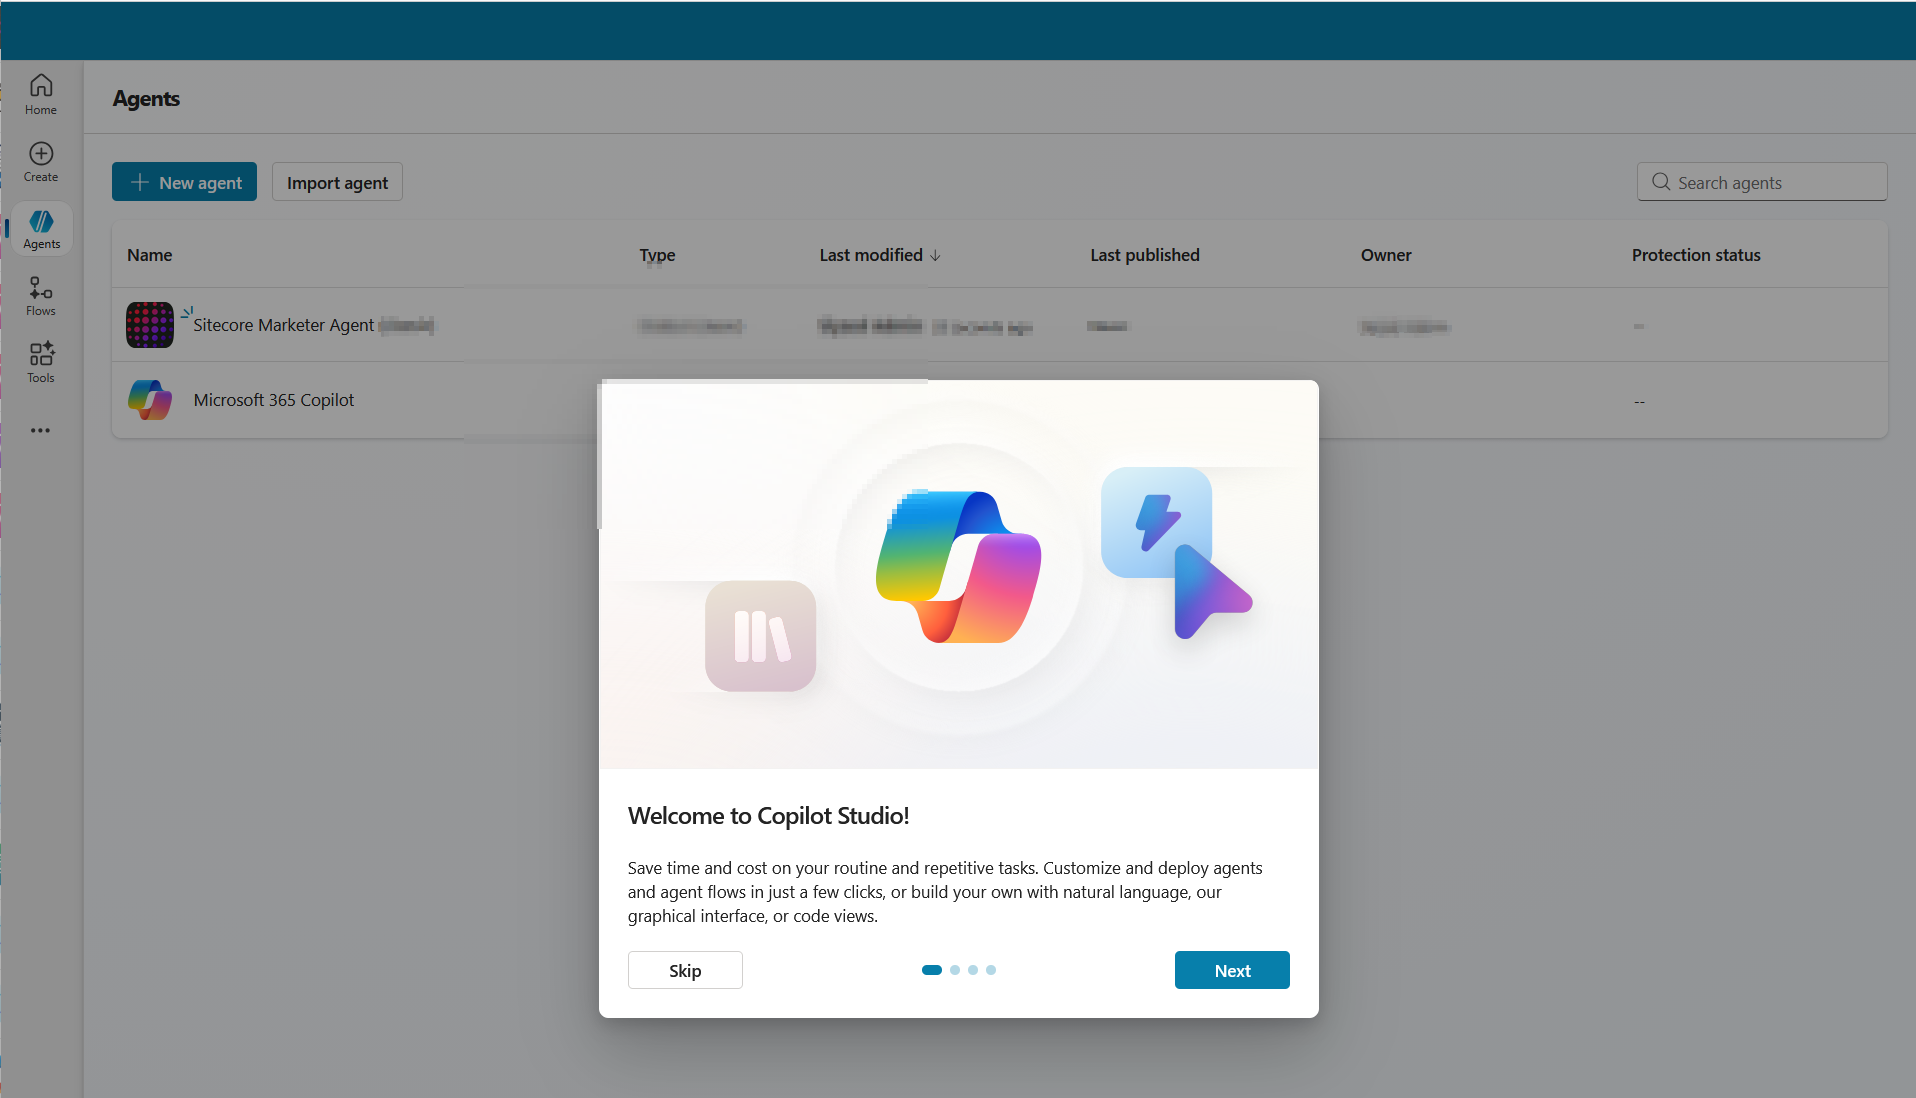
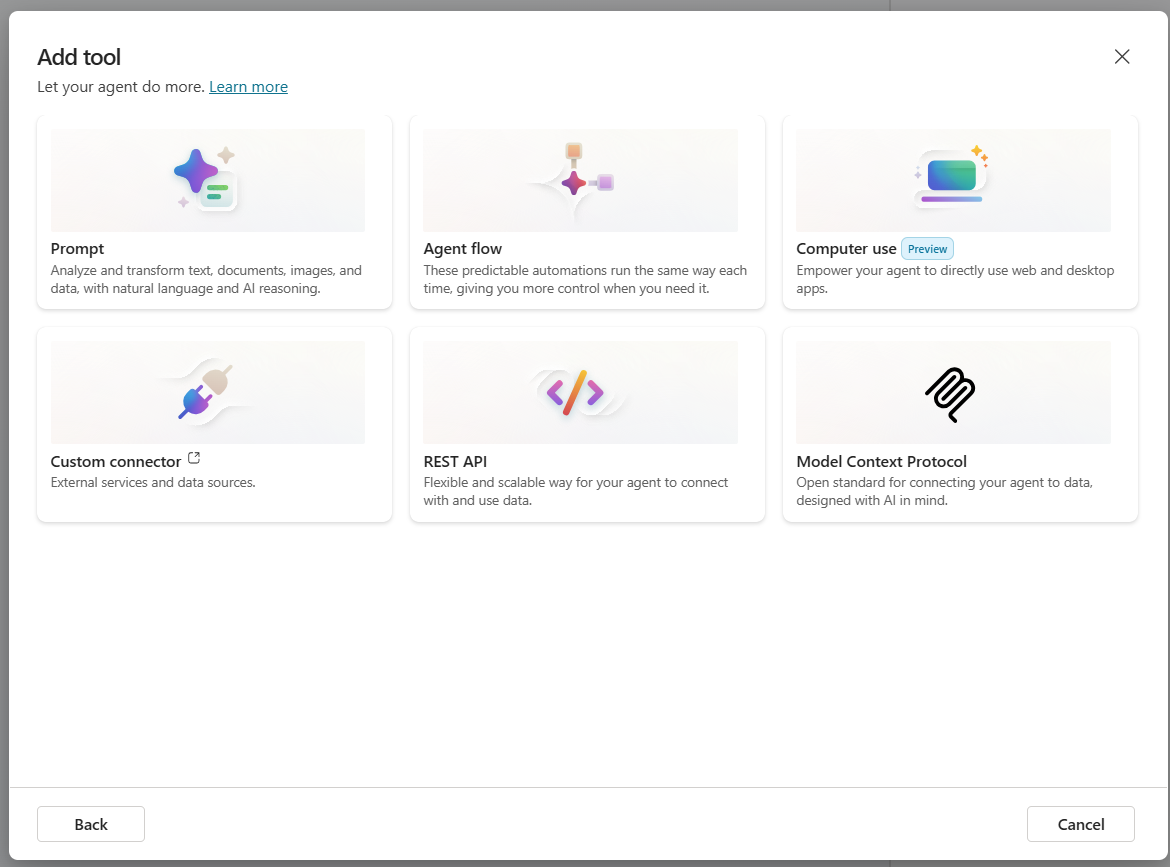
  • Go to the Tools tab for your agent then click  + Add a tool. The Add tool popup shown below opens
  • In the Create New section, select MCP icon Add new MCP.
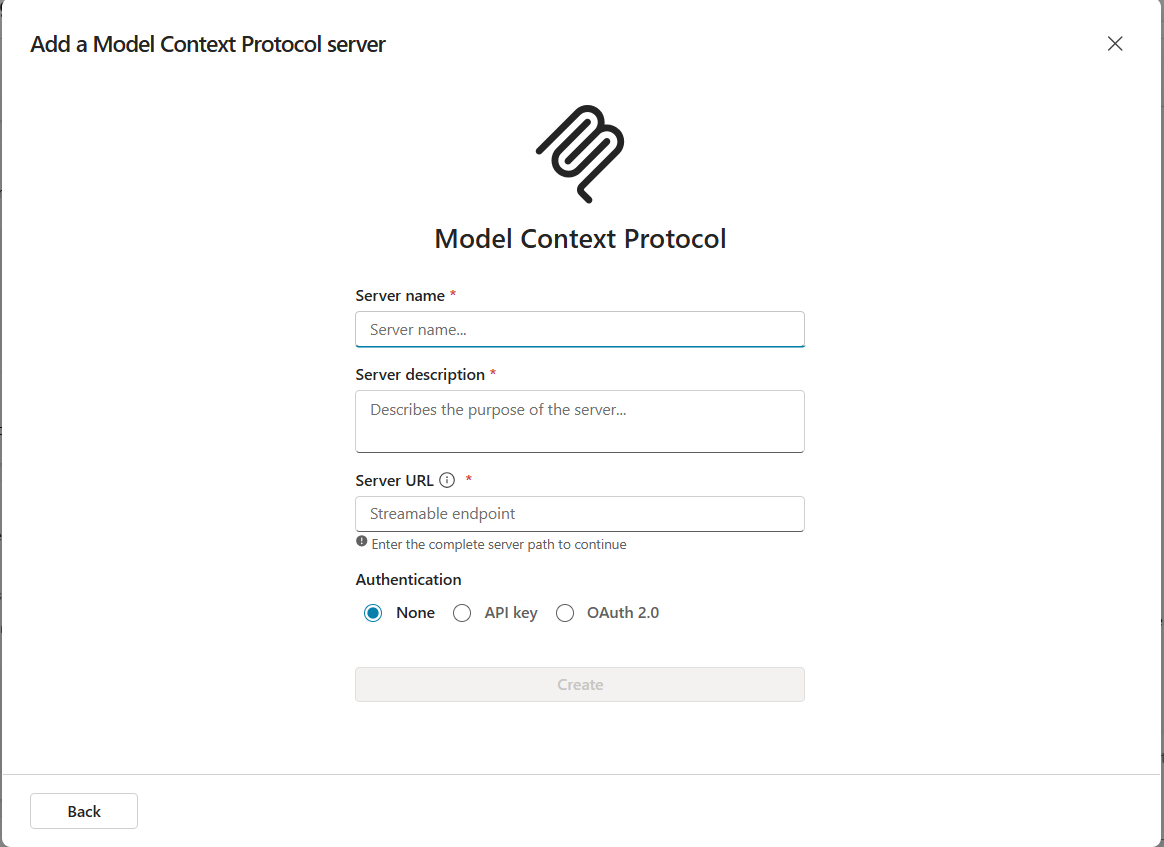
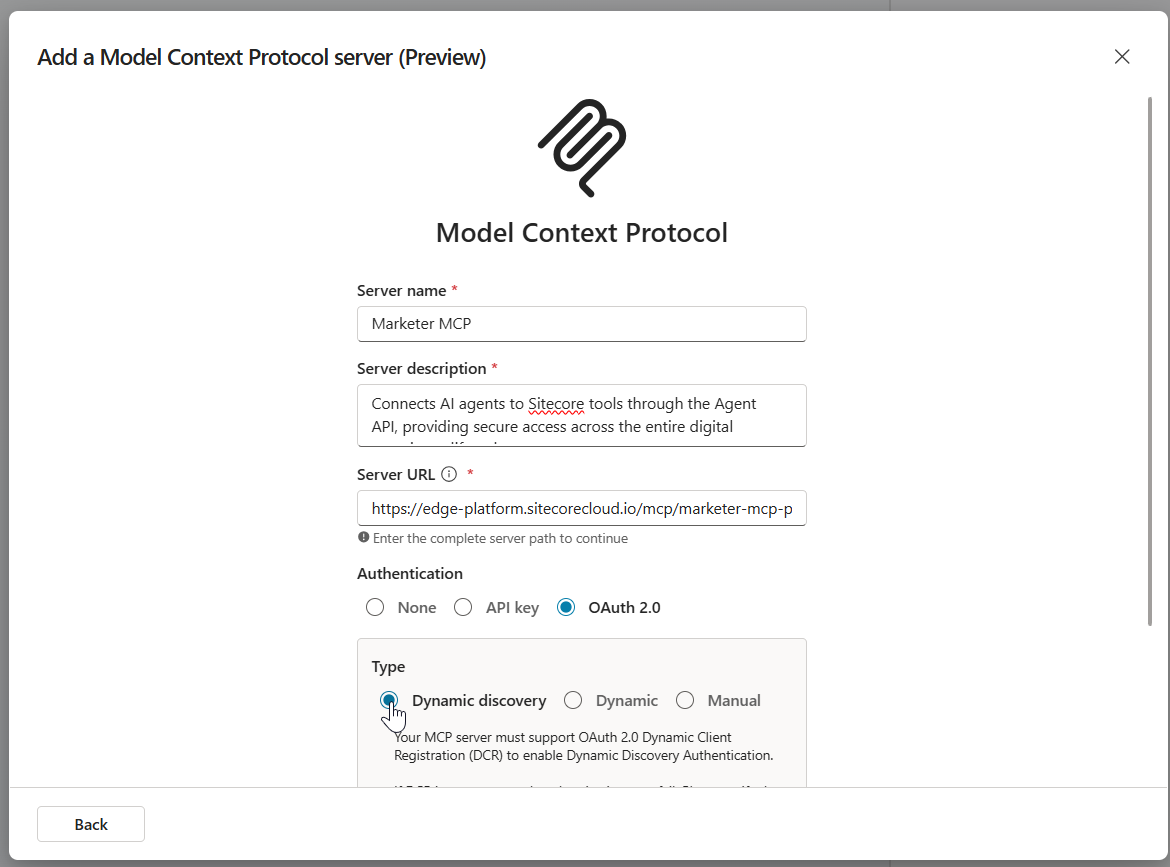
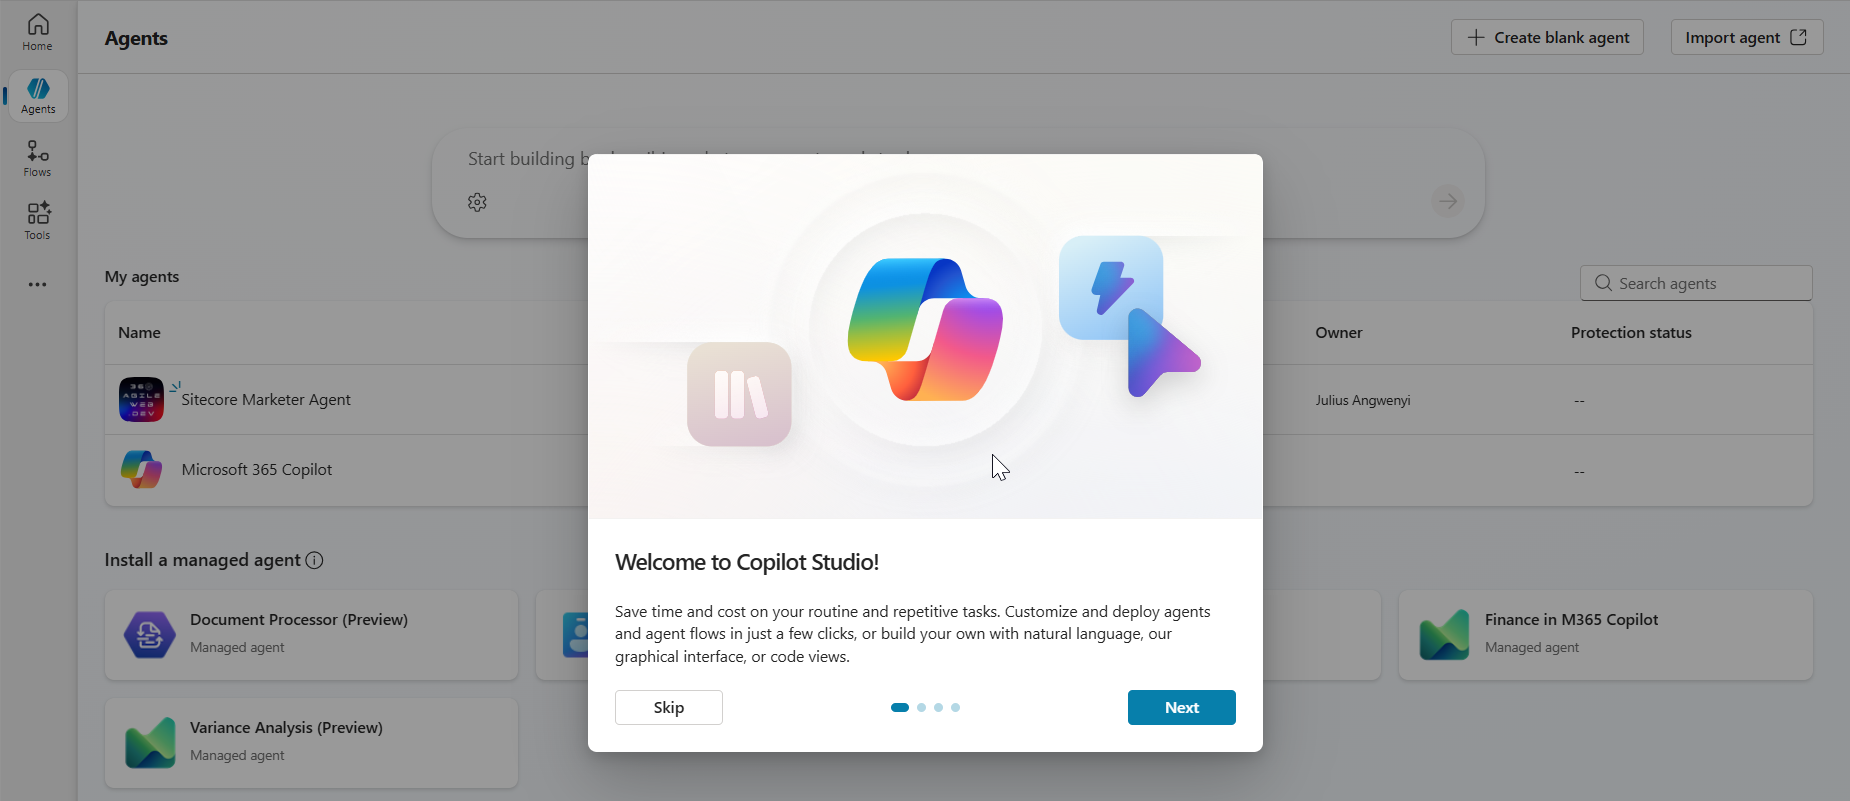
  • The Add a Model Context Protocol server popup opens as shown below
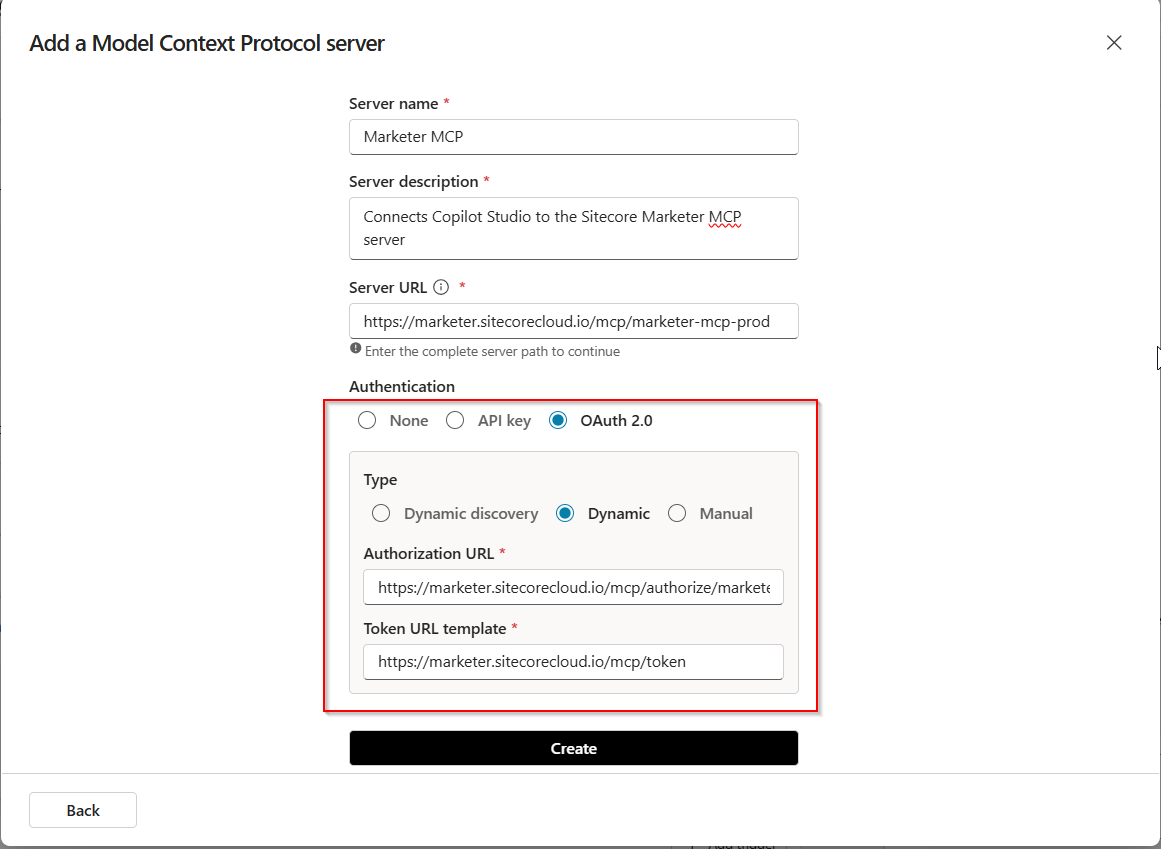
  • In the Add a Model Context Protocol server dialog, enter the following details:
    • Server name – for example, Marketer MCP.
    • Server description – a short description of what the Marketer MCP does. For example,Connects Copilot Studio to the Sitecore Marketer MCP server.
    • Server URL – the Marketer MCP server endpoint:
  • Under Authentication, select OAuth 2.0
  • Enter the following OAuth details:
  • Click Create.
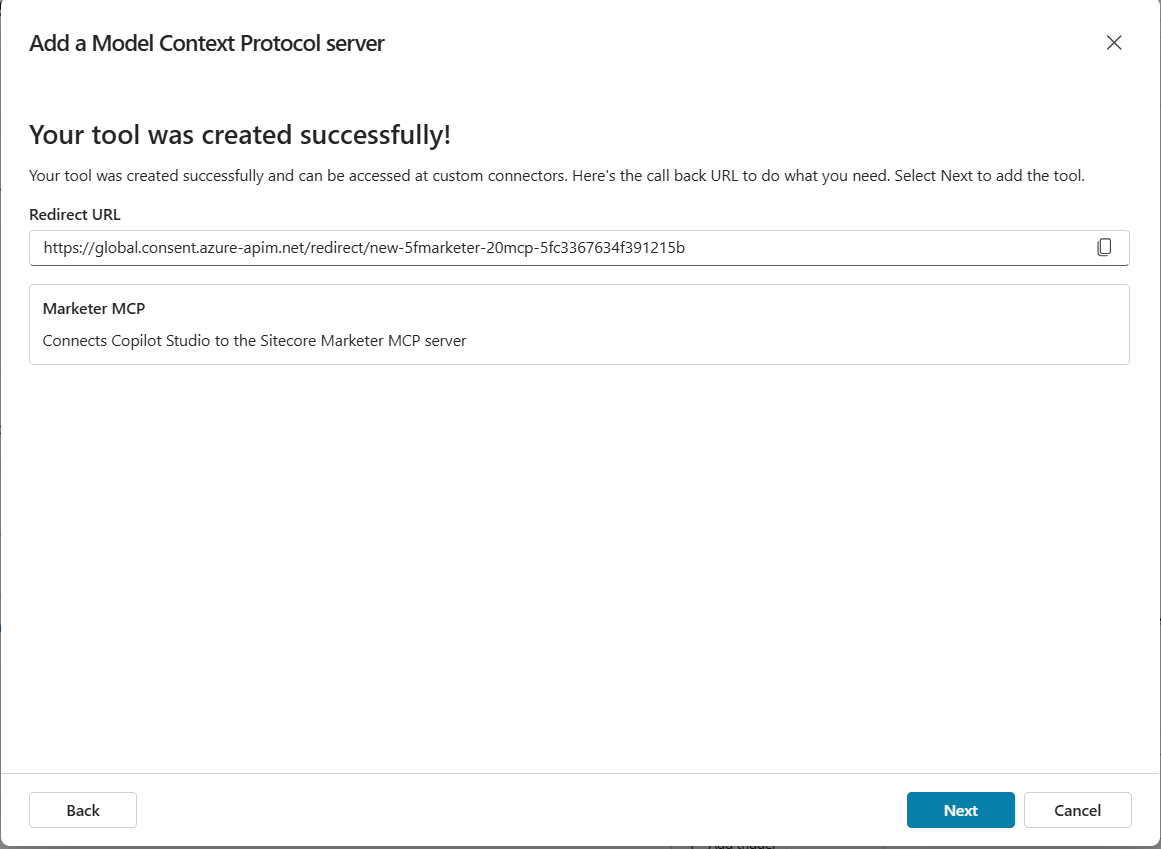
  • When Copilot Studio displays the redirect URL and MCP server details, click Next.
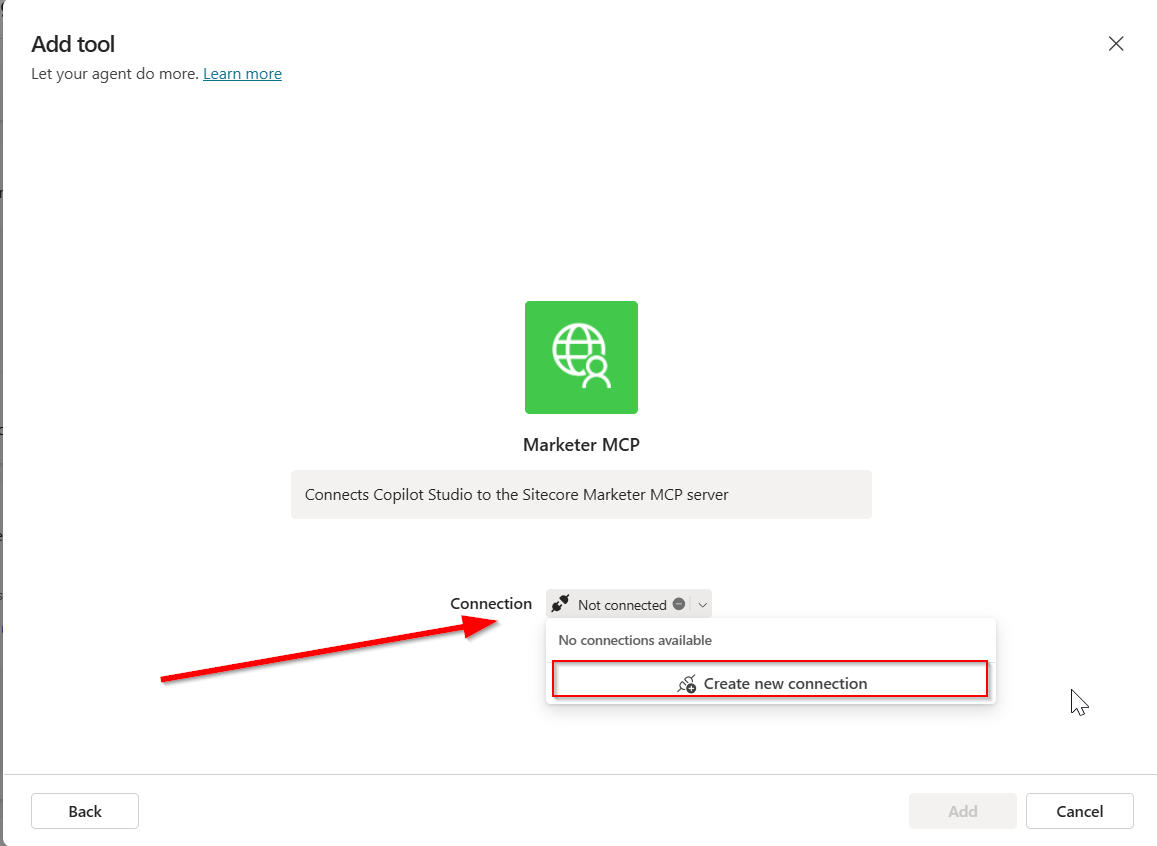
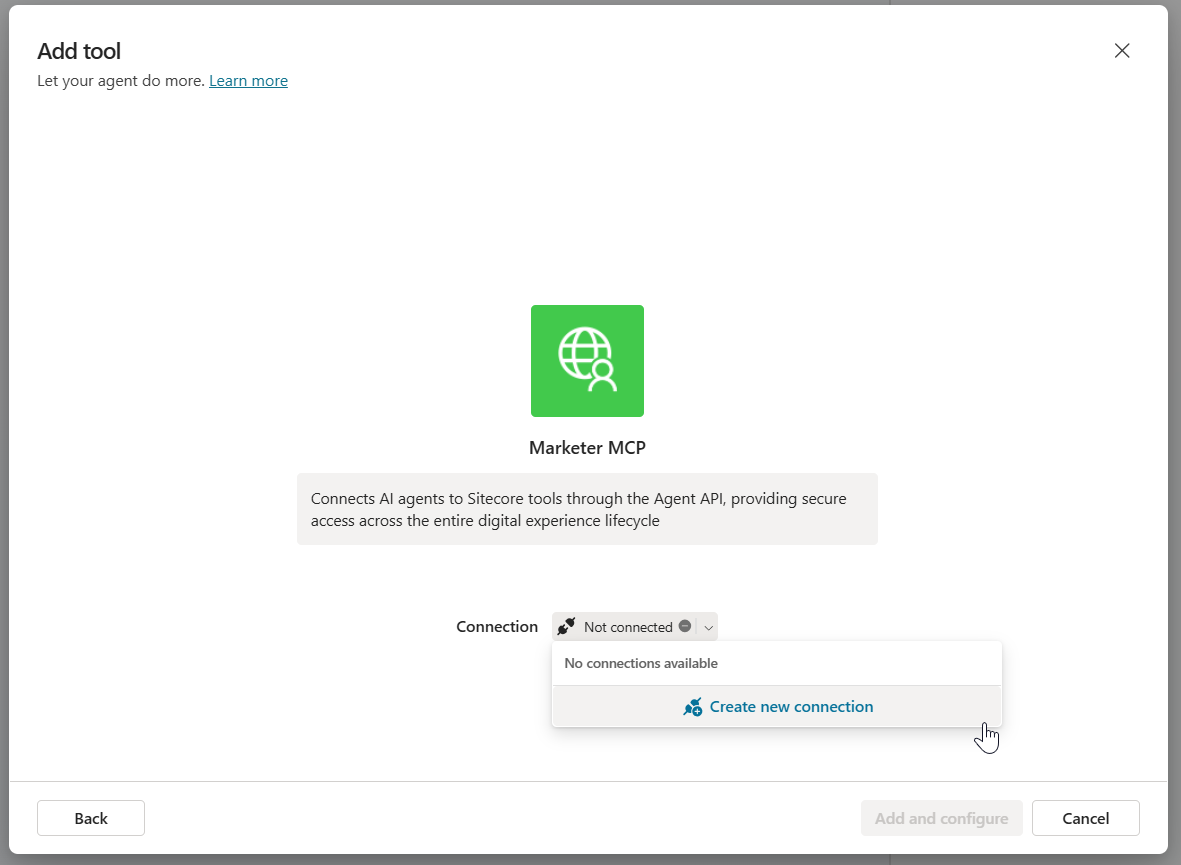
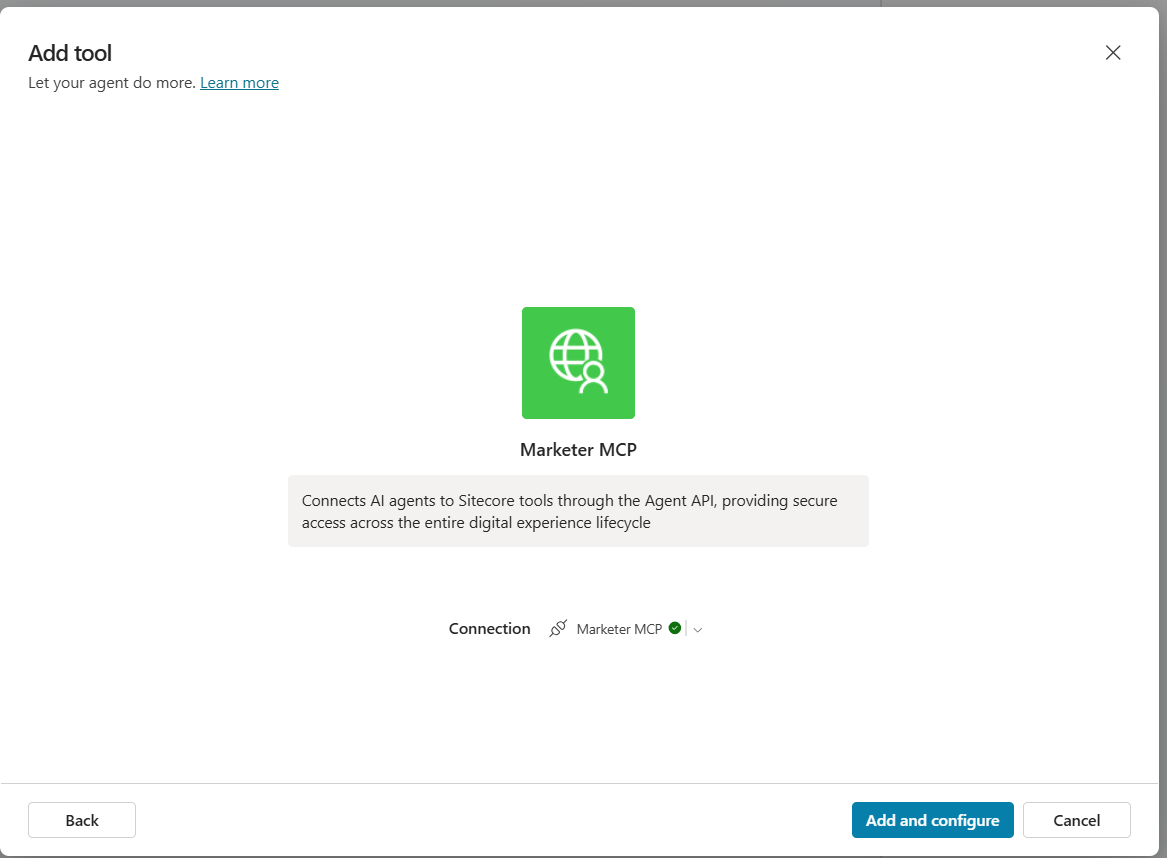
  • In the Add tool dialog, go to Connection. Click Not connected, then click Create new connection.
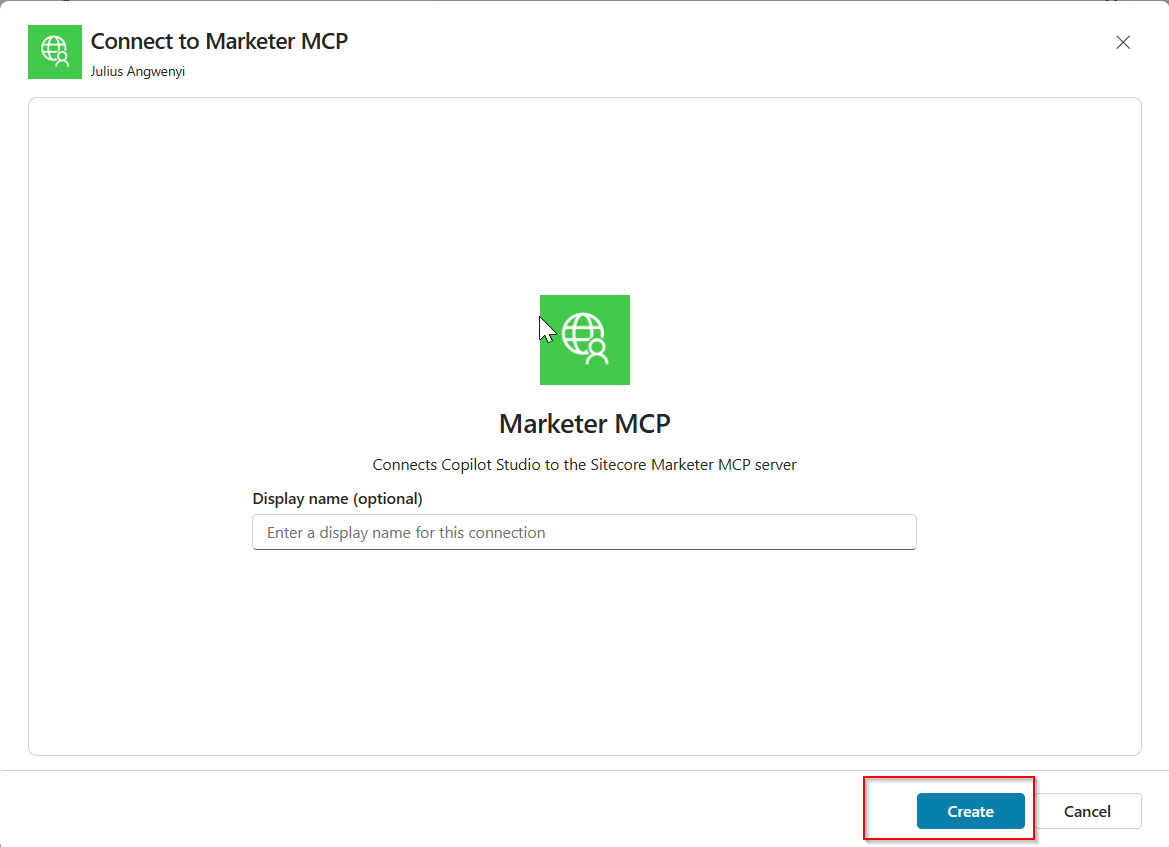
  • Specify the Display name (optional).
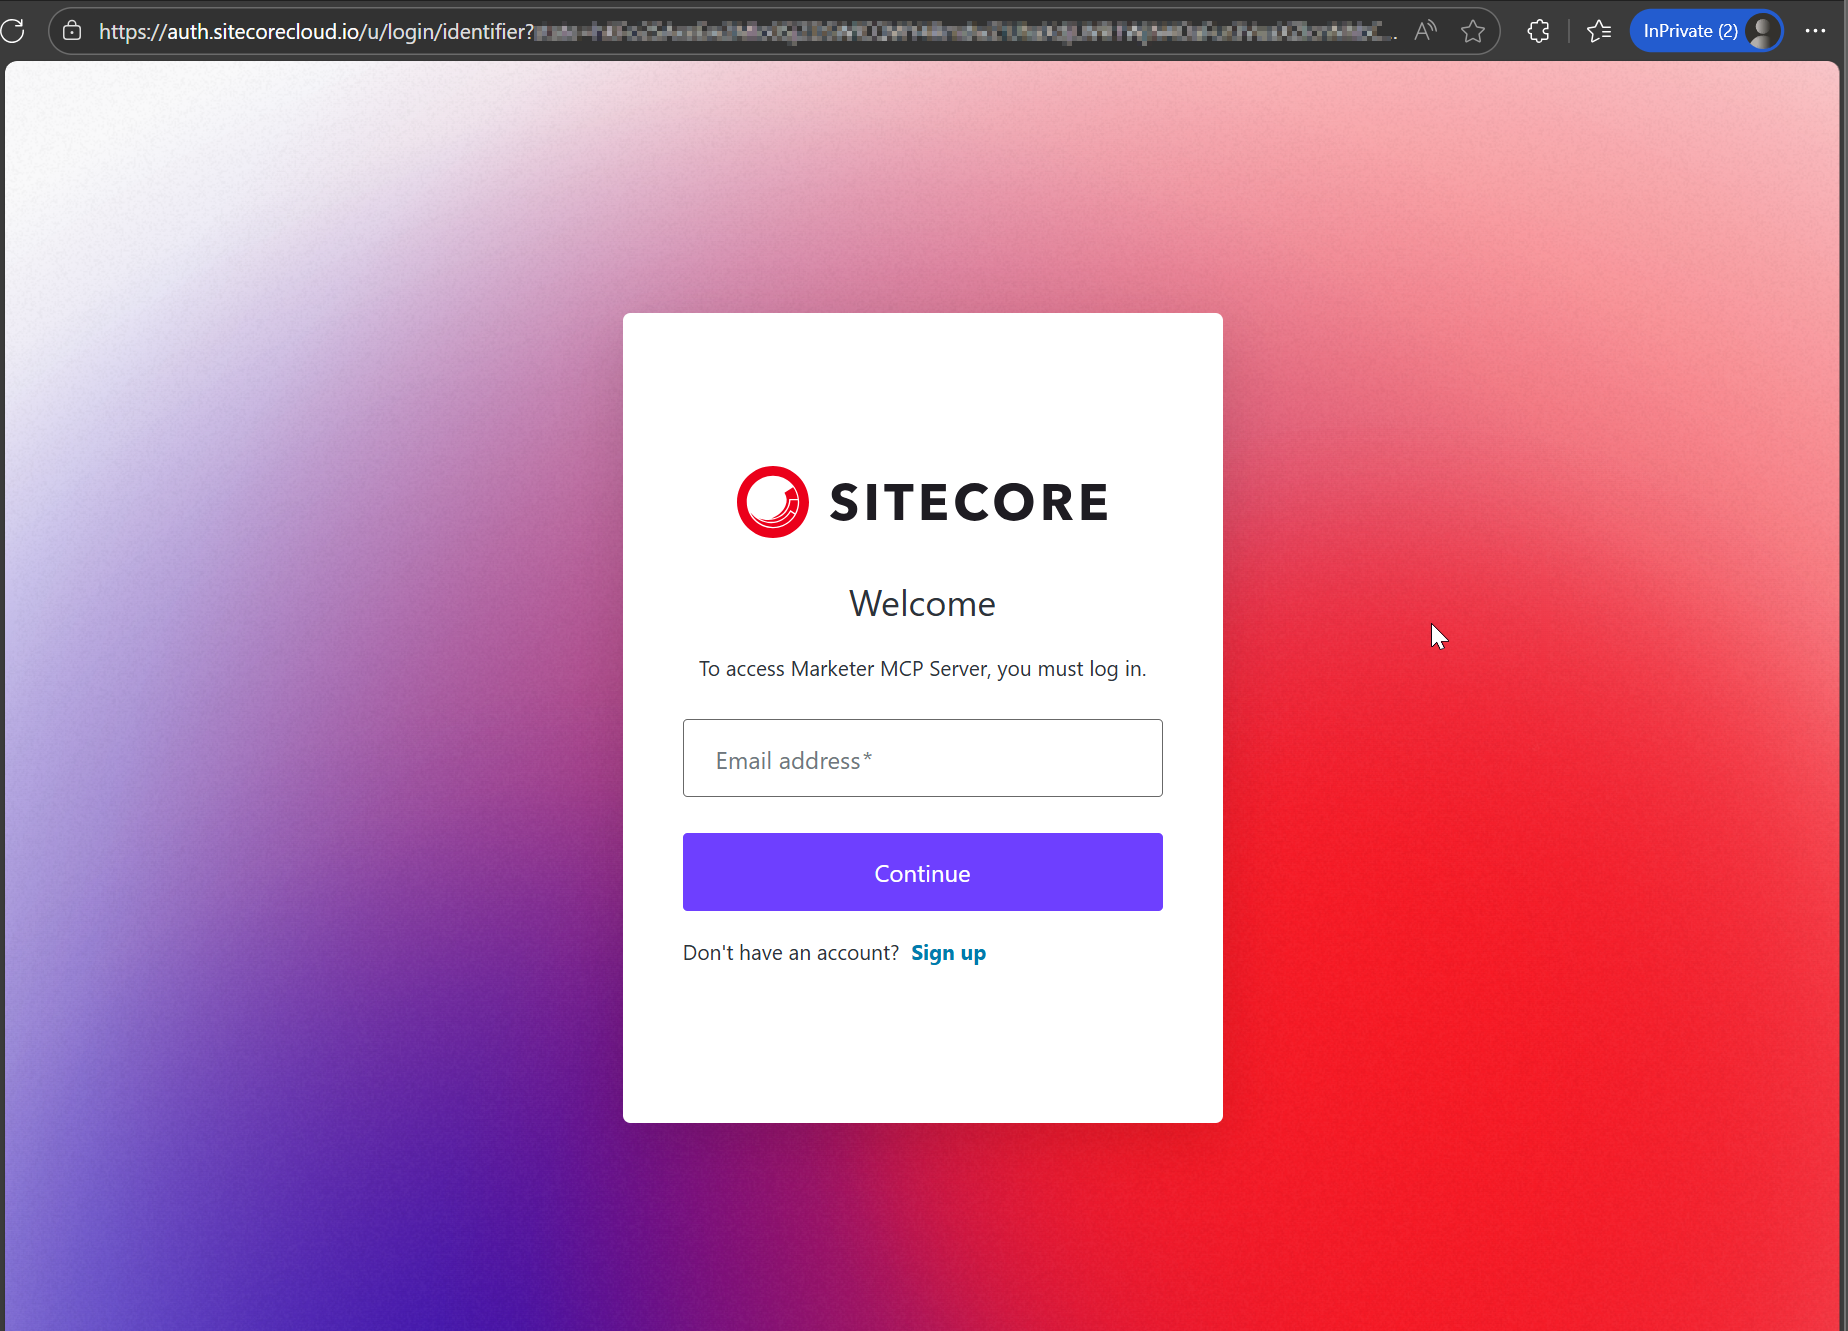
  • Click Create. Copilot Studio opens the Sitecore authorization page in your browser.
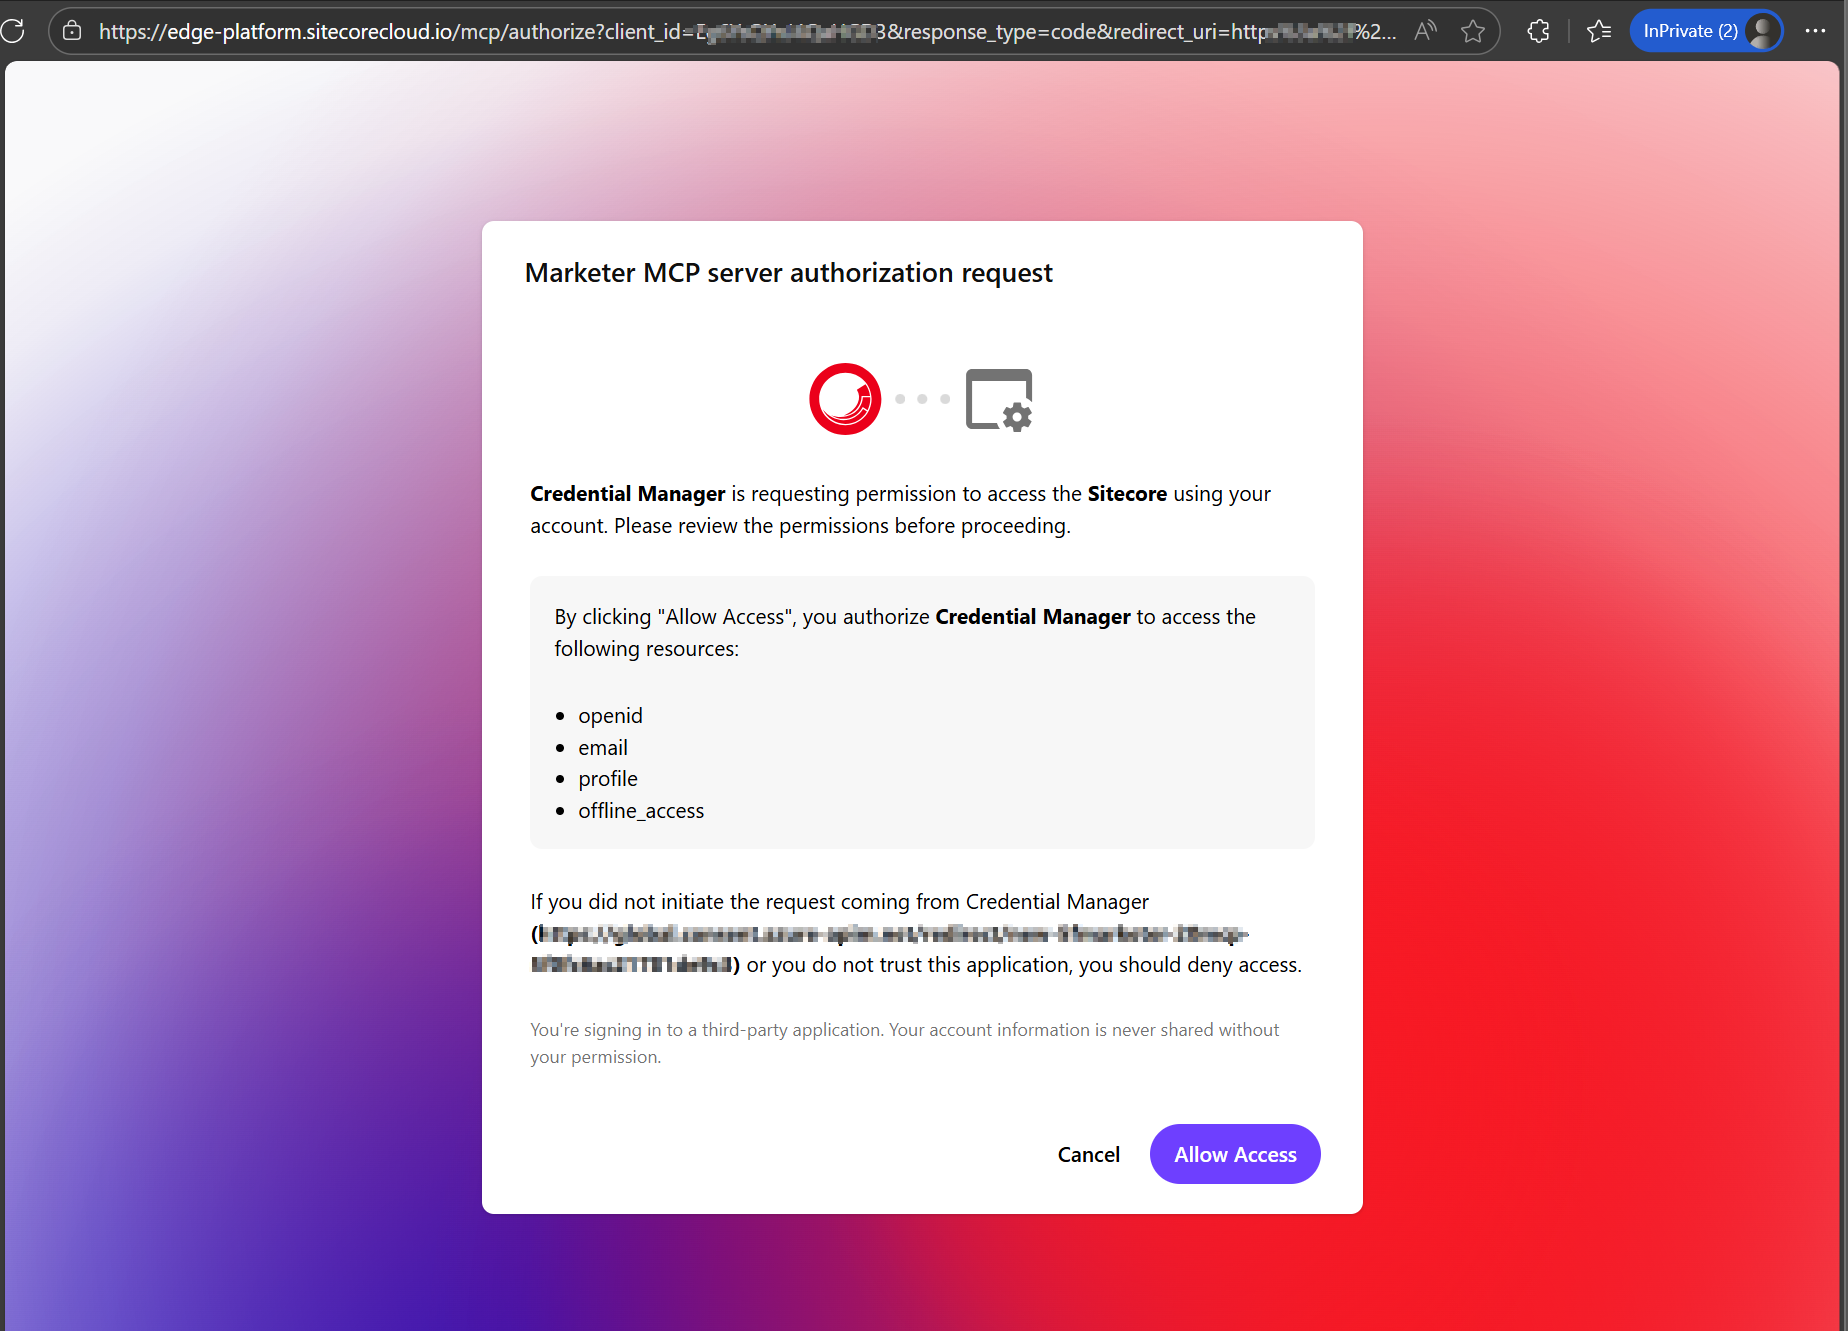
  • In the Marketer MCP server authorization request dialog, click Allow Access.
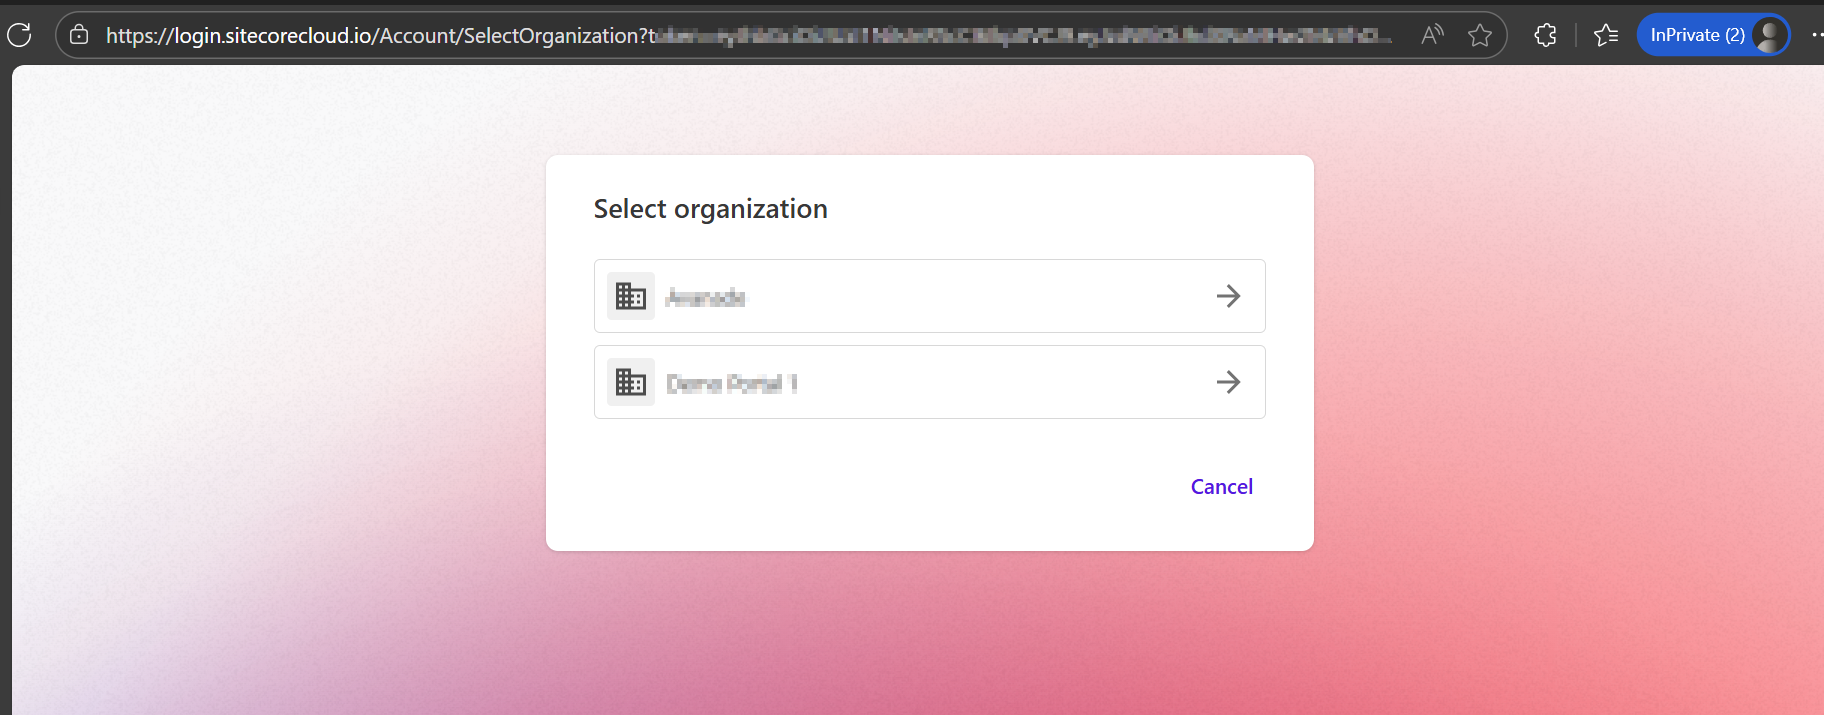
  • Select the organization and tenant you want to use with the MCP server.
  • When the connection shows as connected, click Add and configure.

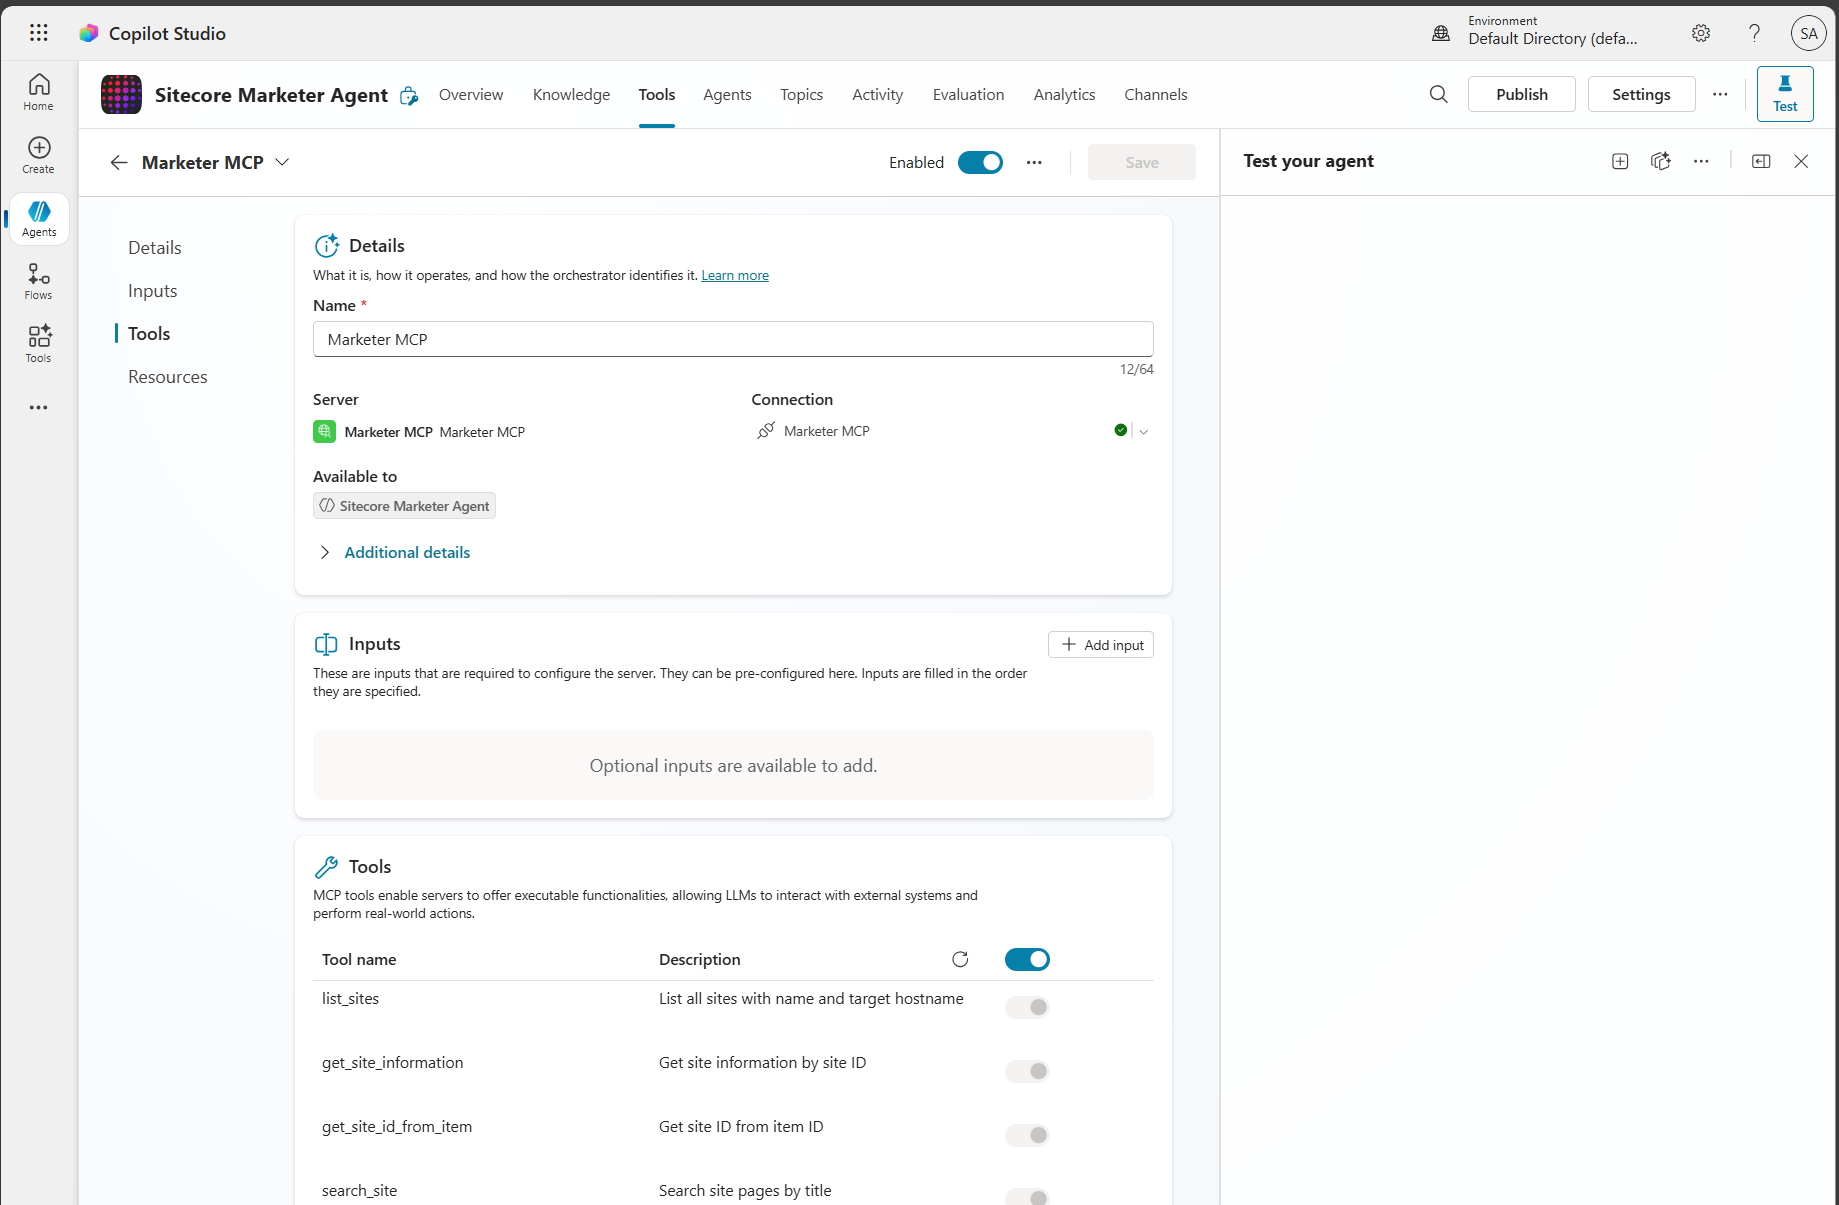
You should now see the Marketer MCP details and its tools enabled and ready to use. You can begin entering prompts to interact with Sitecore through the MCP.

Step 2 – Get prompting

From your Copilot prompt text area, you can now use natural language to prompt and perform actions in SitecoreAI.

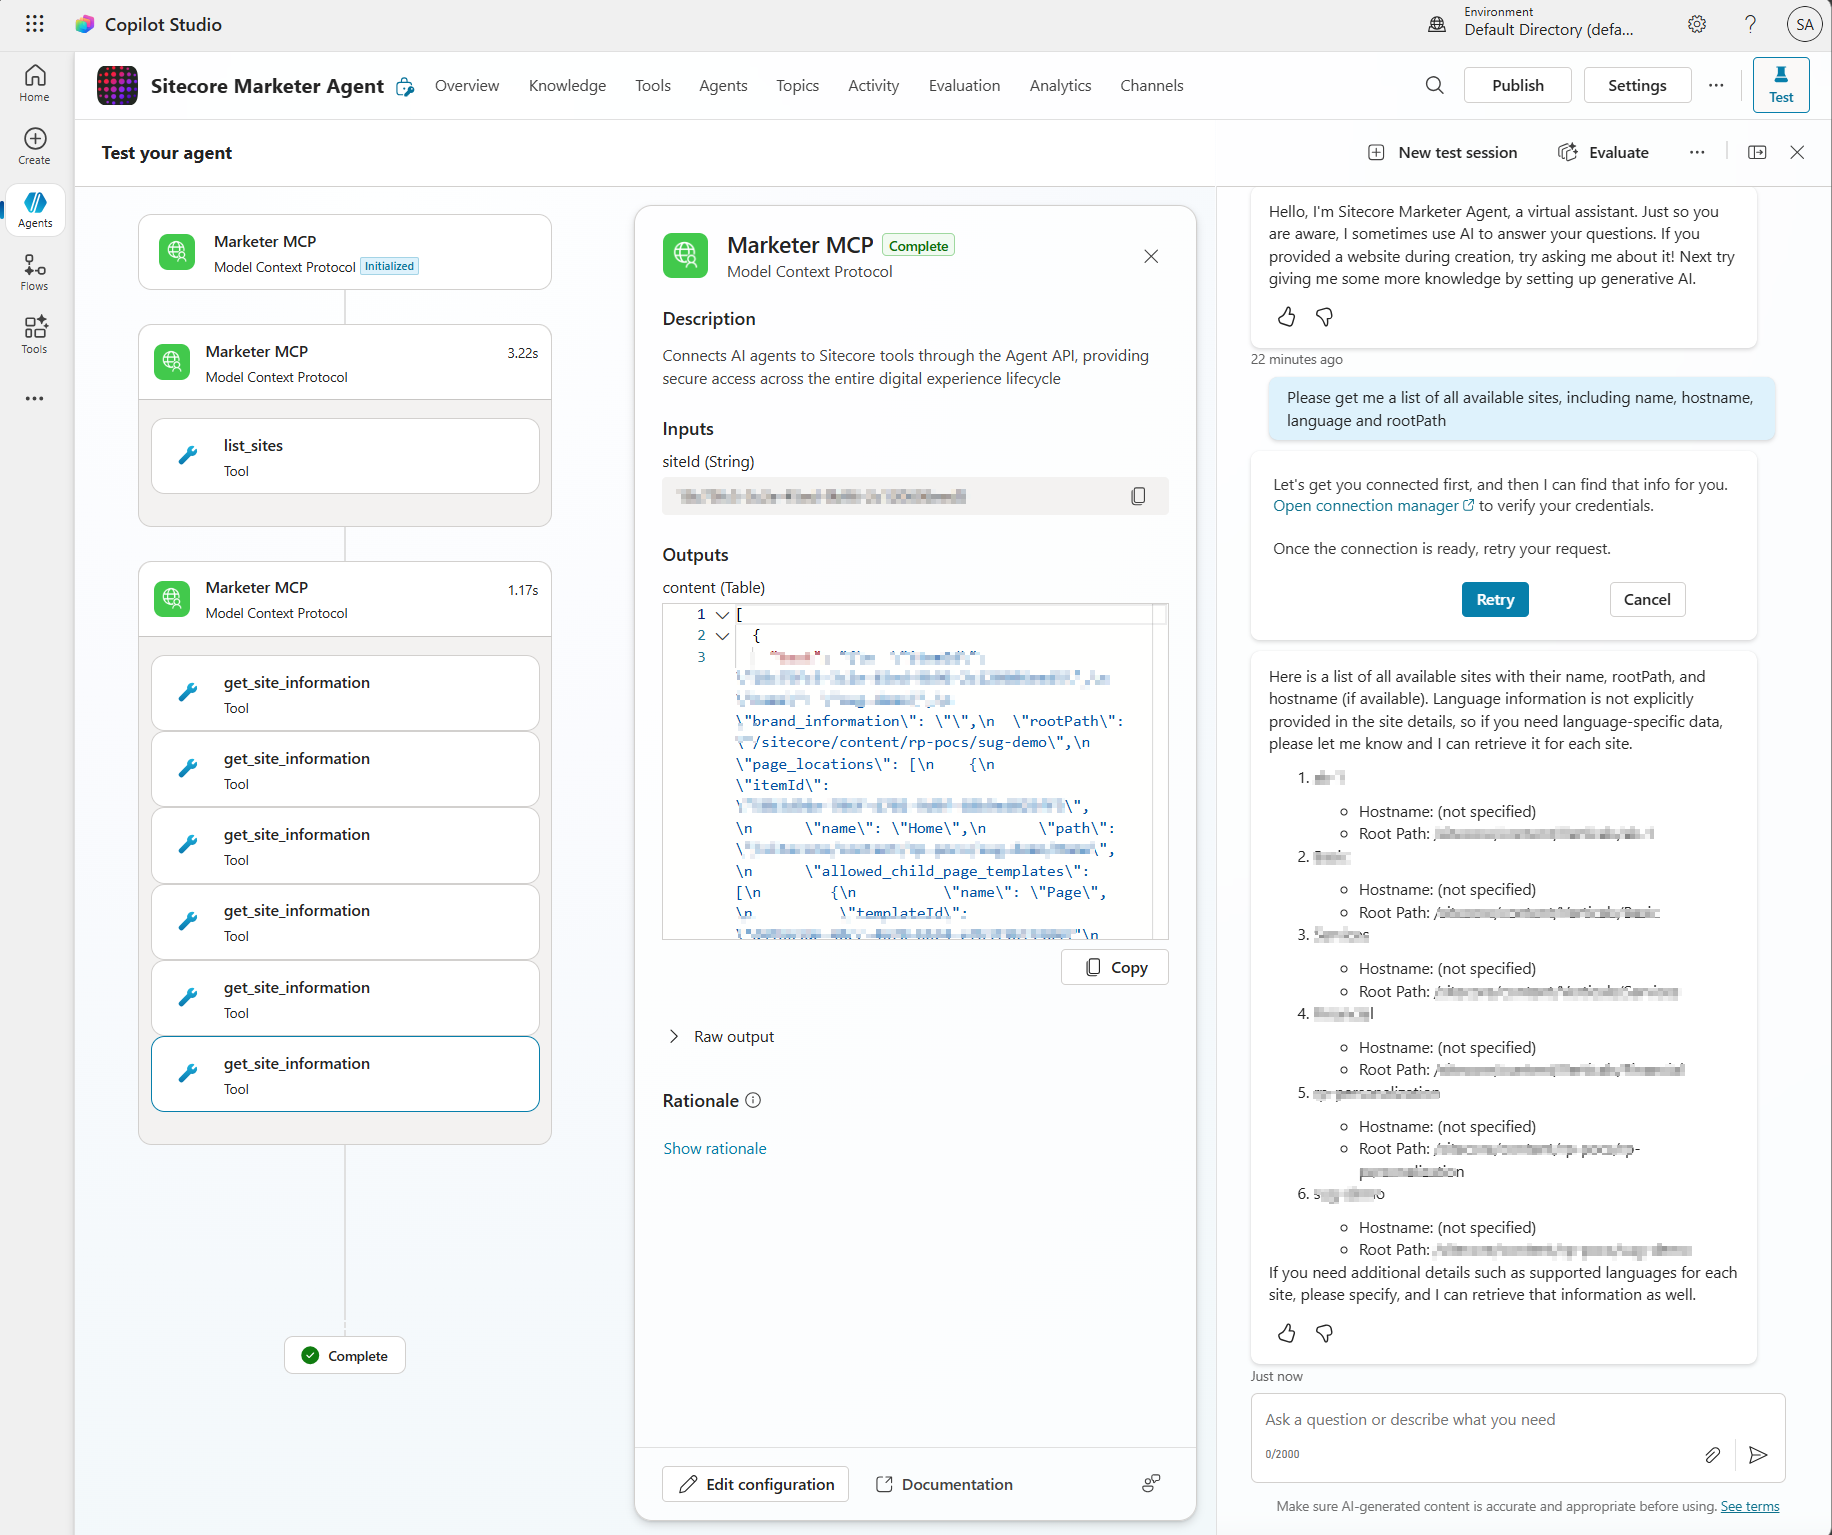
To verify the connection, open the agent test chat panel and enter a prompt like List all available sites. If the connection is successful, the client returns a list of sites for the selected tenant.

If Copilot Studio asks you to connect the MCP server before using it, open the connection manager, click Connect, click Submit, and then retry the prompt

Step 3 – Troubleshooting guide

You may come across some issues when establishing the connectivity into Marketer MCP from Copilot Studio. Below are the issues I encountered and how I resolved them.

Issue 1: Environment Access permission error

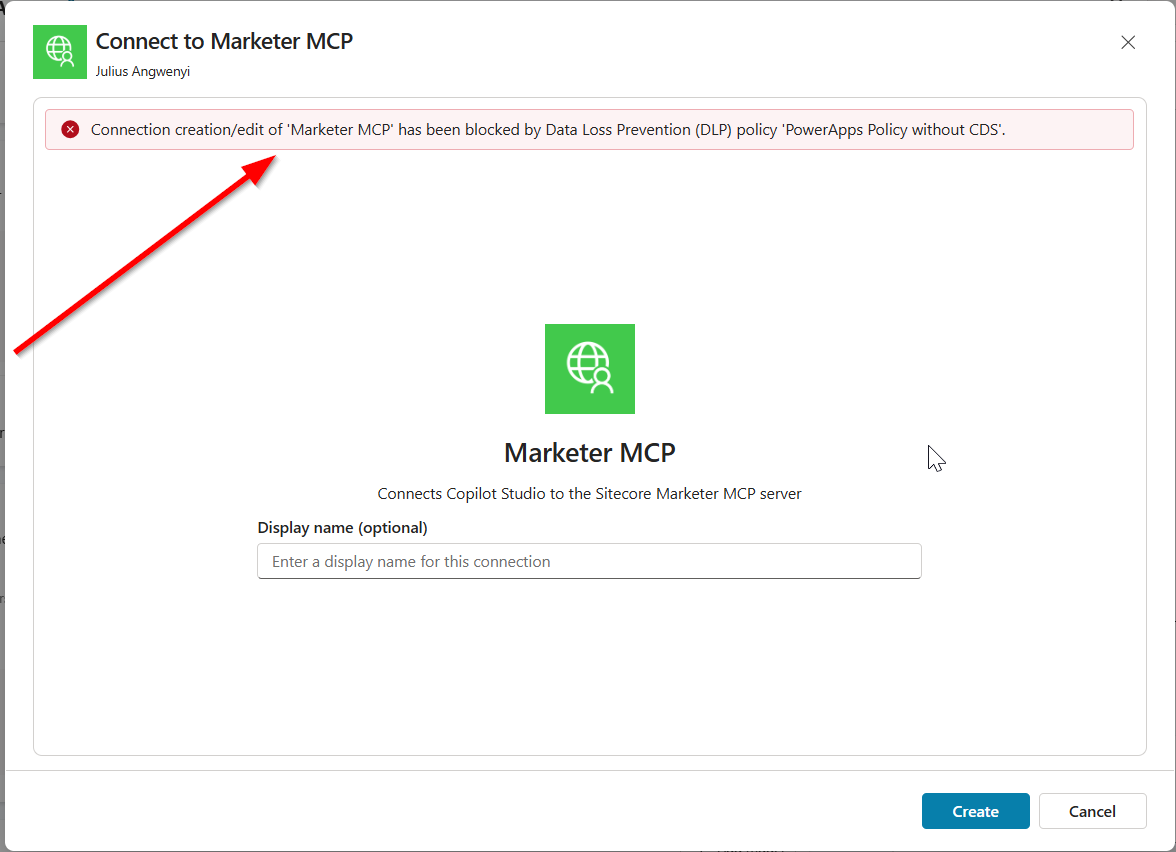
The error below may occur when your Copilot Studio account doesn’t have access permissions to create a custom connection

Connection creation/edit of ‘Marketer MCP’ has been blocked by Data Loss Prevention (DLP) policy ‘PowerApps Policy without CDS’.

Issue 1 Resolution:

Work with your ITS teams to provision the correct level of needed access in Copilot Studio

Next steps

In this blog post, we looked at a step-by-step guide for the simplified Marketer MCP setup for Copilot Studio. We also looked at how to verify the connection and how to troubleshoot potential issues that you may encounter.

The Marketer MCP provides tools to create content, manage campaigns, run marketing automation, and handle content management. Be sure to visit example prompts and the Marketer MCP tool reference for further guidance from official Sitecore docs.

Stay tuned for future posts, feel free to leave us comments and feedback as well.

Everything SitecoreAI – putting into test some of the latest Agentic Studio updates released March 30, 2026

Context

The Agentic studio in SitecoreAI brings human-AI collaboration into everyday marketing work, embedding AI directly into marketing workflows. Sitecore are doing a fantastic job behind the scenes to evolve, enhance and add new capabilities to SitecoreAI’s Agentic Studio.

With the March 30 2026 release, the Agentic studio focuses on working directly with your content, expanding how agents can be built and configured, and supporting larger workflows across multiple items and steps.

This release caught my eye, and I decided to dig deep into the nature of the updates to the agents, and try them first-hand with a practical agent.

In this blog post, I will be creating an agent using SitecoreAI’s Agentic studio,complete with screenshots for all the key steps involved. In particular, put to test working SitecoreAI pages and calling external APIs.

What are they key updates to agents?

  1. You can run agents directly on your content. Agents are structured to work with context, items, and tools as part of your day-to-day workflows. For example, agents can directly work with items like SitcoreAI pages, briefs, artifacts and CSV files
    • Work with items – agents can run on items like SitecoreAI pages, briefs, artifacts, and CSV files. Agents process selected items across parameters (like languages) to generate outputs for each combination. They also enable content at scale from structured inputs, such as accounts in a CSV.
    • Use built-in tools and features – chat interfaces across Agentic studio let you set context, skills, MCPs, and tools for each run, giving you more control over how the agent behaves.
  2. You have more flexibility to create and customize your own agents. You can define and configure agents and workflows to match your needs. Below is a summary verbatim from Sitecore release notes:
    • Create standard agents – define standard agents with instructions, tools, skills, context, and output formats for a flexible, chat-style experience.
    • Add new workflow actions – create workflow agents that support invoking standard agents, calling external APIs, and invoking Agent API tools.
    • Manage skills and tools – a Settings page brings together tools, skills, schemas, templates, user management, and job tracking.
    • Use agent skills – apply built-in agent skills such as campaign planning, competitive analysis, and CSV/text processing, or create your own.
    • Reuse schemas and templates – JSON schemas and HTML templates are managed globally by admins and reused across agents.
    • Test workflows – agent workflows can be tested with step-by-step visibility, including timing and error reporting.

Let us now put this to test – create an agent that invokes external API

Below we are going to create an X/Twitter Single Tweet Generator, a workflow agent that you can leverage to post on your X/Twitter.

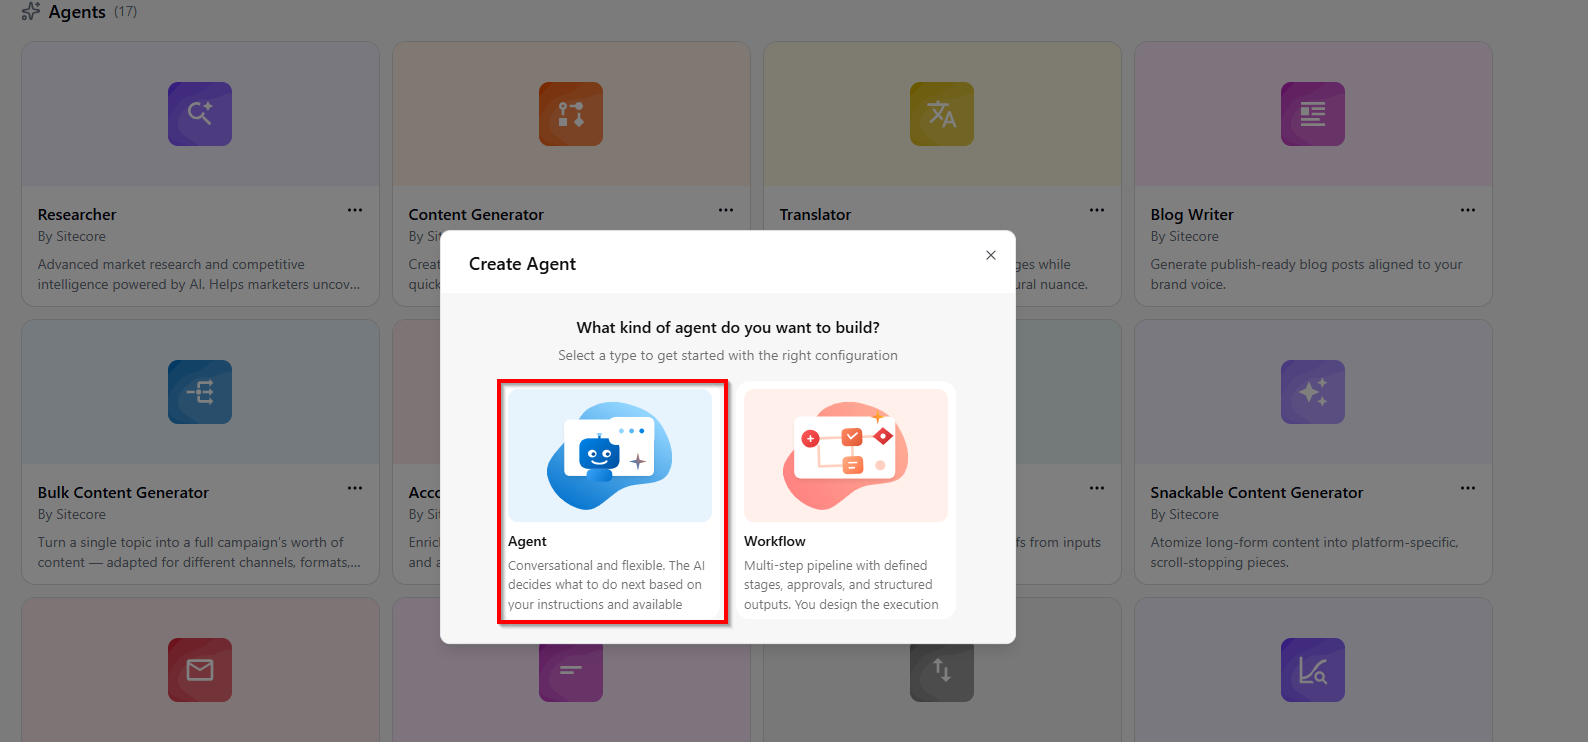
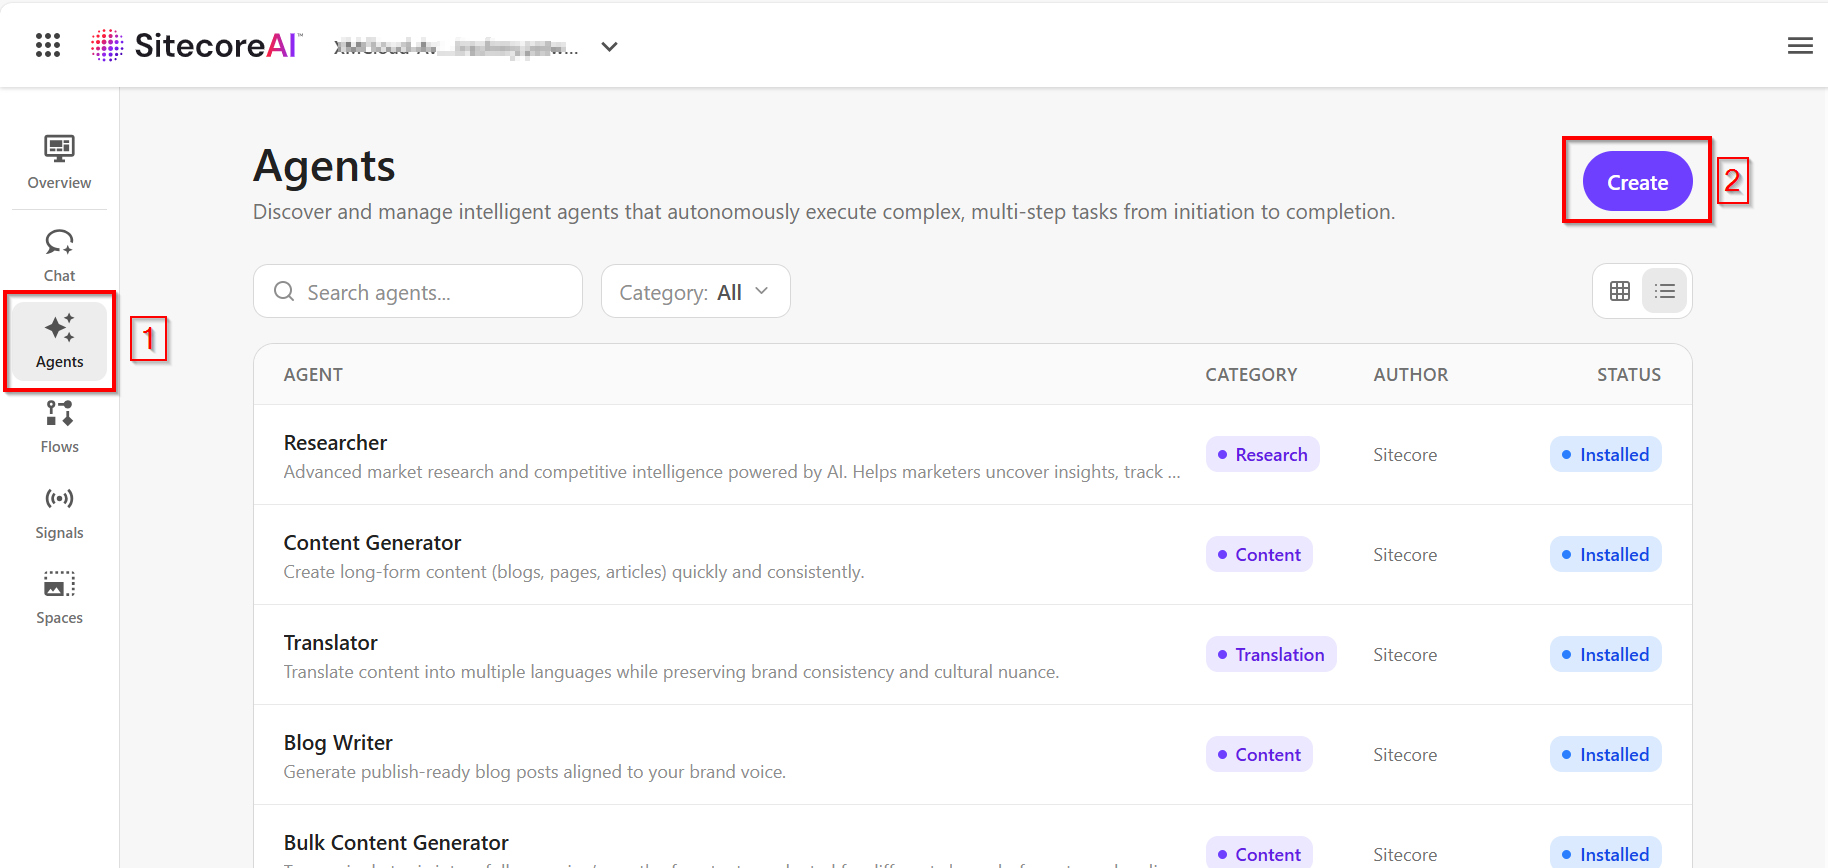
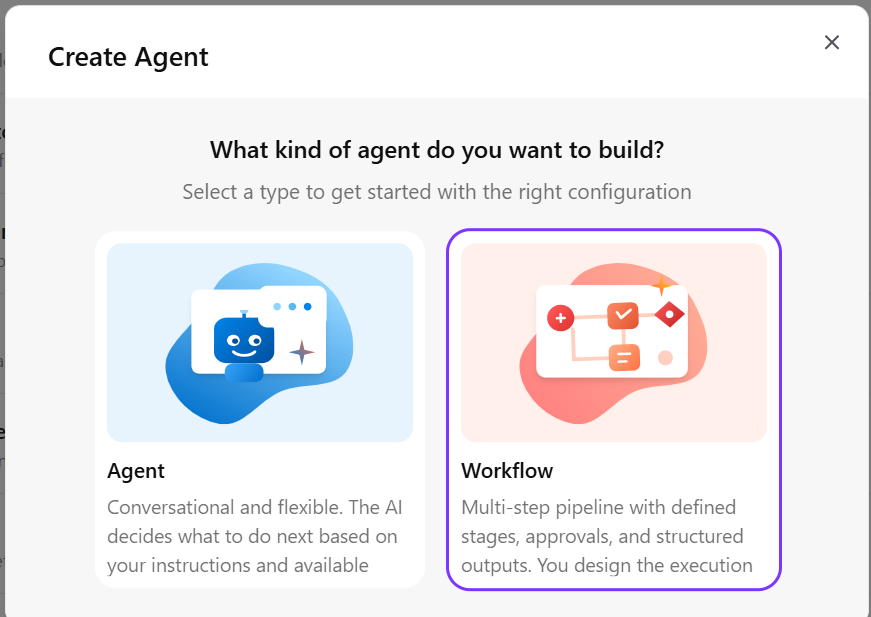
Step 1: In Agentic Studio, click on Create button.

Please note you need a “Builder licence” within SitecoreAI to create new Agents.

  • On the Create Agent popup, select Workflow option

Step 2: Define the overivew.

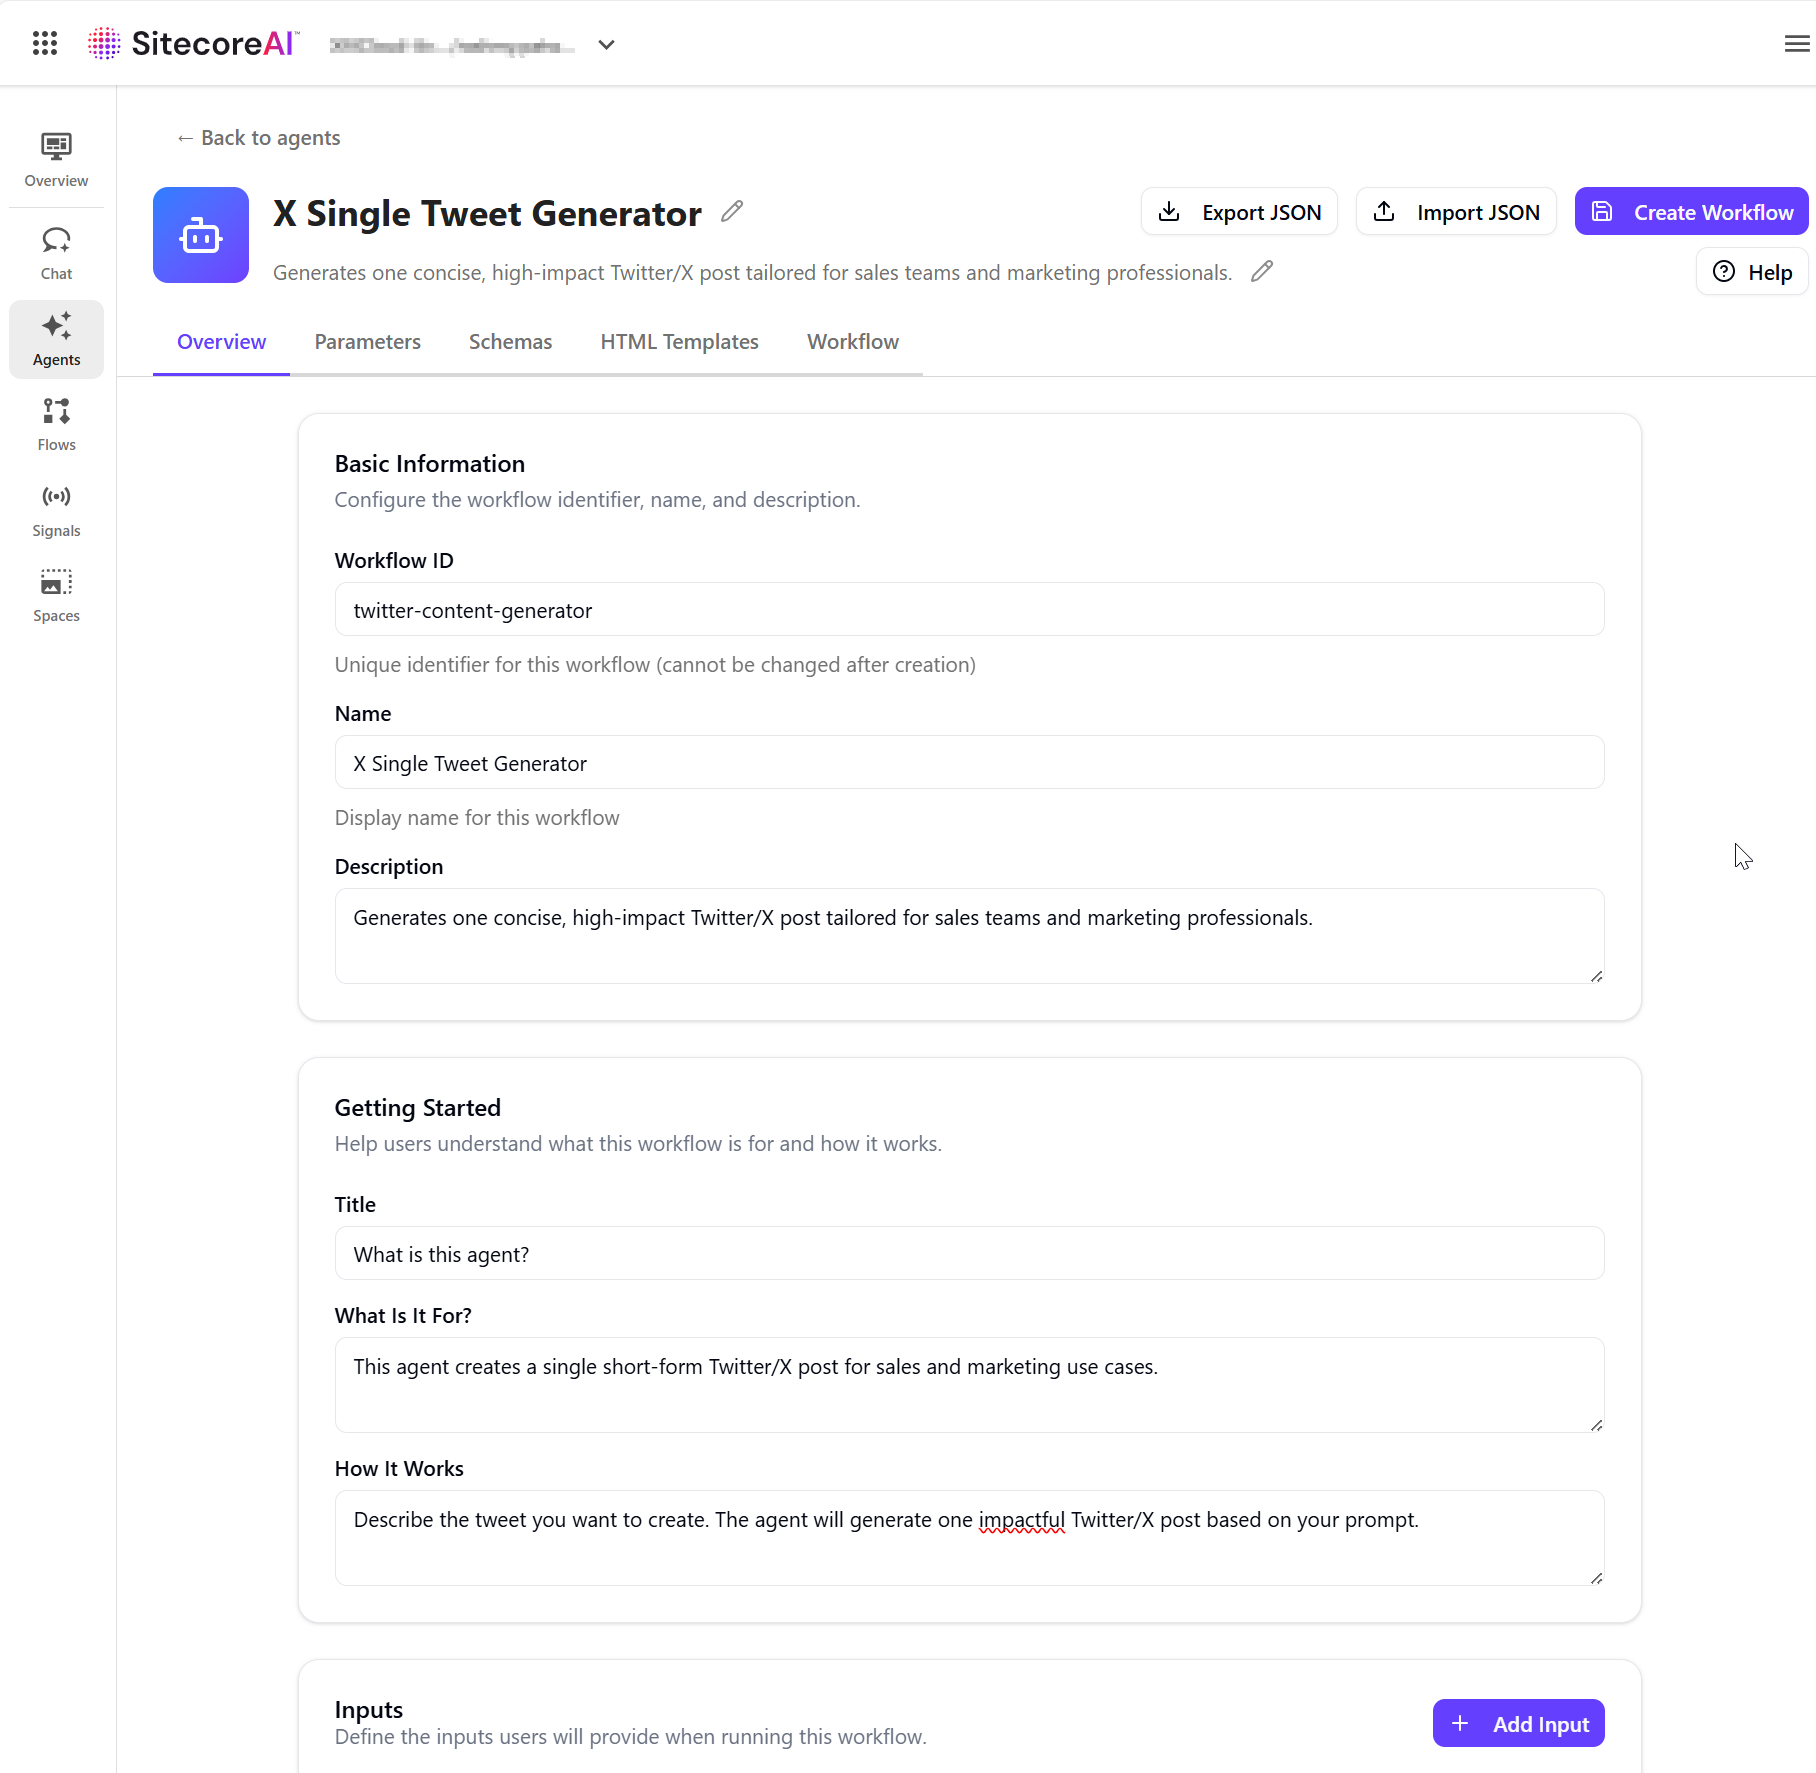
  • On the New Workflow overview page, specify the workflow agent configuration, as shown below
    • Workflow ID – Unique identifier for this workflow (cannot be changed after creation)
    • Name– Display name for this workflow
    • Description –  a short summary of what the agent does.
  • In the Getting Started section, provide the content that appears on the agent run page:
    • Title – a short heading.
    • What is it for – the agent’s purpose.
    • How it works – how inputs are used and what the agent generates.
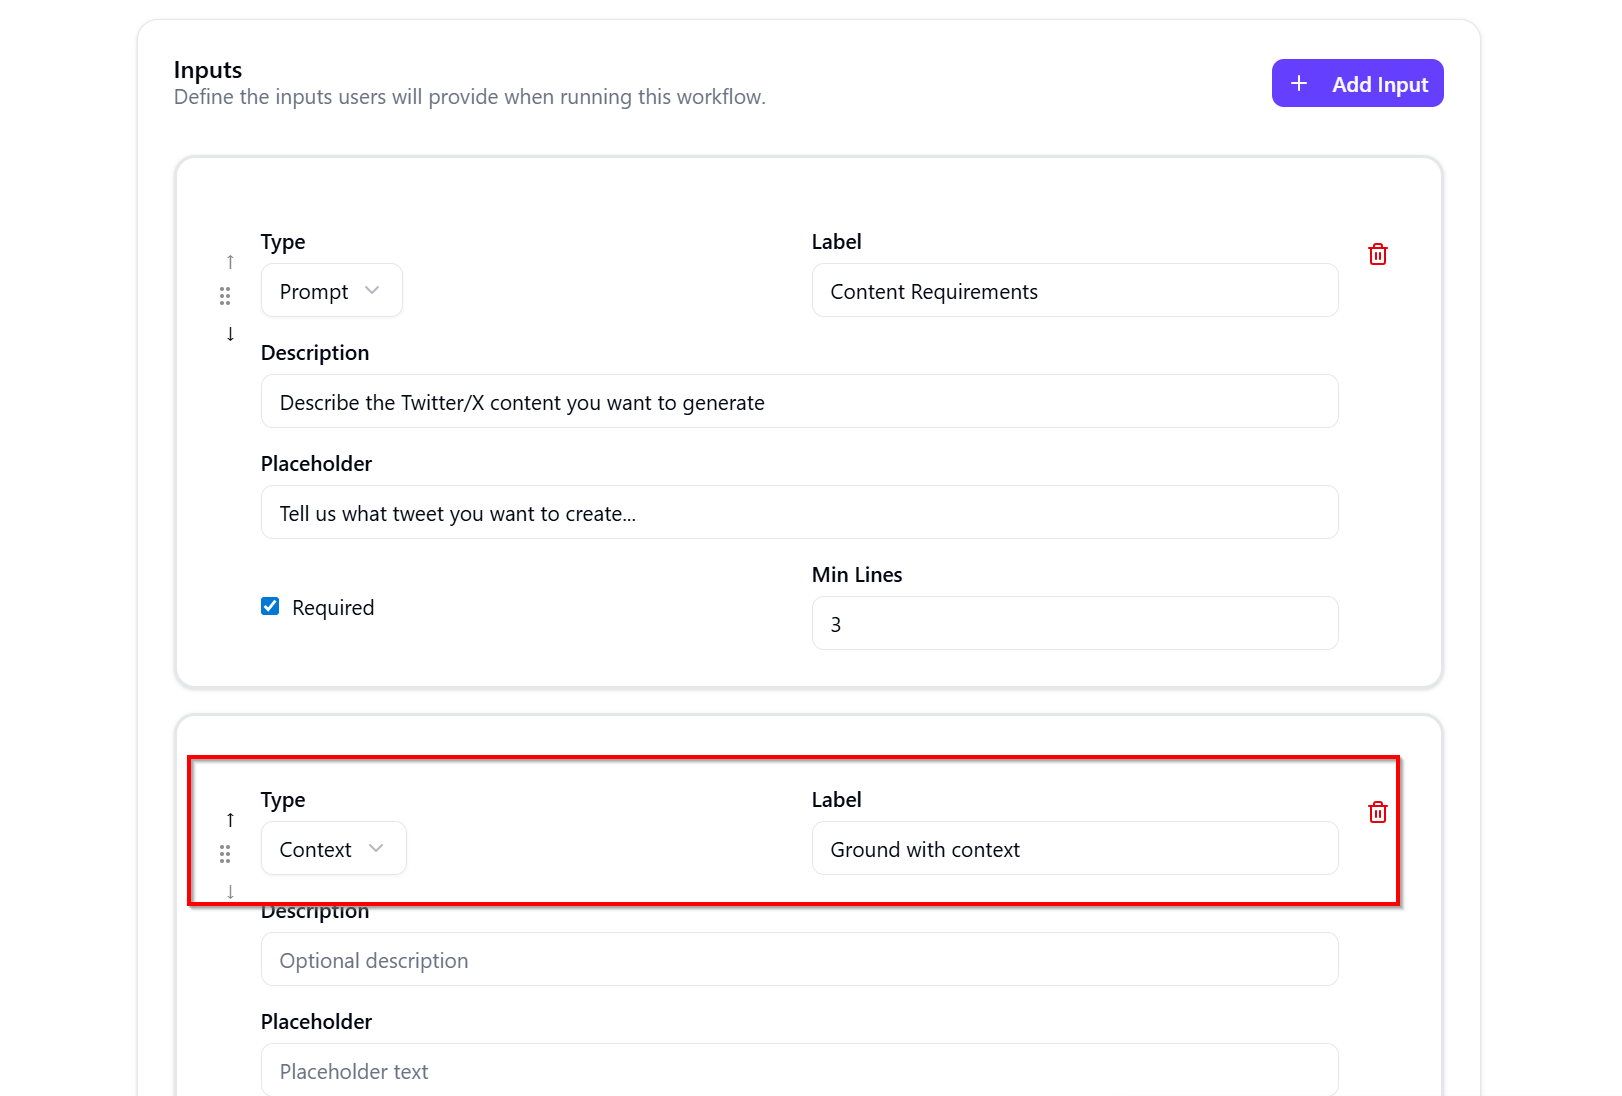
  • In the Inputs section, click Add Input to define required user inputs:
    • Type – the input type, such as Prompt.
    • Label – the field name shown to users.
    • Description – guidance for what uses should enter.
    • Placeholder text – example content displayed in the field.
    • Required – whether the input is mandatory.
    • Min Lines – the minimum number of input lines.
    • Important: Include input of Type Context to enable you to work with SitecoreAI pages for example. As shown below
  • Click Create Workflow to save your changes.

Step 3: Configure the parameters

Parameters are needed to influence how the agent generates content. Parameters allow users to select options such as language, audience, or region, helping the agent adapt its output based on those selections.

We won’t need any parameters for this workflow agent

Step 4: Define a schema

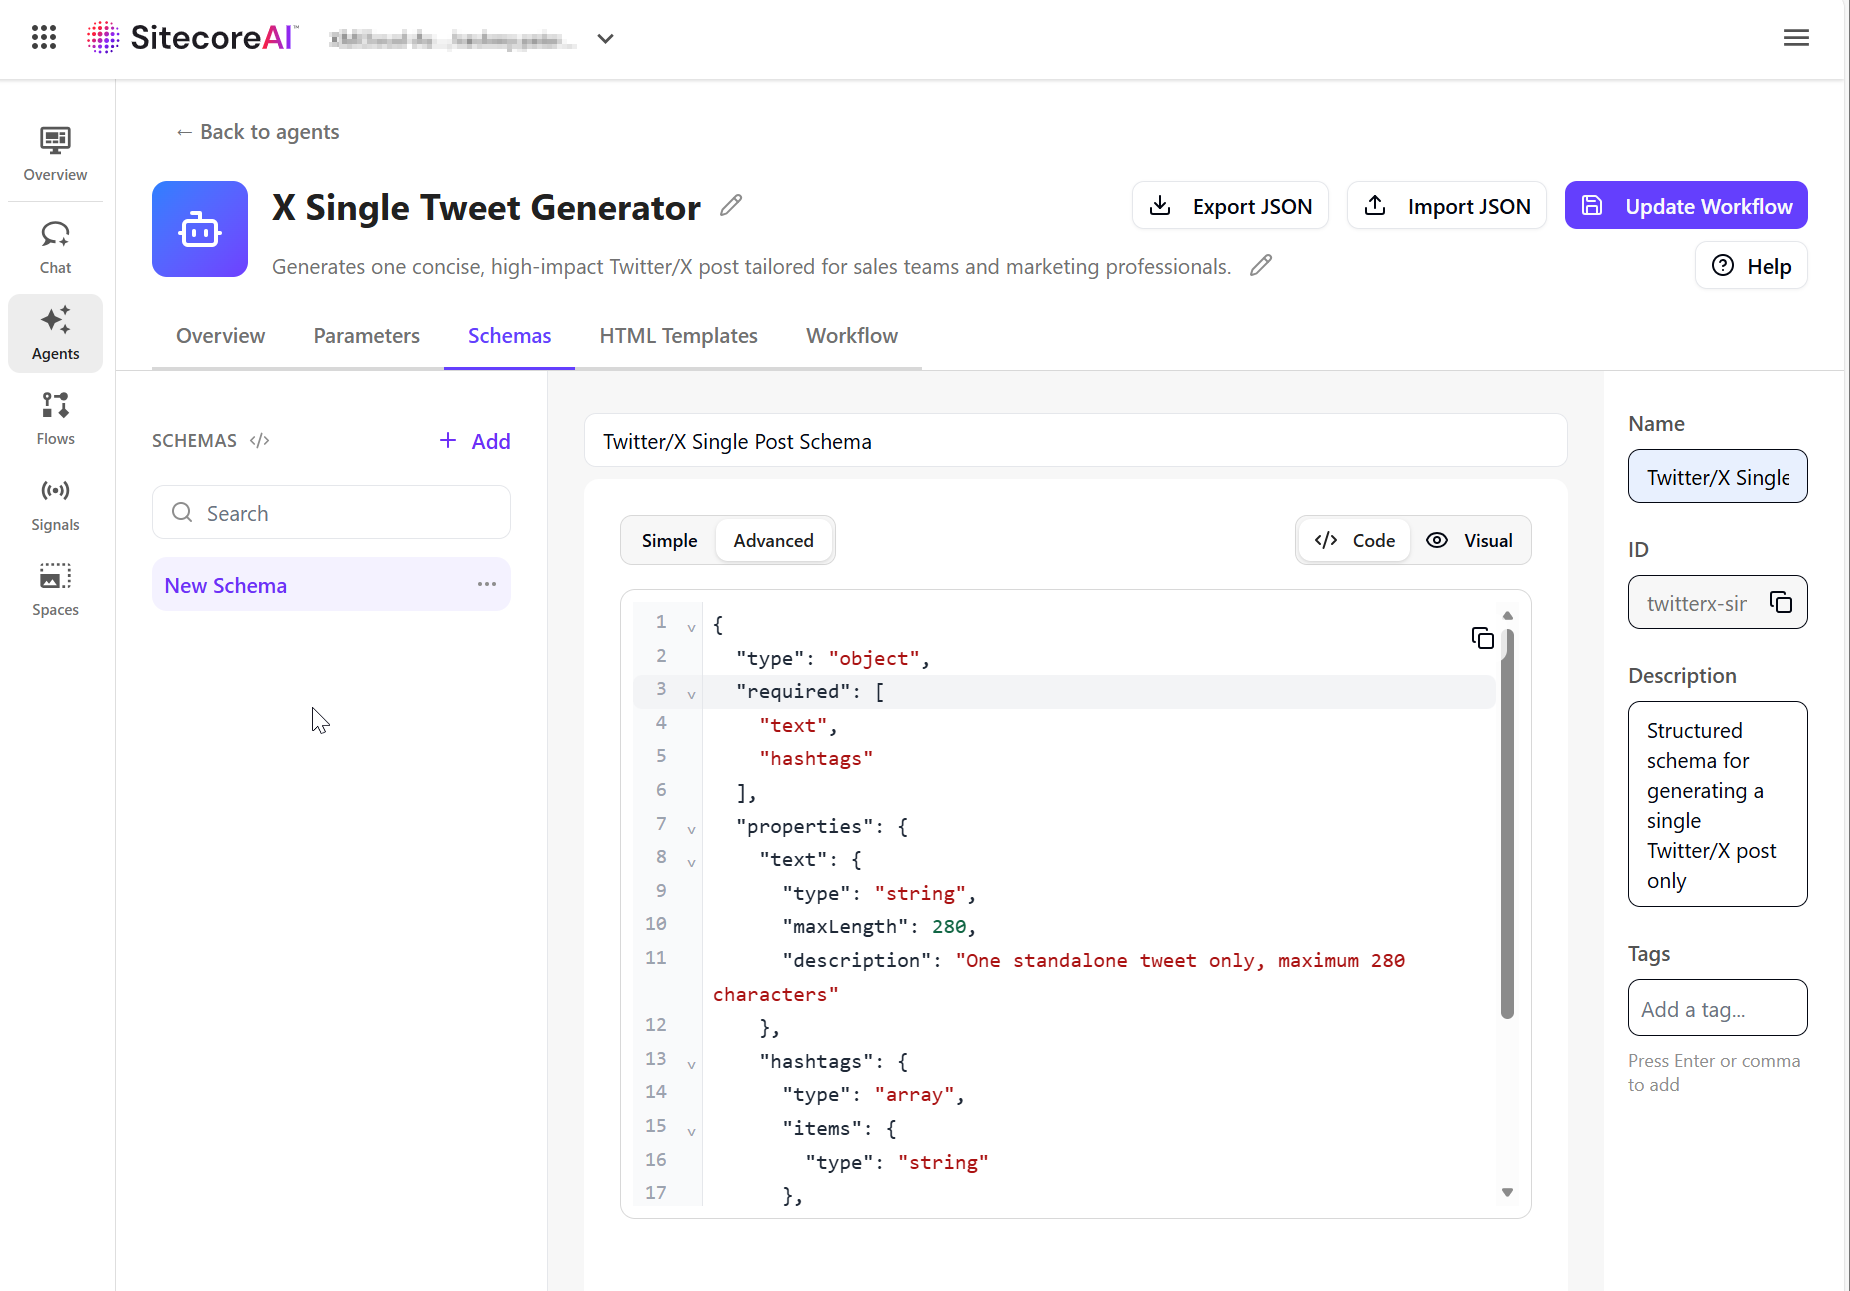
To enforce a structured output, we will define a JSON schema. This ensures the agent produces consistent, structured output that can be validated and also re-usable.

  • On the Schemas tab, click Add.
  • In the right pane, provide the following:
    • Name – the schema name.
    • Description (optional) – what the schema is used for.
  • Define the JSON structure for the output. You can use Simple mode or Advanced mode to define the schema manually using either the Code or Visual editor.
  • Click Update Workflow to save your changes, as shown below

Step 5: Define an HTML template

Use the HTML Templates tab to define how the agent’s output is displayed. Templates use Handlebars syntax to map structured data into a layout.

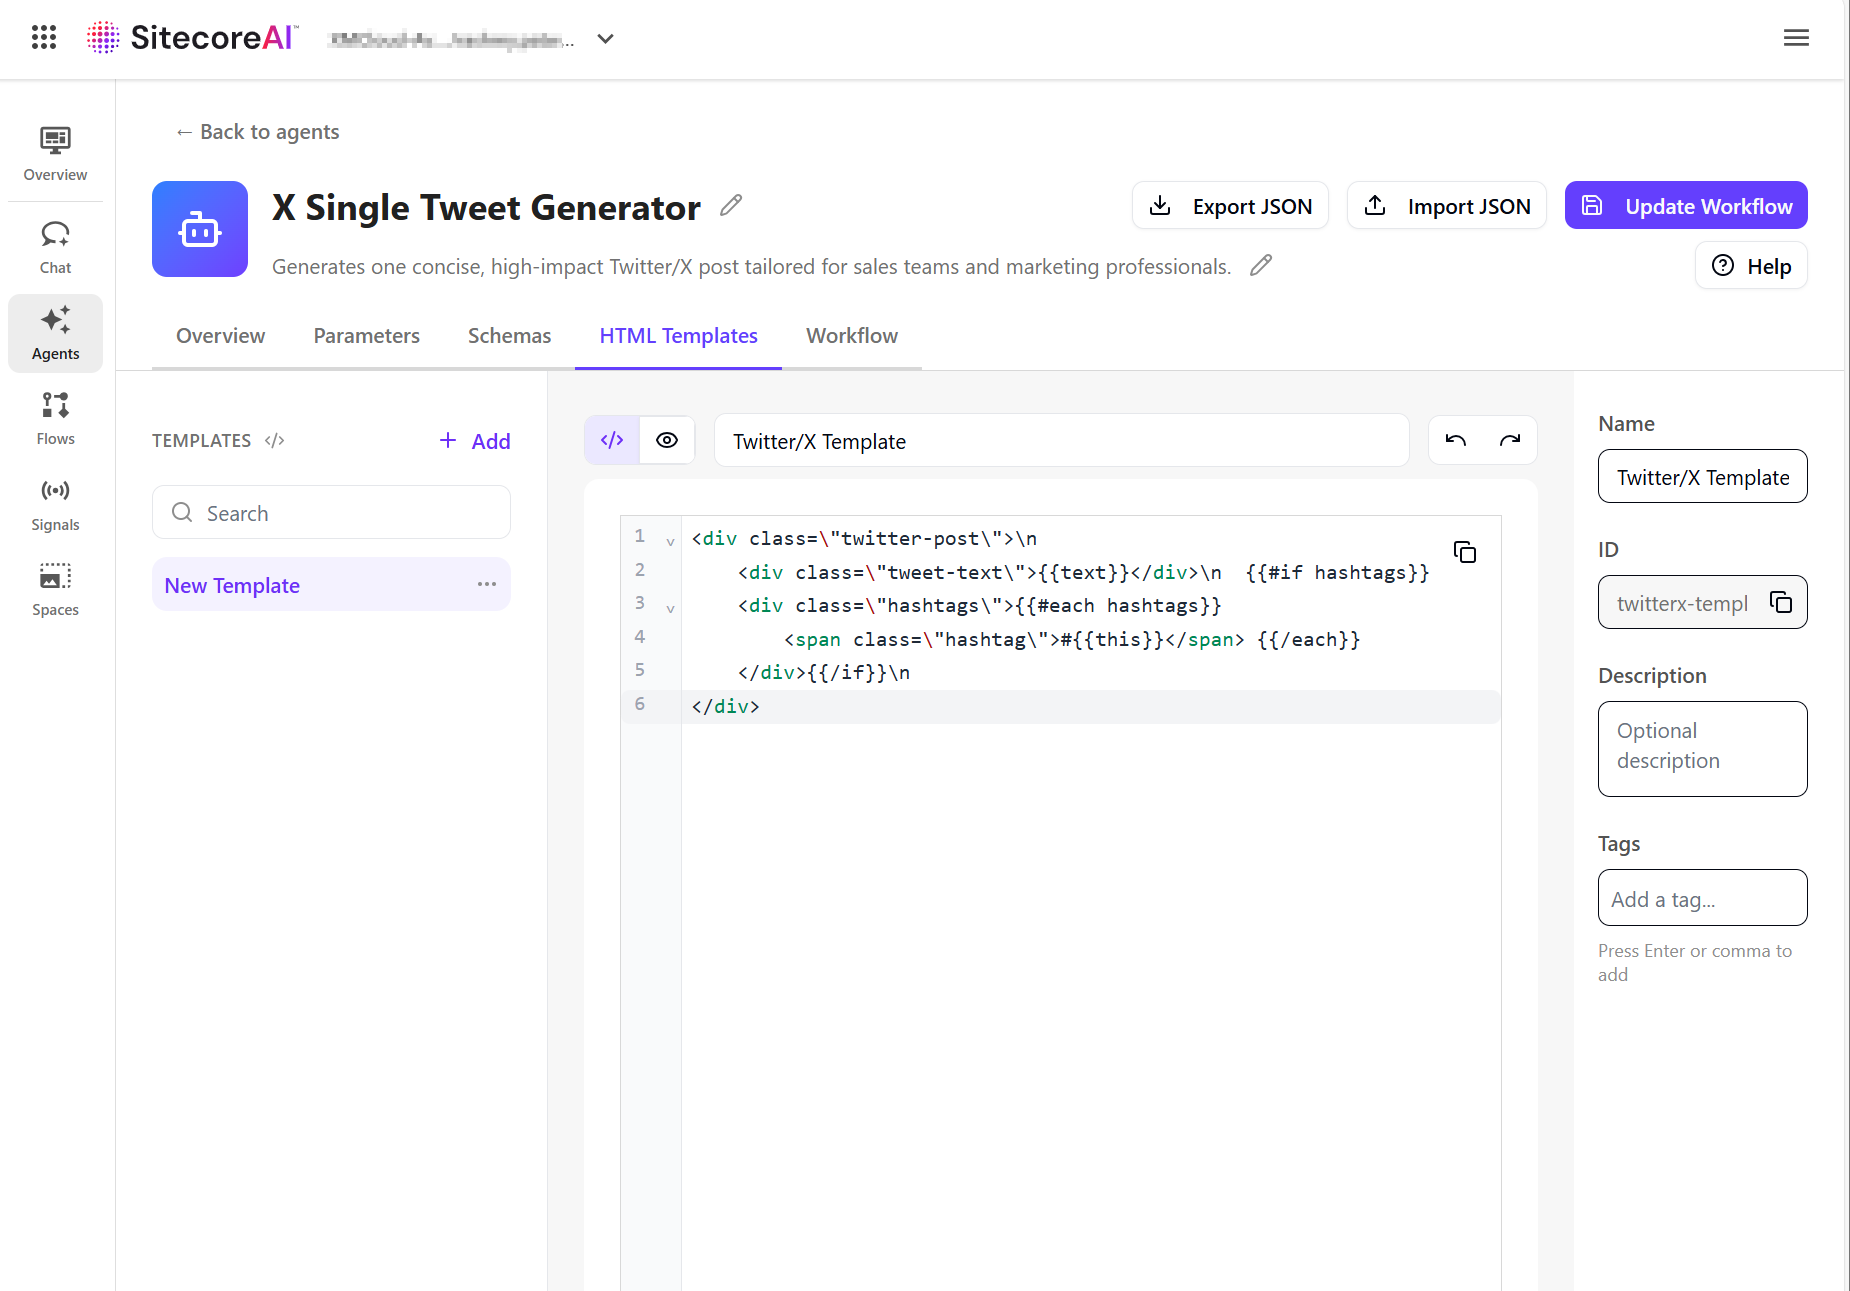
  • On the HTML Templates tab, click Add.
  • In the right pane, provide the following:
    • Name – the template name.
    • Description (optional) – what the template is used for.
  • Define the HTML structure using schema fields. Use Handlebars syntax to map values from the schema into the template in the Code editor.
  • Click Update Workflow to save your changes, as shown below

Step 6a: Build and test the agent workflow

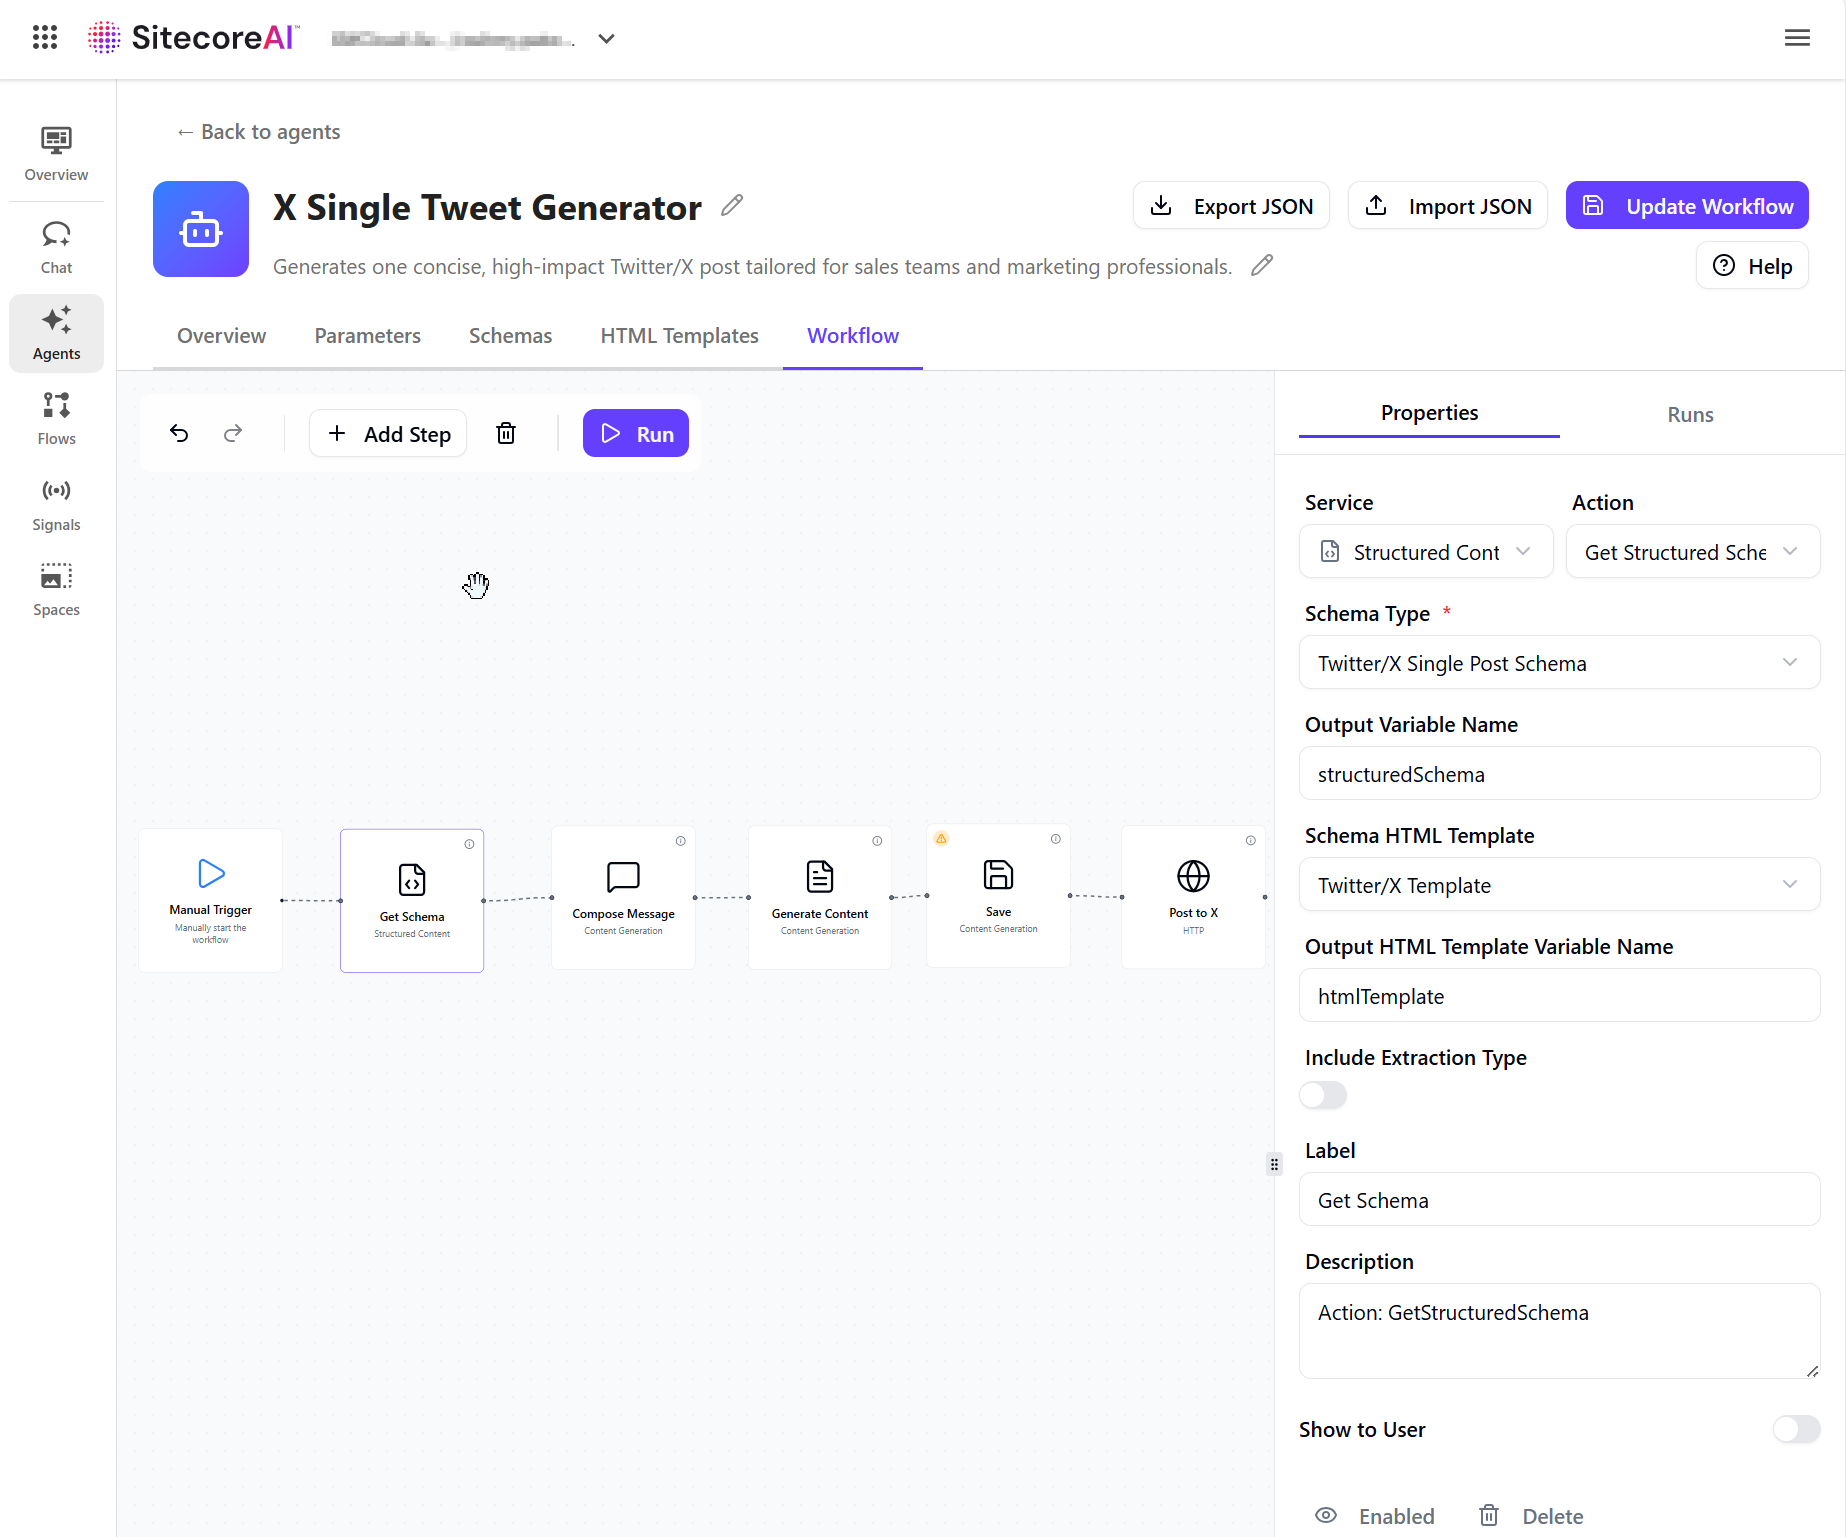
On the Workflow tab, design the sequence of actions that the agent will be executing. To build the agent workflow:

  • On the Workflow tab, the canvas includes a Manual Trigger action as the starting point. Click Add Step to add a new action.
  • In the right pane, on the Properties tab, the list of available actions appears. Select an action to add it to the canvas.
  • Drag from the dot on one action to the dot on another to connect them into a workflow step. Actions run sequentially based on how they are connected.
  • To configure the action, select an action on the canvas and adjust its settings in the Properties pane.
    • Depending on the selection, you might need to configure the action’s inputs and output variables, system prompts, message templates, linked HTML templates and schemas, and artifact storage options.
  • Repeat the process to build out your workflow as needed.
  • To delete an action or connector, select it on the canvas and press Backspace.
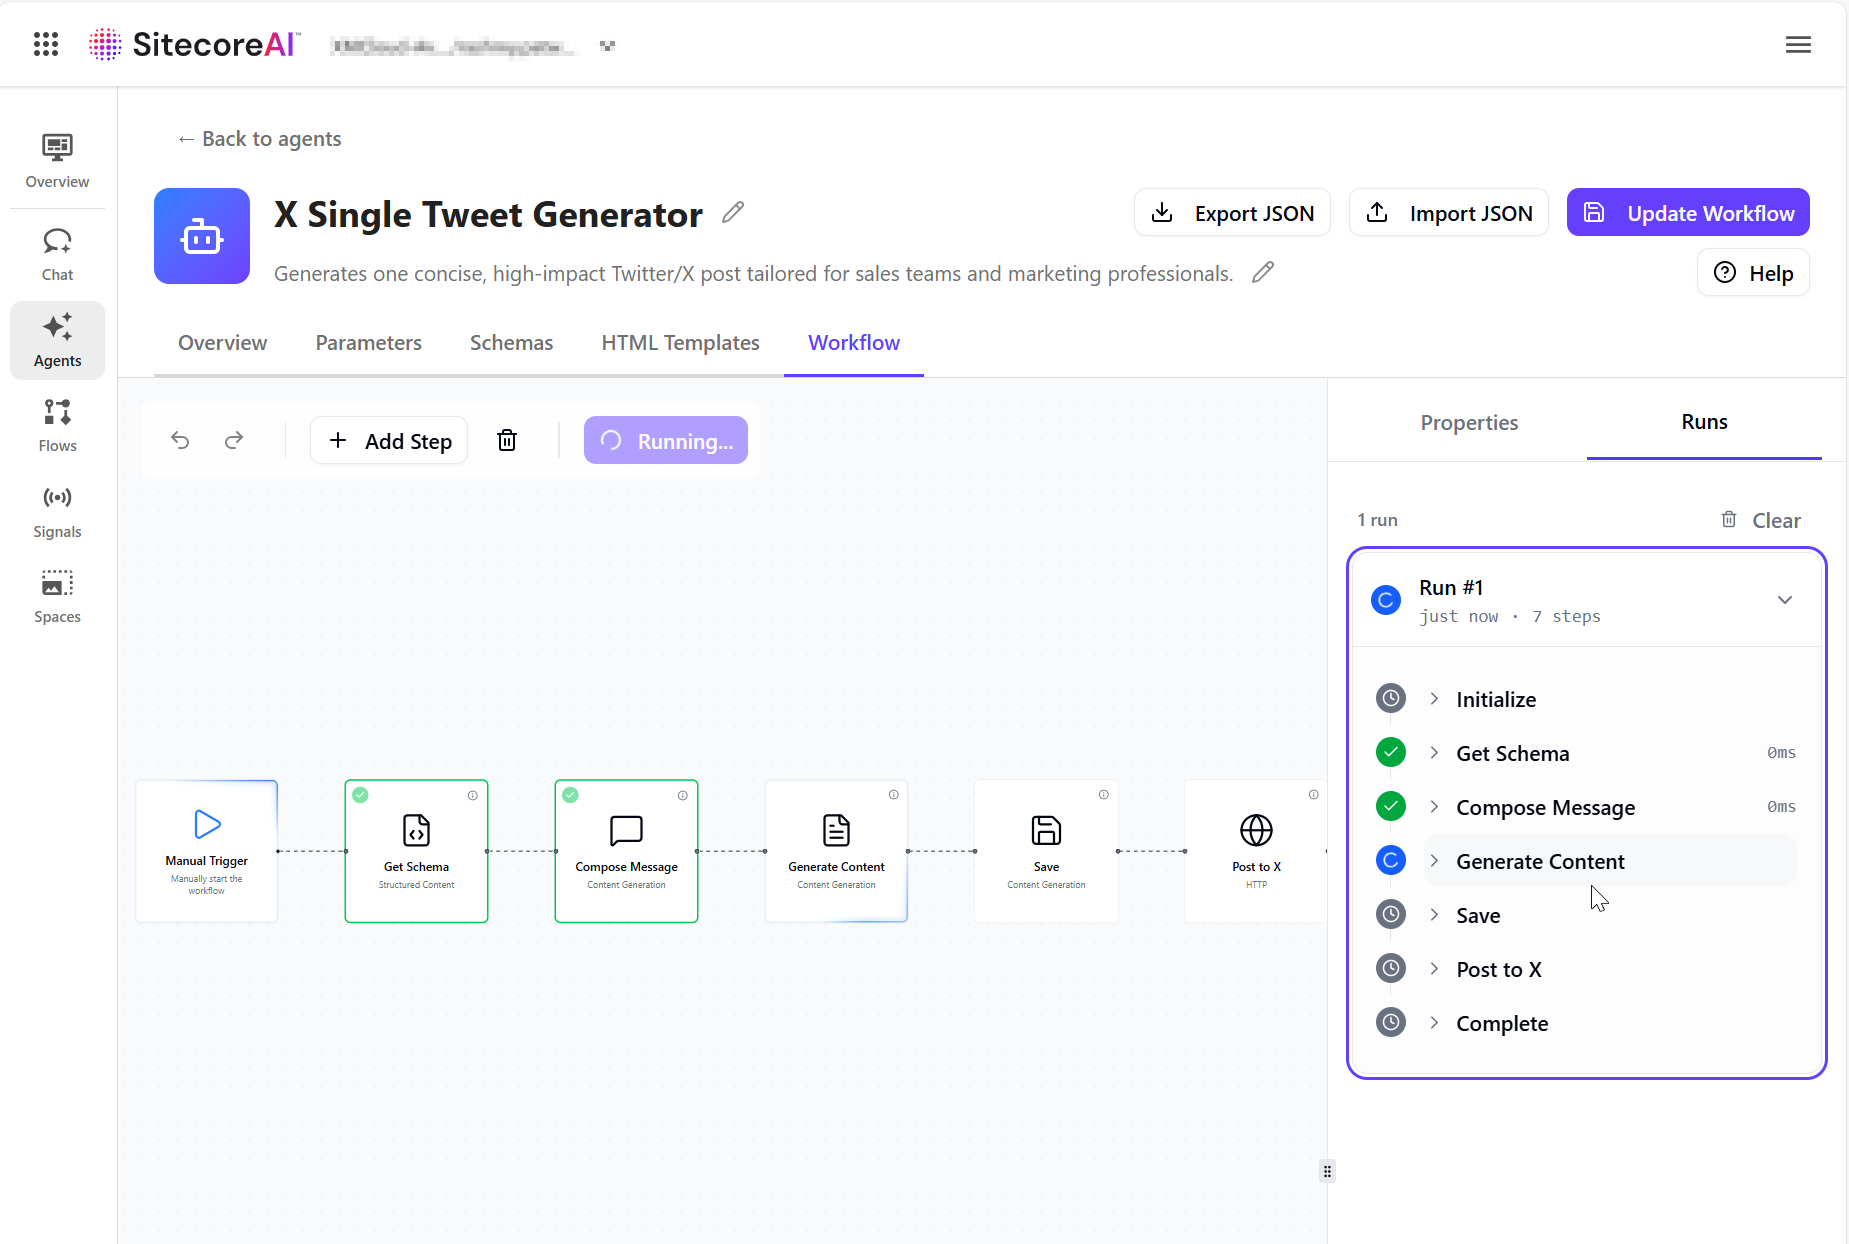
  • Below is the full workflow for our X Single Tweet Generator

Step 6b: Configuring an HTTP Request action

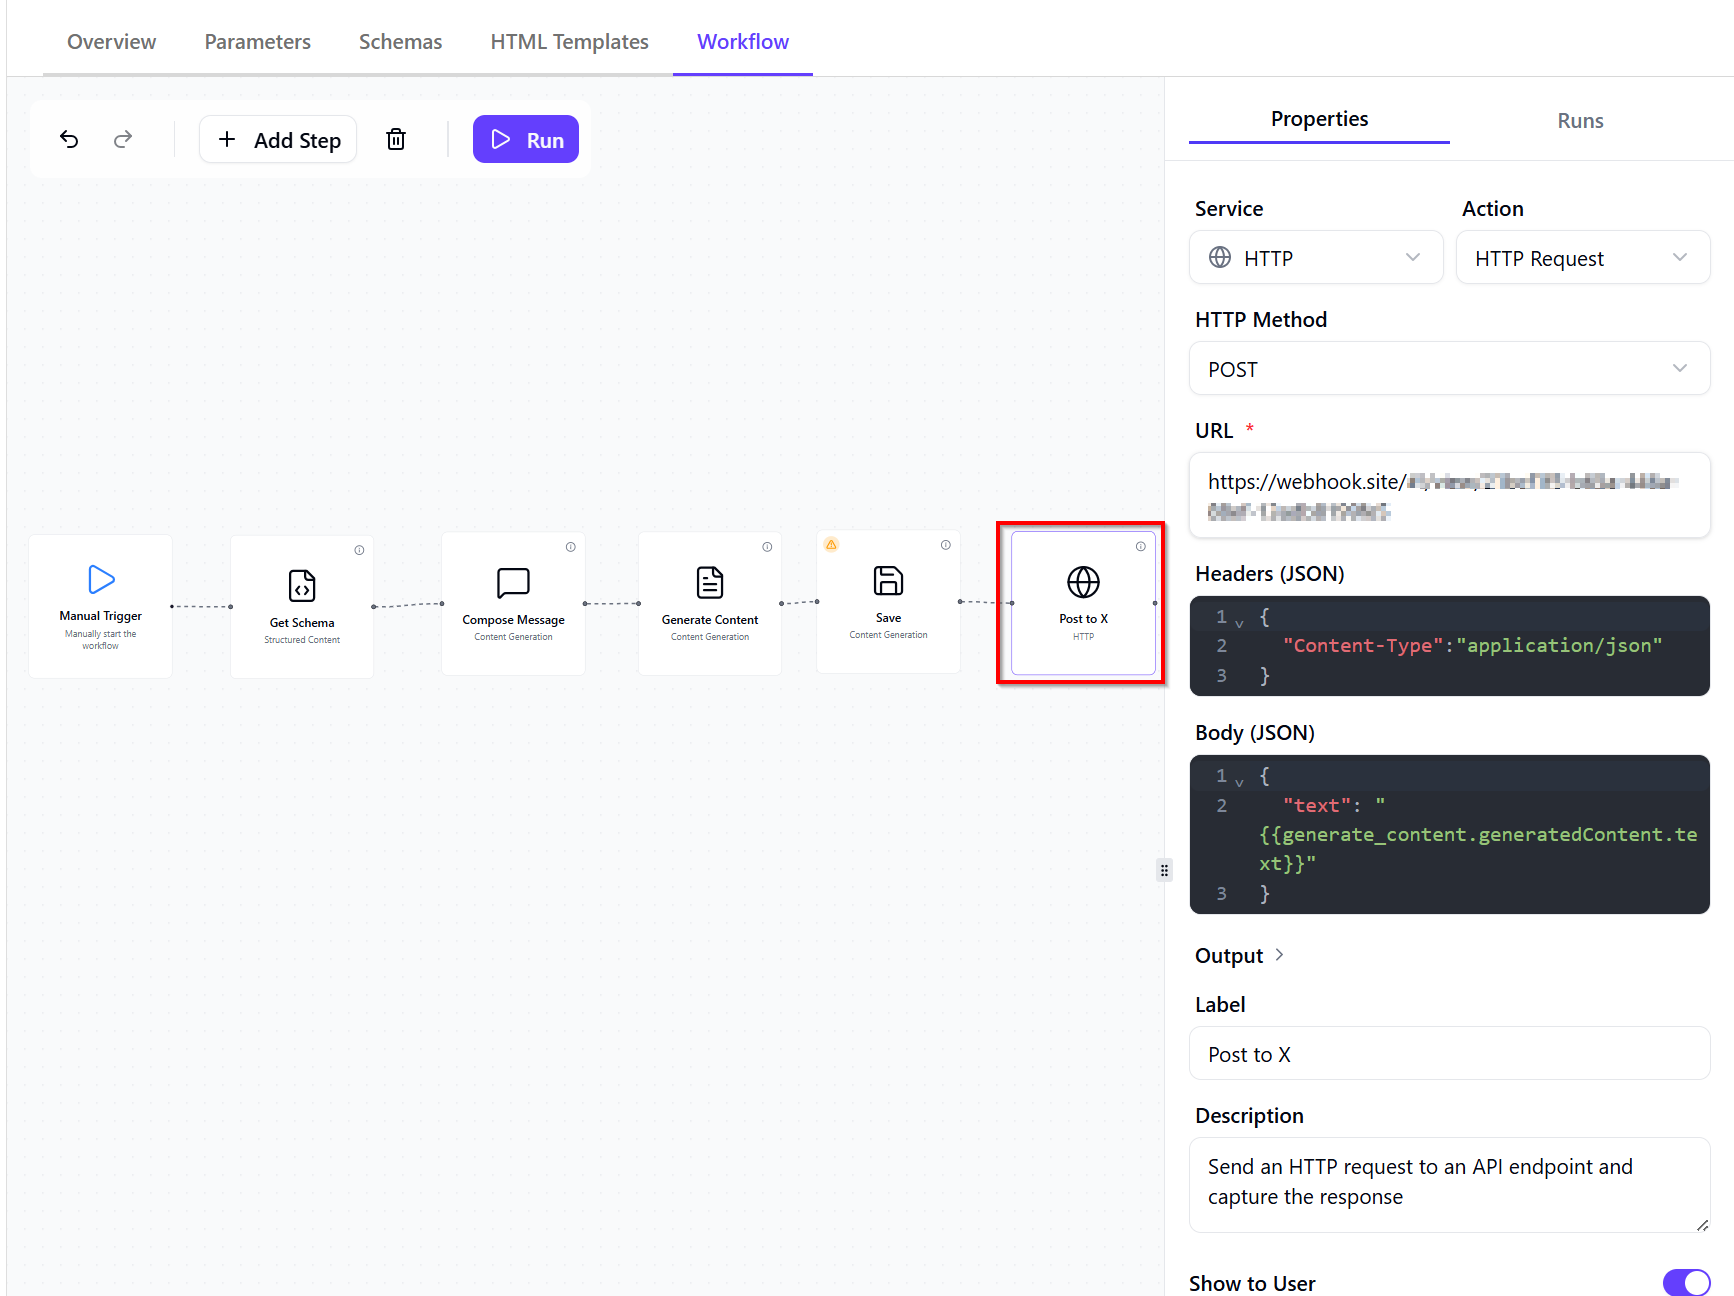
An HTTP Request action is used to send generated content to an external endpoint. In our case, to push the Tweet to Twitter/X.

The HTTP Request action retrieves the generated tweet from the previous step and sends it to the specified endpoint as a JSON payload.

It has the following configuration as shown below:

  • HTTP Method – POST (used to send the generated content to an API)
  • URL – the destination endpoint where the request will be sent.
  • Headers – define request metadata, typically including content type and authentication.
  • Body (JSON) – the payload sent to the API. This is where you pass data from previous workflow steps using variables. Ensure the variable correctly maps to the output of the generation step.

Agent JSON – The full listing of the JSON of the this agent is available in this Gist for reference. You can import it into the workflow editor to test or explore further for your use cases.

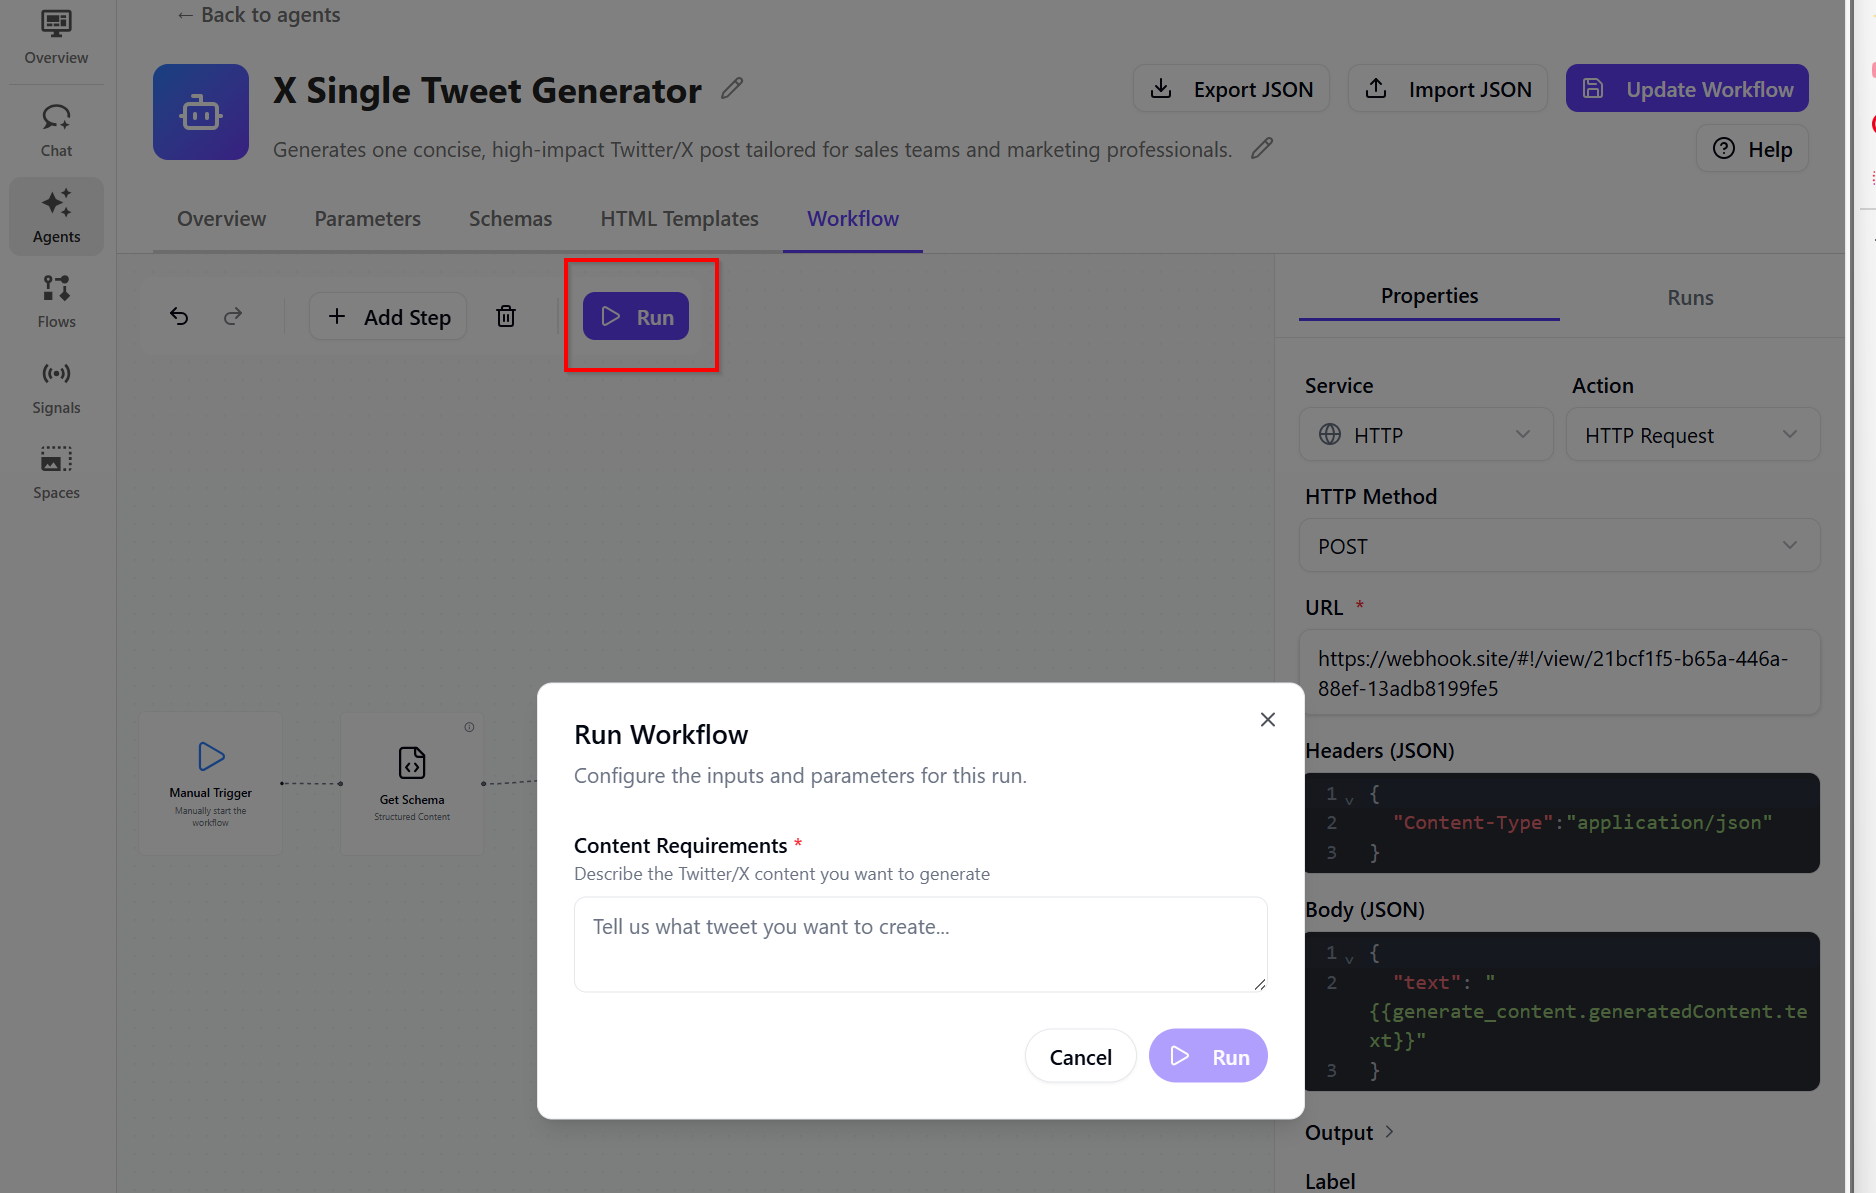
Step 7: Testing the agent

To test the agent, click on the Run button from the Workflow tab

When successful, you will get a sample run similar to the one shown below:

Running agents using items

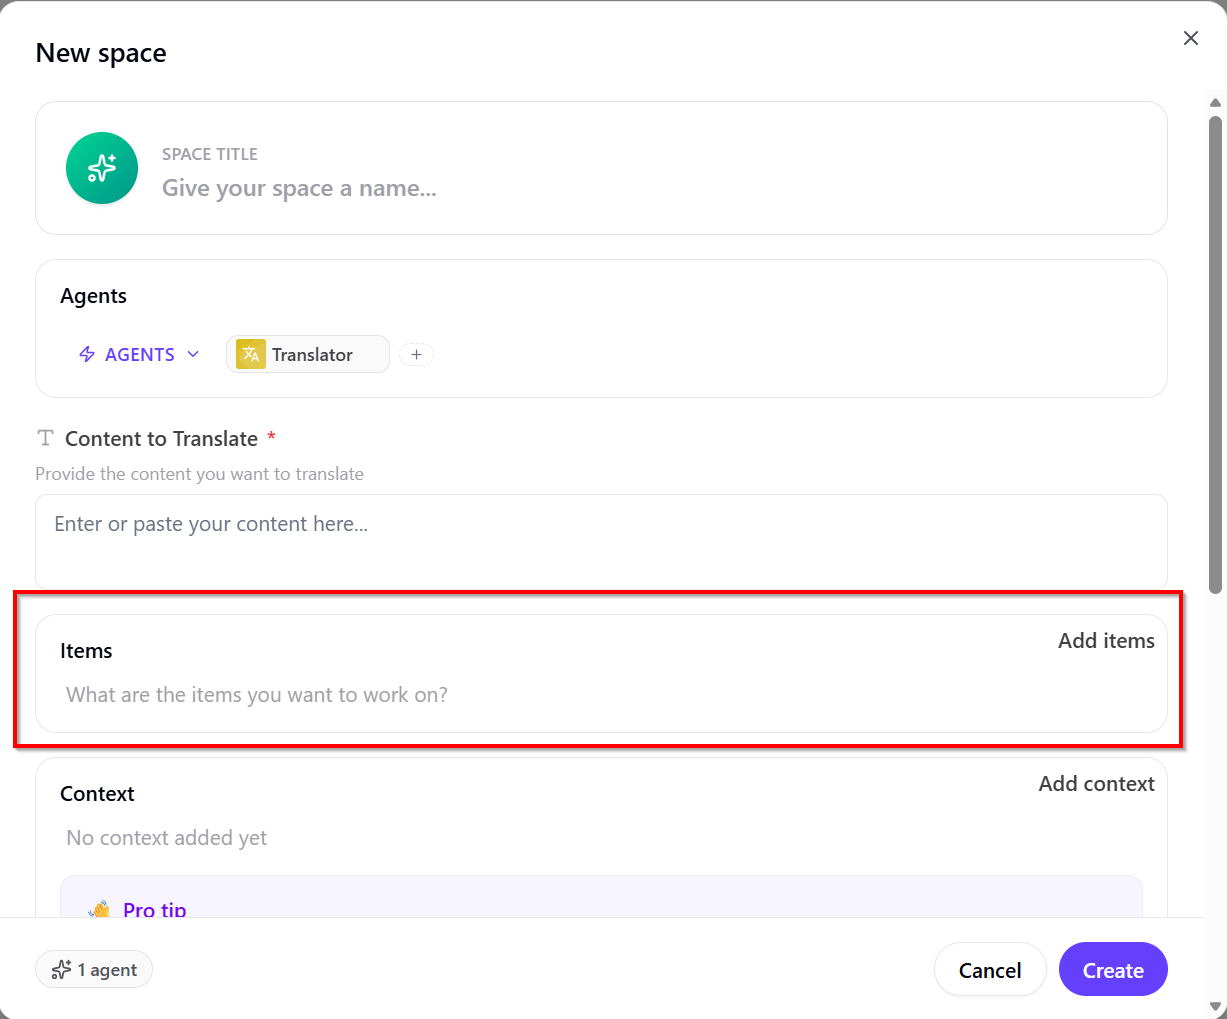
When running agents, you can provide two types of optional inputs: items and context.

Items are the inputs the agent acts on. The agent processes each item and generates outputs for it. Use items to define what the agent should process individually. This enables the agent to perform actions on specific content from SitecoreAI.

When running the agent, you have option to Add items as shown below

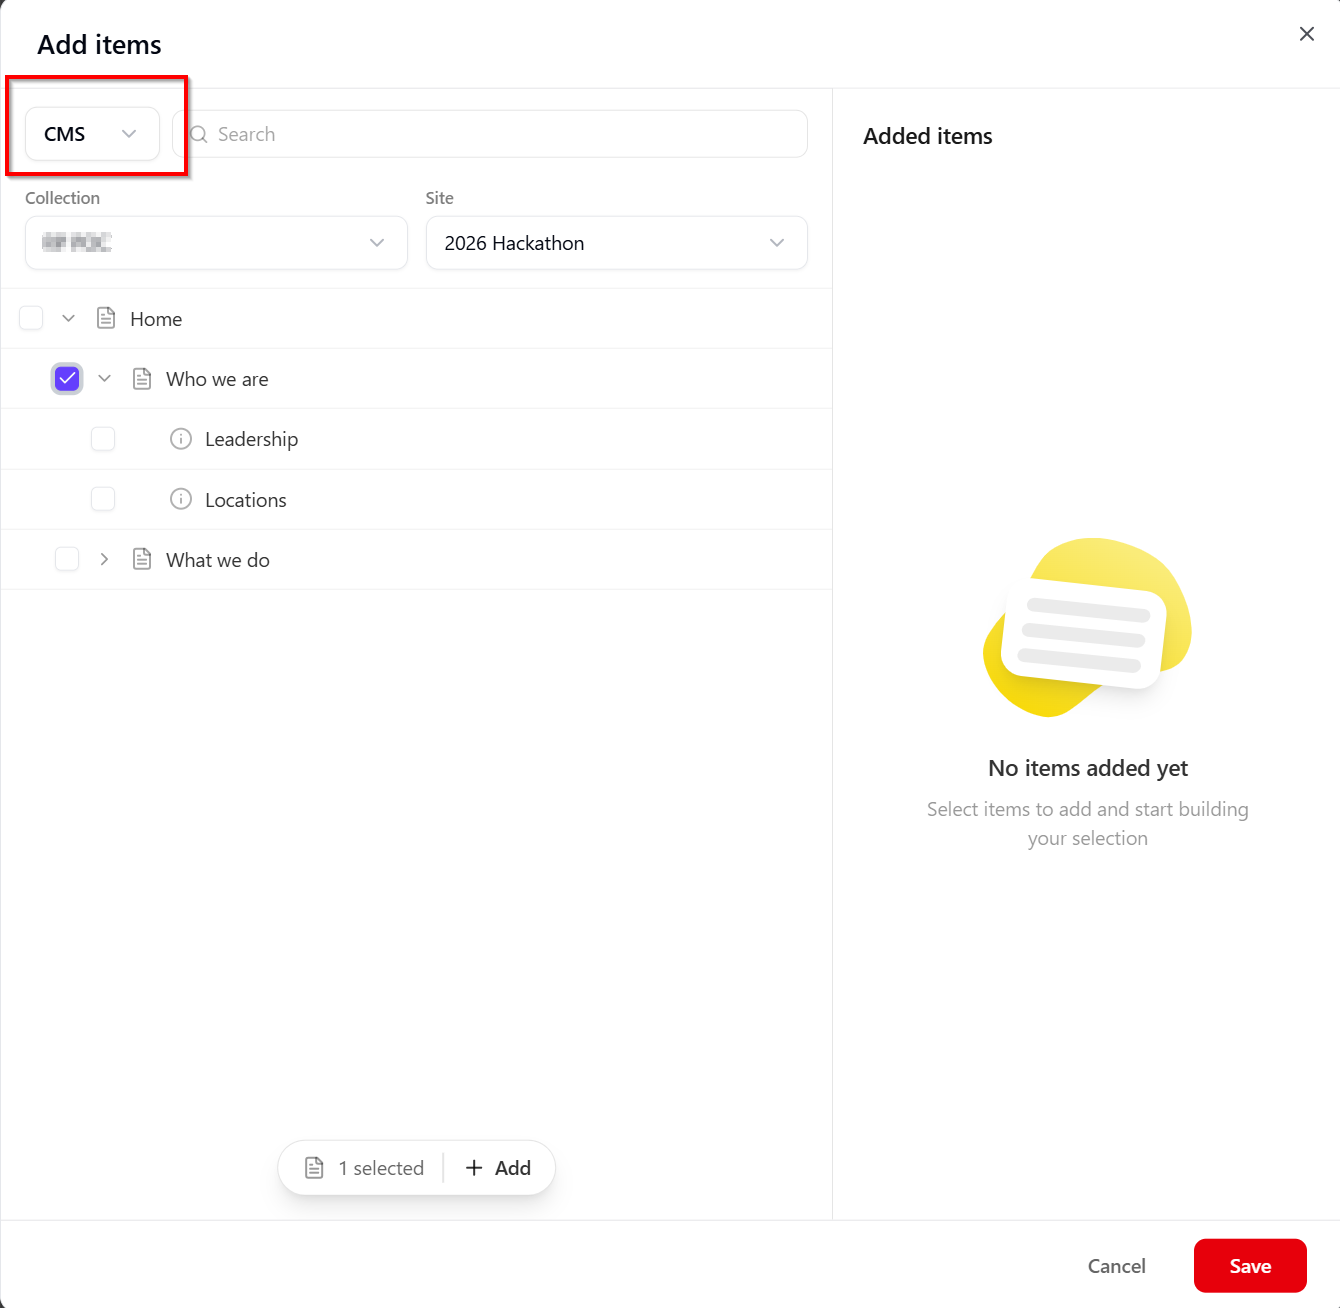
Clicking on Add items will allow to select SitecoreAI CMS content items, as shown below

Next steps

In this blog post, we looked in detail the March 30 2026 release of the Agentic studio, which you can read in full in the original bulletin. As Sitecore continues to bridge the gap between “AI as a tool” and “AI as a teammate,” the March update sets a high bar for the rest of 2026. Whether you’re ready to start chaining agents in the new Spaces or you’re curious about how those custom skills will streamline your specific brand voice, the future of content is officially autonomous. Feel free to leave us a comment or share any thoughts.

Everything Sitecore AI – Marketer MCP integration with Microsoft Copilot Studio

Context

As you may be aware, the Marketer MCP now has a capability to integrate with Microsoft Copilot studio. You can now connect your Microsoft Copilot Studio agents to the Sitecore Marketer MCP for seamless access to Sitecore’s marketing features.

The Marketer MCP is the Model Context Protocol (MCP) for marketing in Sitecore. It connects AI agents to Sitecore tools through the Agent API, providing secure access across the entire digital experience lifecycle.

In this blog post, I will walk you through a step-by-step guide, complete with screenshots.

Pre-requisites

Before you begin, make sure you have:

  • A valid Sitecore account with required permissions
  • A valid Microsoft Copilot studio account with access permissions to Create agents and Create Custom Connectors

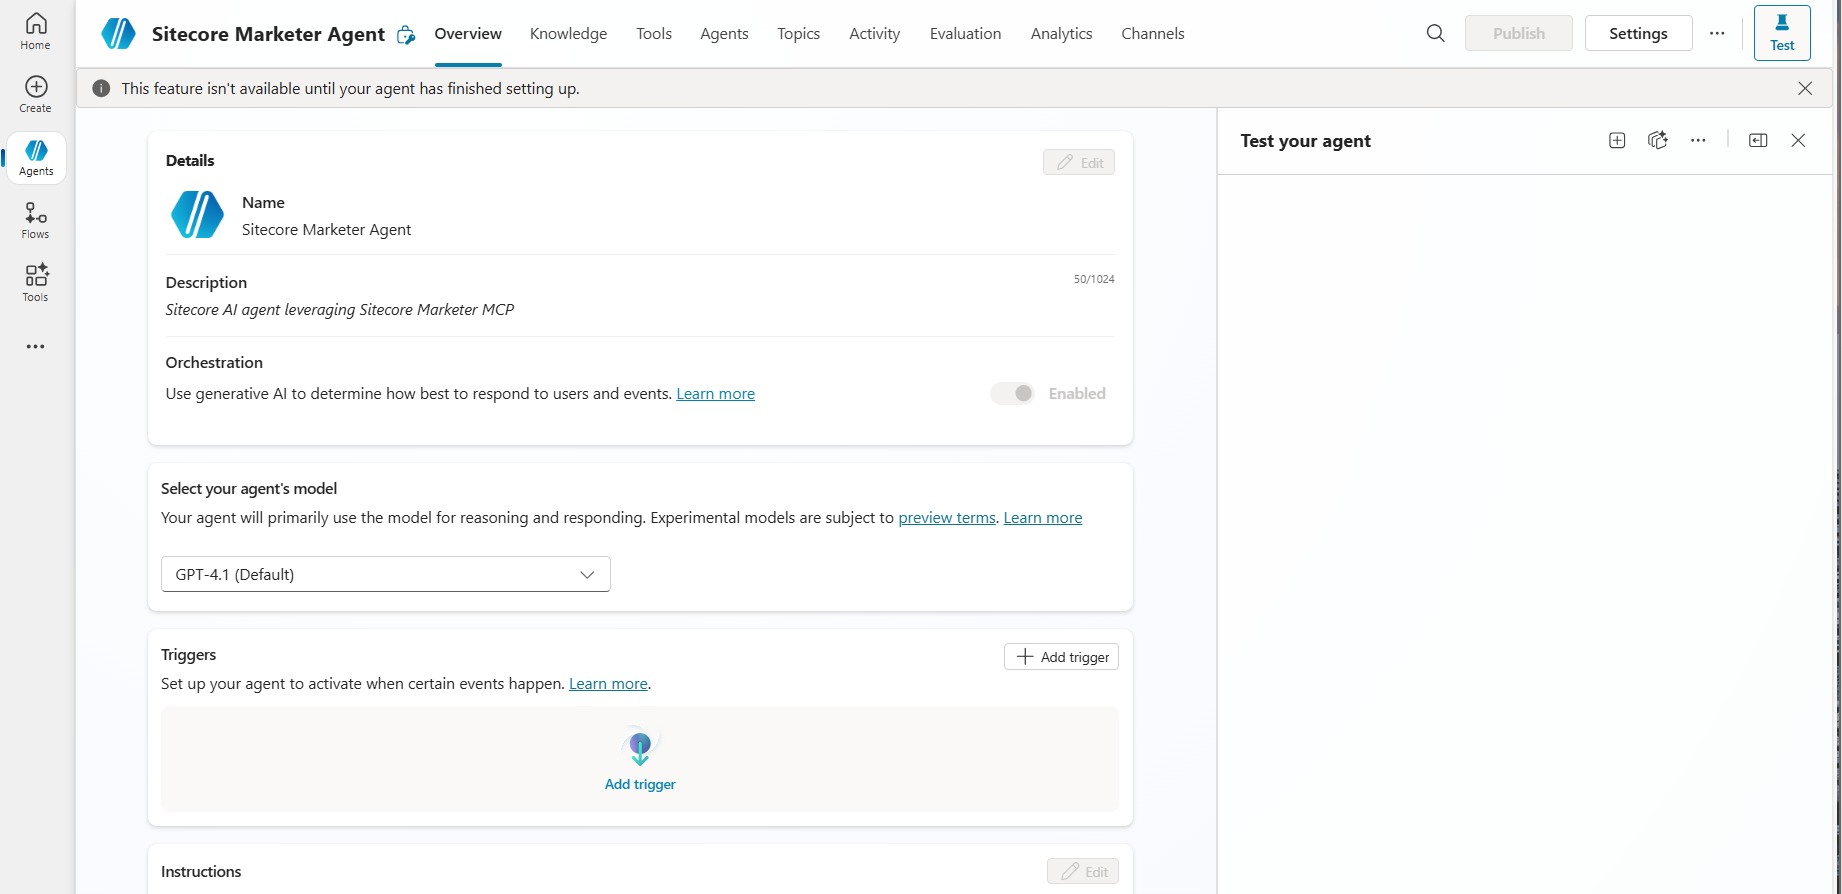
Step 1 – Create a new agent in Copilot Studio

  • Open Copilot Studio and either create a new agent or open an existing one.
  • As shown in the screenshot below, specify the following minimal details for your agent:
    • Name: The name of your agent
    • Description: Description of your agent
    • Icon: You can choose an icon for your agent (optional)
  • Create agent in Copilot Studi0

Step 2 – Add a tool to the agent

  • Go to the Tools tab for your agent then click Add a tool.
  • Select New tool then choose Model Context Protocol. The MCP onboarding wizard opens
  • Enter the following details, as show in screenshot below
  • Under Authentication, select OAuth 2.0 and Dynamic discovery type. Then click Create.
    • The Add tool dialog will be displayed as shown below.
    • In the Add tool dialog, in Connection, click Not connected > Create new connection. Then click Create.
    • A pop-up dialog appears as per the screenshot below, with the message Resource parameter is required. This is expected. Follow the workaround below.
    • Copy the entire URL shown in the dialog. Append the following resource parameter to the end of the URL:
      • &resource=https%3A%2F%2Fedge-platform.sitecorecloud.io%2Fmcp%2Fmarketer-mcp-prod
    • Open a new browser window, paste the updated URL into the address bar and press Enter.
    • In the Marketer MCP authorization request dialog (see screenshot below), click Allow Access.
    • This will prompt you to login to your Sitecore Cloud Portal
    • Then select the organization and tenant you want to use when interacting with the MCP server (as per screenshot below)
  • Return to the Add tool dialog in Copilot Studio. When it shows that you’re connected to the MCP server, click Add and configure.

You should now see the Marketer MCP details and its tools enabled and ready to use. You can begin entering prompts to interact with Sitecore through the MCP.

Step 3 – Get prompting

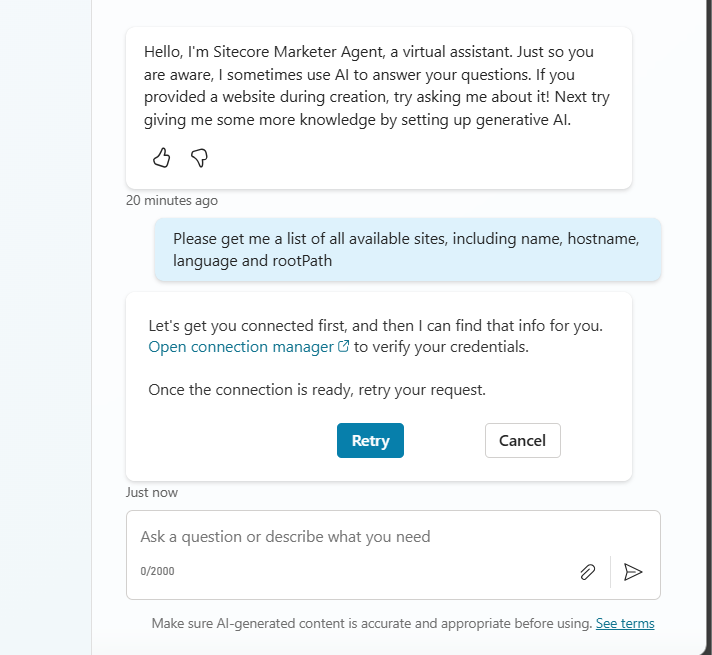
From your Copilot prompt text area, you can now use natural language to prompt and perform actions in SitecoreAI. The first time you write a prompt, you may see a connection warning message shown below.

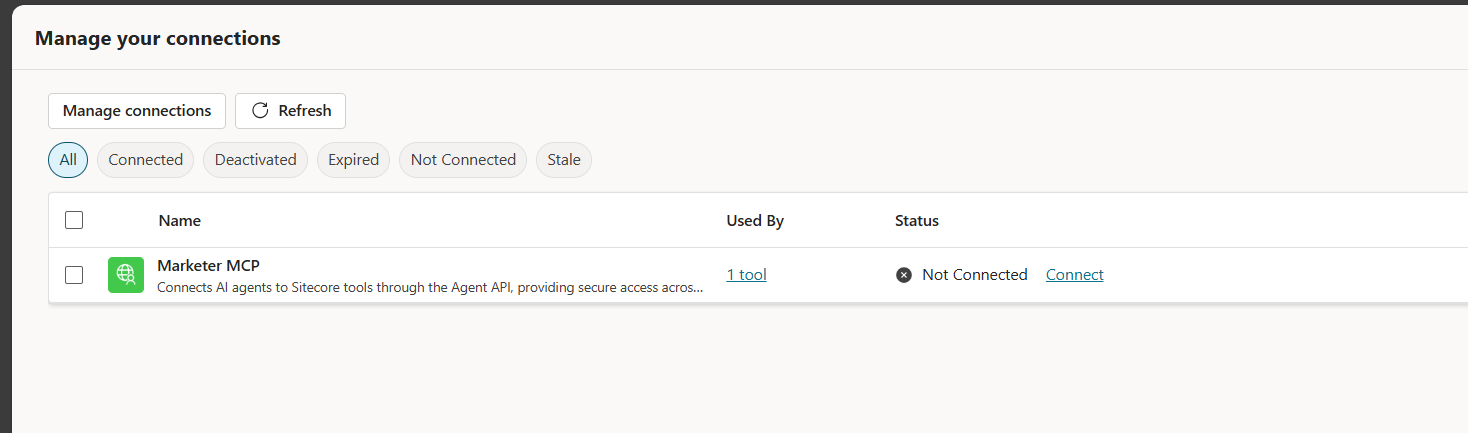
Simply follow the Open connection manager link to get connected. The link will open the dialog shown below

Click on Connect link. You will now get a response from your Sitecore AI as shown below.

Troubleshooting

You may come across some issues when establishing the connectivity into Marketer MCP from Copilot Studio. Below are the issues I encountered and how I resolved them.

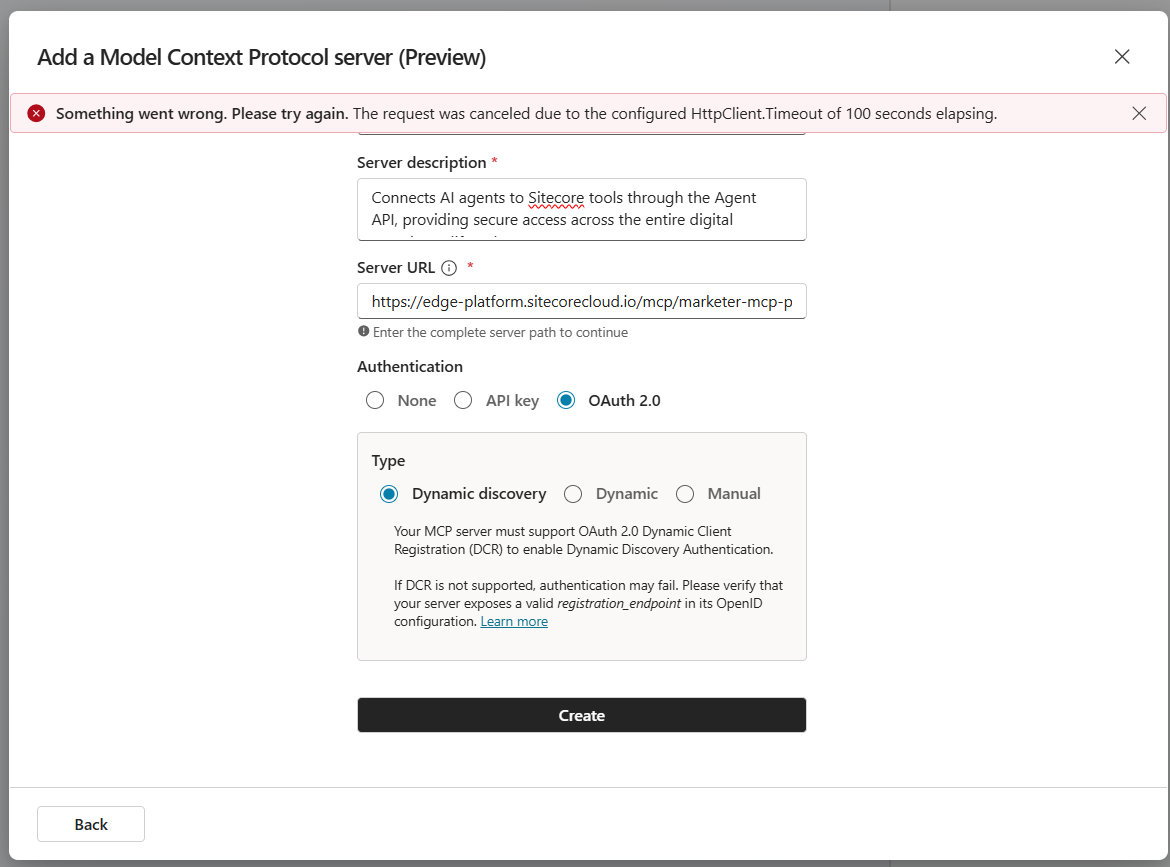
Issue 1: Timeout error

I got this error when Creating the connection:

Issue 1 Resolution:

I simply repeated that step for the second time and issue was resolved

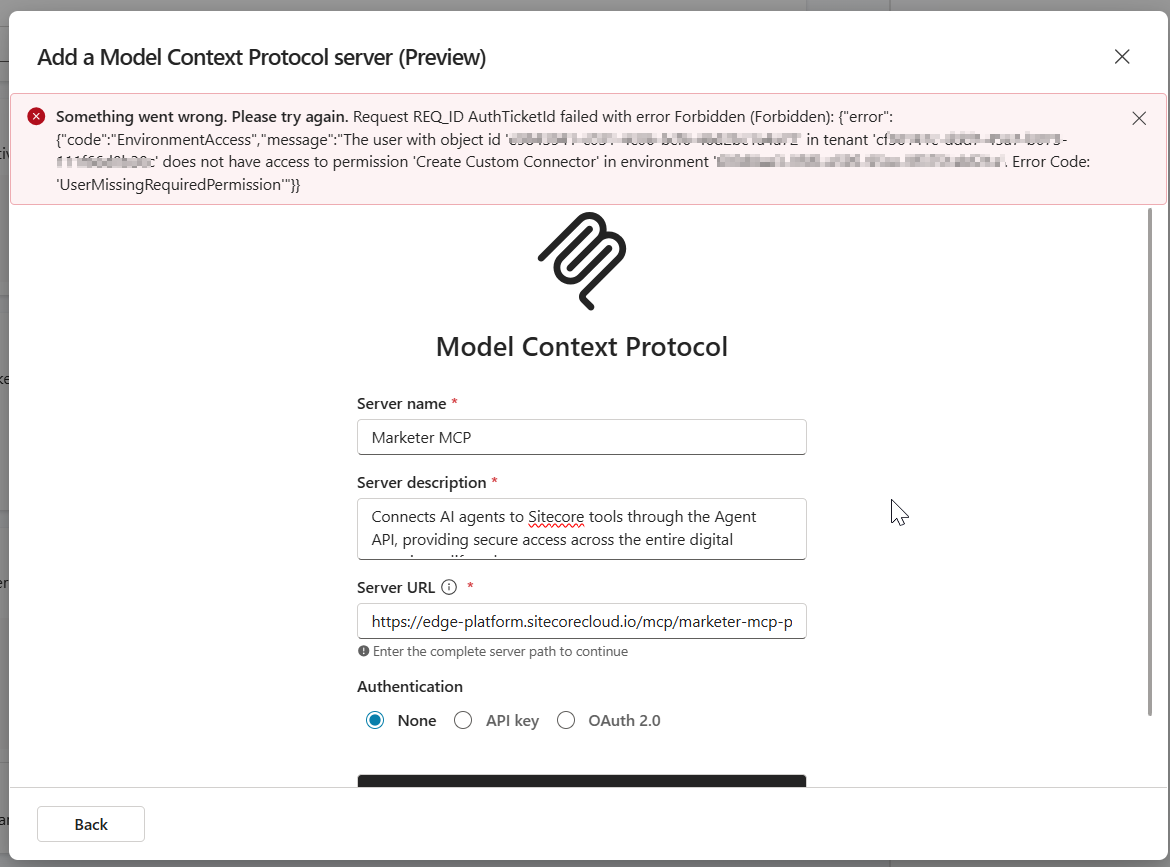
Issue 2: Environment Access permission error

The error below may occur when your Copilot Studio account doesn’t have access permissions to create a custom connection

Issue 2 Resolution:

Work with your ITS teams to provision the correct level of needed access in Copilot Studio

Next steps

In this blog post, we looked at a step-by-step guide on how to set the Marketer MCP integration with Microsoft Copilot Studio. We looked at potential connectivity issues that you may encounter and how to resolve them to get it working.

The Marketer MCP provides tools to create content, manage campaigns, run marketing automation, and handle content management. This is an evolving tool and remember to check latest updates from Sitecore.

The Marketer MCP is only reliable for the supported use cases listed here. Responses outside this scope have not been validated by Sitecore and might be inaccurate.

SitecoreAI docs

Stay tuned for future posts, feel free to leave us comments and feedback as well.