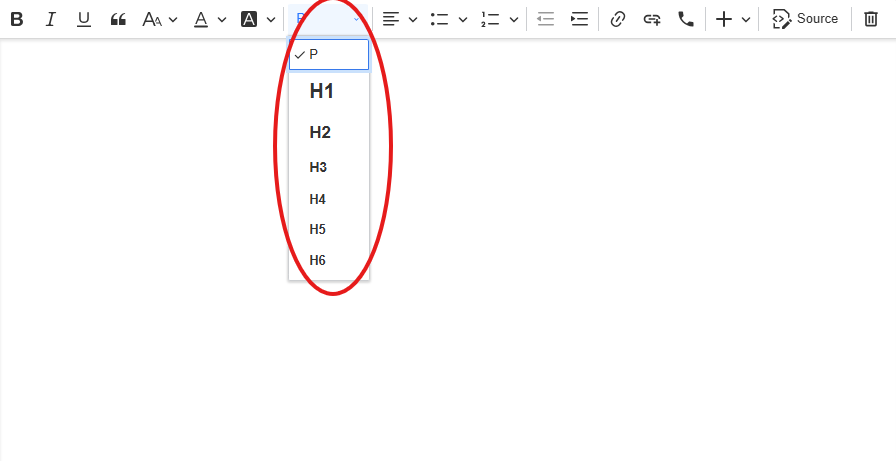
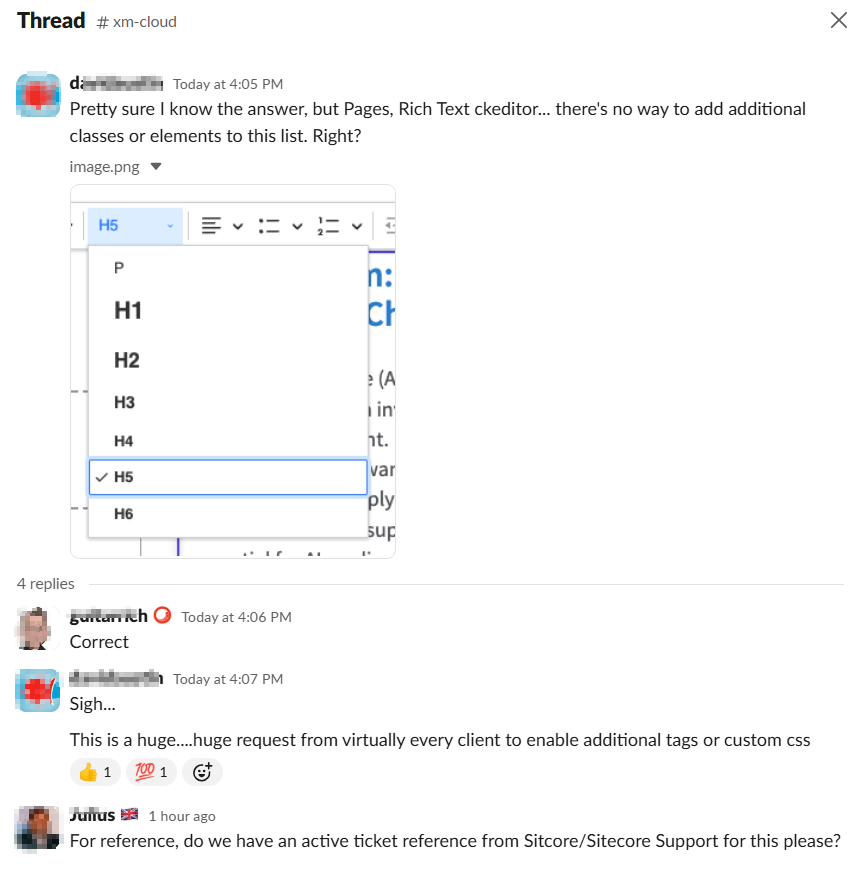
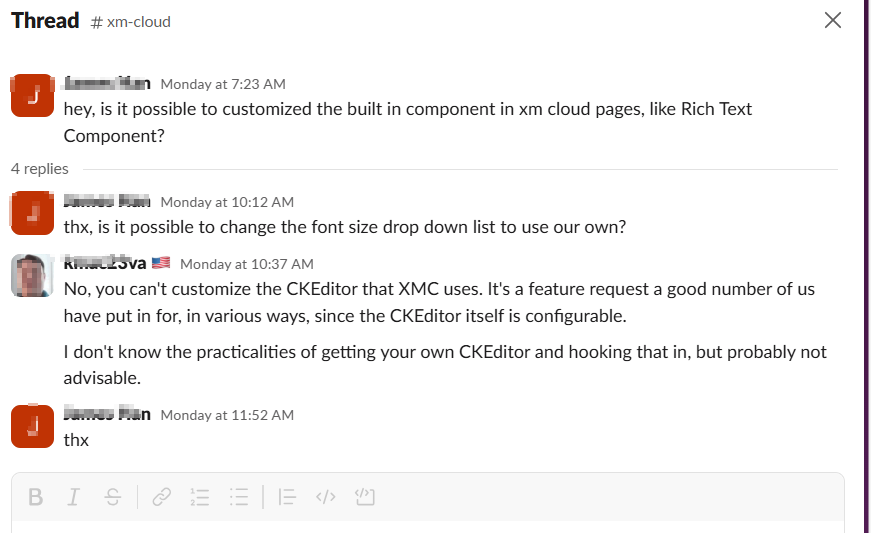
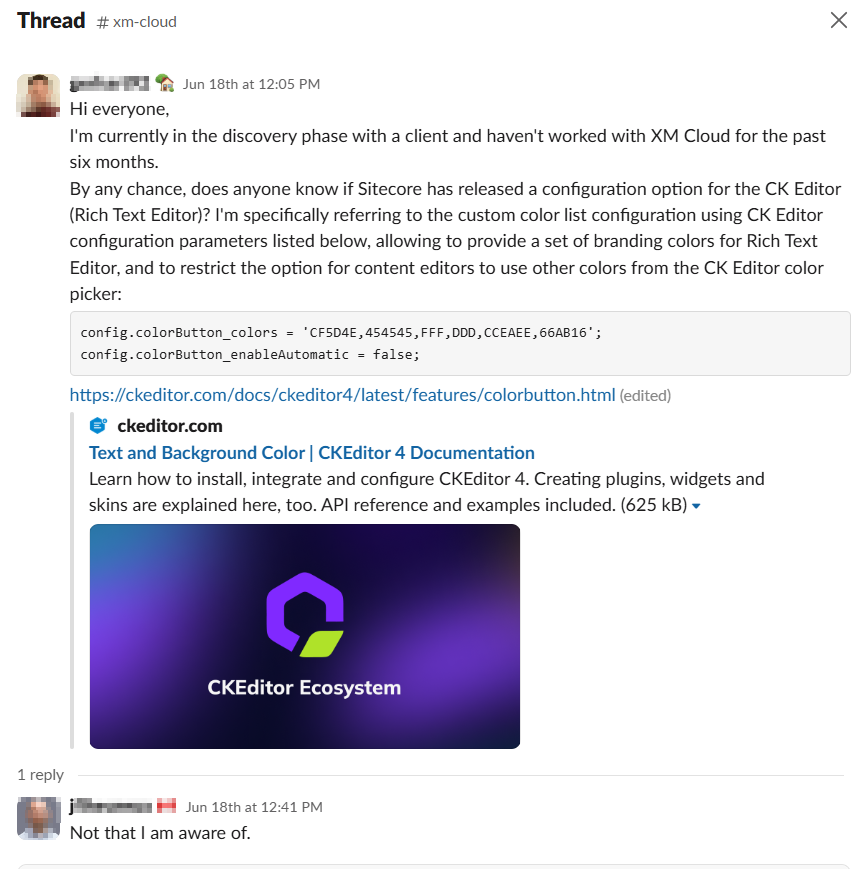
Do you know how to add a custom class using “new” text editor CKEditor? I want to add a custom "<p class="my-custom-class"></p>"
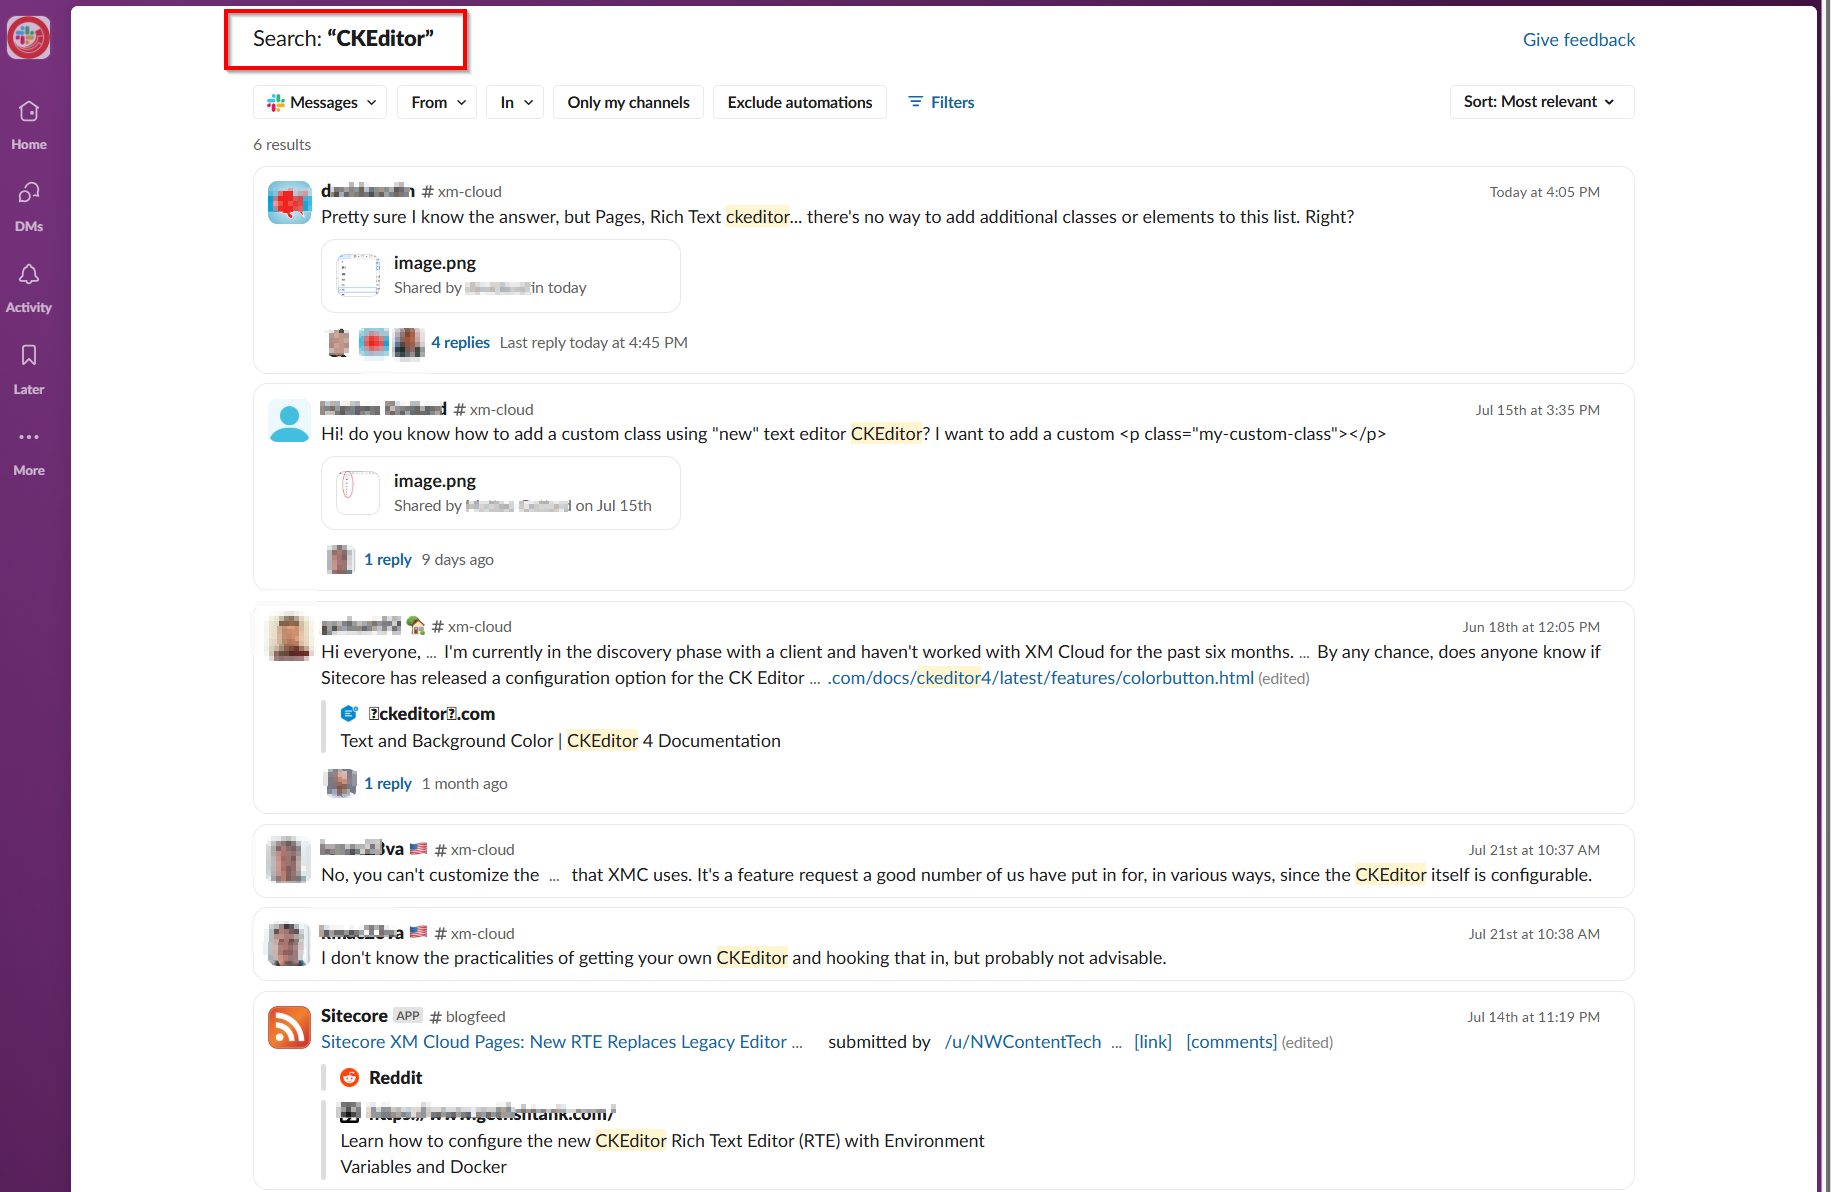
Sounds familiar? This is a common query which XM Cloud developers are grappling on Sitecore developer community channels, including Slack.
In fact, a quick search reveals an active topic as shown below:
What is CKEditor?
On May 8, 2025 Sitecore deprecated the legacy Pages rich text editor in XM Cloud. This was previously accessible from the right-hand side panel. The newer CKEditor rich text editor becomes the default editor. The link I have shared above provides guidance on how to enable the newer CKEditor rich text editor. This involves adding the env variable PAGES_ENABLE_NEW_RTE_EDITOR in the Deploy app and set its value to ‘true’.
supporting new markup (this was not possible with previous legacy editor)
*The image above has been adopted from developers.sitecore.com
But how do I add custom class to CKEditor?
With all these new capabilities and UX improvements, unfortunately you can not customize the CKEditor in XM Cloud (yet). As mentioned earlier, there seems to be demand for a capability to customize the list of the options available from the formatting drop down.
Makes sense to be able to create custom classes to be included in the list right?
Back to you Sitecore XM Cloud team.
What are other developers of XM Cloud saying?
Below are some of the answers to this question on Slack:
Next steps
Joined Sitecore Slack channel yet? Head over to https://sitecore.chat to join the community. In the meantime, stay tuned and please keep any eye on this feature request. Also please give us any feedback or comments.
Content Hub’s Marketing Resource Management (MRM) module provides a robust project management tool within the context of creation and development digital assets as part of the wider DAM solution. For example, you can capture project summaries and briefs, model your assets creative development process using stages, tasks or even jobs. Basically, you can use this tool to map to your ways of working, sharing responsibilities as you will do in a typical project. Only that MRM provides three default roles of Managers, Contributors and Readers which does what they say on the tin. But does this meet your needs?
In this blog post, I will share tips and tricks on how you can go a step further and enhance the default project roles so that you can have a more fine-grained control of permissions to meet the needs of your team members in your projects.
What you get with default Managers, Contributors and Readers project roles
In brief, project roles work like user groups. In a similar way that user group membership determines what you can access and the actions you can take so do project roles. The role you are assigned determines what you can access and the actions you can take for specific project.
Managers have overall visibility of the project, can create projects, edit project information, and manage all defined stages, tasks or jobs within the project
Contributors can make contributions to the project, such as add assets and fragments to projects.
Readers have read only access to assets and fragments in the project
Clearly these three broad definitions above will not always map exactly to your business use cases. For example, you may need your Readers to do more, such as download or preview some assets.
Stay tuned for details on how to get a detailed view of granular permissions available for each of these roles and tips you can use to enhance or extend them.
Can I modify or extend the default permissions for the project roles?
The good news is that these default project roles are not system-owned. These are simply role templates that you can extend yourself so that the permissions closely meet your business needs.
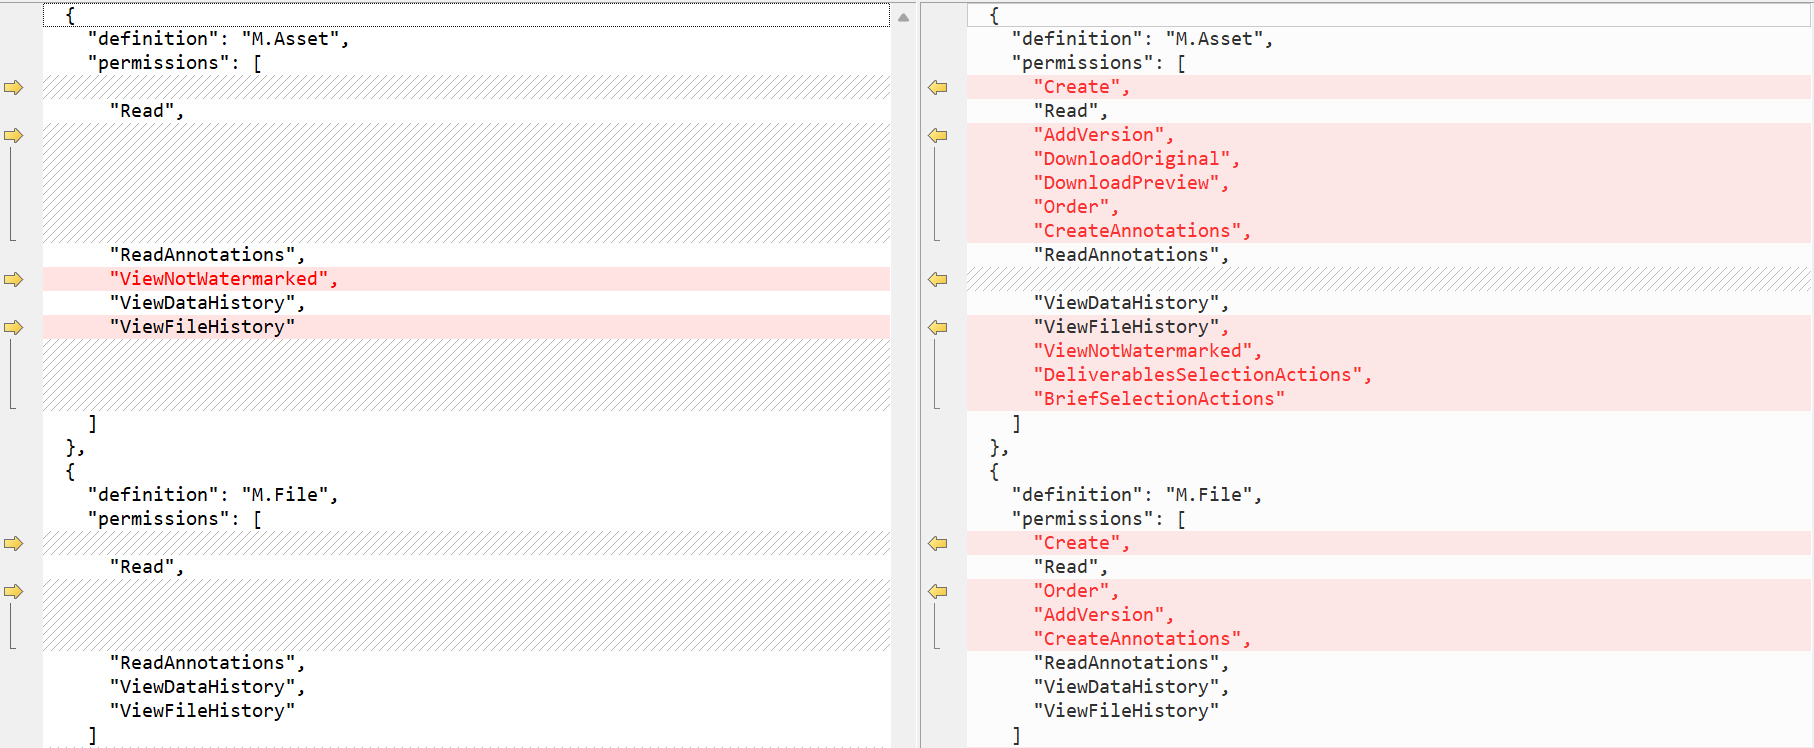
Below is a sample comparison of the default Readers (left-hand-side) and Contributors (right-hand-side)
For example, a Contributor role allows all permissions to M.Asset within Readers role plus the following additional permissions:
Create
AddVersion
DownloadOriginal
DownloadPreview
Order
CreateAnnotations, among others
Likewise, there are different permissions for M.File for both roles, as shown above.
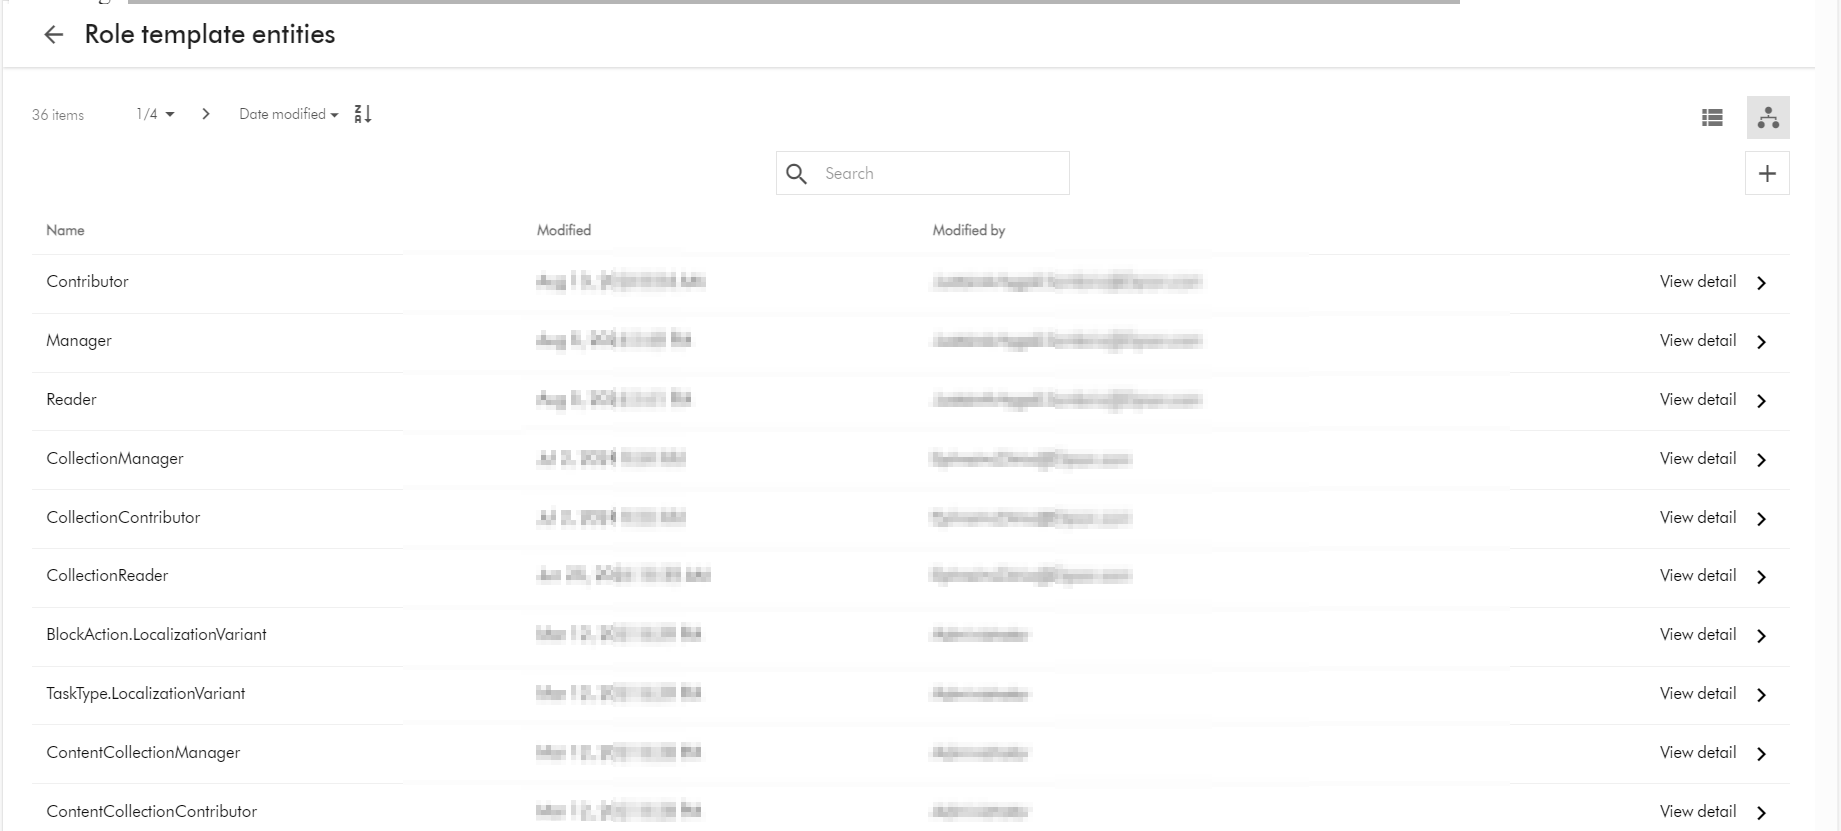
You can access the full list of all role templates in your Content Hub instance by accessing the URL below (assuming you have super user access). BASE_URL is your Content Hub instance base URL.
BASE_URL/en-us/admin/entitymgmt/entity/1471
also
BASE_URL/en-us//admin/entitymgmt/entities/50
And below is a sample list:
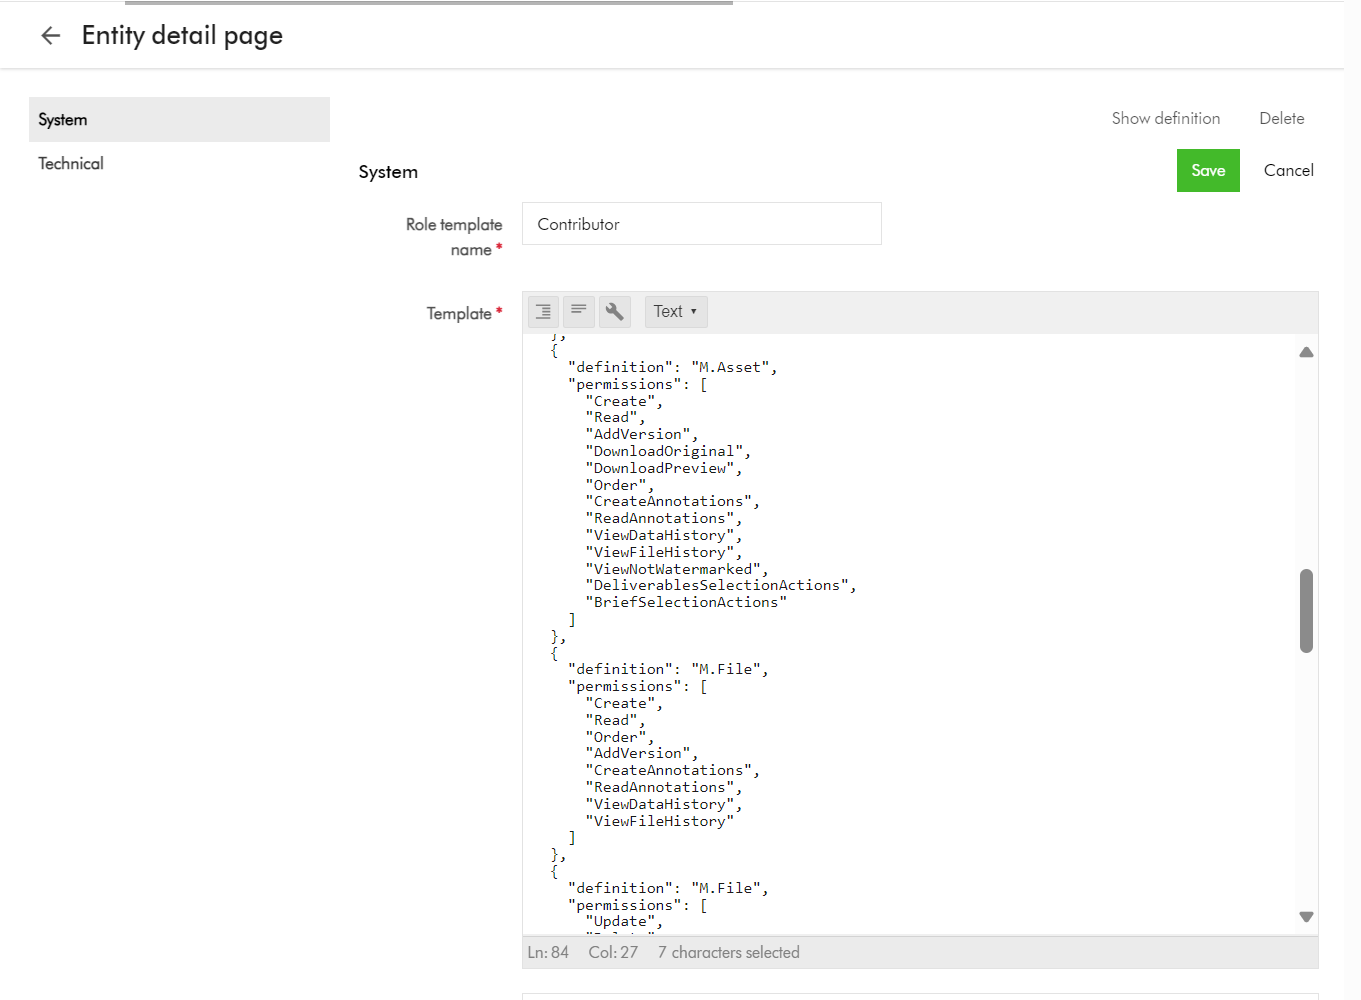
And below is the Details page for the Contributor role template, which you get by clicking on View detail link above.
Tip 2: Viewing and editing role template using entity management page
Warning: You have to take caution when making changes to the role templates. Ensure you are only making changes after consulting with business owners and assessed and agreed on required permission changes to be made.
Follow Tip 1 above to find and select a role template, say Contributor
Click on the Pencil or edit button shown below
This will open the edit page, shown below
You can copy the text and keep note of it before making any changes. You can repeat this step for all the default project role templates, so you can compare what is different between them, to further help you assess what you need to fine tune for your use cases.
Repeat step for all your role templates that need the updates.
Tip 3: Exporting role templates into Excel
Role templates are entities in your Content Hub instance, as such you can export them into Excel.
A typical use case is to export any changes made in a lower environment (say DEV) and apply them into another environment (say QA), by leveraging Excel import into target environment.
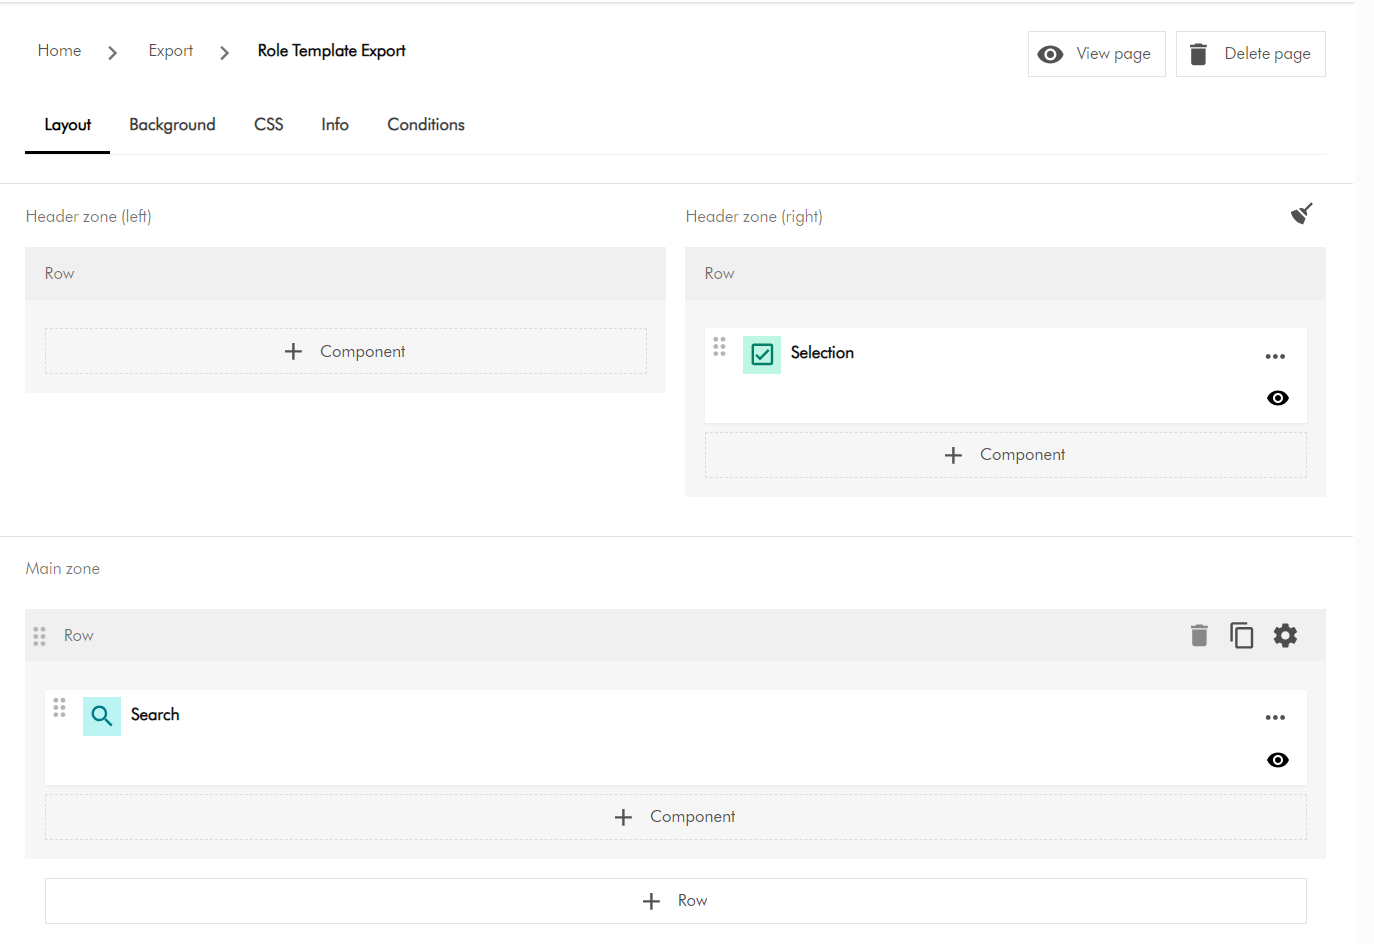
You need to create a new subpage to used for the export purposes. From Manage -> Pages. Then identify which section you will be creating the new page. Then select “Add subpage” option. Refer to detailed steps available on the docs for further guidance.
On your newly created subpage, add a Search component and a Selection component as shown below
Configure the Search component so we can search and display Role templates. You can use the Filters tab as shown below, and choose the M.RoleTemplate definition. You can refer to detailed steps available on the docs for further guidance.
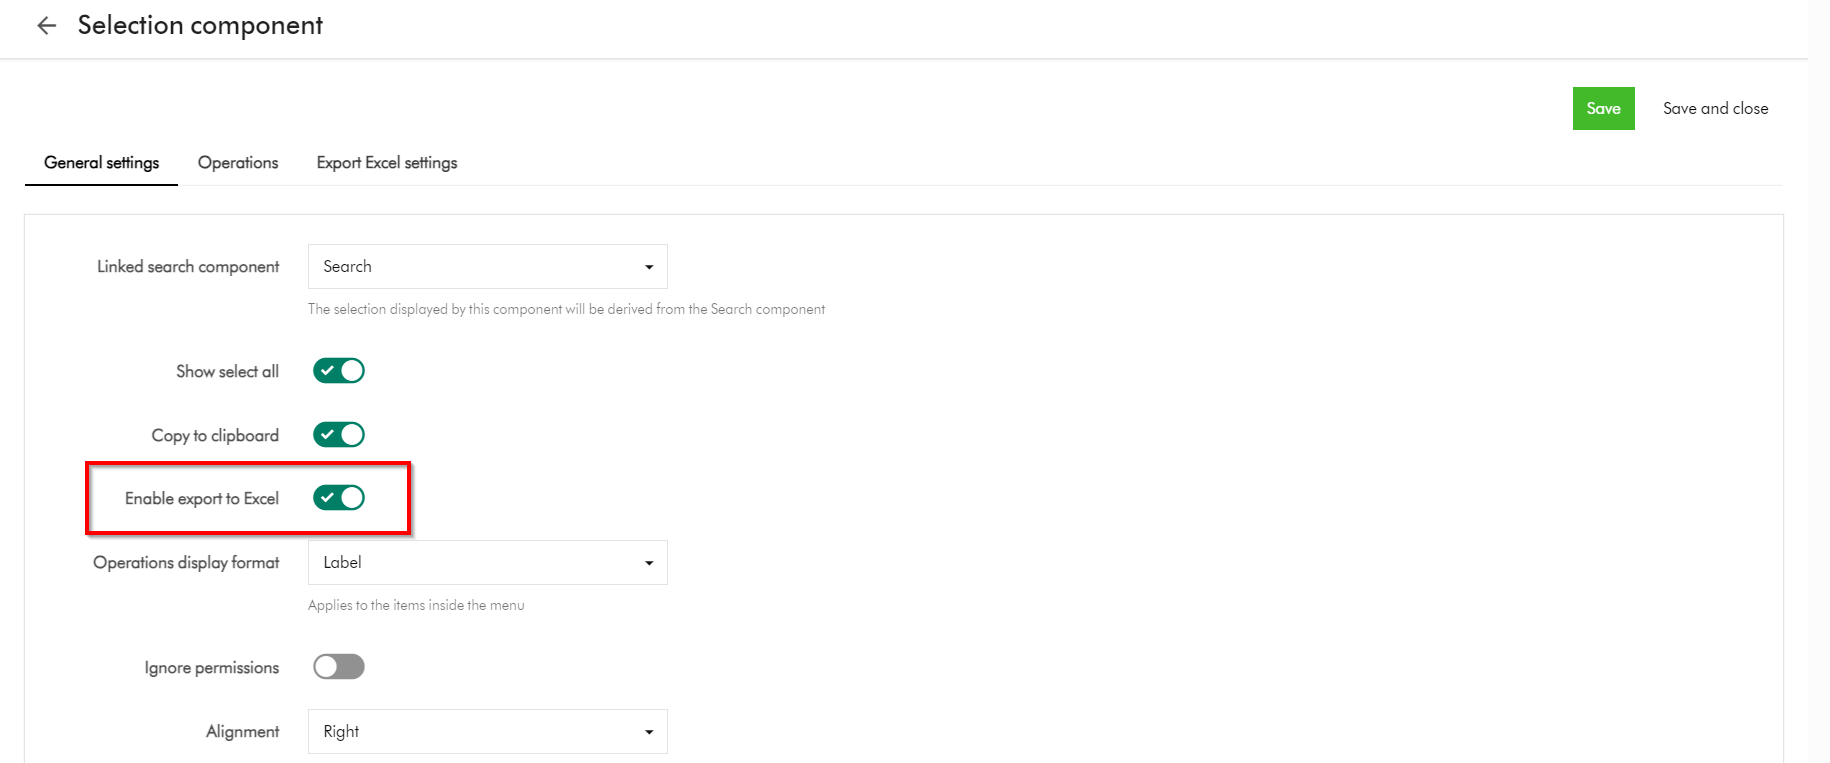
Then Enable export to Excel option on the Selection component as shown below
This is it, your subpage is ready.
On you subpage, select all the role templates that you need to export, and select Export to excel
Next steps
In this blog post, we have looked at Content Hub’s Marketing Resource Management (MRM) module. We looked at the default project roles of Managers, Contributors and Readers and what they offer. I shared some tips and tricks on how you can extend the permissions for these roles to closely meet the needs of your project management use cases. I hope you find this useful for your similar use cases.
Stay tuned and please give us any feedback or comments.
On the previous post, I looked at how to securely share your DAM assets externally by leveraging collections. Among other things, we covered four options you can use to secure the asset collections. One of the options involved defining a permissions policies on M.Asset (model for your assets) based on M.Collection (model for your asset collections). However, this option seems to come with some nuances and will not work by default. I will carry on the conversation to demonstrate how to make this option to work.
Why doesn’t the policy definition work?
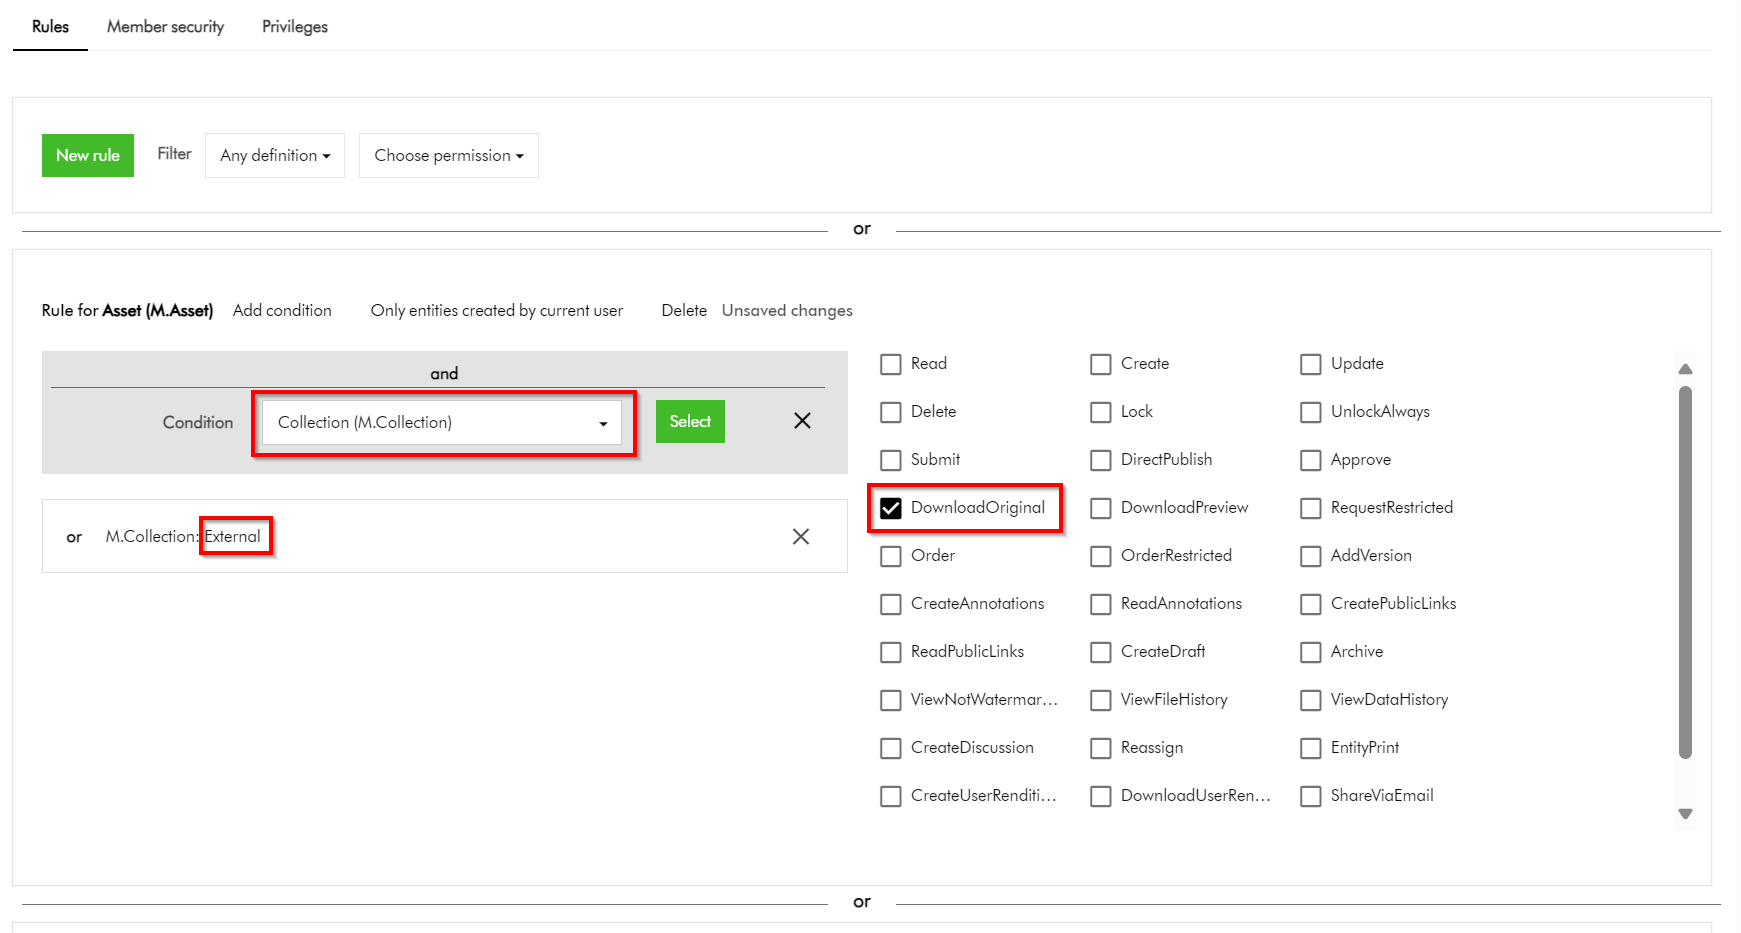
In simple terms, the above policy states that we would like to allow all assets belonging to our collection named “External” to be downloadable. Simple. But it doesn’t work.
But why?
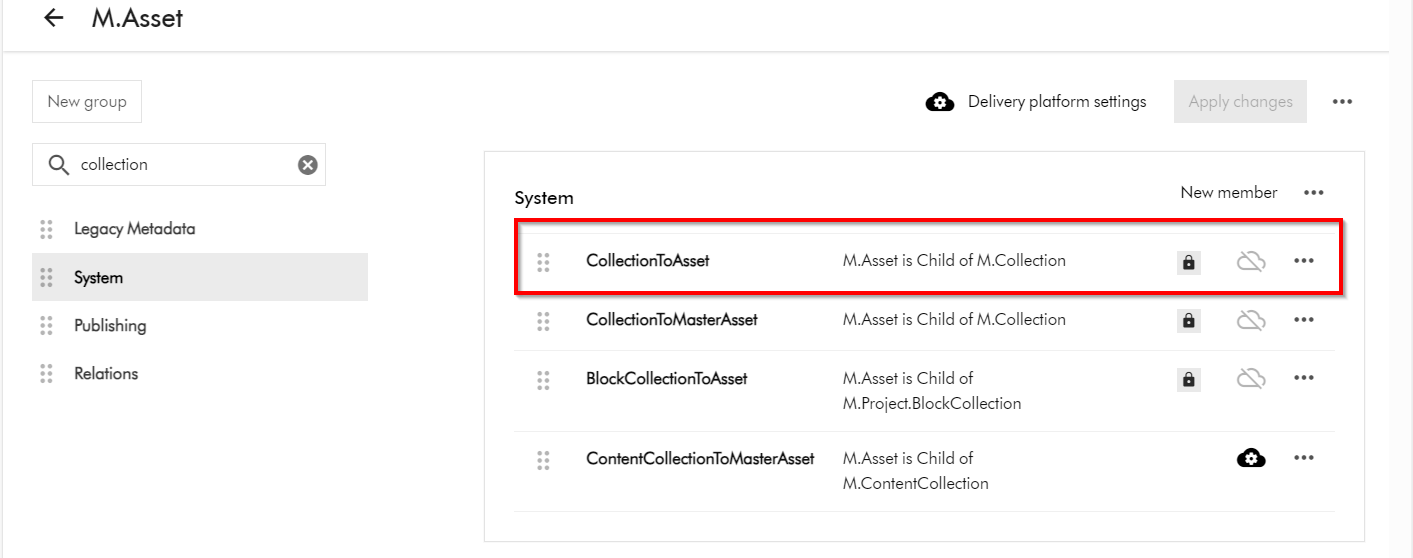
This is because the “Inherits security” setting for the CollectionToAsset relation is turned off by default. In other words, this means security related metadata (from the parents towards the children) can not be inherited while this setting is turned off.
M.Asset is a child of M.Collection (as shown below in the schema details for M.Asset definition). To access M.Asset schema page, click on Manage -> Schema -> then search for M.Asset
How do I turn on “Inherits security” for the CollectionToAsset relation?
Short answer is you can’t modify this by yourself. You will need support from Sitecore Technical Support to make this change for you. Please note CollectionToAsset is a system relation and is locked down to Super users as well.
You can raise Sitecore Support Cases using the Support portal and request the team to enable the “Inherits security” on CollectionToAsset on your environments. This should be actioned swiftly after which your policy definitions can start to work as expected.
Next steps
In this blog post, we have looked at how to make user group permissions policies on M.Asset based on M.Collection work. We looked at nuances that make this not to work by default and how to resolve and get it working. I hope you find this useful for your similar use cases.
Stay tuned and please give us any feedback or comments.
One of the great values you get with your investments in Sitecore Content Hub platform is the collaboration capabilities with your external partners and users in your content supply chains. Siecore Content Hub provides out-of-the box the Asset Collections capability, which enables you to group your assets. Which seamlessly allows collaboration on that asset collection through comments, for example.
However, there is a catch.
When you create an asset collection and want a fine grained control on whether these assets should be downloadable, this doesn’t always seem to work as expected.
For example, you have a collection named “External” with only “Asset test 1” and “Asset test 2” included. And you need these two assets to be downloadable. However, when this collection is shared, there are scenarios when other additional assets will seem to appear within External collection, instead of just “Asset test 1” and “Asset test 2” as expected.
In this blog post, I will be sharing some top tips and tricks on how you can be in control of this process, ensuring you only share assets that need to be shared, securely.
In the top-right corner of the Collections page, click + Collection.
In the Collection dialog, populate the details of the collection you are creating
Click Save.
How do I add assets to my asset collection
Again, the existing official docs provide robust step-by-step guide on how to add asset to a collection. Please note that it is best practice to add existing assets to your collection – which are at the correct stage of your content lifecycle. Avoid uploading new assets directly at this stage.
How do I share my asset collection
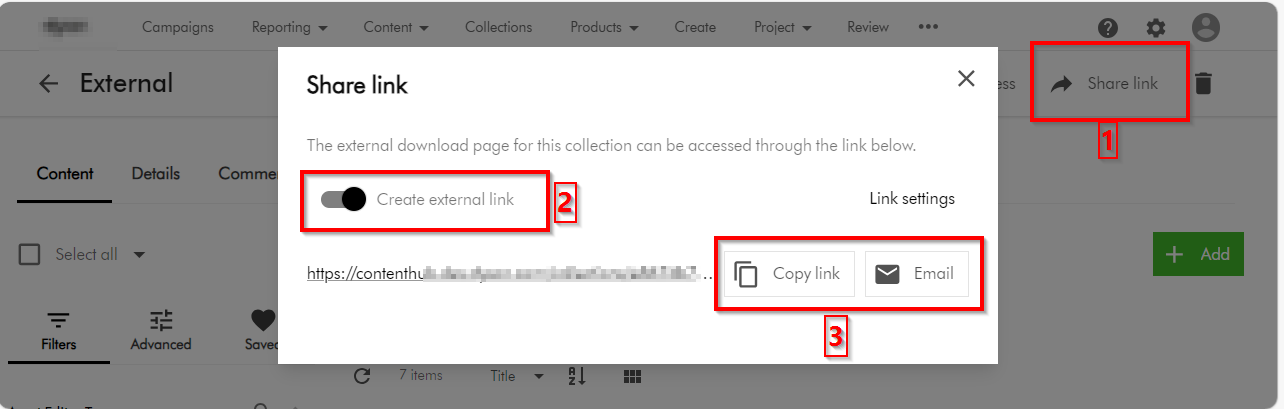
You can share the collection by following the following three main steps:
On the collection details page, click Share link.
In the Share link dialog, turn on the Create external link switch. This will then generate for you a link
To share the link via email, use the Click Email button, which should prompt for emailing details. You can alternatively use the Copy link button to copy the URL and share it as well
Tips and tricks on securing you asset collections
Now that we have covered the basics on how to create an asset collection and share it, I will focus on top tips and tricks of ensuring we are sharing the collection using best practices and for the correct external collaborators.
Top tip 1 – Leverage user groups to manage external collaborators
User groups underpins the permissions model within Content Hub. Members of a user group are granted permissions and privileges according to the user group policies assigned to that group. By managing permissions and privileges using groups, you can streamline how they are assigned.
Read-only external collaborators – Define a separate user group for your external collaborators who need a read-only access. These are not expected to make any contributions, but may be to give them a status update of your assets.
Contributor external collaborators – Define a separate user group for your external collaborators who you would like to give you comments and feedback on shared assets.
Download external collaborators – Define a separate user group for your external collaborators who you would like download your shared assets. The use case is when you would like them them to use download the shared assets for allowed activities such are offline brands channels.
Add external collaborators to a user group – Always add external collaborators as users in your Content Hub instance, then assign them one of the above user groupings. Sitecore Content Hub allows users belonging to an external domains to be added using Users Manager (and they can sign in with their username and passwords) Depending on your security policies and governance, it is possible to also leverage Single sign on with External domains. If you need guidance, reach out to your Security and Identity team or Sitecore Technical support.
Top tip 2 – Leverage user group policies to lock down UX and pages
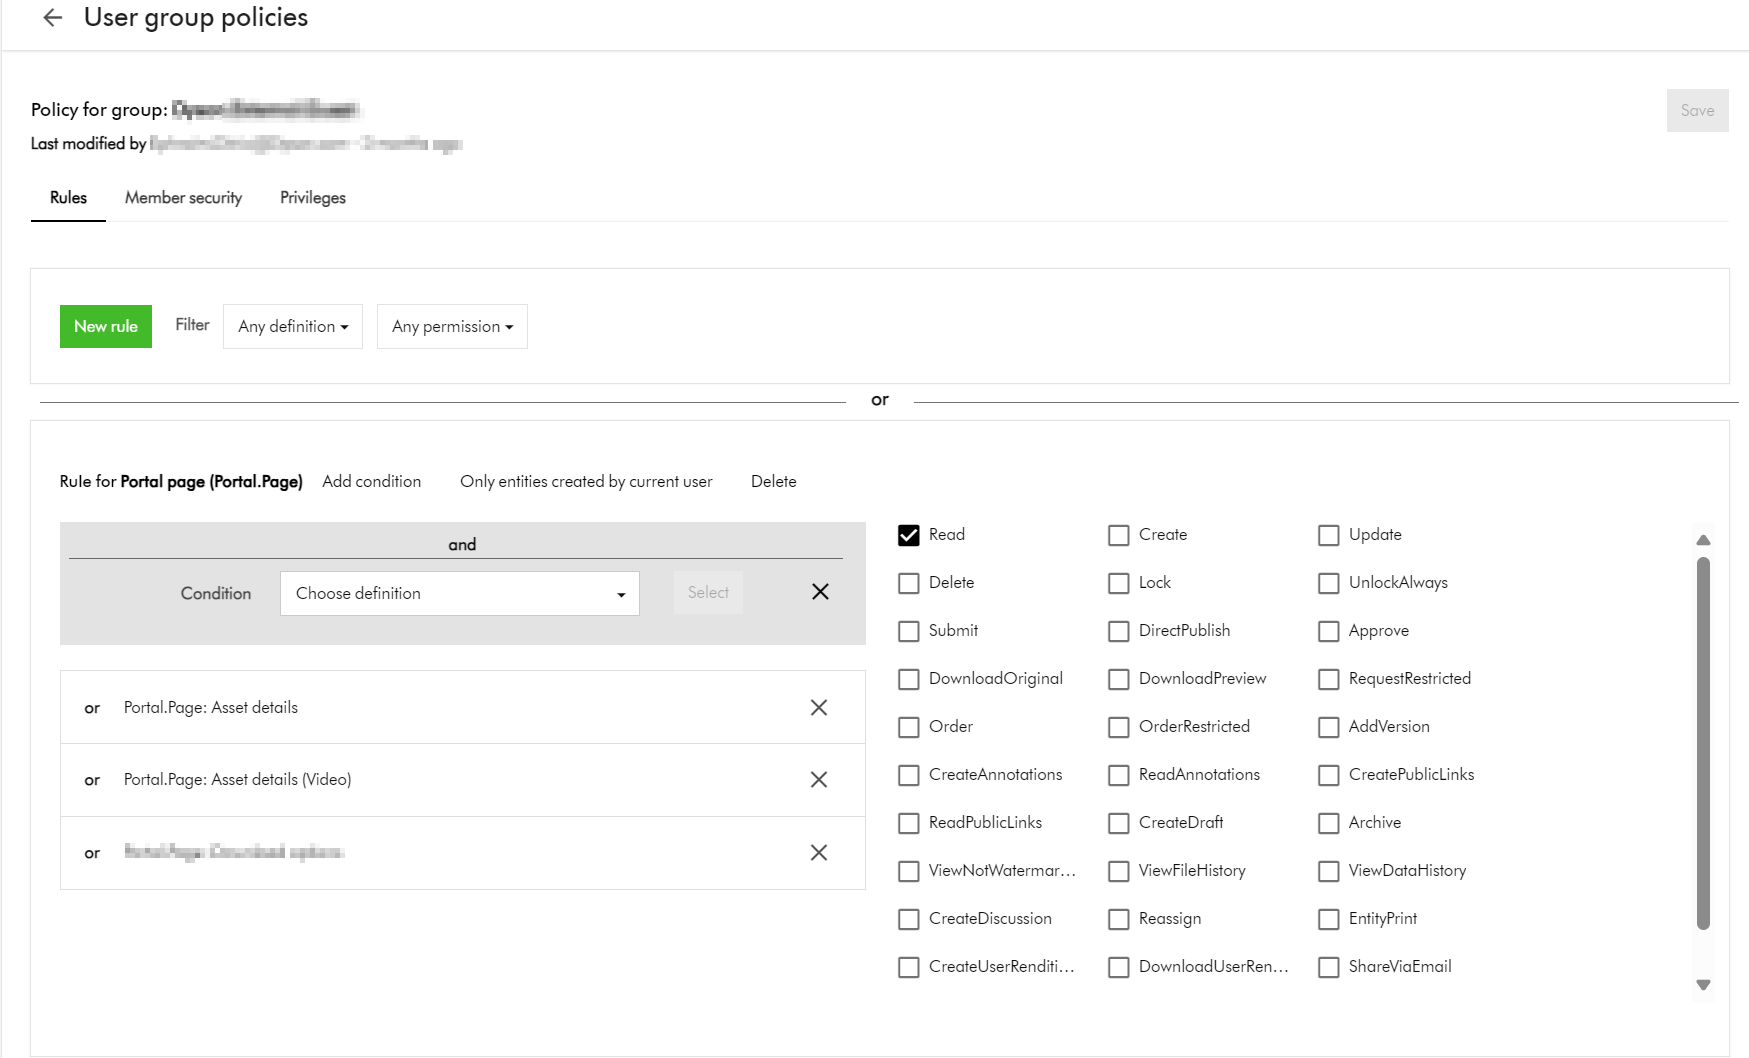
You need to make a decision which pages your external collaborators can view. For example, should they access your Asset details page, which will potentially give them access to additional meta data?
If you have followed Top tip 1 above, all you need to do is define user group policies for each relevant user groups.
Below is an example of how you can give access to allow viewing Asset details page(s) such as Asset details or Video asset details page as shown below.
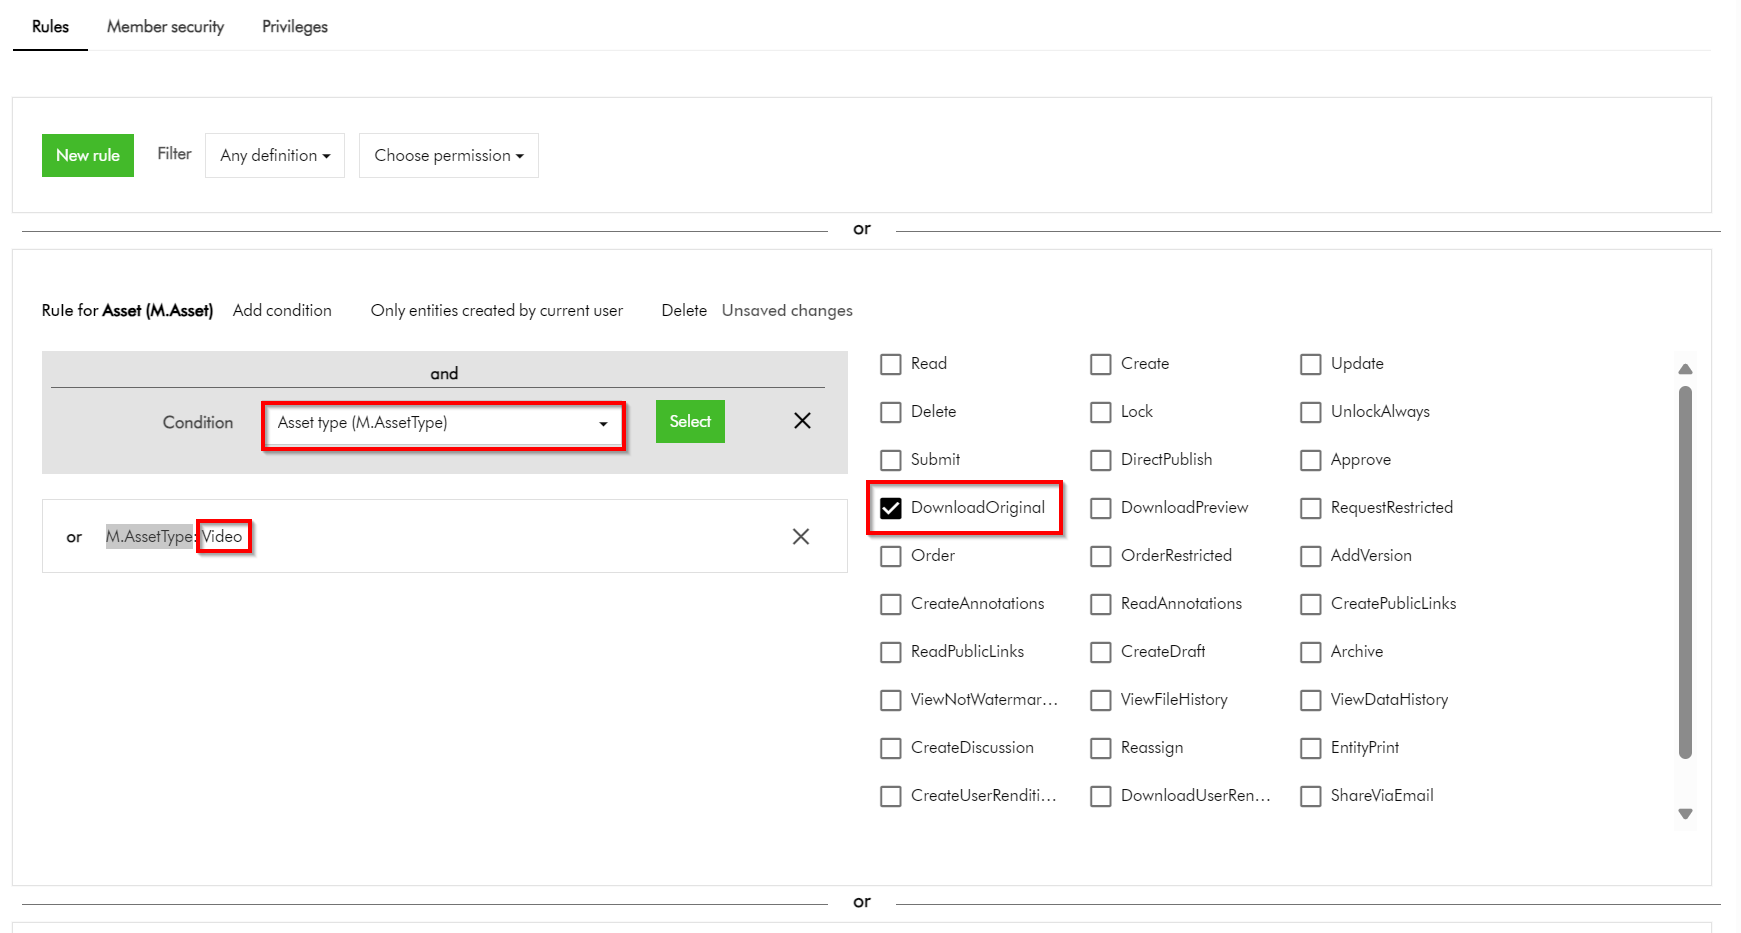
Top tip 3 – Additional policies – downloadable assets based on a taxonomy value
You recall the scenario I described at the start of the blog. You have a collection named “External” with only “Asset test 1” and “Asset test 2” included. How will you go about ensuring only these two assets are downloadable?
Define taxonomy, use this to tag and identify external assets:
This option requires you to define some form of Taxonomy, say, ExternalAsset which entities Yes or No. For all externally shareable assets, you will need to tag them with value of Yes. You can then leverage this Taxonomy within your User Group policies definitions to narrow down which assets can be downloadable. As an example, this policy below shows how I can narrow which asset is downloadable based on M.AssetType value of Video
This clearly works. However, with this option you will need to ensure all assets are tagged accordingly before sharing them externally. This could add more work to your content workflows.
Top tip 4 – Additional policies – downloadable assets based on current asset collection
You could be asking, why can’t I apply the additional policy for downloadable assets based on the current asset collection? Good question.
If you try this approach, your User group policy will look like this instead.
This is perfectly fine. You could have thought this will work, right?
This option does not work. It seems you can not define a policy on M.Asset (model for your assets) based on M.Collection (model for your asset collections) by default.
In this blog post, we have looked at Content Hub asset collections a great feature for collaboration capabilities with your external users during your digital assets lifecycle. We have looked at some of the top tips you can leverage to secure your collections when sharing them with your external collaborators. I hope you find this useful for your similar use cases.
If you currently leveraging Action scripts as part of your Content Hub solution, you probably noticed that any updates done to your entities are tagged as Created by or Modified by ‘Scriptuser’. You may as well not be aware that actually this is how the Content Hub platform works by design. At present, all scripts operate under the Scriptuser account
But how do I override the ‘Scriptuser’ account?
Frustratingly, there isn’t much documentation around this ‘Scriptuser’ on the official docs. You are not alone in this. That is why I have put together this blog post to help provide a solution to this problem.
It is not all doom and gloom. In fact, if you look around in Sitecore docs, the IMClient provides a capability to impersonate a user, using the the ImpersonateAsync method.
Below is a definition from Sitecore docs:
ImpersonateAsync(string)
Creates a new IMClient that acts on behalf of the user with the specified username. The current logger will be copied to the new client.
So we will need a function to get an impersonated MClient
Looks like we have a solution then. All we need to do now is define function within our Action Script, that will create an instance of an impersonated MClient. This impersonated client will in effect allow us to override the Scriptuser with the current user triggering our Action Script. Which is the solution to our current problem.
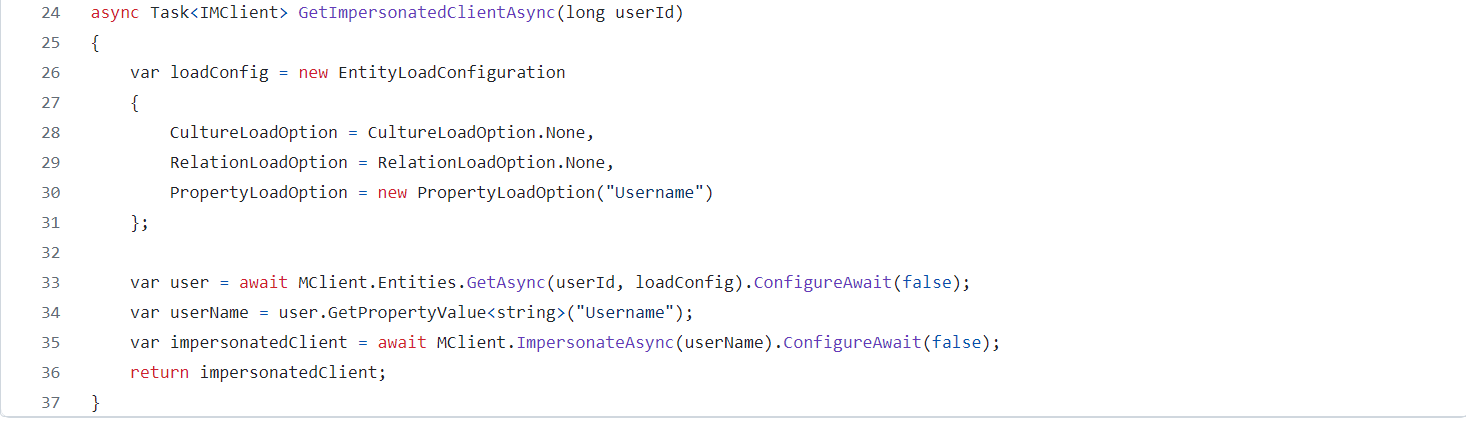
Good news, I have already defined such a function for you. I have named this function GetImpersonatedClientAsync, a shown below.
You should be familiar on how to load an entity property, by leveraging the PropertyLoadOption in your EntityLoadConfiguration, as shown above. That is how I am able to retrieve the Username property from the current user entity (currently authenticated user within Content Hub). This will be the user that has triggered our Action Script.
It is need as a parameter when calling the MClient.ImpersonateAsync as shown on line 35 above.
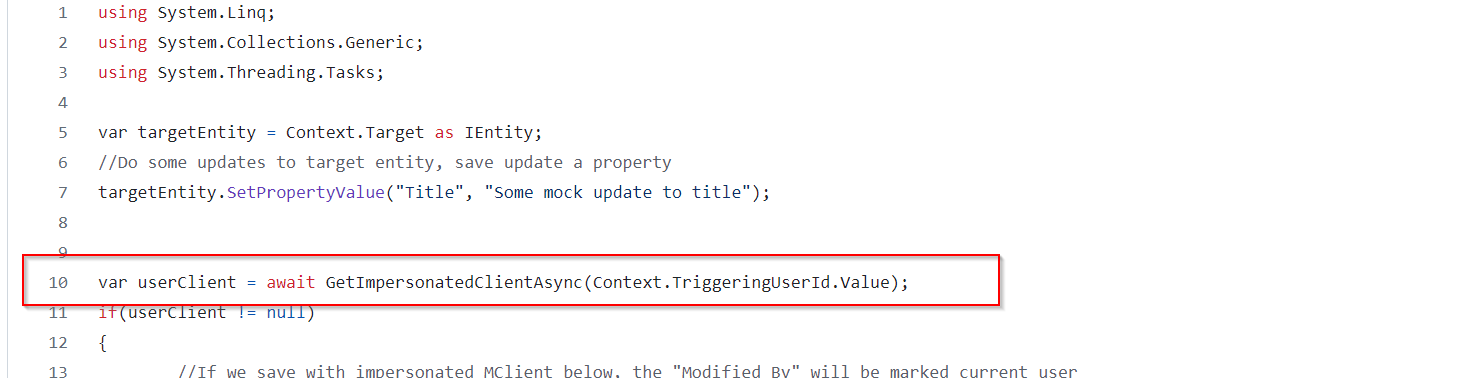
However, I would like to call out that the UserId of the authenticated user is always available within the Action Script via accessing the Context object. Below is a snippet of how I have done this on line 10.
Saving changes with Impersonated MClient
We now need to use the impersonated MClient in all instances where we are saving changes in our Action Script. Below is a code snippet on how to achieve this. You can see on line 15, I am using the impersonated userClient. You can easily compare this with line 20, which is a fallback option that uses default MClient.
In this blog post, we have looked at a how to override the Scriptuser within an action script. I have walked you through a sample action script and also shared sample source code for your reference. I hope you find this useful for your similar use cases.
Stay tuned and leave please us any feedback or comments.
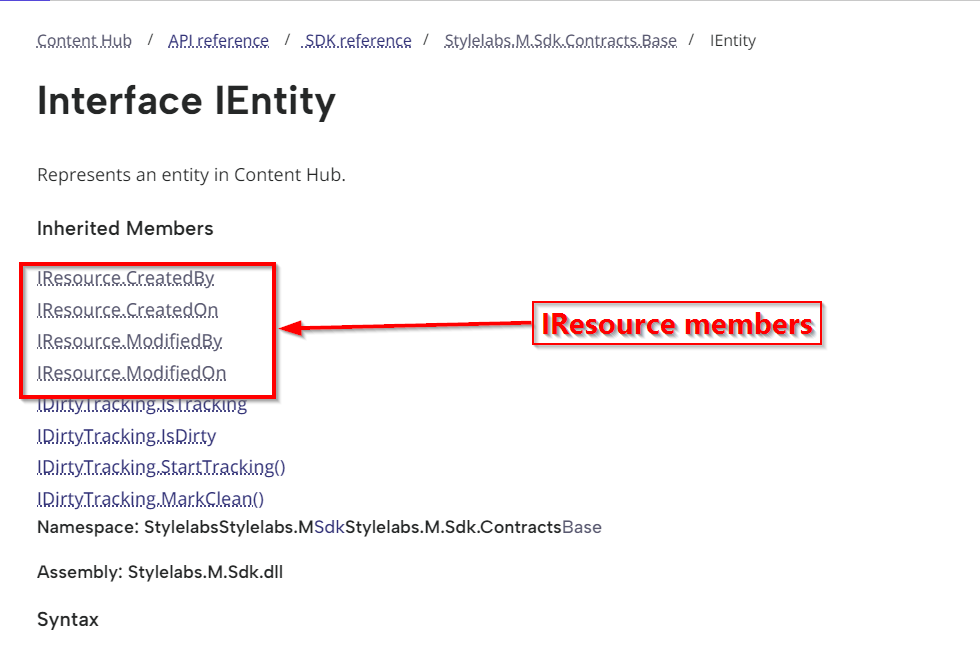
I have previously blogged about creating Action Scripts to help aggregate your Content Hub data for sharing with external or third party integrations. In this blog post, I wanted to demonstrate how to access your entities audit data such as when the entity was created and who created it. Also when it was last modified and who made the modification.
Below is a snippet of an action script, to demonstrate how to access these audit fields.
And below is the sample output from the above script.
Script explanation
Line 14 through 27 demonstrates how to get the entity object within your action script. The Context object provides you with the triggering context properties. In this case we are can try obtain the entity from Context.Target as shown on Line 14. The rest of the code checks if we succeeded to get the entity object, in which case we can try load it using a custom function GetEntity as shown in Line 20. I will cover details about this in a minute.
Line 29 demonstrates how to obtain the entity definition name
Line 32 through 35 demonstrates how to obtain the entity auditing metadata.
Below is a sample trigger, indicating the triggering events we are interested in. As you can see, our trigger will fire whenever an entity has been created, modified or deleted within Content Hub.
In this blog post, we have looked at a how to access an entity’s auditing metadata within an action script. I walked you through a sample action script and a sample output, and also shared sample source code for your reference. I hope you find this useful for your similar use cases.
Stay tuned and leave please us any feedback or comments.
When you are searching for assets within Content Hub, the search is underpinned by a search component within your page. You can also leverage the same search component, within the Search API to integrate the search results to an external or third-party system. One such use case, for example, is where you would like your business users to search for your assets on an external portal, without gaining direct access to Content Hub.
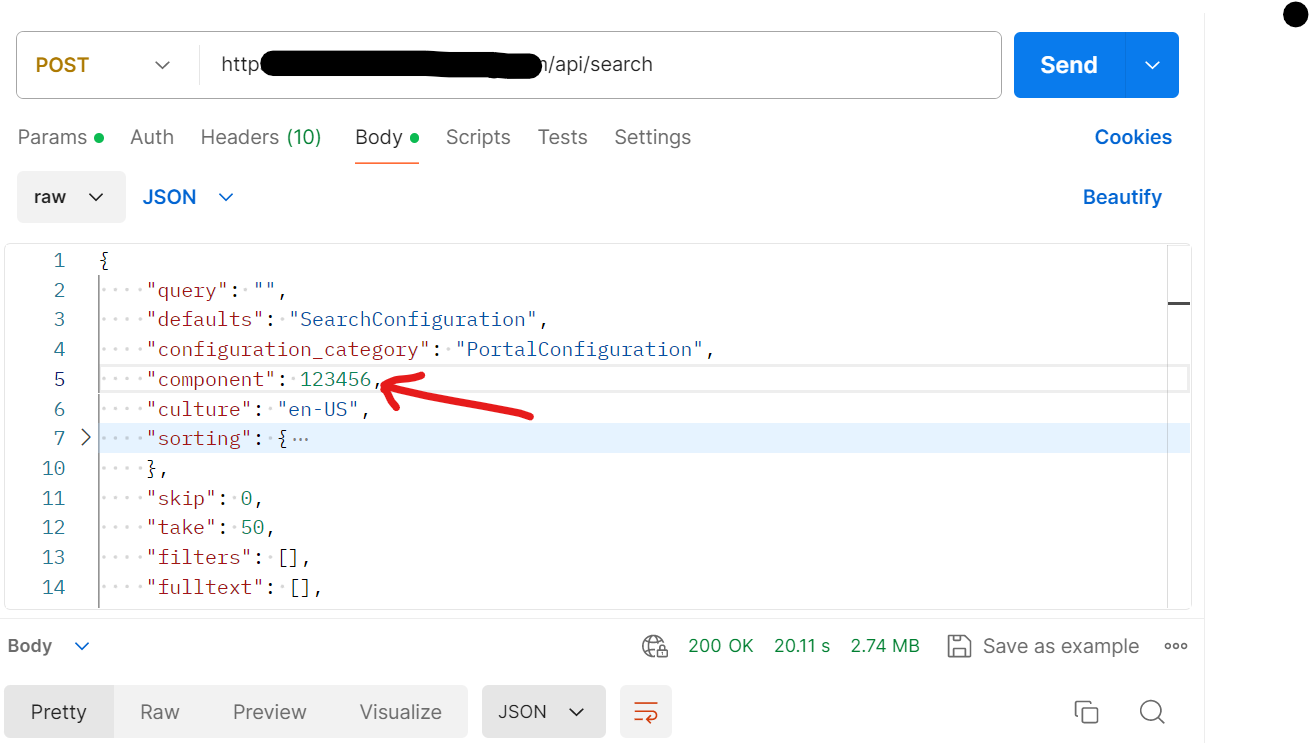
Search API – postman request
Below is an example of a POST request, indicating the search component Id within the request body. Of course you will also need to specify the required X-Auth-Token header to authenticate your request. (I am assuming you know how to go about this, and I have skipped these details)
Delivery links default expiry duration is only 20 mins
The response that you receive from Search API will contain a list of your assets that meet the search criteria. Each item in the response will contain the asset metadata details defined in your search component. In addition, you will get Thumbnail delivery link for the asset. This is particularly of interest for me, as the default expiry time is set to 20 minutes and is not enough for my current scenario. Below is a snippet of such response, indicating the thumbnail delivery link. Notice the expires url param indicated.
How to extend the default expiry duration for delivery or rendition link
The good news is that this expiry duration is configurable within Content Hub. This behavior is related to the media processing task. When a media processing task is created, it is possible to enable the store output functionality and configure rendition links for these tasks with the needed parameters.
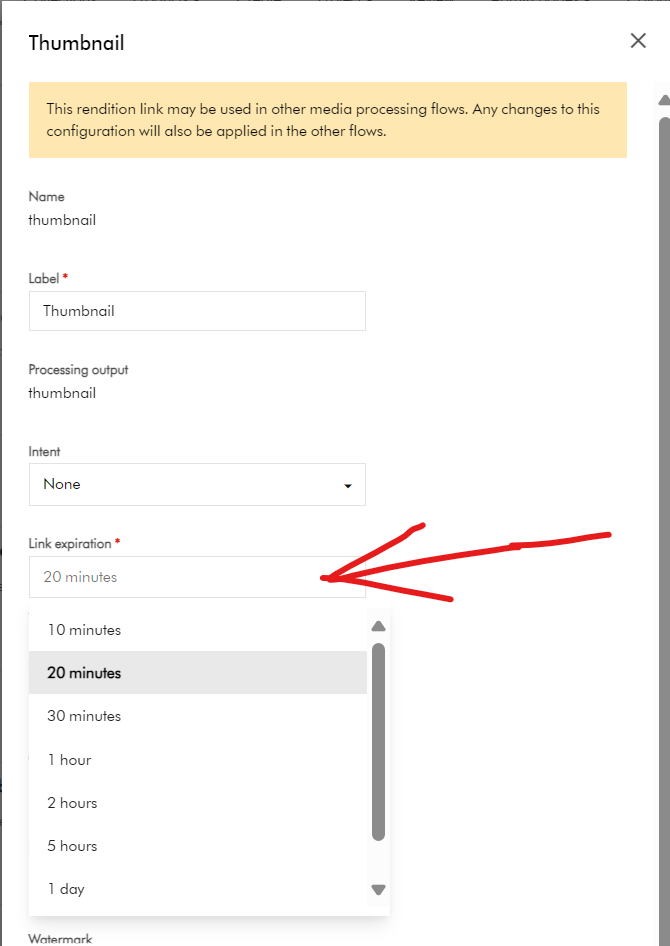
Steps to follow:
Open Manage -> Media Processing -> Images -> thumbnail task -> Outputs tab -> the “Edit” Rendition link button
Find the “Link expiration” field and change it to the required value.
Save the task. Publish the changes on the Manage -> Media Processing page
After these steps, when you send a request to the search API, it should return the rendition link with the new expiration time.
Next steps
In this blog post, we have explored that the Search API will return a response which has thumbnail delivery links expiry of 20 minutes. I have explored how to update this configuration within the Media Processing tasks, so you can choose a longer expiry to meet your needs.
Please let me know if you have any comments regarding above and if would like me to provide further or additional details.
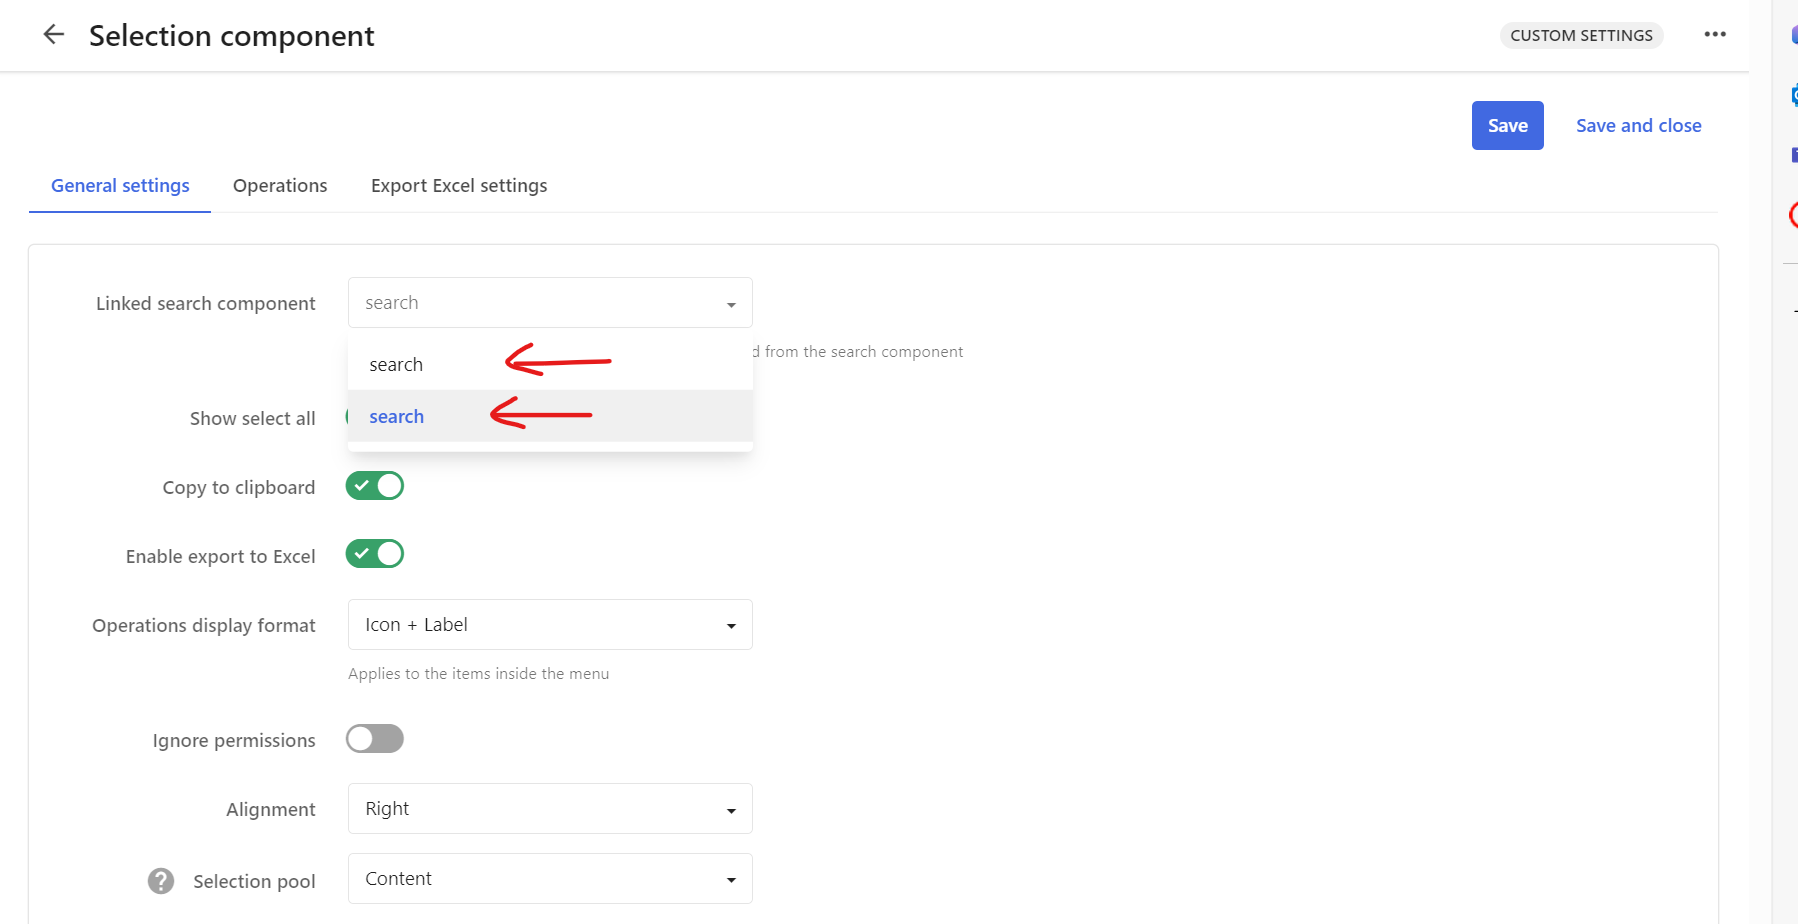
Consider the scenario as per the screenshot above. You are configuring a second Search component on your Assets search page. You make a genuine mistake and name your second Search component identical with your existing one, as shown. In this case, you would like to link your second Search component with your existing Selection component as shown.
Selection component shows ‘duplicates’
I know that I have made a genuine mistake of using the same ‘search‘ name for my second Search component. My selection component will display the following.
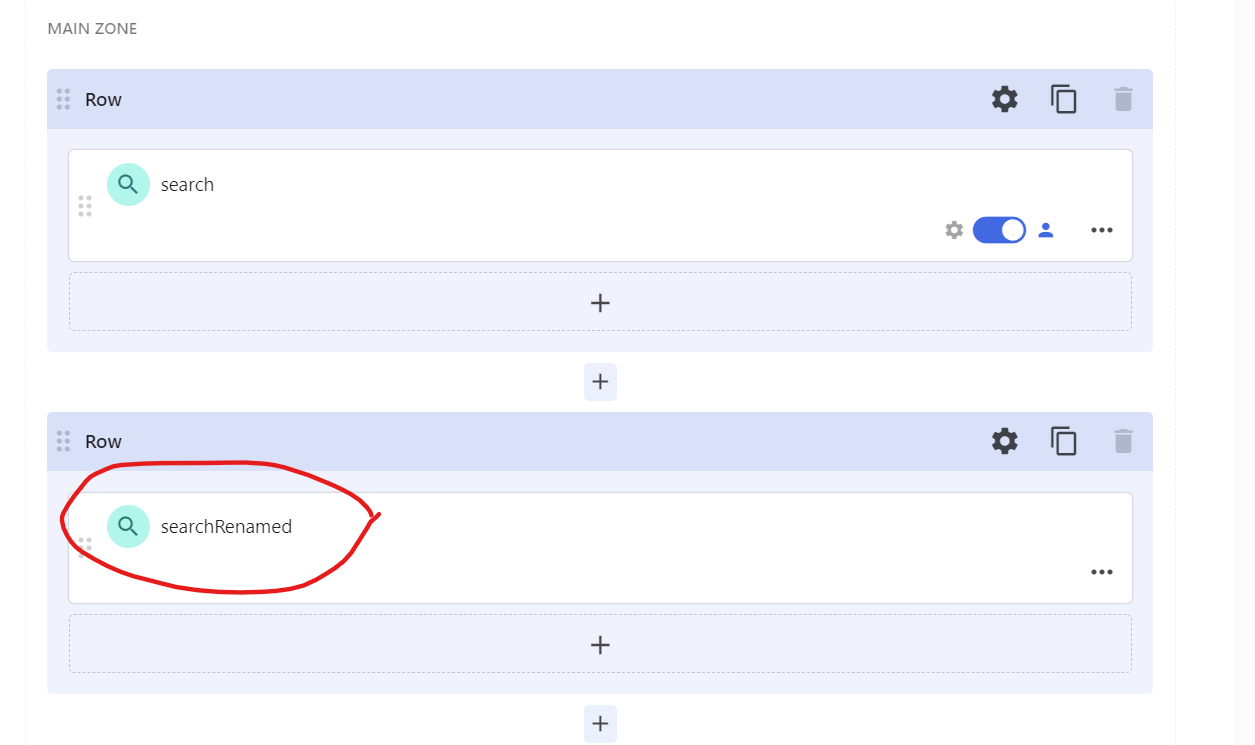
This is obviously confusing and we don’t know which is which. Now I will try rectify my mistake, and rename my second Search component.
Renaming Search component
Do rename my second Search component, I click on the Settings button shown below
Which opens the Settings pop up, from where I will specify a new Title as shown below and Save it.
Below is the outcome showing my second Search component renamed.
Selection component still shows ‘previous’ name
After this change, I was expecting my Selection component to show ‘searchRenamed’. However, I still have the same problem as shown below.
Sitecore Technical support have logged a product bug
I reached out to Sitecore Technical support and shared my use case above. Below is the response I received.
Hi Julius,
Based on the provided information we would like to define the scope of the current case:
Issue definition: in the drop down list the PageComponent.Name property is used instead of PageComponent.Title in the Linked search component (in the Selection component). Investigation target: we will work diligently to help find the root cause and a resolution to the defined issue.
Additional notes:
[Redacted]
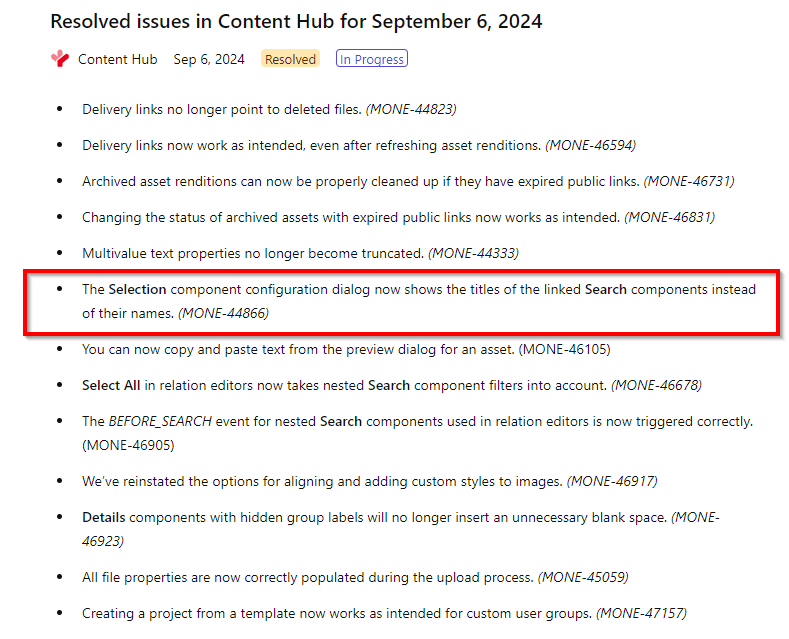
The issue reported has been registered as an issue in the Content Hub product.
The reference of the bug report is the following: MONE-44866, which can be further reviewed and followed-up via the support portal in the “My Product Issue” page
Update:
Glad to report that Content Hub product team have resolved this issue in September 6, 2024 release
Tips and tricks
Currently, the Selection component’s Linked search component drop down list uses the PageComponent.Name instead of PageComponent.Title. While Sitecore have acknowledged this as product bug, you can easily work around this issue.
If you are going to create more than one Search Component, ensure you name the appropriately with distinct and easily identifiable titles. This is because the title will be used as the component name in the backend, which will ultimately be displayed on the list when linked to Selection component.
If you initially assign your second Search Component the same name as the first one, then renaming the second component will NOT resolve the issue as I have explained in this blog post. Either delete the second Search component and create a new one with a unique Title.
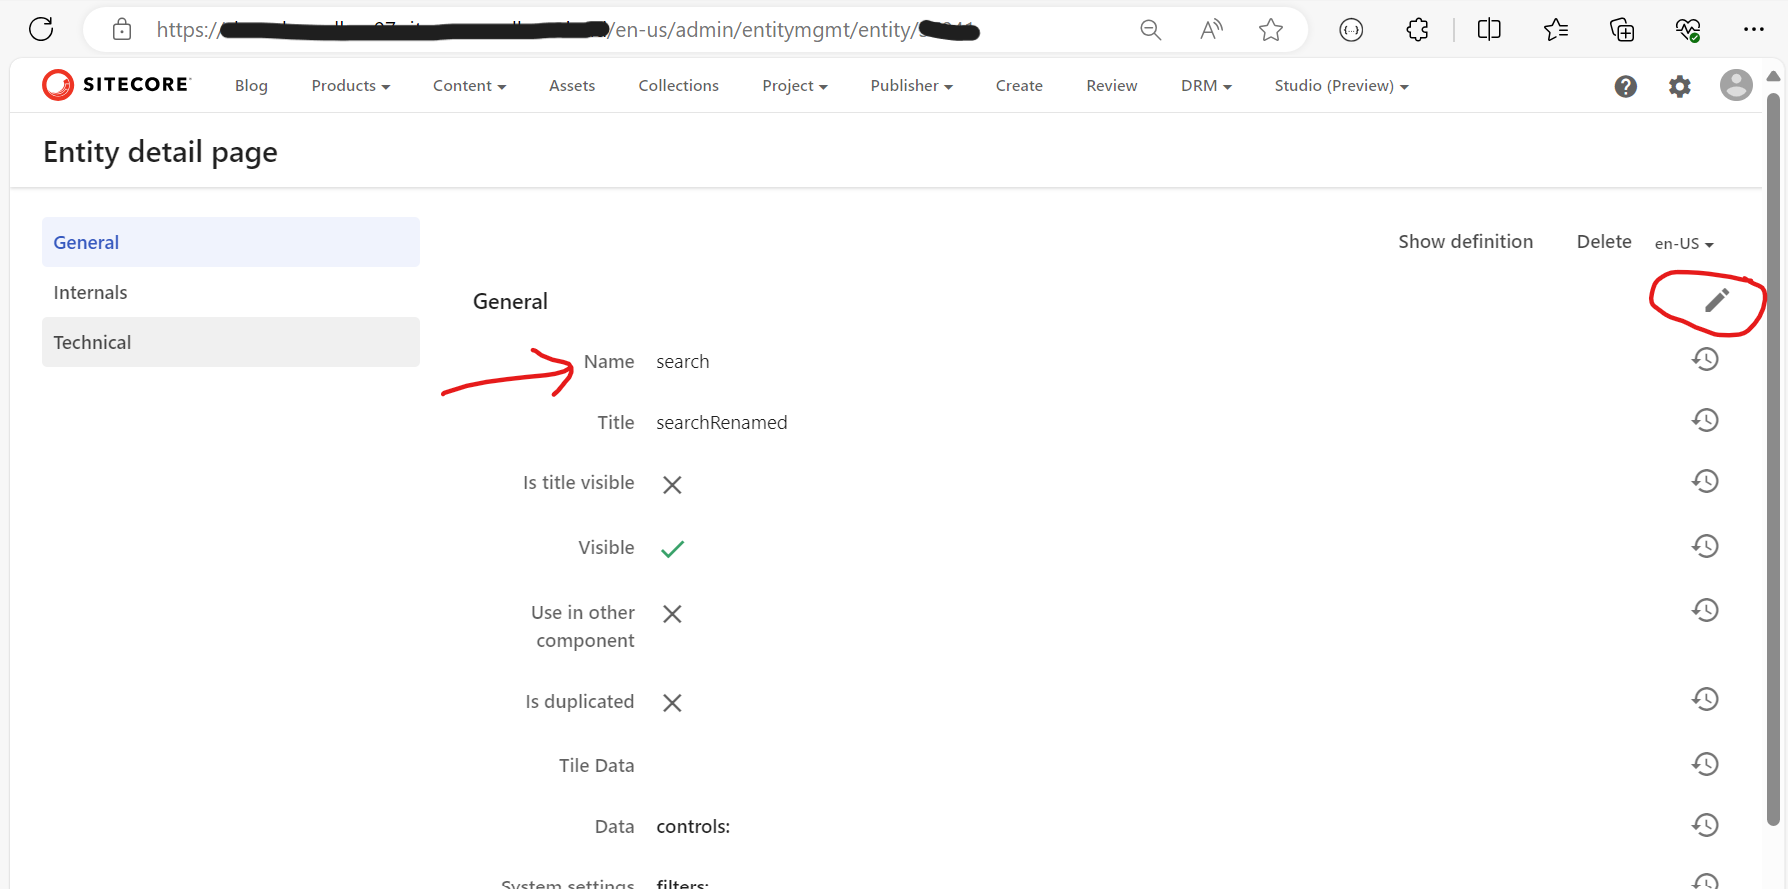
Or, use the Entity Management page to rename the Name of the second Search component to make it unique, as shown below. You will need to know the Entity Id of your second Search component.
Entity Management page can be accessed using the URL below
In this blog post, we have looked at a scenario where having more than one Search components with the same name causes ‘duplication’ issue with your Selection component Linked Search component list. I have shared some tips and tricks to help you work around this issue.
Stay tuned and leave please us any feedback or comments.
I recently was working on a cool project that required migration of hundreds of videos from a legacy video platform to Sitecore Content Hub as part of a digital modernization strategy. These video assets happened to have subtitles for multiple languages, which presented a significant challenge in itself.
If you are familiar with Sitecore Content Hub DAM, we have a capability to do a bulk import of DAM assets using the Excel import feature. There is also a fair number of blogs with guidance on how to go about this process. However, if you are looking for a quick guide on performing bulk import of video subtitles, there seems to be lack of documentation or step by step guidance.
I thought I document this process to fill this gap and share my story of overcoming this challenge.
First things first – recap on importing video subtitles via Portal page
I am assuming you already have a video asset imported into your Sitecore CH instance.
After selecting your video asset, the asset details page will look like this one below.
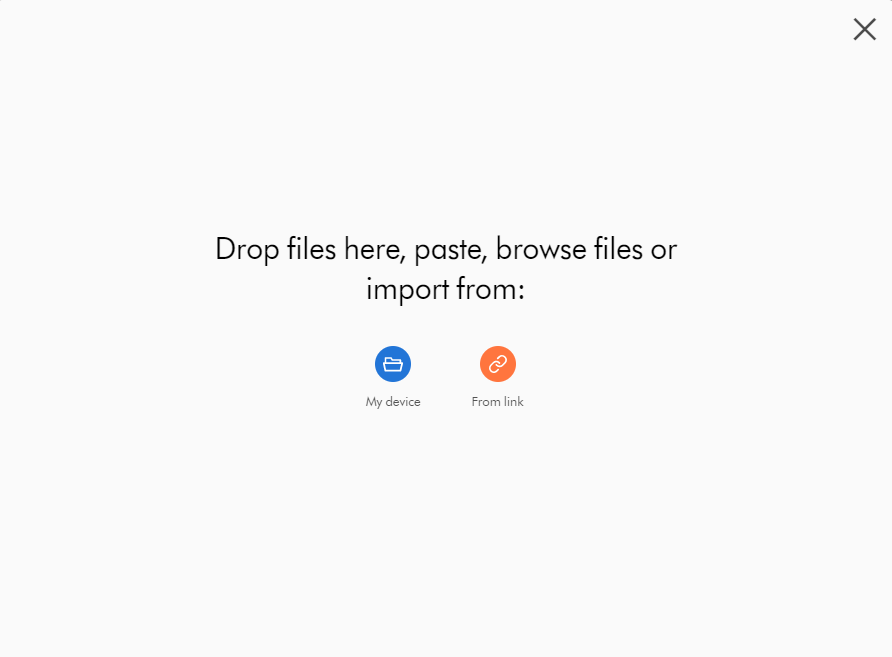
Clicking Upload files button will prompt with a dialog box shown below:
Click My device, navigate to the location of the files, select them, and then click Open. Optionally, to add more files, click + Add more; otherwise click Upload files.
Click From link, paste links to the files you want to upload, and then click Import.
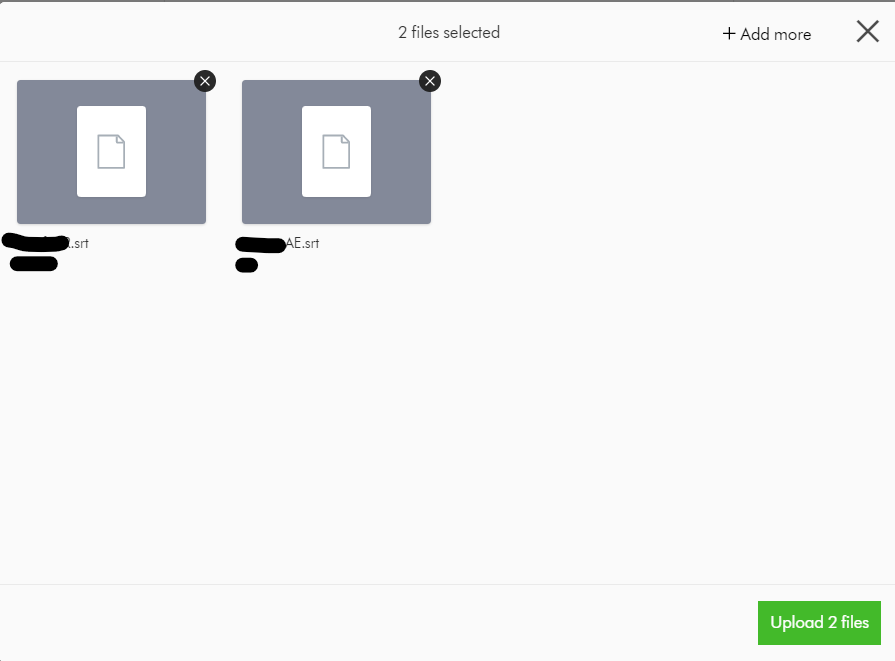
After successful upload of the subtitle files, your Video subtitles section will look like this below.
At this stage, we haven’t specified the localised language for the subtitle file. To do this, click the file name or click Edit language and, in the Edit language dialog box, select the language from the drop-down list and then click Save.
Congratulations! You can now have the closed caption option (CC) show in the media player, which lets you select the uploaded subtitles to play along with your video.
Where are my subtitle files stored?
As you may have guessed it right, the subtitle files uploaded are actually M.Asset entities which as stored within the M.Content.Repository.Subtitle Content repository. You can view these files using your All-assets portal page, and filter the Subtitle Content repository.
How are the subtitle files linked to the video asset?
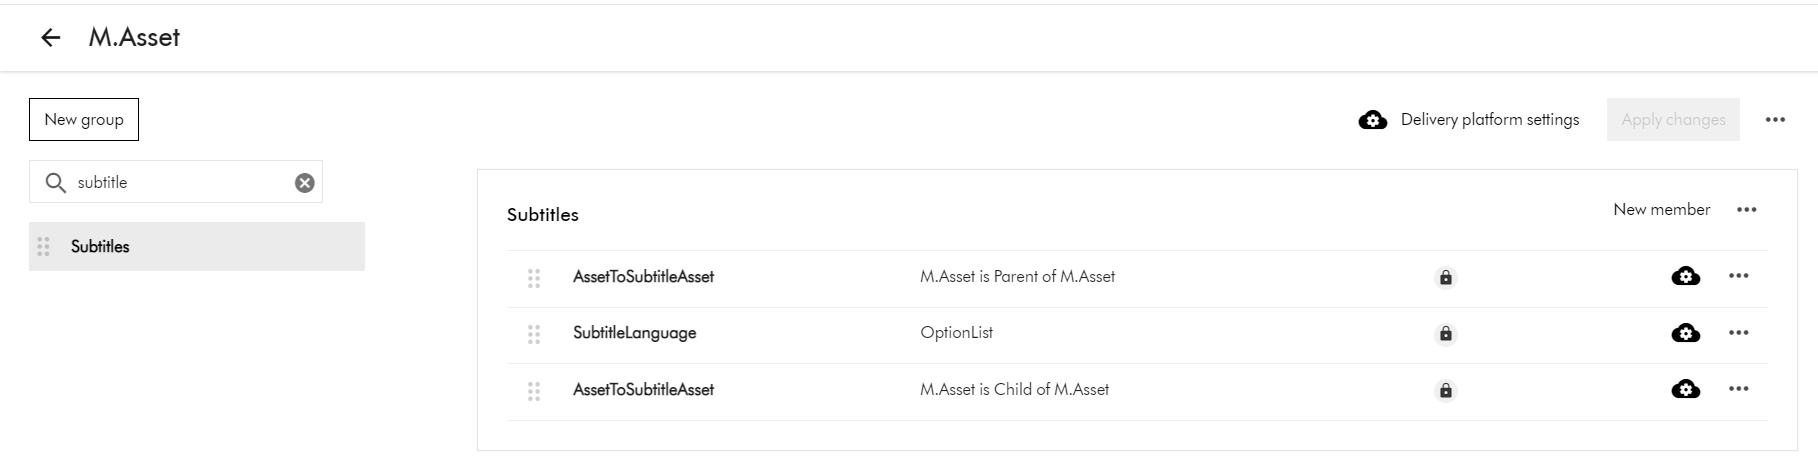
To view the subtitle and video asset relationship, head on to the Schema section by navigating to Manage -> Schema -> M.Asset
On the M.Asset schema page, search for subtitle. This will filter the schema for subtitles as show below.
This means that:
the video asset is the Parent of the Subtitle asset (AssetToSubtitleAsset:Parent)
the subtitle asset is the Child of Video asset (AssetToSubtitleAsset:Child)
Now that we know subtitle are M.Asset entities, we will leverage the Excel Import template to achieve the bulk import.
When importing an Excel file, ensure that the name of each worksheet matches the name of the corresponding definition. For example, to import assets, a worksheet must be called M.Asset
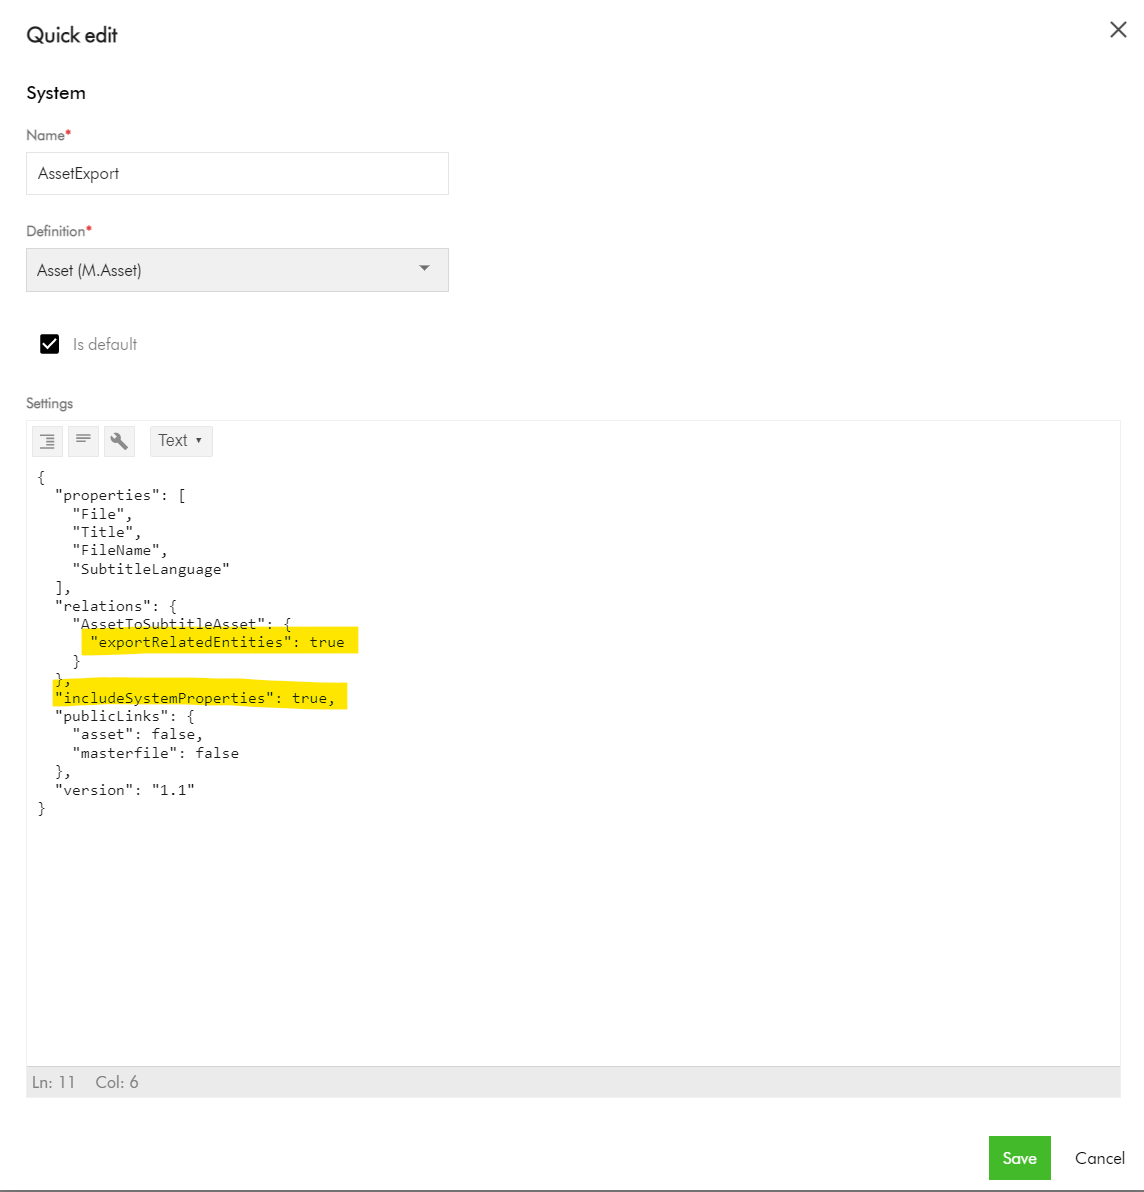
Pay attention to the Relations section, where we are enabling the export of the AssetToSubtitleAsset related entities. Also, ensure includeSystemProperties is enabled.
Export your sample video asset into Excel
Navigate to your Assets portal page.
Search and locate your video asset.
Select the video asset (tick the checkbox of your selection component)
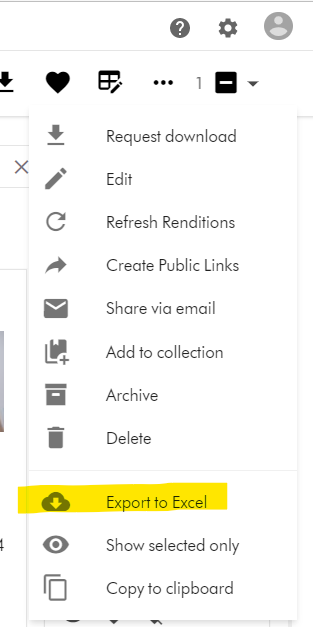
On the right-hand side, access the Actions dropdown menu, and click on “Export to Excel”
Your download should be ready and accessible from Profile -> Downloads link
M.Asset Video Subtitles Import template
Your M.Asset video subtitles import template will look similar to this one below.
Row 1 – this has the M.Asset entity properties in your Sitecore CH instance
Row 2 and 3 – these have the entries for the two subtitles that we configured.
Row 4 – this is the entry for the video asset.
Pay special attention to the AssetToSubtitleAsset:Parent which is how the subtitles are linked to the parent video asset using identifier id123456789 in this example
Pay special attention to the AssetToSubtitleAsset:Child which is how the video asset is linked to all subtitles. This will have pipe delimited list of subtitles identifiers (e.g., id123456789-viralvideo-ar-AE|id123456789-viralvideo-fr-FR)
Please note, you need to pre-generate unique values for the identifier column for your subtitles, in order to be link them with parent video as shown above. This will be key to successful bulk import of the subtiltes.
Use the File column for the URL to the actual video asset and subtitle assets.
And finally, the bulk import from Excel
To bulk import, use the Asset Creation page.
On the menu bar, click Create.
On the Create page, in the top-right corner, click Add and then select Import Excel.
Do one of the following:
Drag the Excel file you want to upload into the dialog box.
Click browse, then pick the Excel file you want to upload.
Optionally, click Add more to add more files if needed.
Click Upload files.
Next steps
On this blog post, we have look at how to bulk import video subtitles to your Sitecore Content Hub instance. I am keen to hear your feedback or comments. Please do use the comments section for that.
With modern and mature DevOps, we all want smooth, sleek and painless automated deployments with zero-downtime. Sitecore deployments are no exception. Have you embraced zero-downtime deployments? This is not a new topic. If you look around Sitecore community, you see an odd question popping here and there regarding this topic.
The journey towards achieving zero-downtime deployments for any application in fact starts with your code base. So, in this series of blog posts, we will refresh ourselves on concepts like “Code Freeze” and the CI/CD process before deep diving into implementing Sitecore zero-downtime deployments.
Sitecore Zero-downtime deployments – Part 4 (this post)
Sitecore XP PaaS Blue-Green architecture
Sitecore XP PaaS reference architecture
The infographic above shows a typical Azure PaaS architecture for Sitecore XP scaled topology. In summary we have:
our Sitecore XP application roles such as CM, CD, ID among others
these role have access to Sitecore databases (master, web, core among others)
access to rest of the services such as Azure Key Vault, Azure Redis cache, App Insights, Azure Search among others
You will notice in this architecture, we have Blue-Web and Green-Web databases, which are corresponding to the BLUE-GREEN deployment slots for the CD App Service. We need separate web databases to enable us achieve content-safe deployments
The CM App Service also has BLUE-GREEN deployment slots specifically for code deployment, but with a shared master database. There is no compelling reason to have BLUE-GREEN master databases purely on basis of complexity introduced by such architecture (although it is not impossible to implement if you prefer this approach).
The rest of our XP scaled topology resources are shared
The Azure DevOps organisation typically will have access to run the CI/CD pipelines, is also included in the architecture.
How to manage settings
App Service Settings section can be leveraged to manage your Sitecore configuration settings including Sitecore connections Strings
Sitecore XP PaaS CI/CD process summary
Sitecore XP PaaS CI/CD process
Required steps:
Tigger CD process
Make copy of your web-db – this is for content safe deployment. Both CM and BLUE CD pointing to original web-db at this point. BLUE CD still in production with our live users accessing it
Now deploy your new version to both CM instance and GREEN CD Staging slot instance – pointing them to use copy of web-db. Perform content deployment as usual, publish, rebuild the Sitecore indexes and perform any tests. This will not affect your BLUE CD at this stage.
Once happy with deployment, then Swap CD production and staging slots. The GREEN CD with our new version is now production and our live users accessing it now. Zero down time achieved! Our previous version is still running in BLUE CD. If we have issues, we swap again to roll back.
Some notes:
This example doesn’t have BLUE-GREEN for the CM instance, as I want to keep it simple – This though means your content editors will have to wait for deployment to finish to use the CM. If you really need CM zero down time, then you need to deploy CM BLUE-GREEN deployment slots as well. Alternatively, you can keep the deployment time to CM to a minimum and avoid BLUE-GREEN
You can be more also be creative with your Sitecore templates changes such that your changes are always backward compatible between successive releases (e.g. don’t delete fields immediately, mark them as obsolete) This means you can safely rollback your changes without breaking the application
Sitecore XP AKS Blue-Green architecture
Sitecore using Containers makes use of Azure Kubernetes Service. This infographics shows a very simplified AKS blue-green strategy allows us to achieve zero downtime deployments.
Kubernetes Blue-Green strategy
How does it work?
You will define a blue deployment for v1 and apply it to your desired state of your cluster.
When version 2 comes along, you define a green deployment, apply it to your cluster, test and validate it without affecting blue deployment
You then gradually replace V1 with V2
Version 1 can be deleted if no longer needed.
Below we have a typical Sitcore XP Azure Kubernetes Service architecture for Sitecore XP scaled topology – the AKS cluster containing various pods running our containers.
Sitecore XP AKS Blue-Green reference architecture
You can see the scaled out Sitecore XP application roles running as individual Pods within this AKS cluster backed by a Windows Node Pool.
We also have access to Sitecore databases as well as other services such as Azure Key Vault, Azure Redis cache, App Insights among others.
I am showing our Azure DevOps organisations which will typically have access to run the CI/CD pipelines
Similar to the Azure PaaS architecture, AKS zero downtime deployments will make use of BLUE-GREEN deployment strategy for CD or CM instance
AKS Zero downtime deployments process
How do we do that? we don’t need to provision a separate cluster for GREEN environment. Instead, we define an additional GREEN deployment with its corresponding service and then label it accordingly, alongside our BLUE deployment.
For content-safe deployments, we will also be pointing to a copy of web database (Green) as shown.
Once we have tested and are happy with our new GREEN deployment, we switch traffic or routing to point to GREEN. We do this by updating our Ingress controller specification
Sitecore AKS Blue-Green (Green deployment)
In the above infographic, you can see now our end-users can access V2 in the GREEN deployment
BLUE deployment is on stand-by in case of roll back. And can be deleted if no longer required.
Note as previously discussed in PaaS deployments, you can implement BLUE-GREEN for the CM if required
Sitecore XP AKS CI/CD process
Sitecore XP AKS CI/CD process
Steps summary
Trigger release pipeline process
Make copy of your web-db – this is for content safe deployment. Both CM and BLUE CD pointing to web-db at this point. BLUE CD still in production with live users accessing it
Apply your green deployment desired state onto the cluster. This creates the green pods with new version of docker images, and our Sitecore deployment including content deployment. This will use the copy of web-db we created earlier. Publish and Rebuild indexes as usual and test and verify the deployment
Once happy with deployment, Update traffic routing in Ingress Controller and live users can now access our new Sitecore version. In event of roll-back, update traffic routing in Ingress controller. If BLUE deployment no longer needed, clean it up to save on resources
Next steps
An this is a wrap. This post concludes this series of blog posts where we looked into implementing Sitecore Zero Downtime deployments. I hope you found this useful and can start your own journey towards achieving Zero Downtime deployments with your Sitecore workloads. If you have any comments or queries, please leave me a comment at the end of this post.


 .
. button, which should prompt for emailing details. You can alternatively use the Copy link button to copy the URL and share it as well