In this blog post, we will explore further How the Brand Aware AI works, by looking at the architecture of Agents and how we bring them to life in our Stream Brand Assistant agent. There is also an accompanying video series on my YouTube channel.
What is an agent?
An agent is simply a software service that uses AI to assist users with information and task automation: An agent does a task, Take this do it and let me know when you are done.
We have three main elements on an Agent, as shown in the architecture below:
Model – We now have access many Large Language Models and Small Language models that does the thinking
Knowledge – This is the Instructions, data sources that enable the agent to ground prompts with Contextual data
Tools – A set of tools that agents can invoke such as retrieving information, Actions such as making API calls, and keeping a thread in memory of current conversation. You can also create custom tools using your own code or Azure Functions
How Brand Assistant agent works
Below are the steps involved when interacting with the Brand Assistant within Sitecore Stream:
The user enters a prompt – the user enters a prompt in Brand Assistant – such as a question or an instruction as shown during the demo by Alessandro earlier.
The system passes information from the Brand Context – the system automatically provides information from the Brand Context brand kit section as a system prompt.
Copilot analyzes if it can answer from Brand Context – the thinking process begins. The Brand Assistant evaluates whether the information passed from the Brand Context alone is enough to answer the prompt.
Based on the analysis, the process continues in one of two ways:
Generate a direct response – if the Brand Context provides sufficient information, the Brand Assistant generates a direct response using only that content.
Invoke other AI agents – if the Brand Context doesn’t answer the prompt and more information is needed, the Brand Assistant automatically activates one or more AI agents to search and organize the information and generate a response:
Search agent – uses tools to find information from your brand knowledge, web searches, or both.
Brief agent – activated only when the user specifically requests a campaign or creative brief
•Summary agent – condenses all retrieved information into a concise, relevant response.
As generative AI continues to evolve and become more deeply embedded in our digital landscape, its applications have expanded well beyond simple chat interfaces. Today, these models are powering intelligent agents capable of autonomously executing complex tasks and streamlining operations.
Forward-thinking organizations are now harnessing this potential to build AI-driven agents that orchestrate business processes and manage workloads in ways that were once out of reach.
In this post, we’ll take a closer look at how Sitecore is embracing this shift—leveraging Brand-Aware AI to transform the way enterprise marketing teams operate. There is also an accompanying video series on my YouTube channel.
Some of pain points that marketers face today
Before we look at how Sitecore are leveraging AI with Sitecore Stream, let me set the context around some of the pain points that marketers face today:
Keeping brand consistency – challenges around keeping their brands aligned with latest trends, efficiently improving previous campaigns & briefs, assets to keep a consistent brand tonal voice
Taking longer time to make decisions – challenges around decision making turnaround time due to manual processes and large volumes of content and material that needs reviewing as part of the creative process
Availability of robust Self-Serve tools – challenges around lack of tools for efficient task planning, content supply chains, moving faster removing blockers and having more control
To address these challenges, Sitecore has taken steps to introduce AI-Driven marketing by creating Sitecore Stream. Sitecore Stream is the way Sitecore are infusing AI capabilities across their products.
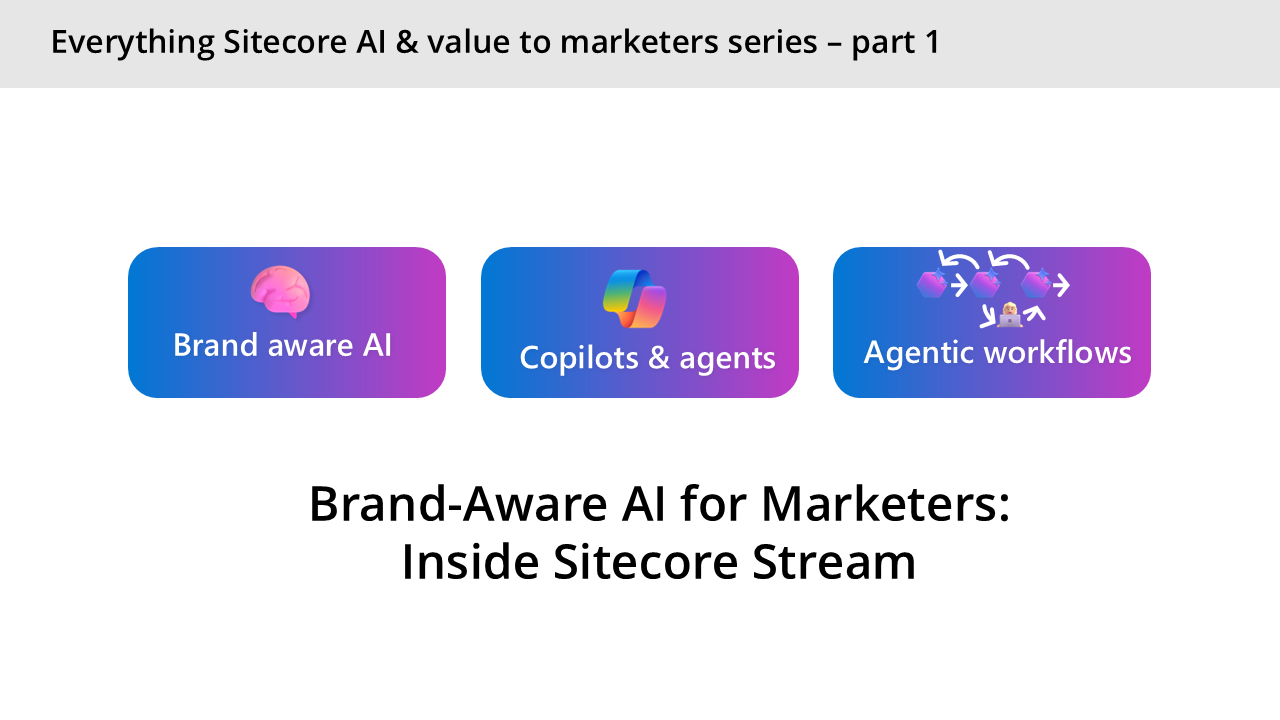
Sitecore Stream consists of three components: Brand-aware AI, Copilots & agents and Agentic workflows, as discussed below.
Brand-aware AI
This is what powers Sitecore AI tools to generate content that reflects your brand’s identity. This is made possible by a foundational understanding of your brand called brand knowledge. In the next slide, I will show in detail how this brand knowledge is created in Sitecore Stream.
Brand-aware AI enables marketers to create high-quality content faster, by combining deep brand knowledge with real-time Web insights to generate outlines and long-form drafts in seconds.
Copilots and agents
These are the AI assistants designed to increase marketers’ productivity by speeding up decision-making and task execution. Copilots are for humans, Agents are for processes. Copilot is the UI for AI – the chat based interface is where you can ask specific questions about your brand. Better still, you can actually brainstorm with AI, e.g. you want to create new content for blog post or a campaign brief.
Agentic workflows
These are advanced tooling to orchestrate tasks and streamline marketing project management across teams. This capability enables you to discover gaps in your campaigns and reduce planning time with help of AI that understands your brand and project context.
You can essentially ideate & plan entire campaign with help of AI. AI will recommend key top deliverables to bring your campaigns to life and recommend tasks to get them completed within seconds. Providing full agentic experiences to marketing campaigns, which human-in-the-loop too keep or discard suggestions
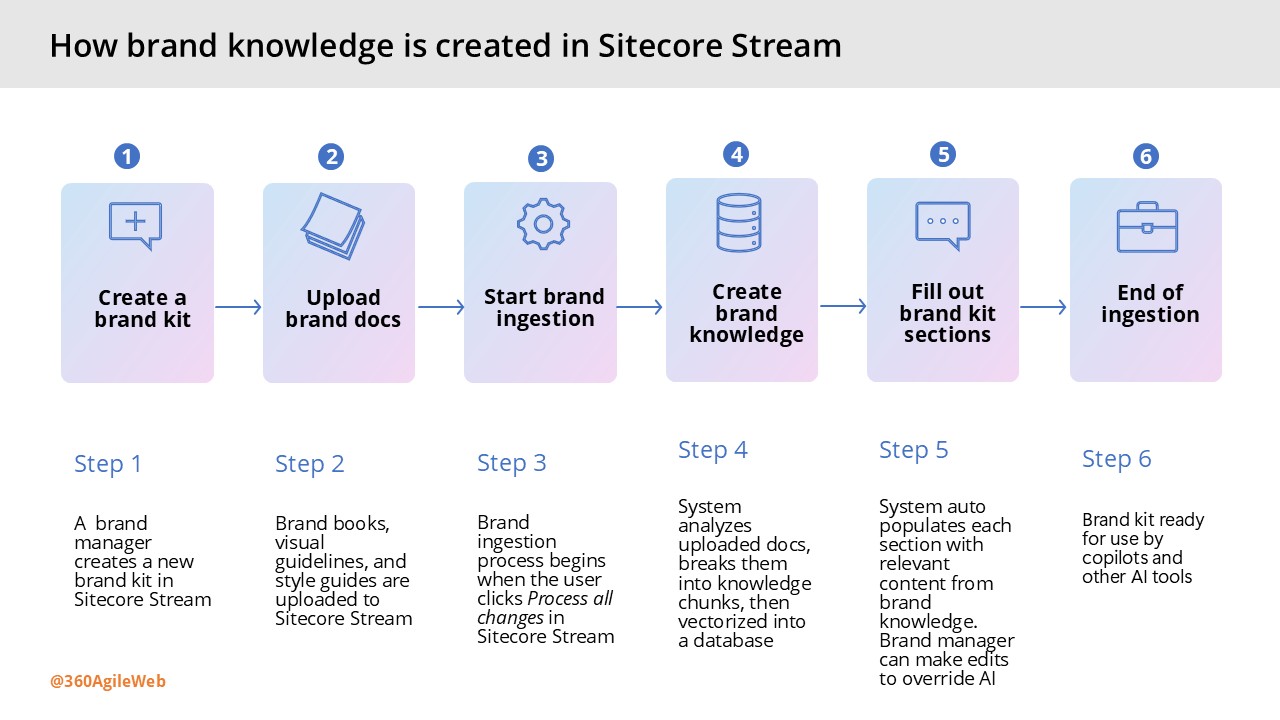
How to create your brand knowledge in Stream
This involves a 6-step process as outlined in the infographic shown below. If you are managing a multi-brand enterprise, you can repeat this process for each of your separate brands. Essentially creating multiple brand kits within Sitecore Stream.
Next steps
Have you started using Sitecore Stream with your Sitecore products yet? You can reach out to Sitecore directly by filling in the ‘Sitecore Steam: Get Your Demo’ form on their website.
Summary: Liz and Spyros gave a high level overview of the Sitecore XM Cloud Marketplace Apps, headlining it as “Extensibility Umbrella” comprising of a Public Portal and Developer Marketplace.
Session key takeaways:
Developers can now leverage the CLI, SDK on GitHub to build extensions to integrate with XM Cloud APIs.
Developers can embed features into Pages directly or creating standalone tools.
Developers can build applications that enhances functionality and streamline workflows
Spyros’s live demo of building a sample Marketplace App showcased that we can start leveraging existing the developer tooling right now to build the apps.
Session: Leading in the new era of AI
Hans Verbeeck (Technology Manager @ Microsoft)
Summary: Hans session covered the journey of AI to date, highlighting how things have changed from the early days of Scaling Laws that pretty much limited computing capacity. With computing capacity and storage readily available with cloud and data centres, Microsoft has made rapid progress with Copilots, AI platform and Agent Frameworks. He amplified the need to make a choice between Buy or Build in this new era of AI and he was leaning towards “better of Buying” or “consider Buying before Building”.
Session key takeaways
When it comes to AI, better of Buying” or “consider Buying before Building”
Think of what you can Buy first
Copilot is the UX for AI, Copilot is for Humans
Agents are for Processes
Sitecore Stream is AI-enabled capabilities with Sitecore products, that is underpinned by Brand-aware AI, Copilots & Agents and Agentic Workflows.
Sitecore Stream leverage Azure’s scalability, reliability, security, advanced analytics, AI and machine learning
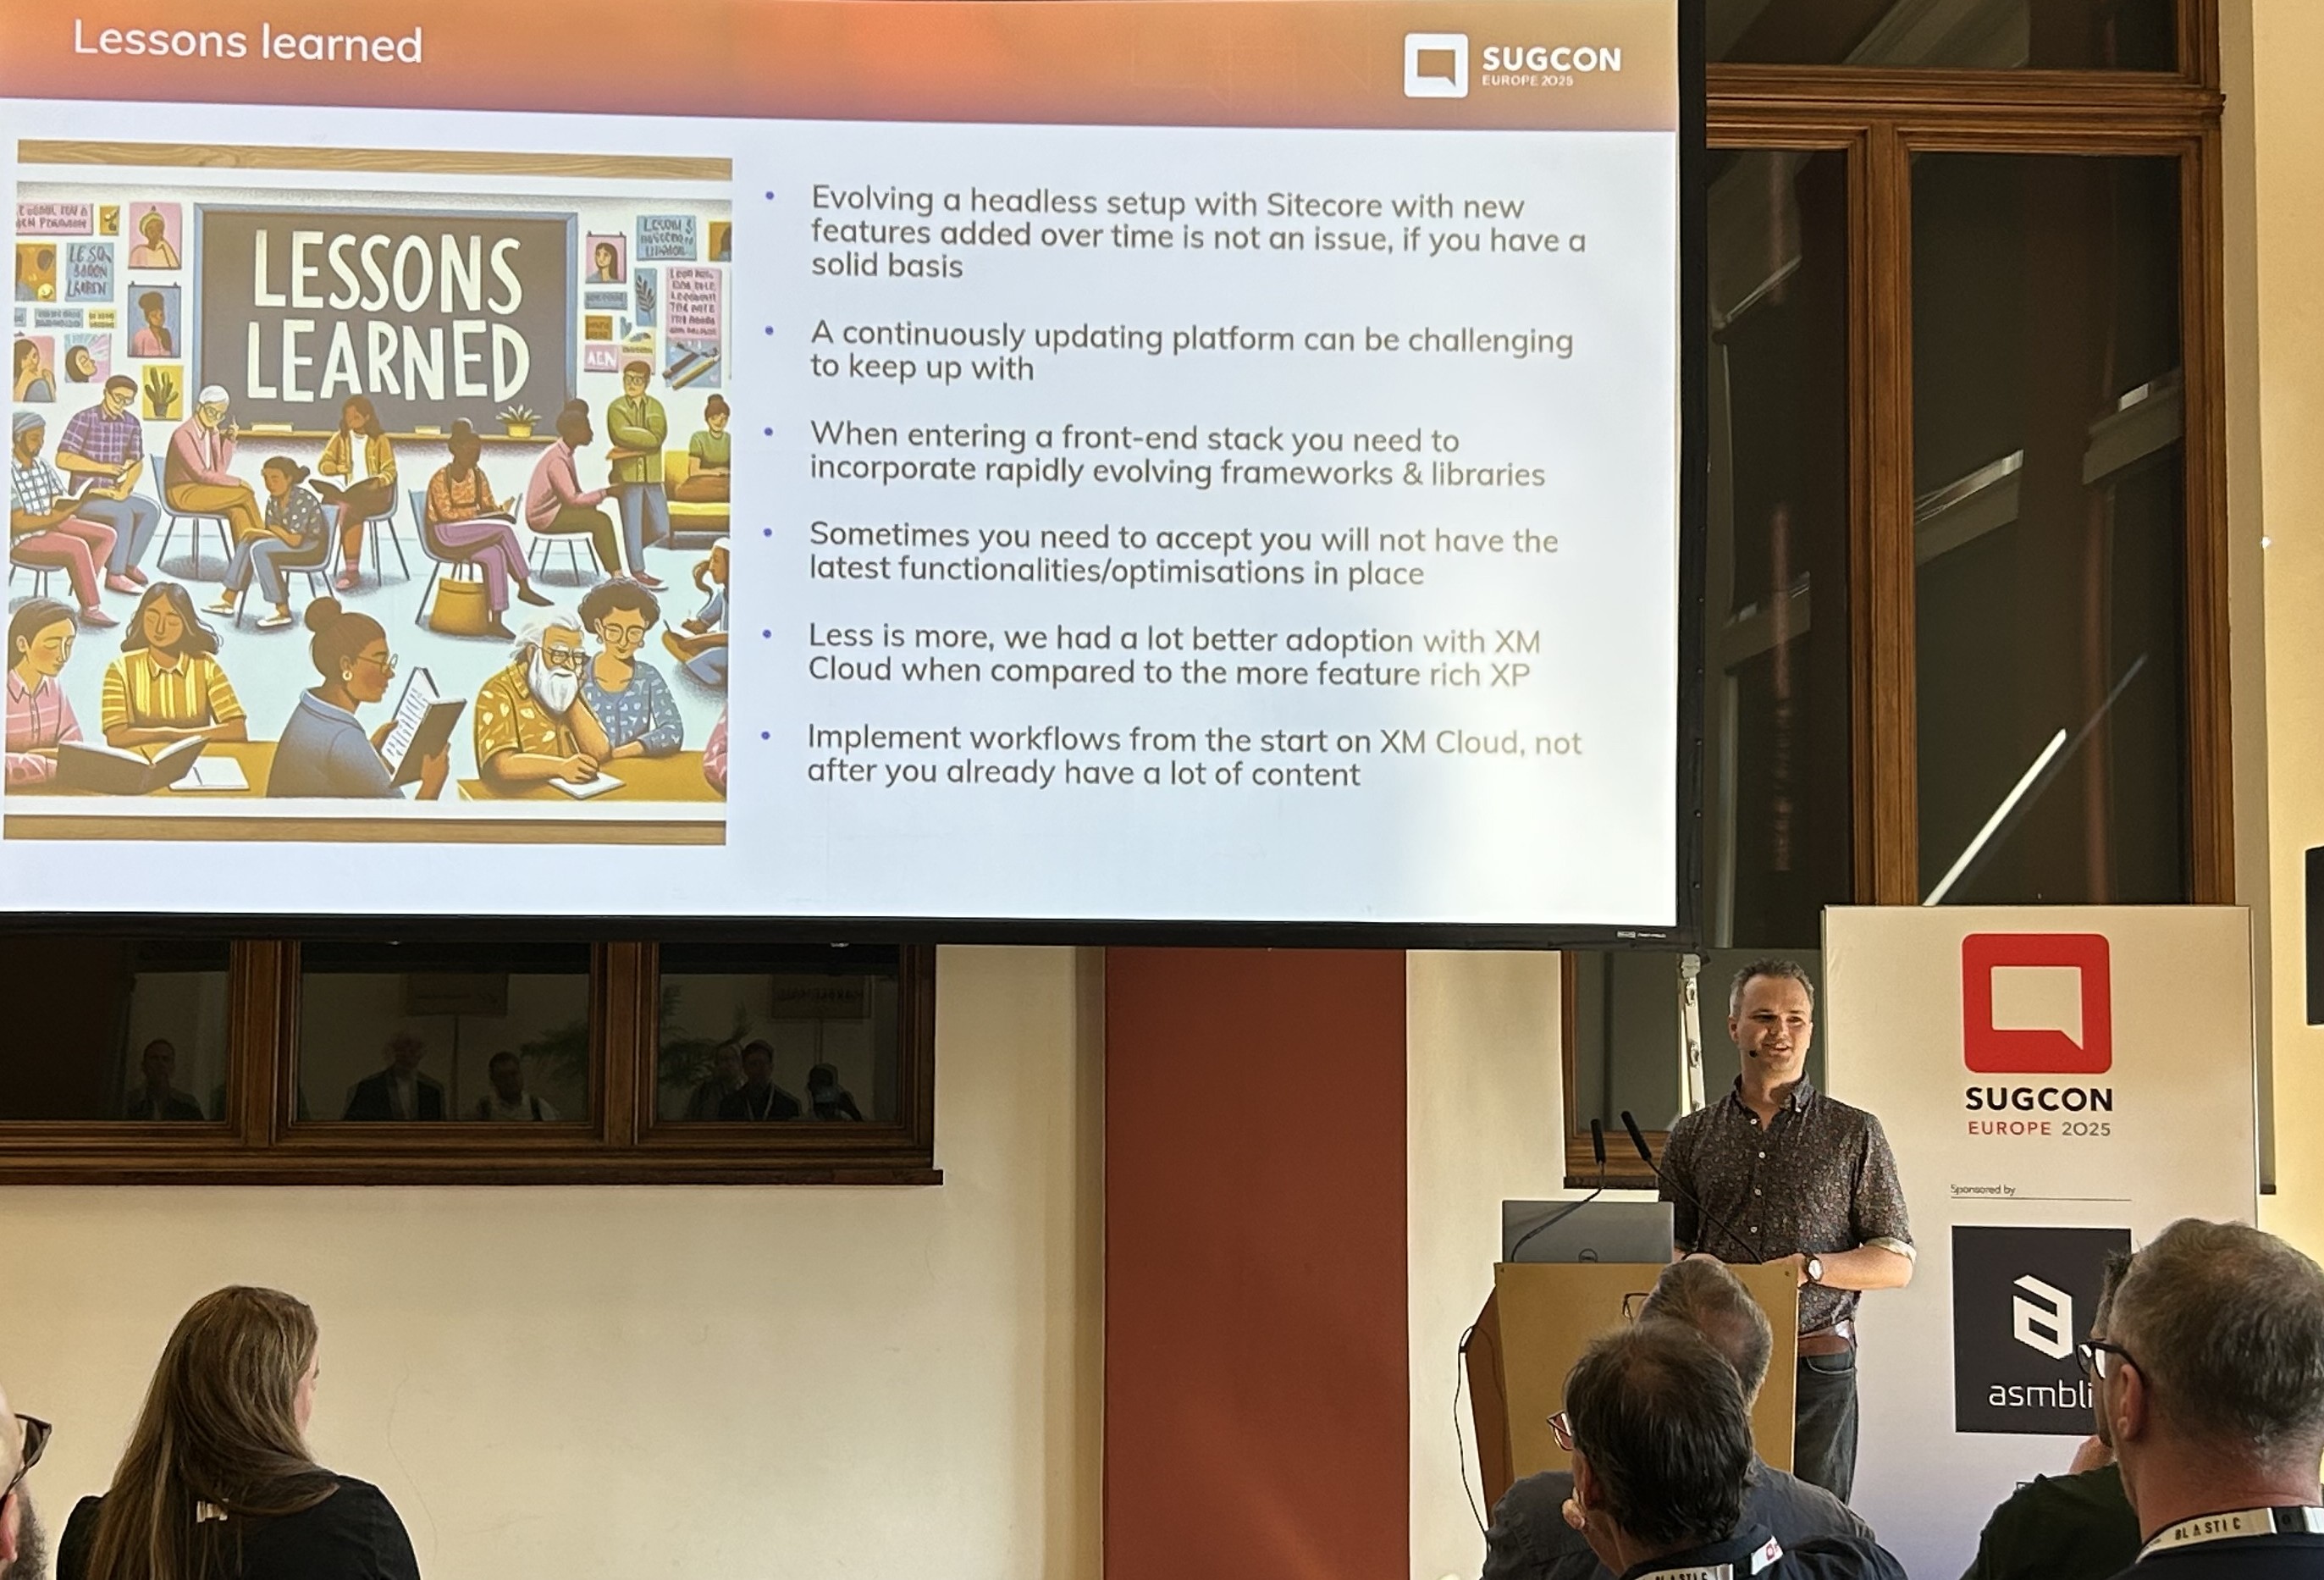
Session: Lessons learned – 2 years after building our first XM Cloud platform
Derk Hudepol (Avanade CX Solution lead & Architect and Technology MVP)
Summary: In this session Derk took us through his journey with XM Cloud over the past two years at BDR Thermea. They had started small—with just one site—after building a solid core platform. From there, things really took off as they expanded to support five brands and over ten sites, adding features like eCommerce and search along the way. Derk also shared the lessons learnt and some tips and tricks working with XM cloud.
Session key takeaways
Have a solid basis for your CM Cloud solution
It is challenging to keep up with a continuously updating platform (XM Cloud)
Less is more, XM Cloud provided a lot better adoption compared to XP platform
Implement workflows from Day 1 for XM Cloud projects
Experience Edge comes with a lot of benefits, but also has challenges around rate limiting, stale content /cache issues and lack of Admin UI
Session: Building advanced RAG systems with Sitecore products. Putting AI assistants in Production
Sergey Baranov (Technology MVP)
Summary: Sergey’s session was a classic of how to get value from your data leveraging AI. In his well researched and presented session, he demonstrated how to unlock the potential of your data by transforming it into meaningful interactions with advanced Retrieval-Augmented Generation (RAG) systems.
Sergey explored how to design advanced virtual agents using RAG, connecting LLMs with Sitecore tools like CDP, Personalize, and OrderCloud to create personalized, data-driven customer interactions, while also covering optimization, cost-efficiency, and quality monitoring
Session key takeaways
Know differences between traditional Virtual Assistants and Naive RAG systems
Understand Large Language Models (LLM) limitations when building RAGs, such as limited knowledge, hallucinations, no personalisation
Naive RAG versus Advanced RAG: the former improves responses of LLM responses, the latter improves the quality of RAG
GPT-40 mini is recommended for RAGs (actually always leverage mini versions in RAGs)
Session: The Future of Design Library for Multi-Site, Multi-Channel Content
Liz Nelson (Product Lead of XM Cloud)
Eirini Kalampogia (Product Director, Sitecore)
Summary: Liz doesn’t need introduction, but Eirini this was her first presentation. During the session Liz and Eirini shared how a centralized Design Library helps manage components and design across complex multi-site, multi-channel ecosystems. It improves consistency, streamlines workflows, and boosts developer efficiency through integration with client codebases, unified templates, and usage metrics—creating a one-stop hub for scalable, high-quality digital experiences. The session had a live demo that showcased identifying “duplicate” components with new Design Library – a common pain point marketers face today.
Session key takeaways
Design system is needed so that we can have consistency across channels, have visibility of components, with faster delivery cycles (and reduced tech debt).
Design library gives marketers autonomy they much so need
Design at scale is a smarter way to manage components
Avoiding fragmentations of components (marketer vs developer), code & no-code means better together
Look out for future announcements on Design Library and capabilities available within Sitecore products. Especially leveraging AI component generation, whereby a marketer starts component creation (no-code) and developer later takes AI-generated code and improves it. And marketer plays with it iteratively
The vision being “A single platform where devs build structure, marketers bring stories to life and AI scales the creative output across audiences and channels”
Session: Sitecore Stream in Platform DXP
Vignesh Vishwanath (Product Manager, Sitecore)
Summary: This was a session by Vignesh where he provided a full overview of the Sitecore Stream module within Sitecore Platform DX. He showcased the available features today as well what is in the roadmap.
Session key takeaways
Demonstrated Language translation with Stream Translate (which adds new item version)
You can use Stream with Content Structure, Content Auditing (review and suggest improvements)
You can use Stream for Image to Alt Text
You can use Stream for Component Generation (leveraging prompts)
Session: The joys and challenges of managing thousands of websites in a single Sitecore instance
Adam Najmanowicz (Developer)
Summary: Adam need no introduction. His session theme was basically lessons learnt, tips and tricks from the joys and challenges of managing a large number of websites in a single Sitecore instance.
Session key takeaways
Don’t run in integrated mode for XM Cloud
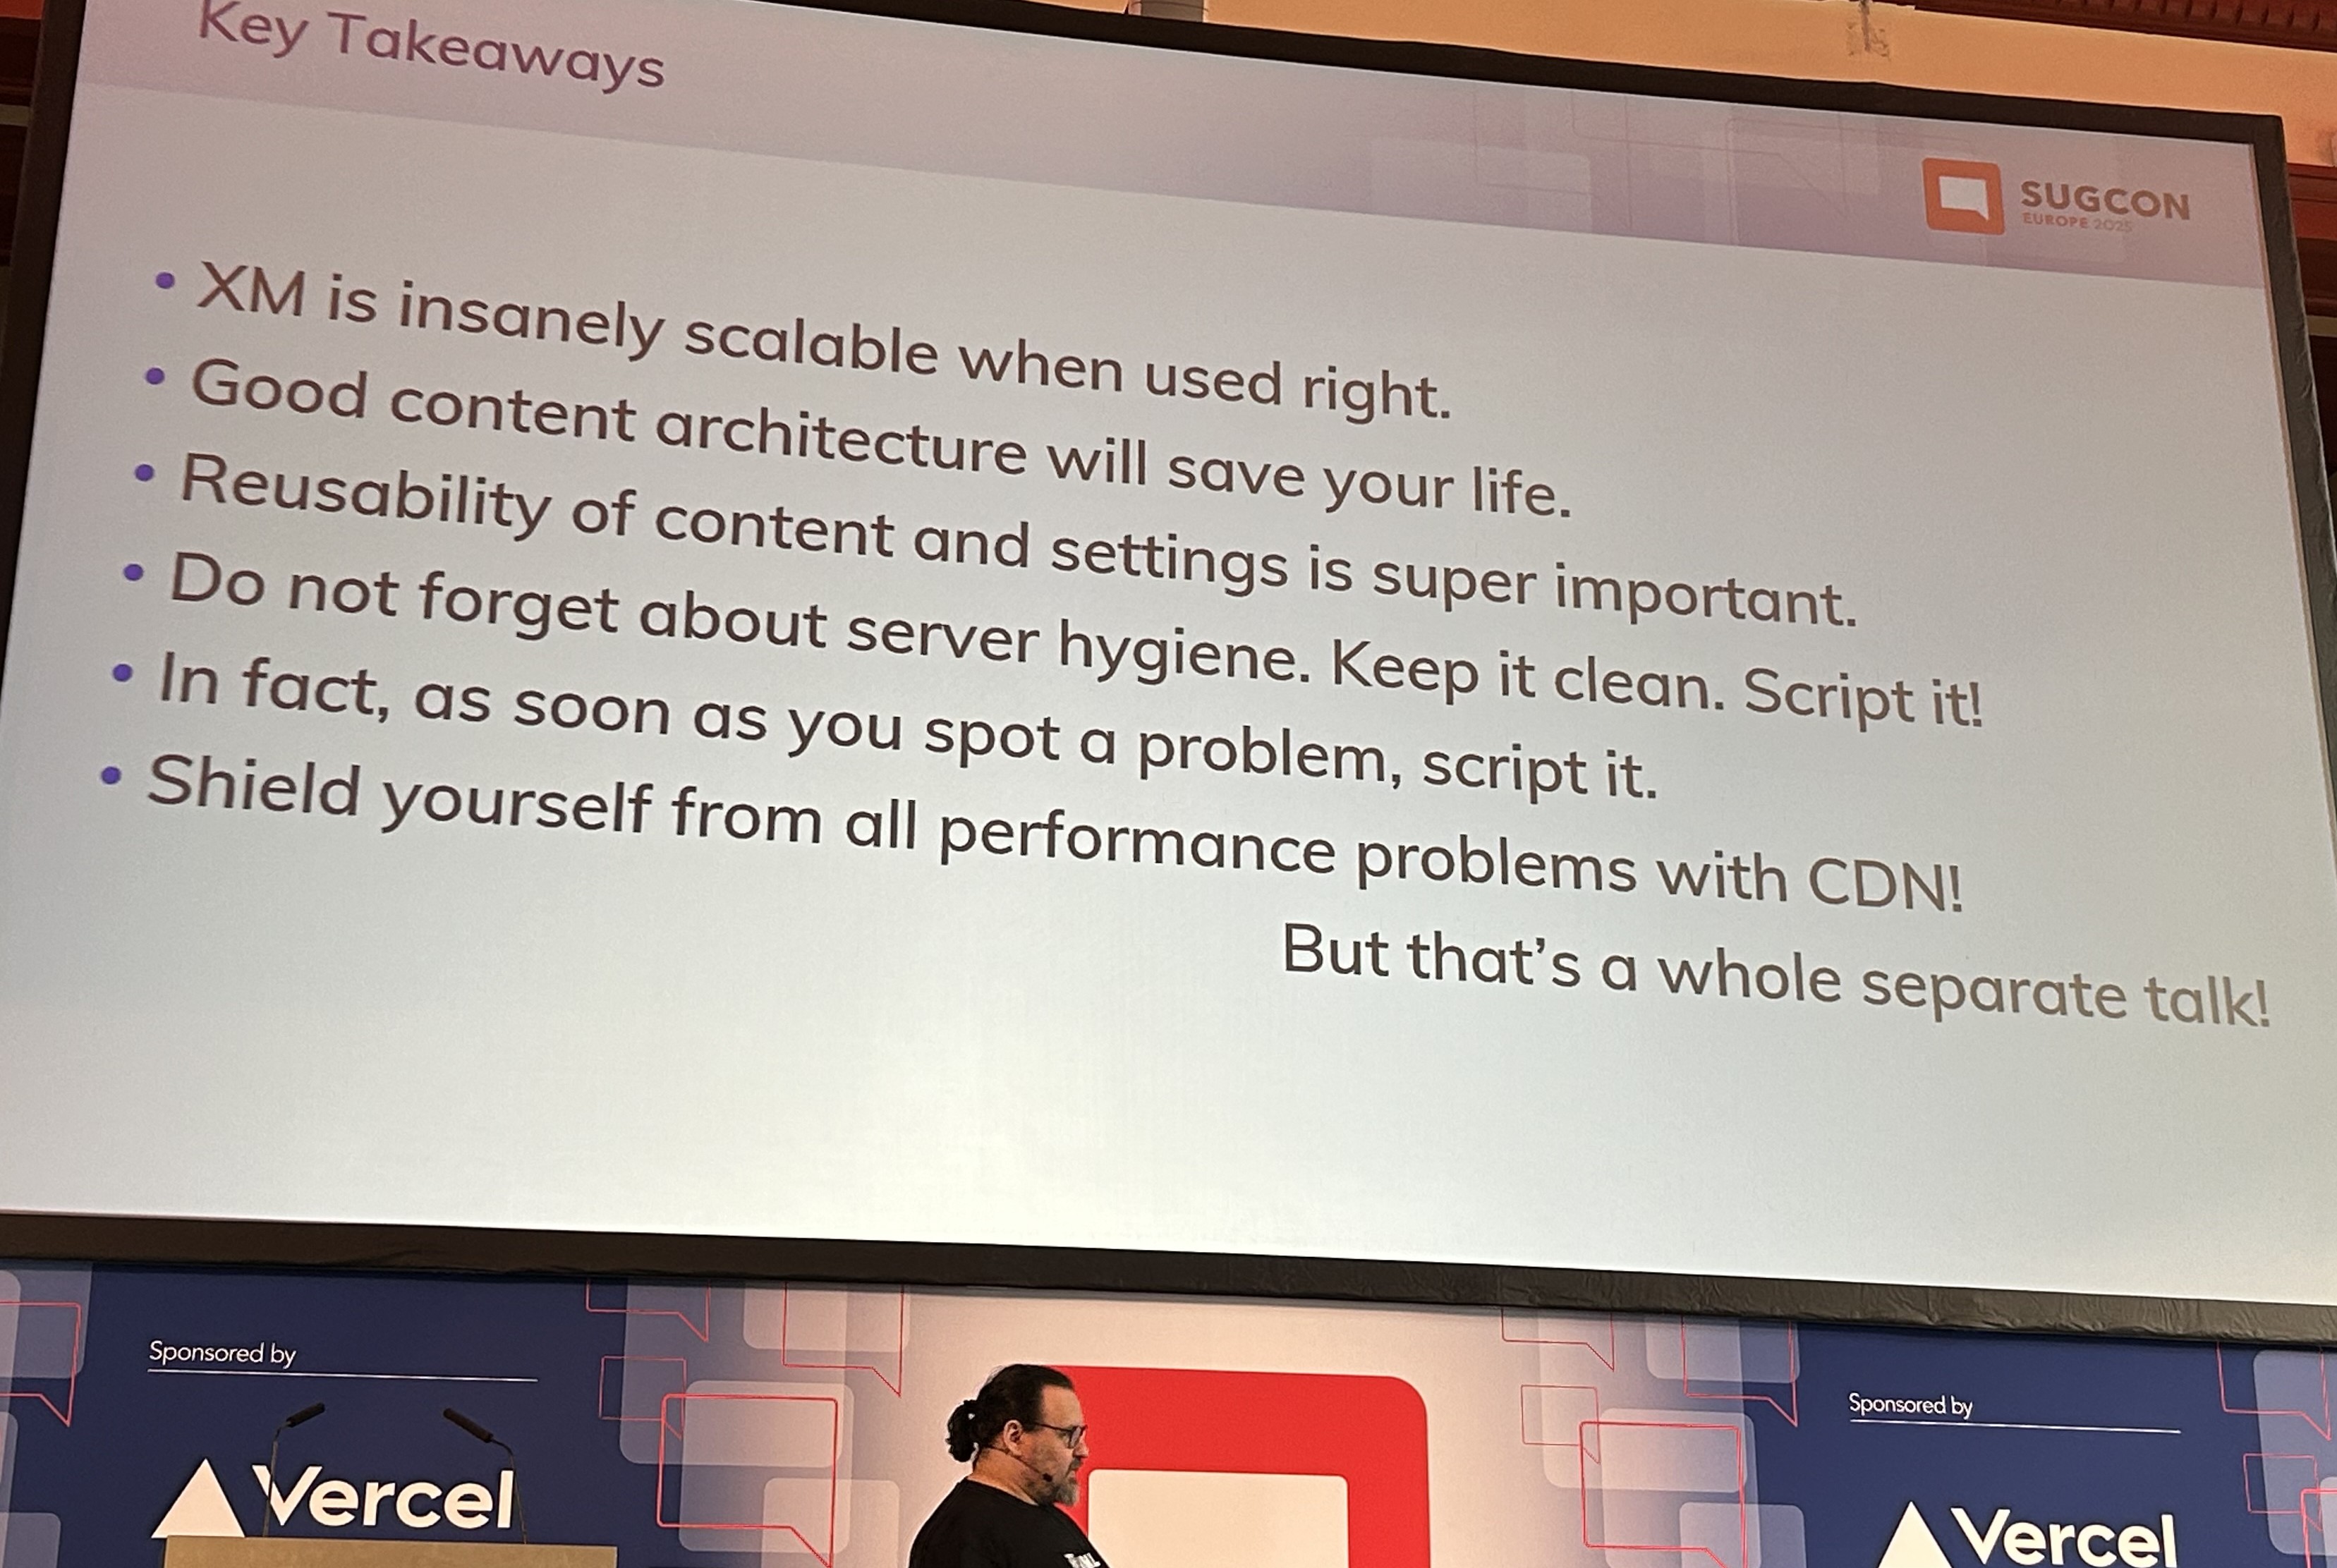
Servers are “cattle not pets”
Go headless node from the very start of XM Cloud projects
Reusability of content and settings is super important
Session: Better XM/XP deployments with Kubernetes
Peter Procházka (Sitecore Solutions Architect @ Accenture and Technology MVP)
Summary: Pete’s session was mostly lesson learnt and his insights using Kubernetes with Sitecore XM/XP workloads. He showcased Kubernetes and how it enables cloud orchestration and self-healing among other features. This session was more valuable for anyone transitioning from IaaS or PaaS, as Pete shared useful reference architectures.
Session key takeaways
Nice recap of what Traditional vs Cloud-based services workloads look like, IaaS vs CaaS
Local developer workflows and process to follow
Docker architecture, Image registry, Docker compose and override files
Why Kubernetes (with declarative vs imperative use cases) and pros/cons for either approach
Session: Synchronizing Sitecore XM Cloud Content with Azure DevOps
Robbert Hock (Technology MVP)
Summary: This was a fast-paced 15-minute lightning talk in which Robbert Hock(who needs no introduction) shared how his team addressed a common challenge with Sitecore XM Cloud: keeping lower Sitecore XM Cloud environments synchronized with production. I will point you to read more about it on Robbert follow up blog post. Robbert actually demonstrated his solution as well as the Azure DevOps CI/CD pipelines his team had built.
Session: Sitecore’s Marketplace roadmap review & Developer program
Below is a high level summary of other sessions I managed to attend
Session: Our Conversational AI future – Predicting the new web by looking to the past
Presented by Rob Coyle (Director of Product Design, Sitecore)
Summary: Rob session was on “a speculative future of Web and CMS” where he demonstrated concepts such as: “Show recommendations based on time to go home”. He explored futuristic use cases such as Content remixes and Agent rules.
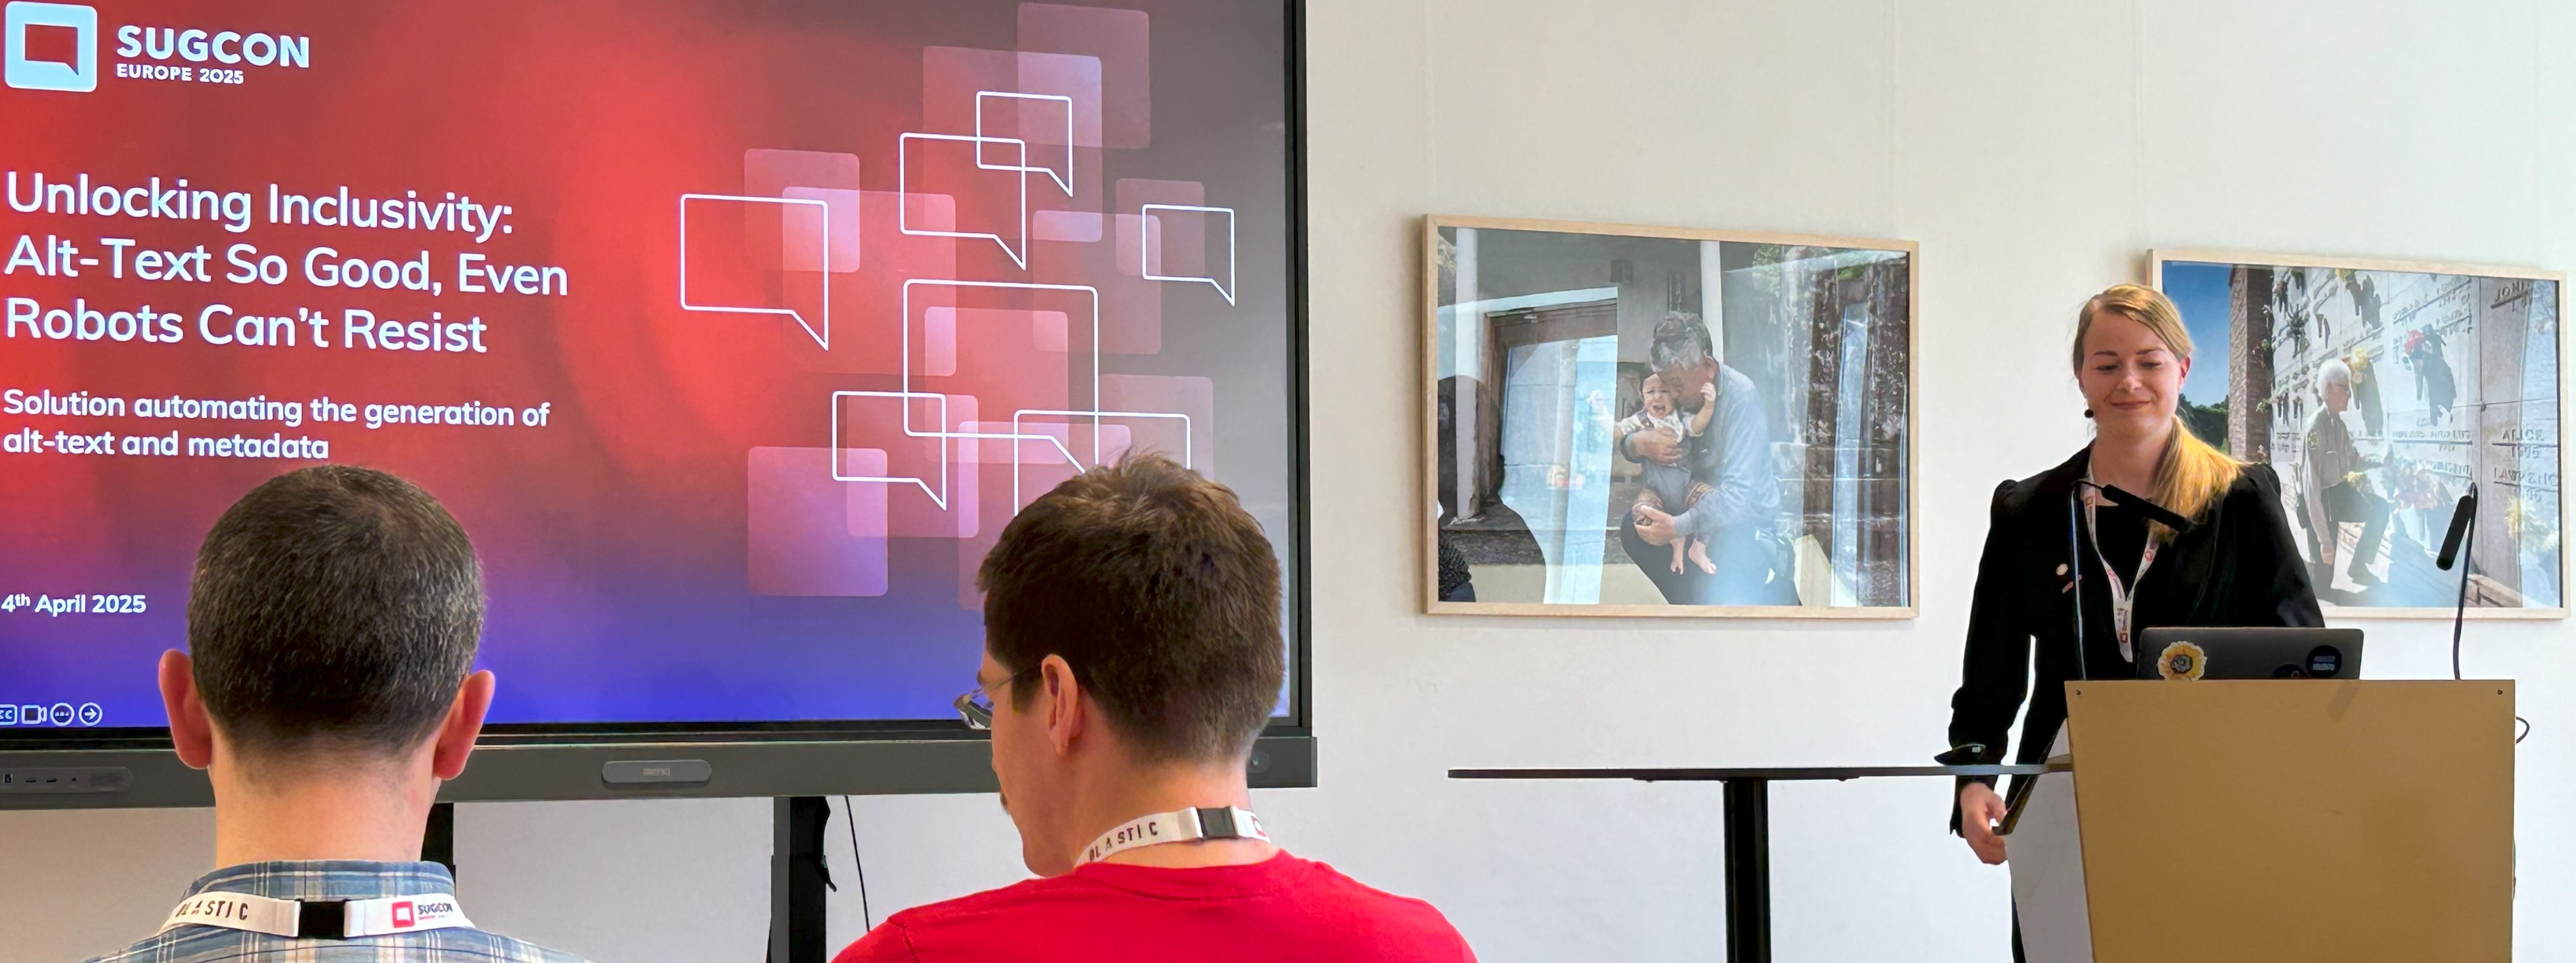
Session: Unlocking Inclusivity – Alt-Text So Good, Even Robots Can’t Resist
Presented by Anna Pokorna (Ambassador MVP)
Summary: In this session, Anna shared how they leveraged AI to automate the generation of Image alt-text and metadata for their client. Thereby enhancing accessibility, SEO, and maintaining brand tone of voice. The solution was implemented over a year ago, well before Sitecore Stream was announced, highlighting Anna’s company forward-thinking approach as the industry now moves toward similar capabilities.
Session: Full Circle – The Architect of XM Cloud builds an XM Cloud Site (as a partner for the first time)
Presented Andy Cohen (Honorary MVP)
Summary: Andy Cohen doesn’t need further introduction — the founding architect of XM Cloud, was sharing his own story and experiences as he built his first project on XM Cloud—this time from a partner perspective. It was an interesting session that was well attended.
Session: Diversity in the Age of AI – Why It Matters More Than Ever?
Presented by Daniela Militaru (Senior Sales Engineer, Sitecore)
Summary: Daniela’s session was a group discussion in the format of a fire-side chat where the audience explored the vital role that diverse perspectives play in developing ethical, innovative, and effective AI solutions. Very engaging and great to see so many contributions from the engaged audience in this important AI topic.
Session: A walk-through of XM Cloud Content
Presented by Alistair Deneys (System Architect, Sitecore). I already covered this as part of the Key Product Roadmaps announcements in part one post.
Round up from Sitecore community
Below is a summary of related blog posts from our Sitecore community, whereby Sitecore MVPs, marketers and developers alike are sharing their key takeaways as well. Please note this list has not been presented in any particular ordering.
Overall, I observed a positive sentiment during this conference. There was positive energy and buzz throughout the event, and this was echoed in various social media posts as well. I have also provided a round up from Sitecore community for your convenience – I hope you get time to read through the blog posts to corroborate my key takeaways and feedback from other attendees. SUGCON Europe is a key event in Sitecore calendar and there is already talk about next year! We are also looking forward to SUGCON ANZ later in the year and Sitecore Symposium is back again in Orlando during November 2025. In the meantime, stay tuned.
Sitecore User Group Conference Europe 2025 has just concluded. It was held over two days in Antwerp city, Belgium last week (3-4 April 2025) and I was one of the lucky attendees. In this blog post, I will be sharing my experiences and key takeaways from the conference.
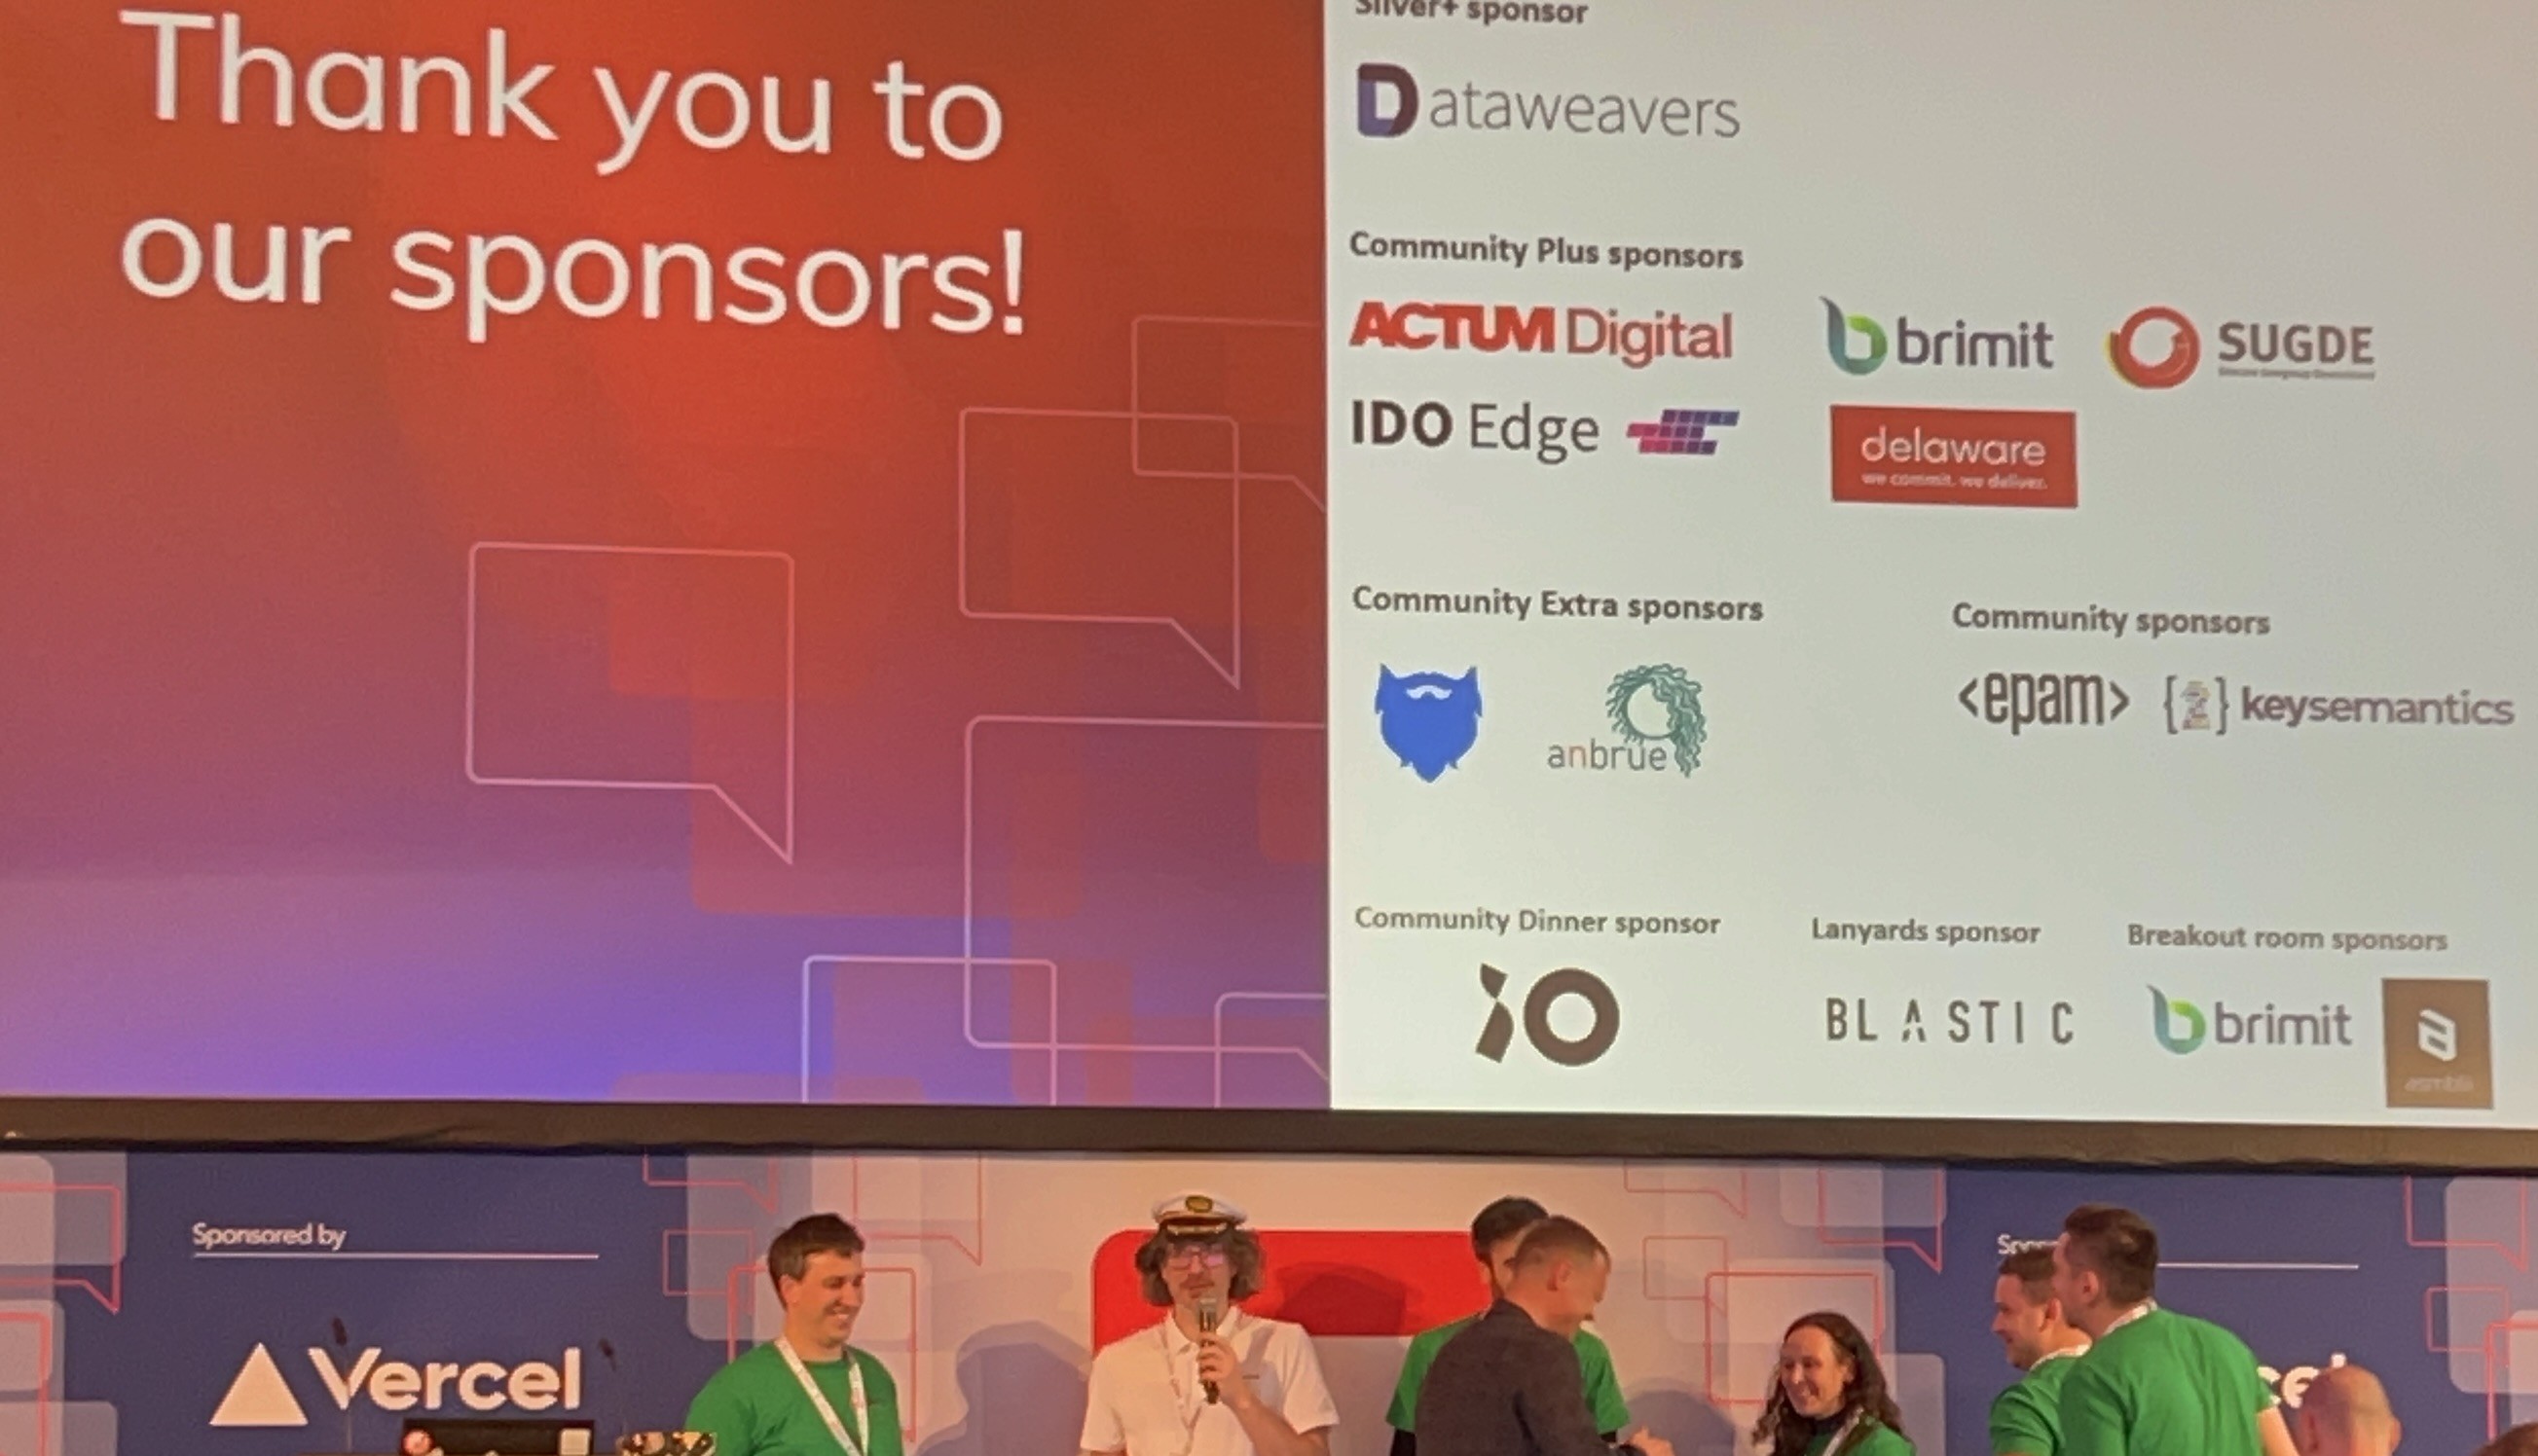
Firstly, I would like to thank the SUGCON organizers and the Sitecore community for making the event such a success. The choice of venue was spot on! Held in A Room with a ZOO – Antwerp, Belgium, the venue was most accessible via train seamlessly connected to the adjacent Belle Époque international station, which links to the European rail network. And right next to the Antwerp Central Station, the most beautiful station in the world. The food and hospitality were top notch, with variety of Belgian cuisine and desserts on the menu.
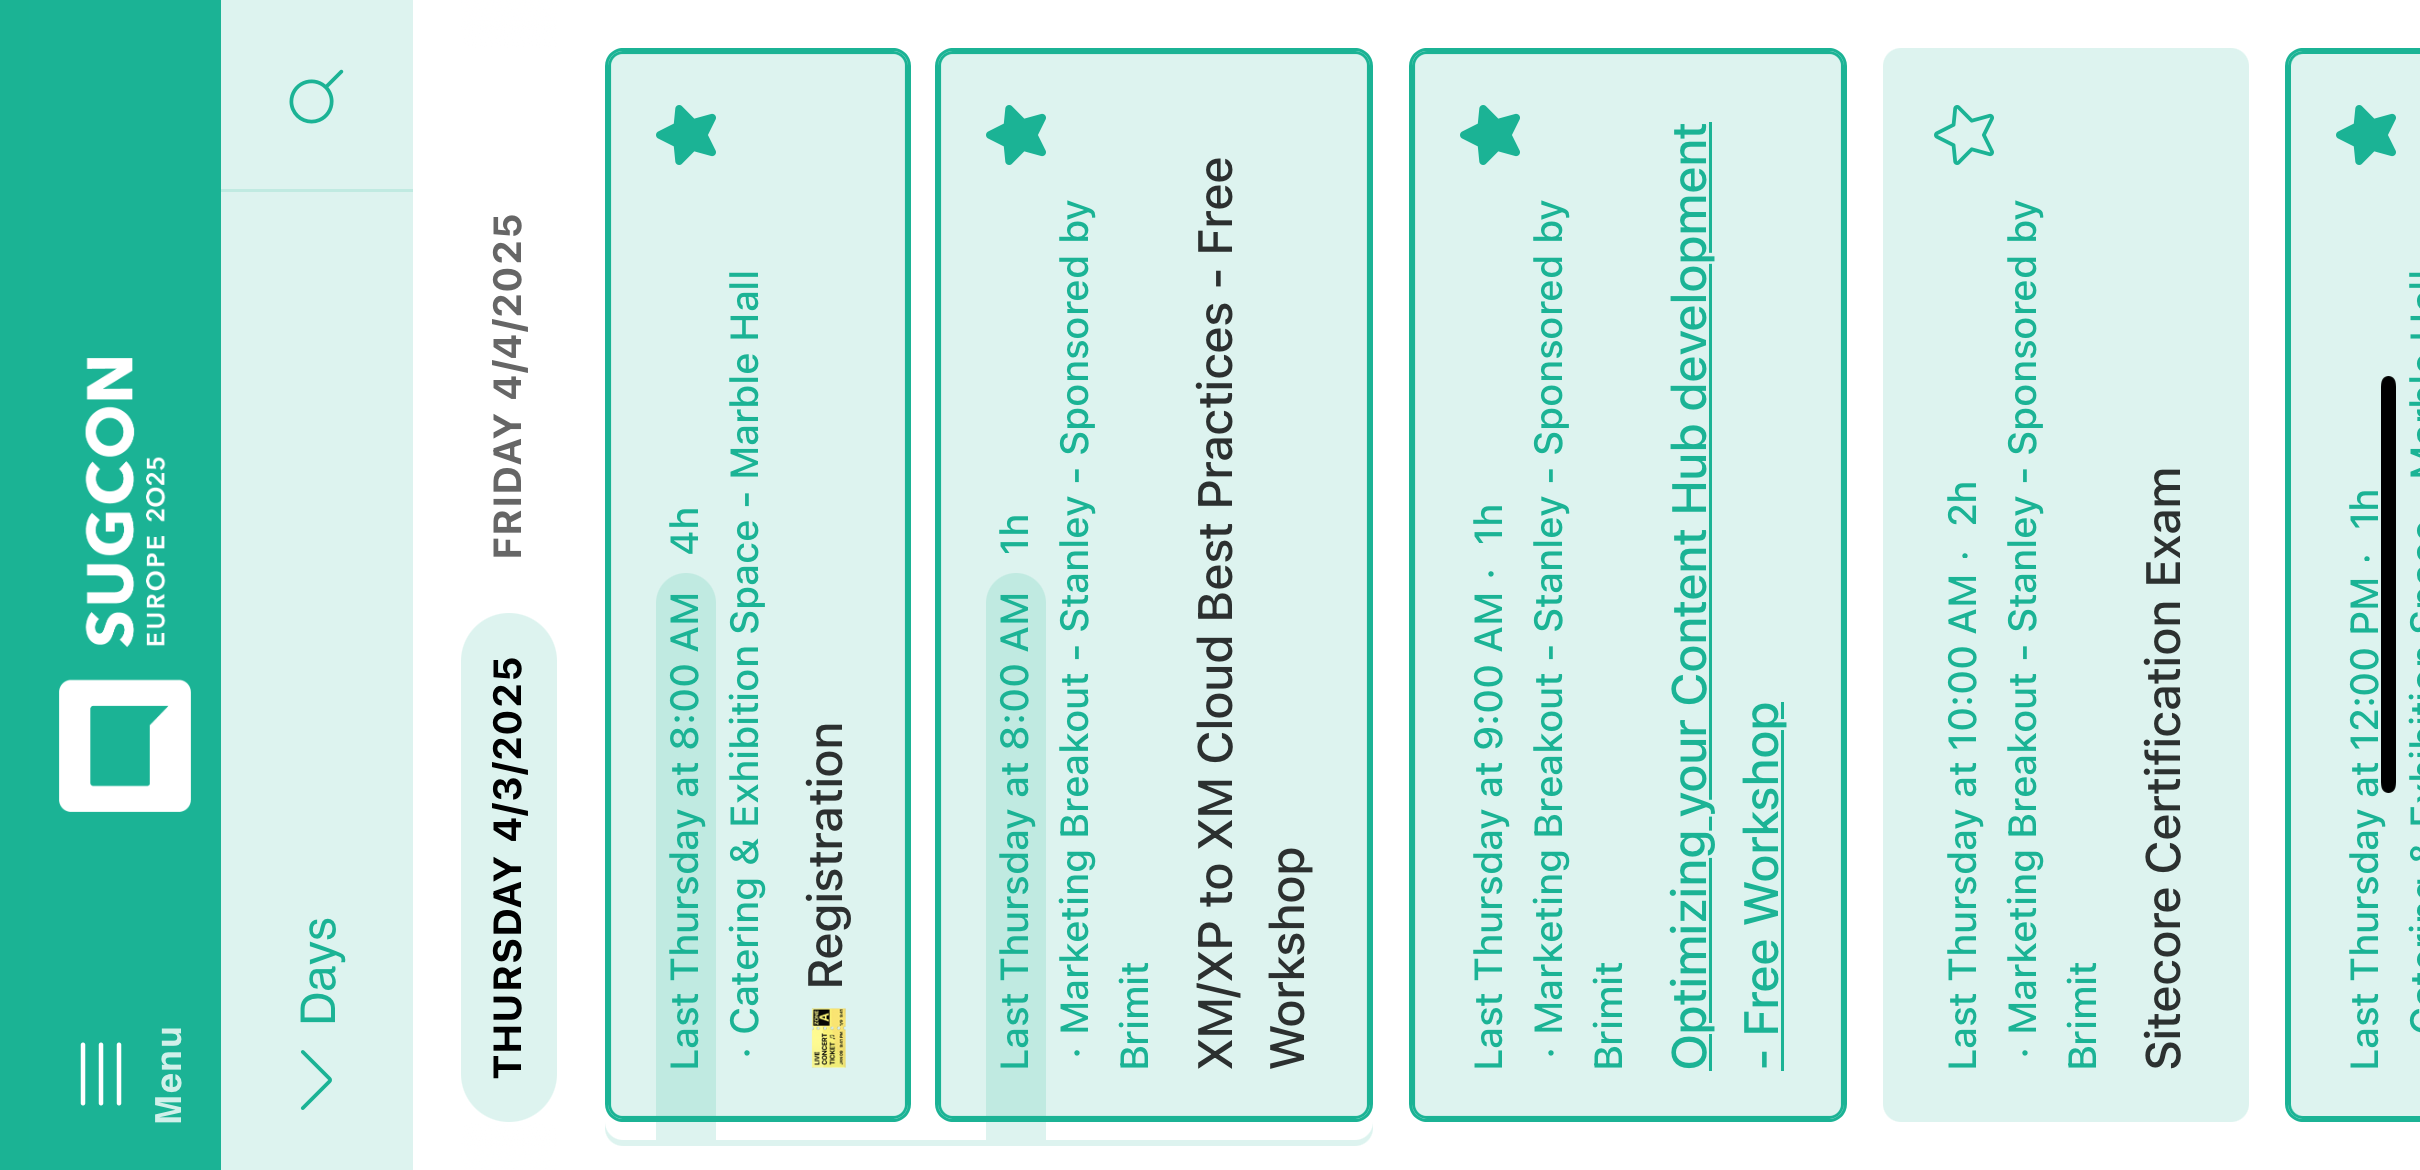
Secondly, the event schedule was the best you could have asked for. It catered for both developers and marketers alike, with keynotes from Sitecore leadership team, Sitecore product updates, great Sitecore community contents and demos alike. This year SUGCON also provided an accompanying SUGCON app to help personalise your sessions, keep track schedule and the room switches! Whether it was the usual ad hoc chit chat along corridors with other attendees, over lunch and dinner everyone was engaged. Including a Community Scavenger hunt app powered by Deckle, that kept everyone engaged and exploring the venue with many prizes won by those on top of the leaderboard at close of the event!
Keynote: Powering the Future of Sitecore Together
Dave O’Flanagan (CEO, Sitecore)
Roger Connolly (CPO, Sitecore)
Danny Robinson(CTO, Sitecore)
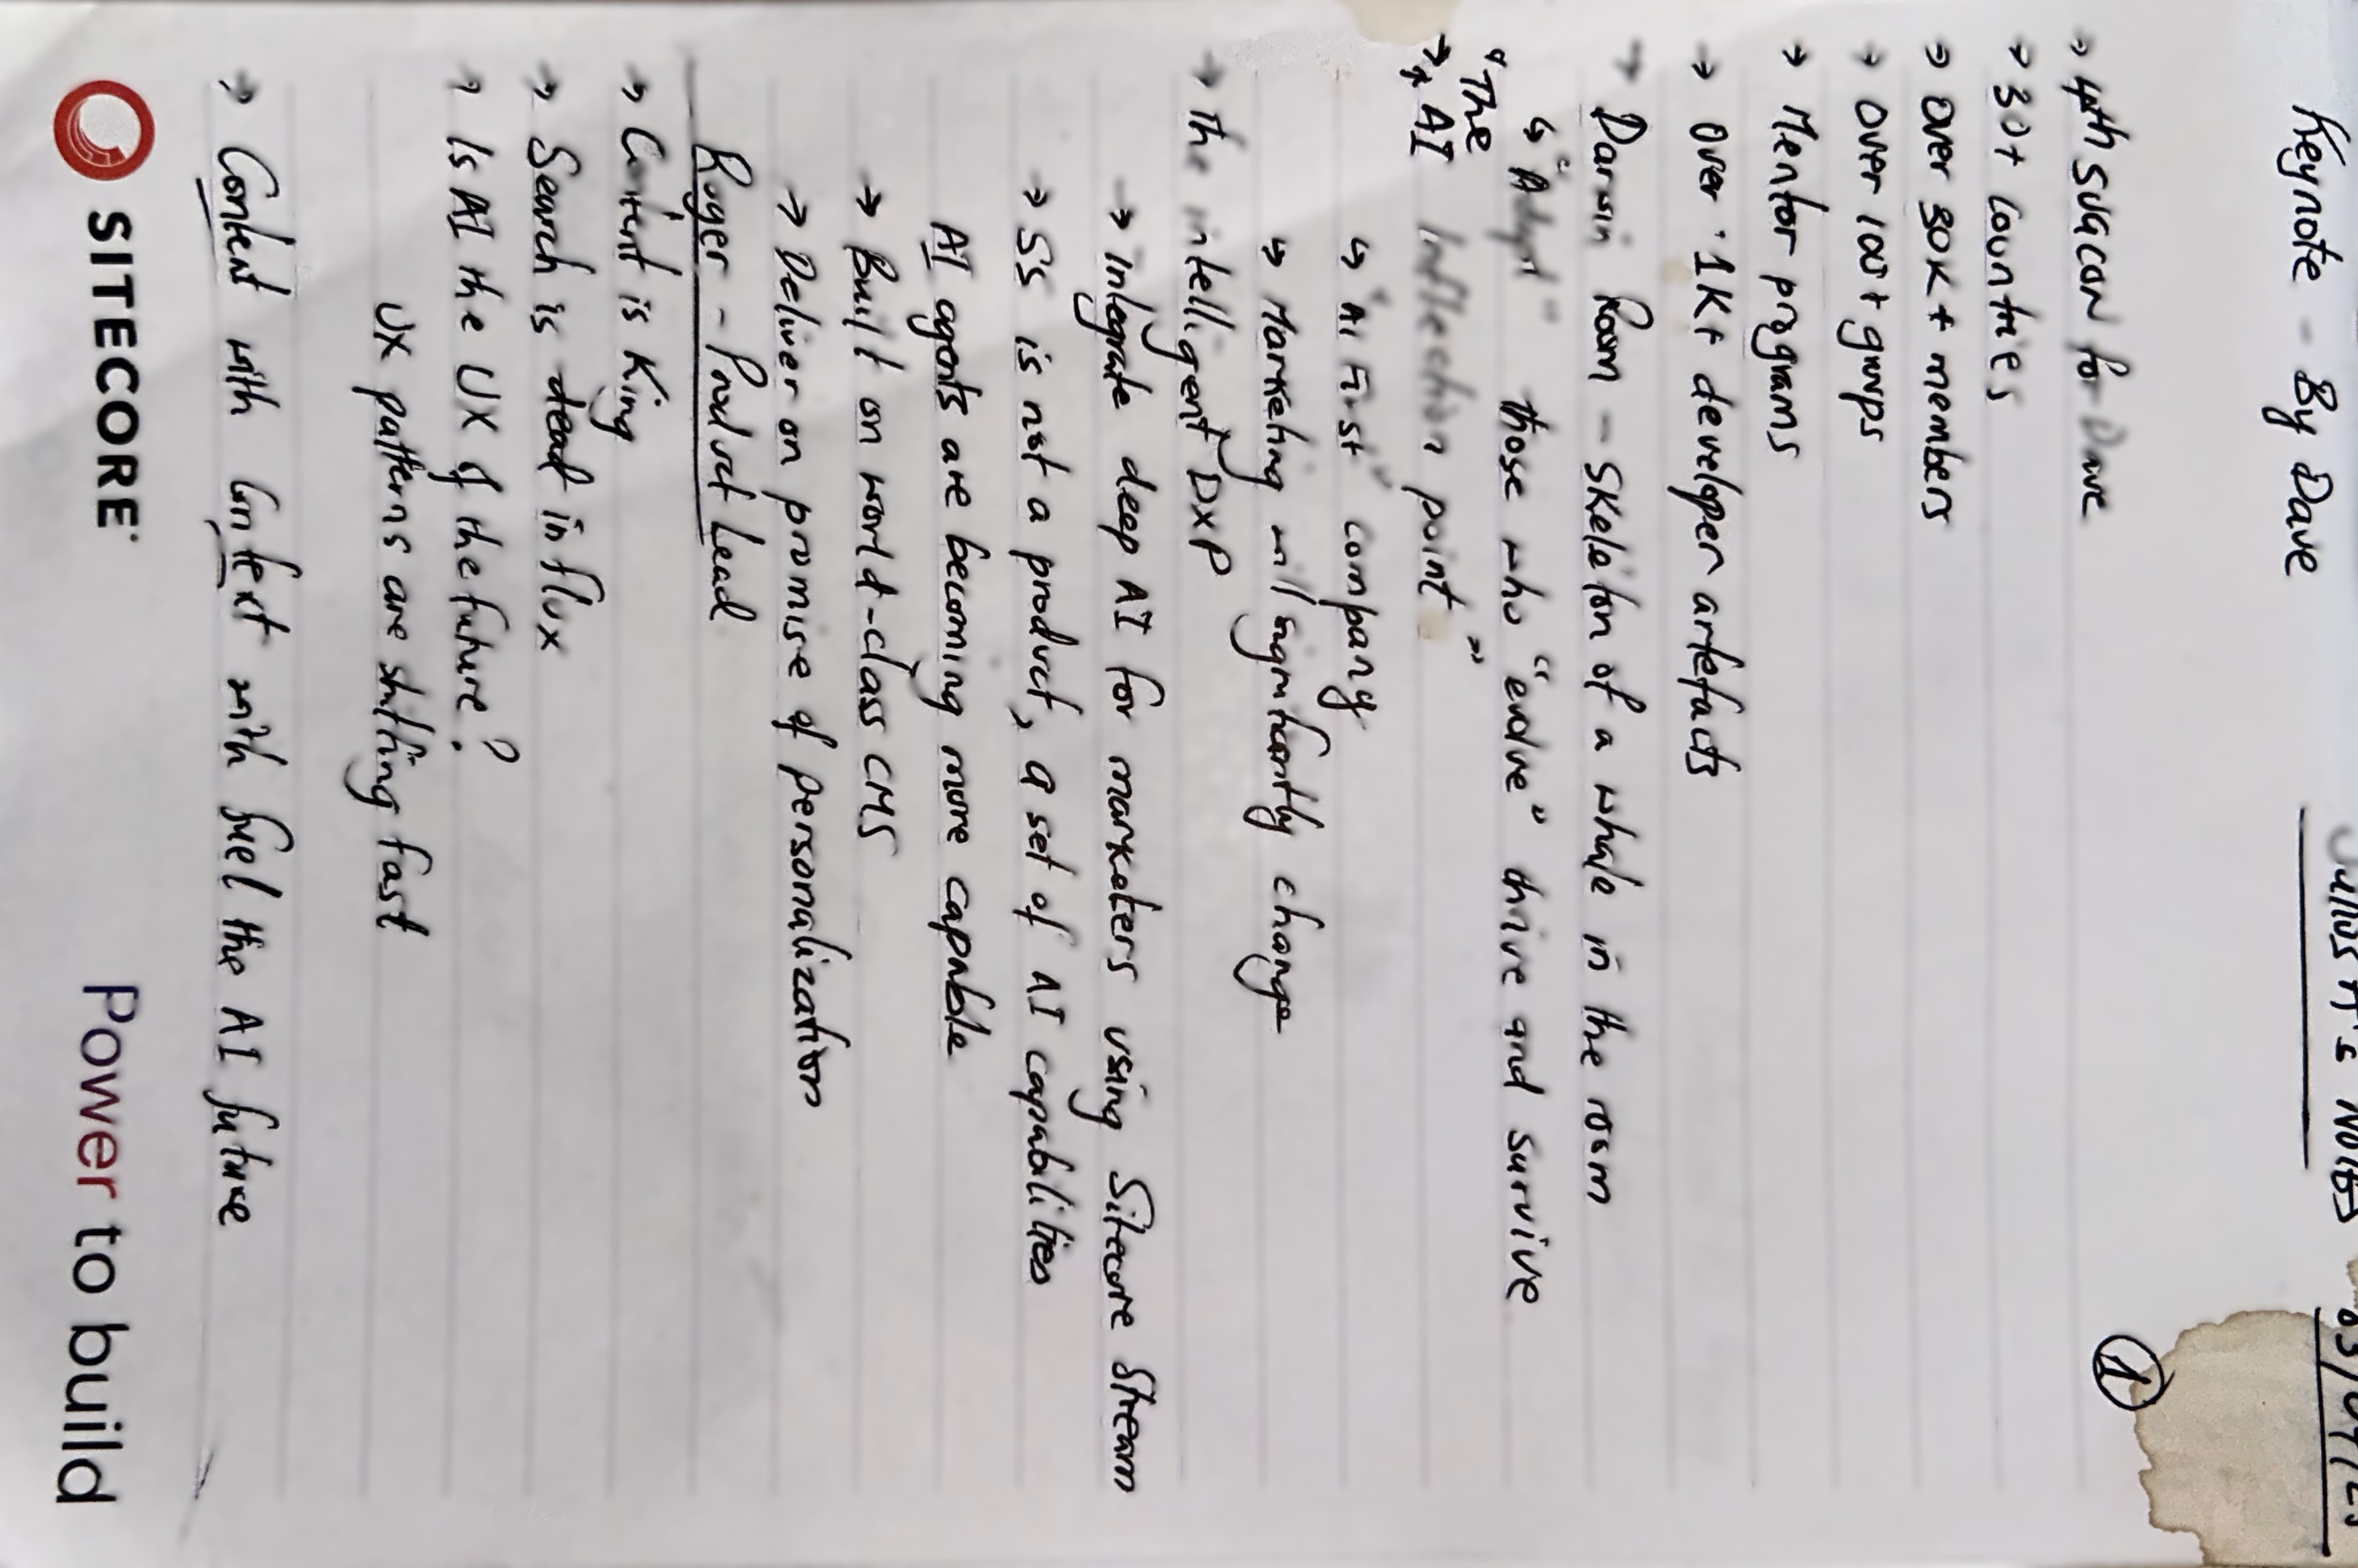
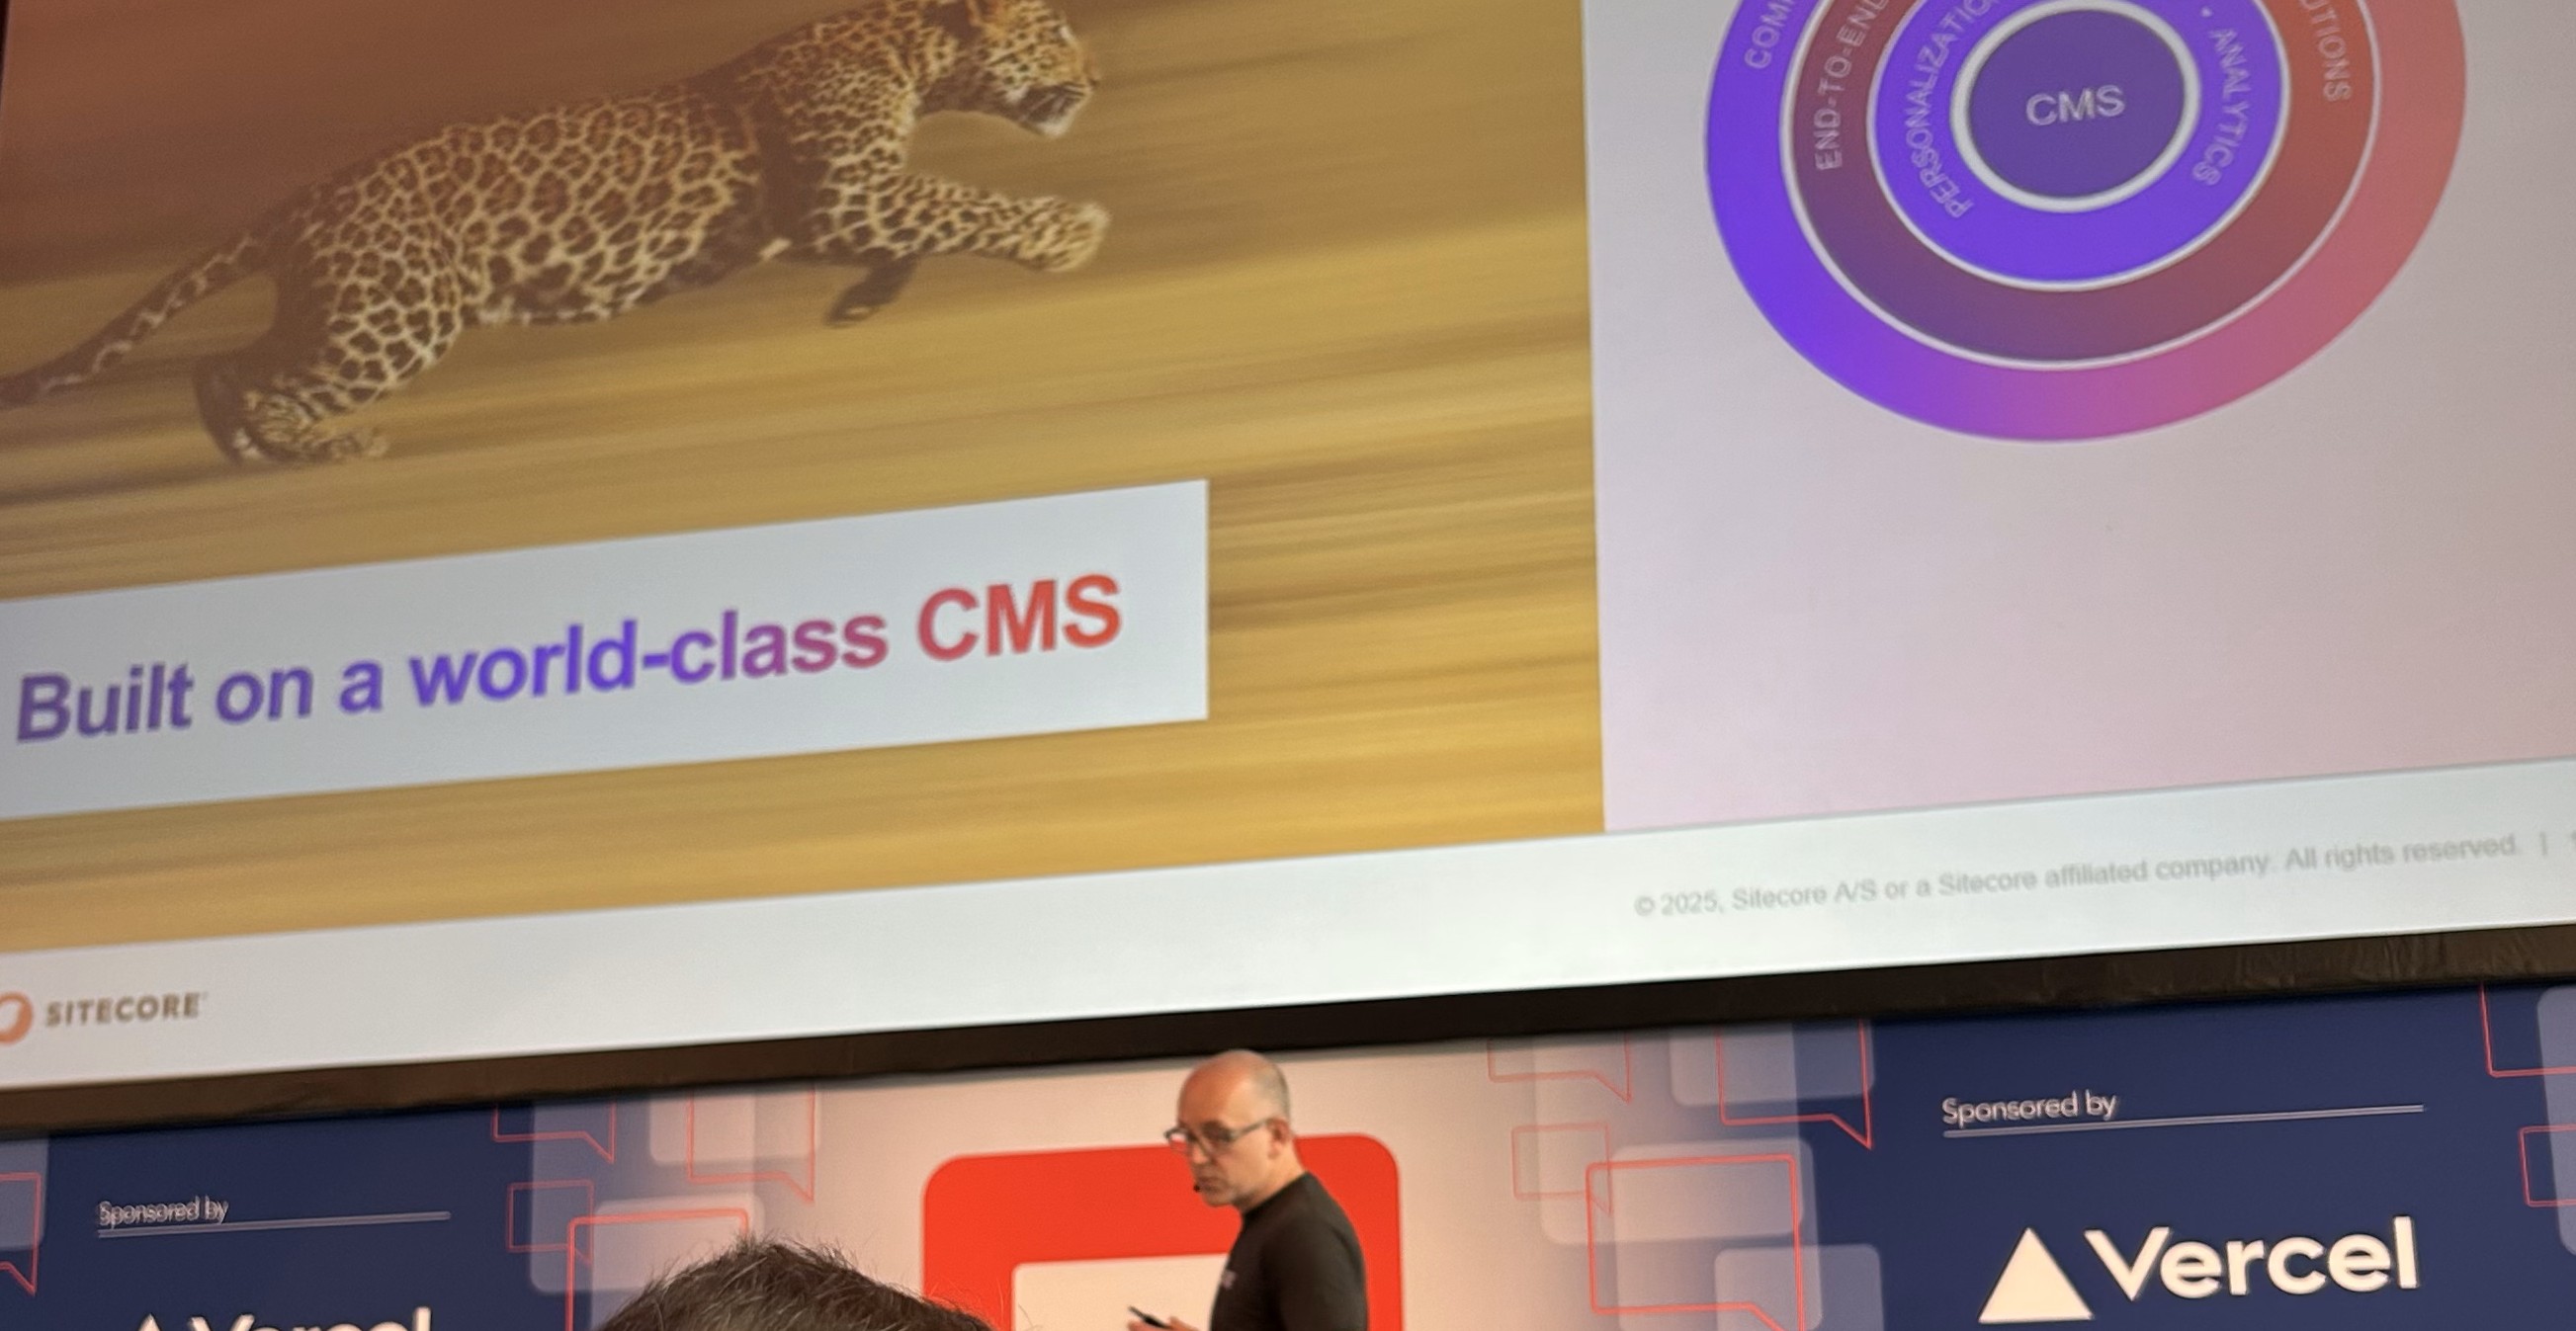
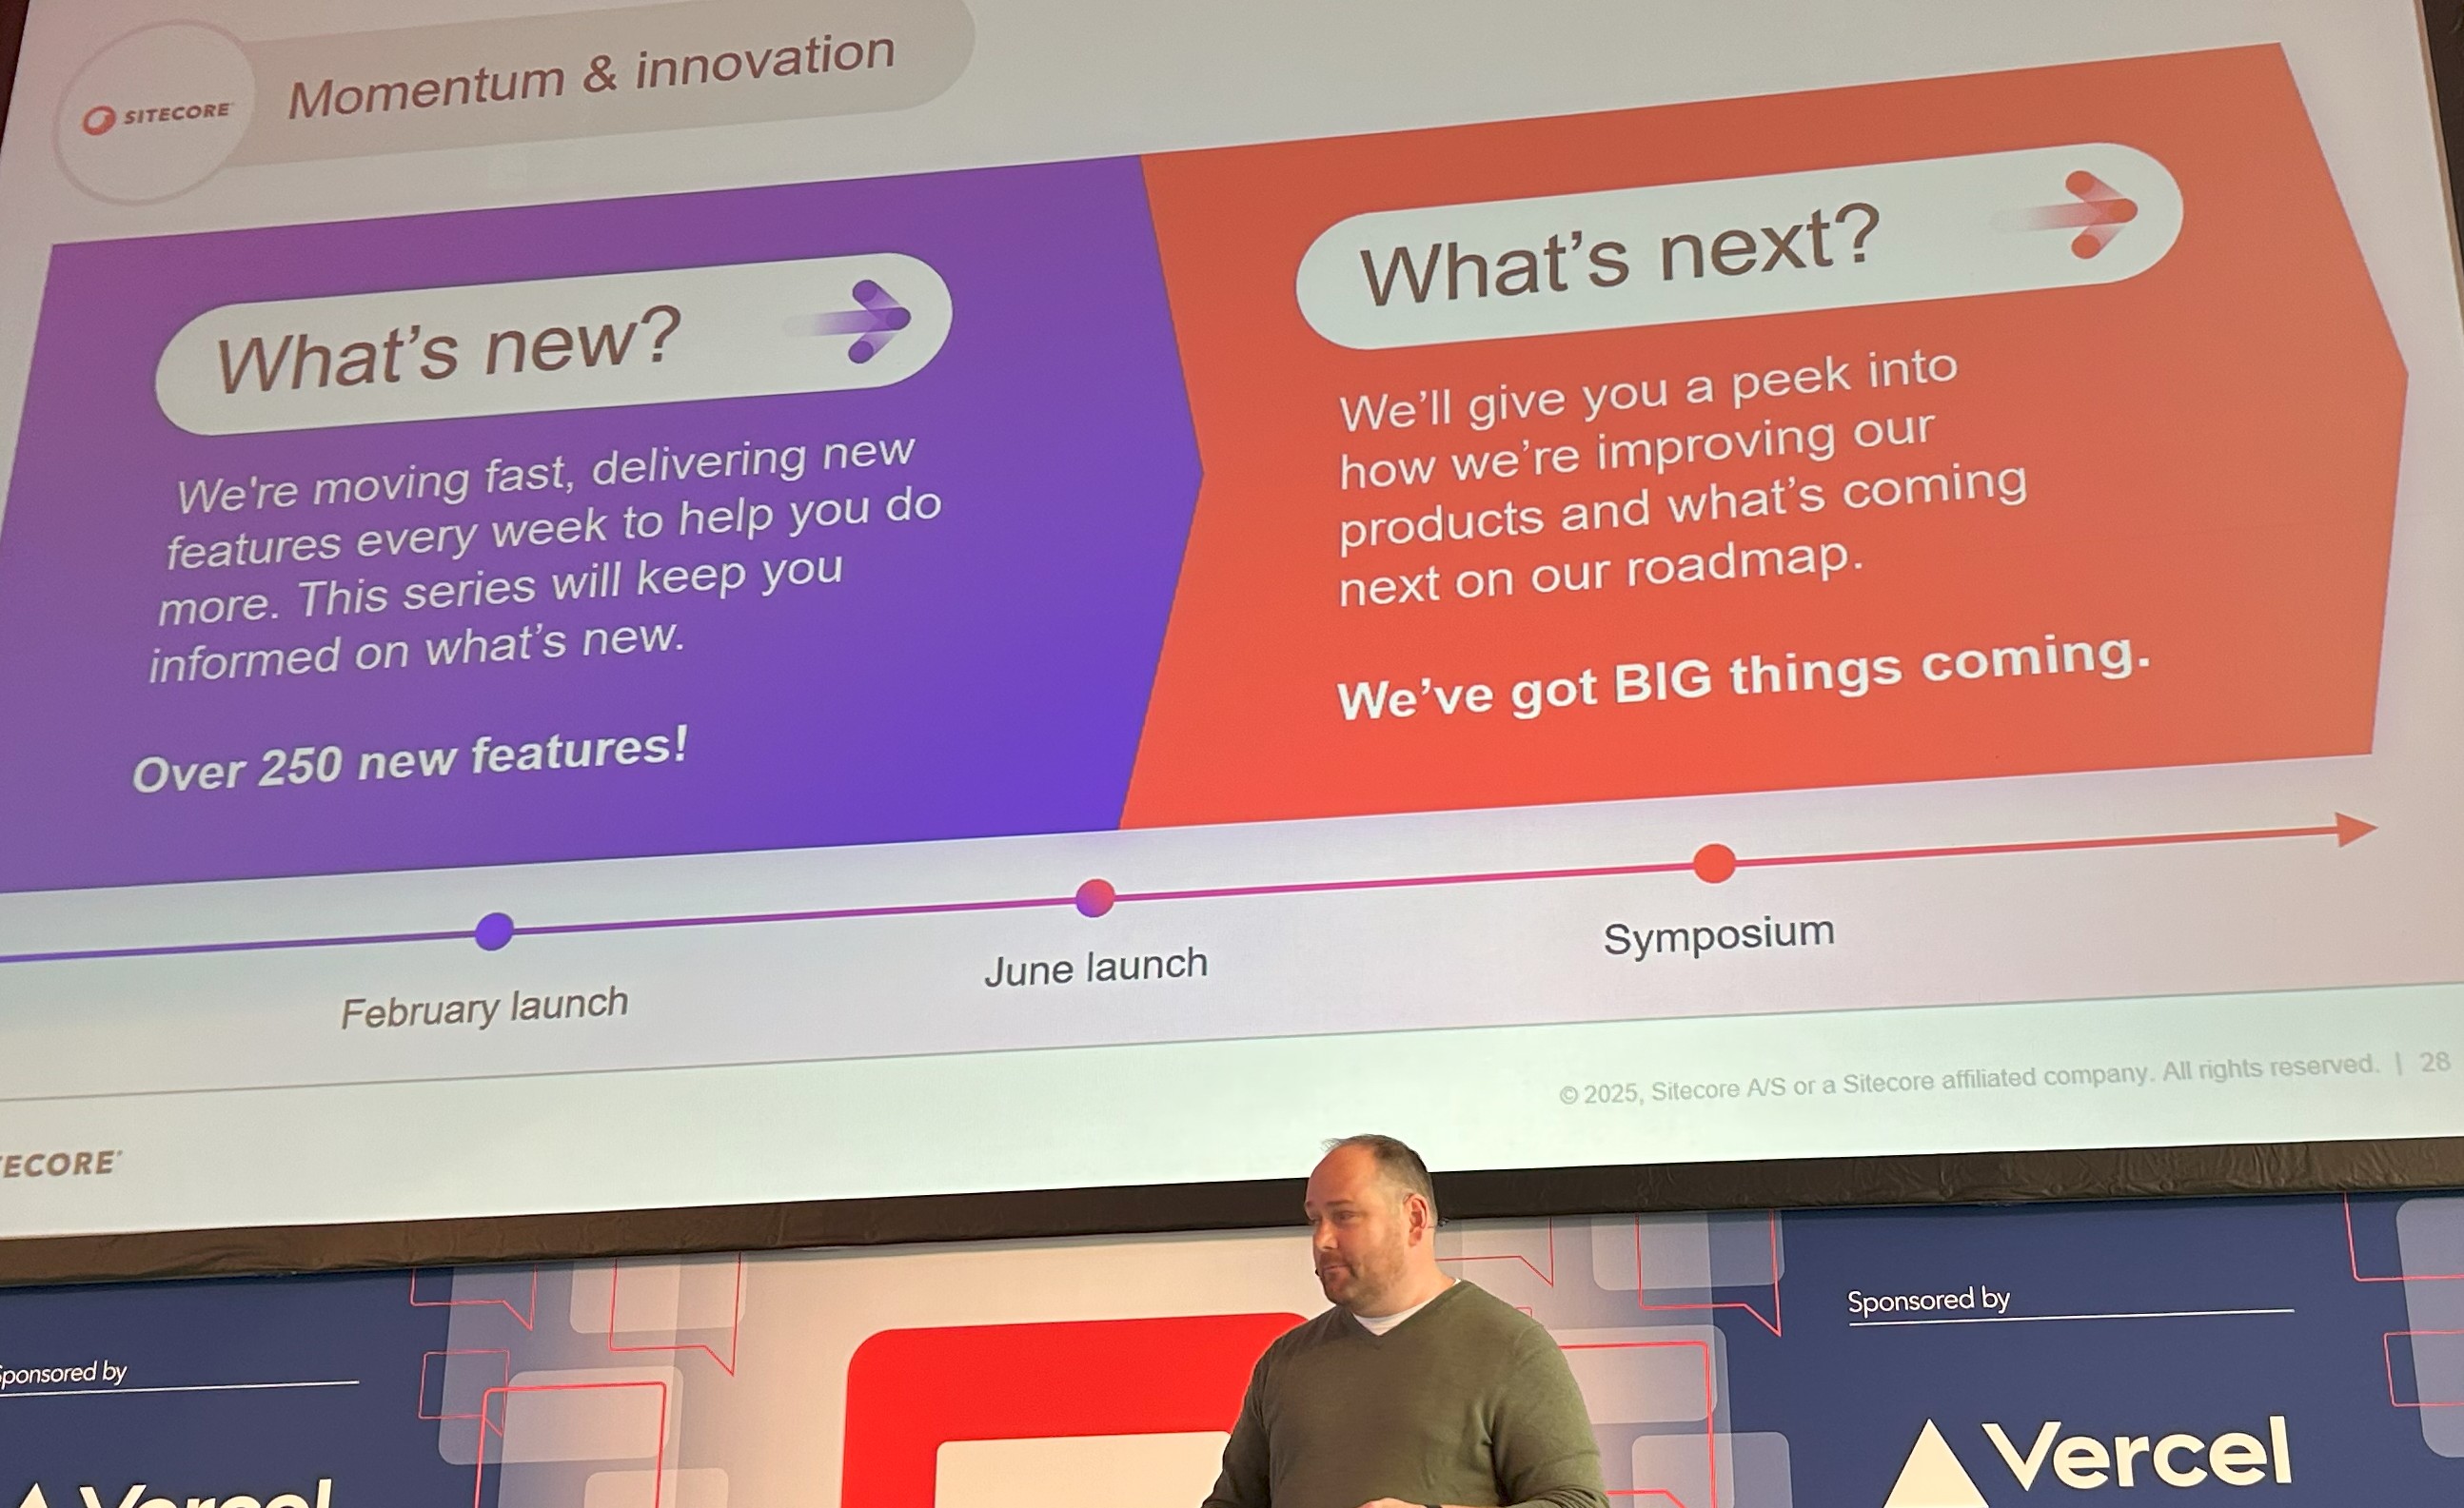
Keynote from Dave: This was Dave’s 4th SUGCON, and his first as Sitecore CEO. Dave shared stats that highlighted the key role our Sitecore community in success of Sitecore, such as 100+ user groups with over 30k members across 30+ countries, producing over 1k+ developer artefacts. Keynote was held in the “Darwin Room” which had a huge skeleton of a whale provided a great backdrop of his “Adapt” messaging. He reminded us, to echo famous Darwin mantra, that those who “evolve” and “adapt” thrive and survive. We are at what he called “The AI Inflection point”. His key message was he’s very much building Sitecore as an “AI First” company going forward. We will see marketing significantly change, let’s embrace the “The Intelligent DXP” built on a world-class CMS that is underpinned by AI (Sitecore Stream). With AI capabilities already being infused across Sitecore products and as AI agents are becoming more capable, Sitecore can deliver on their promises such as personalisation.
Keynote from Roger: Roger swiftly picked on from where Dave left and his messaging revolved around Content with Context will fuel the AI future. Content is King. Simple. He challenged whether “Is AI the UX of the future?” as we are seeing UX patterns shifting fast. With AI capabilities already being infused across Sitecore products, you can use Sitecore Stream with DXP 10.2+ and XM Cloud to generate content. As well as Contextual AI tagging and Visual Search in Content Hub which solves the metadata and retrieval main issues he sees within Content Hub. He also touched on the changing face of Search in the AI age and showcased the AI-powered A/B/n testing, personalisation and language translation tools available to us now.
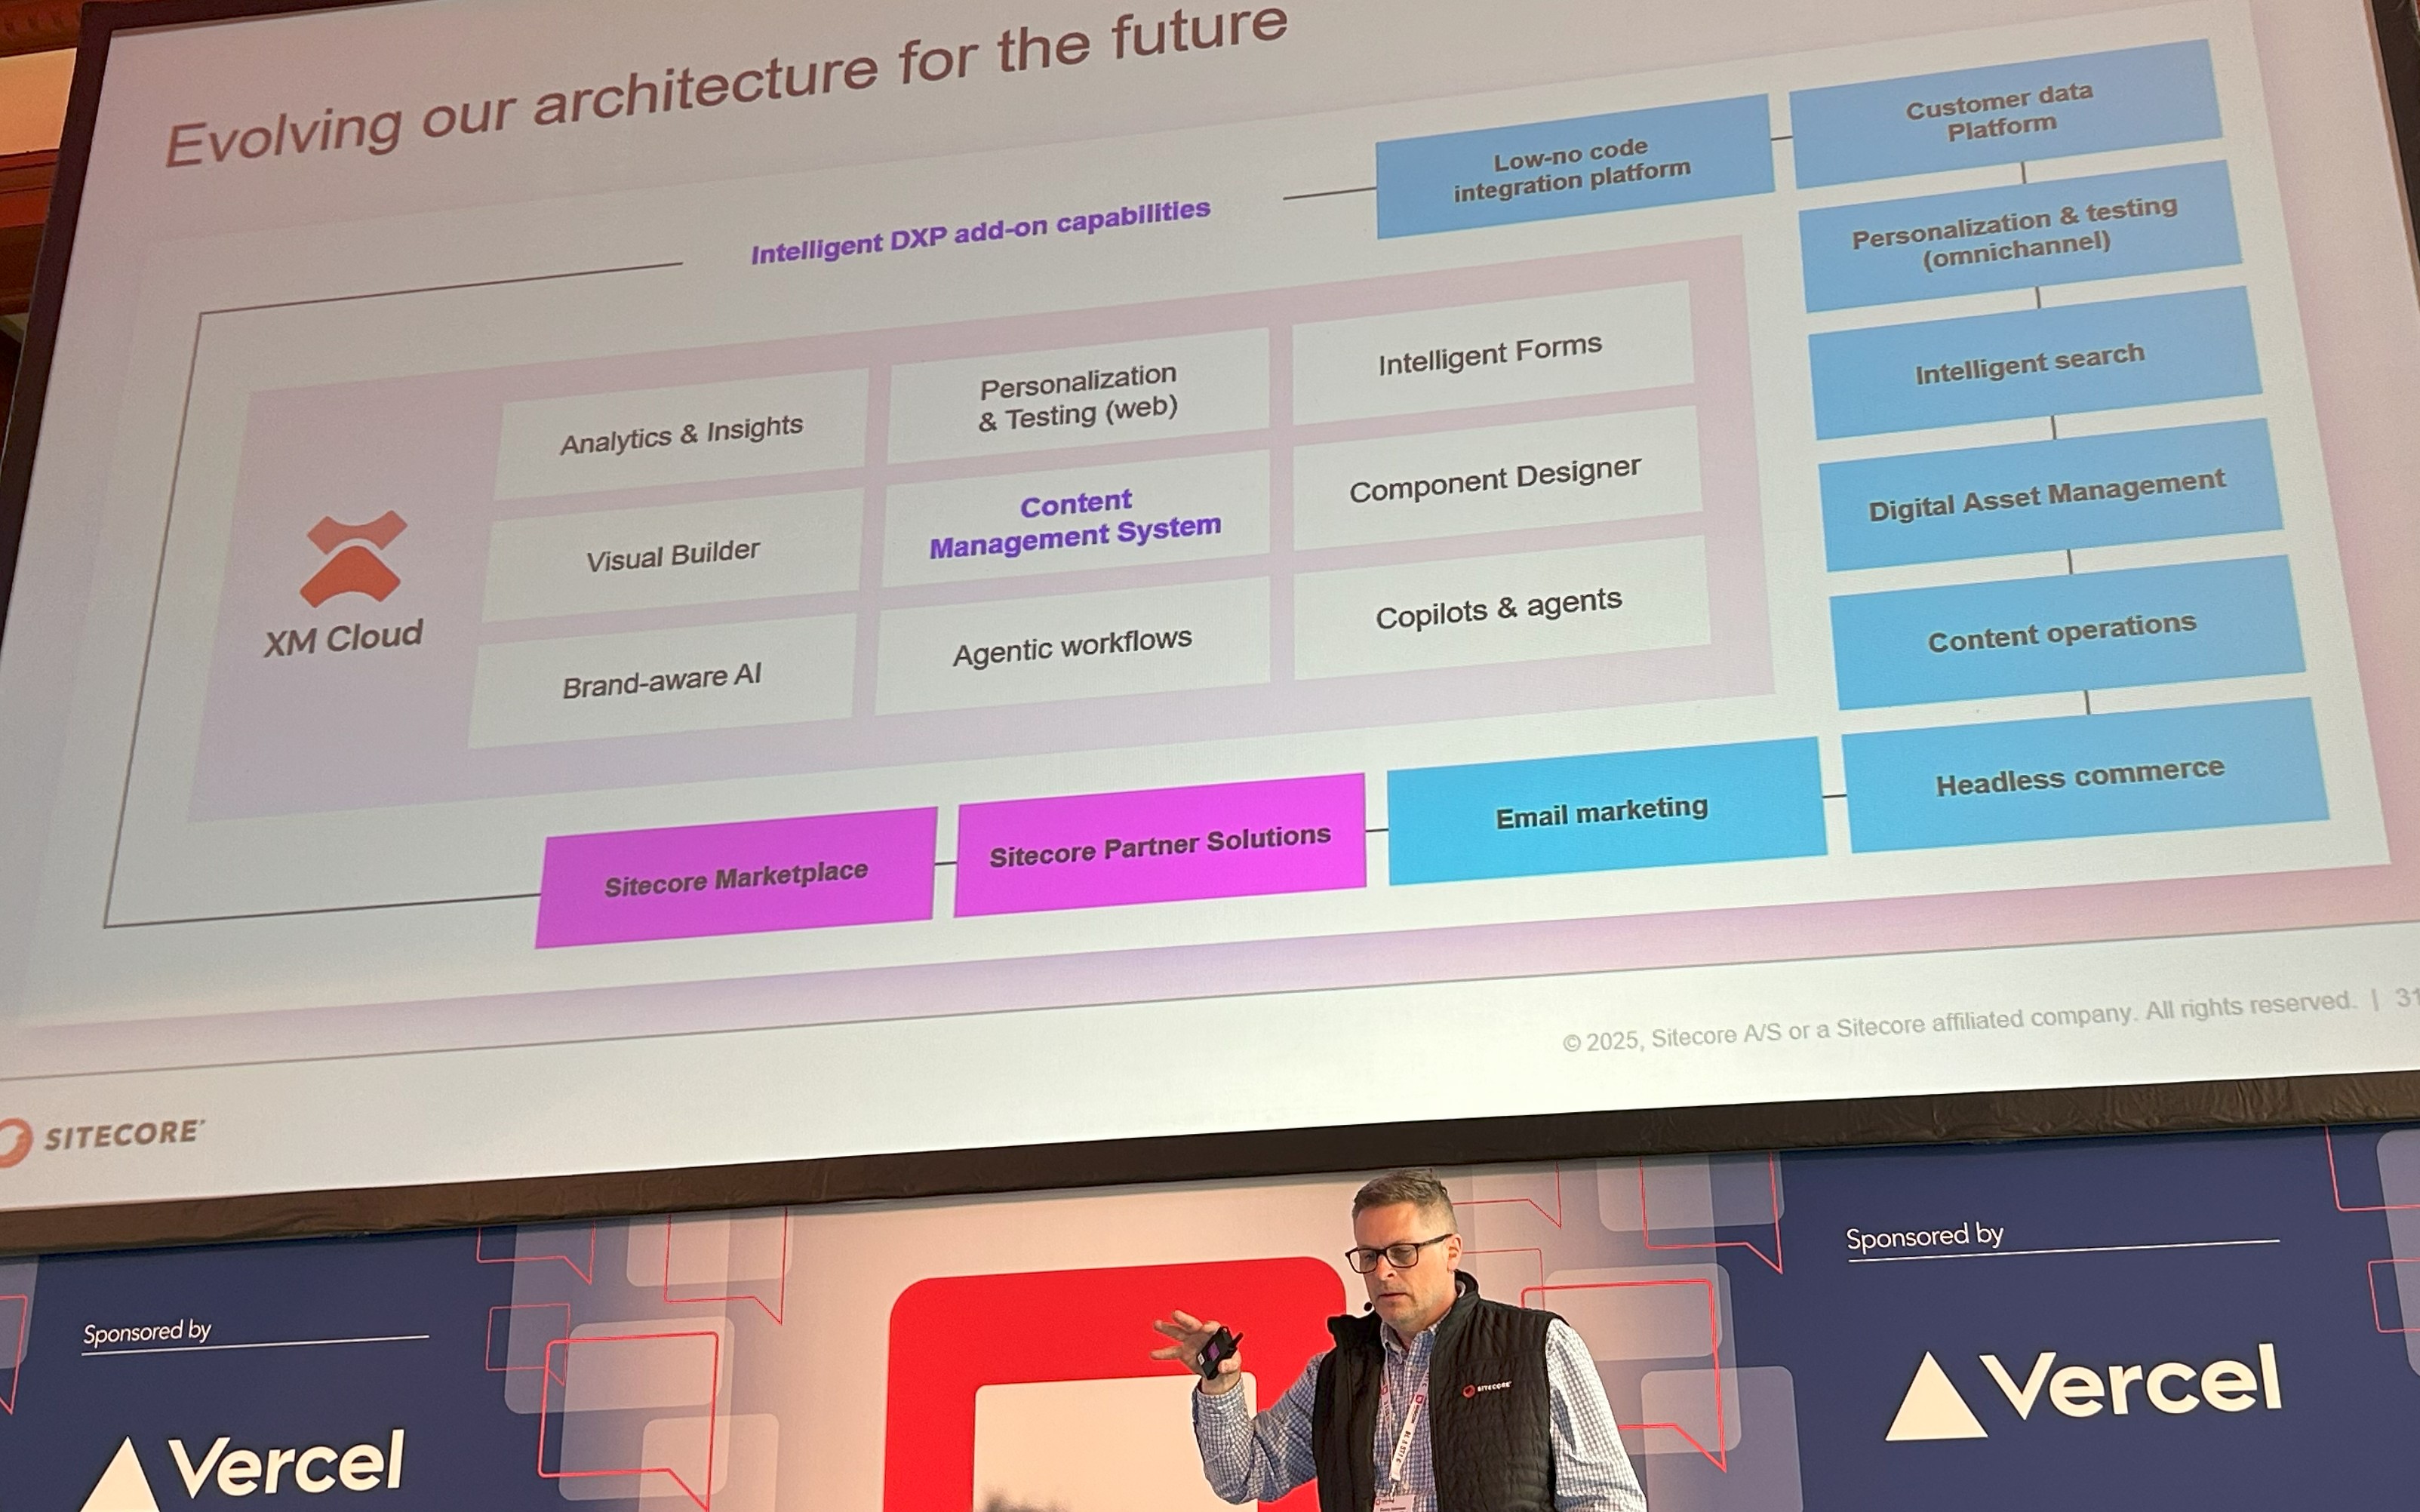
Keynote from Danny: Last but not least, Danny shared his vision and roadmap with his key messaging also revolving around Innovating faster with AI. He re-emphasized Dave’s “Intelligent DXP” by showcasing how he is evolving the architecture for the future. He is also very much driven in improving developer experience by enabling developers with tools and SDKs they need. He sees this as ground-up, embedded AI capabilities, federated content, AI-powered site creation and bringing Sitecore Stream to all products. He promised that on June 4th, 2025 he will be making a significant future innovation announcement, so keep an eye on that date.
Key product roadmaps and announcements
Throughout the conference, we were given key product roadmap announcements.
a) Delivery on the promise, Sitecore Stream set of AI capabilities are available now.
Sitecore Stream in itself is not a product, but a set of AI capabilities that are already being infused across Sitecore products.
Available now on DXP 10.2+
Available now on XM Cloud
Available now for A/B/n testing/personalisation
Available now on Content Hub for Contextual AI metadata auto tagging and AI Visual Search
b) Sitecore’s Marketplace & Developer program
We had two separate sessions around Sitecore Marketplace. First session by Liz Nelson (Product Lead of XM Cloud) and Spyros Misichronis (Marketplace Architect, Sitecore) where they showcased the Sitecore XM Cloud Marketplace Apps, which she called an “Extensibility Umbrella” comprising of a Public Portal and Developer Marketplace.
Developers can now leverage the CLI, SDK on GitHub to build extensions to integrate with XM Cloud APIs.
Developers can embed features into Pages directly or creating standalone tools.
Developers can build applications that enhances functionality and streamline workflows
Spyros Misichronis demonstrated a live demo of building a sample Marketplace App leveraging the developer tooling.
The second session was by Krassi Eneva and Justin Vogt (Product Managers from Sitecore) who took a deep dive into more detail and showcased different use cases for Sitecore’s Marketplace and Developer program. Sitecore Marketplace brings the following benefits: faster time to value, flexibility & extensibility and growth & enablement.
Contribute to the community or build for your use cases. Sitecore is providing three models for this
Custom Single Tenant – Built for a specific organization & available right away
Custom Multi Tenant – Build for selected number of organizations & partner managed
Public – Available to any Sitecore customer or partner
What can you build? This is about what experience can you tailor for your end-users and not what type of apps. Scope is wide and covers creation of the following:
apps to the Sitecore portal
apps within XM Cloud
apps within custom touchpoints such as panels in Page Builder in context of a page, fields editor and panels within sites dashboard
Early Access Developer Program – Sitecore’s Marketplace Early Access Program is currently in progress and Sitecore is actively working with the following:
Technology Partners
Sitecore Partners
Internal Sitecore teams
Individual community members
Is this like an App store we are used to? Similar analogy if you like. You are responsible for testing your own apps, responsible for supporting them in the marketplace. Apps once submitted will undergo review process before approval to Sitecore’s marketplace
This was a major announcement that brings a solution to plug in gaps currently available in XM Cloud as result of moving from Platform DXP. They demonstrated cool apps like copying content between XM Cloud environments, leveraging third party content translations within XM Cloud UI among others. Interesting space to keep an eye on.
c) XM Cloud Content (previously known as “Content Service”)
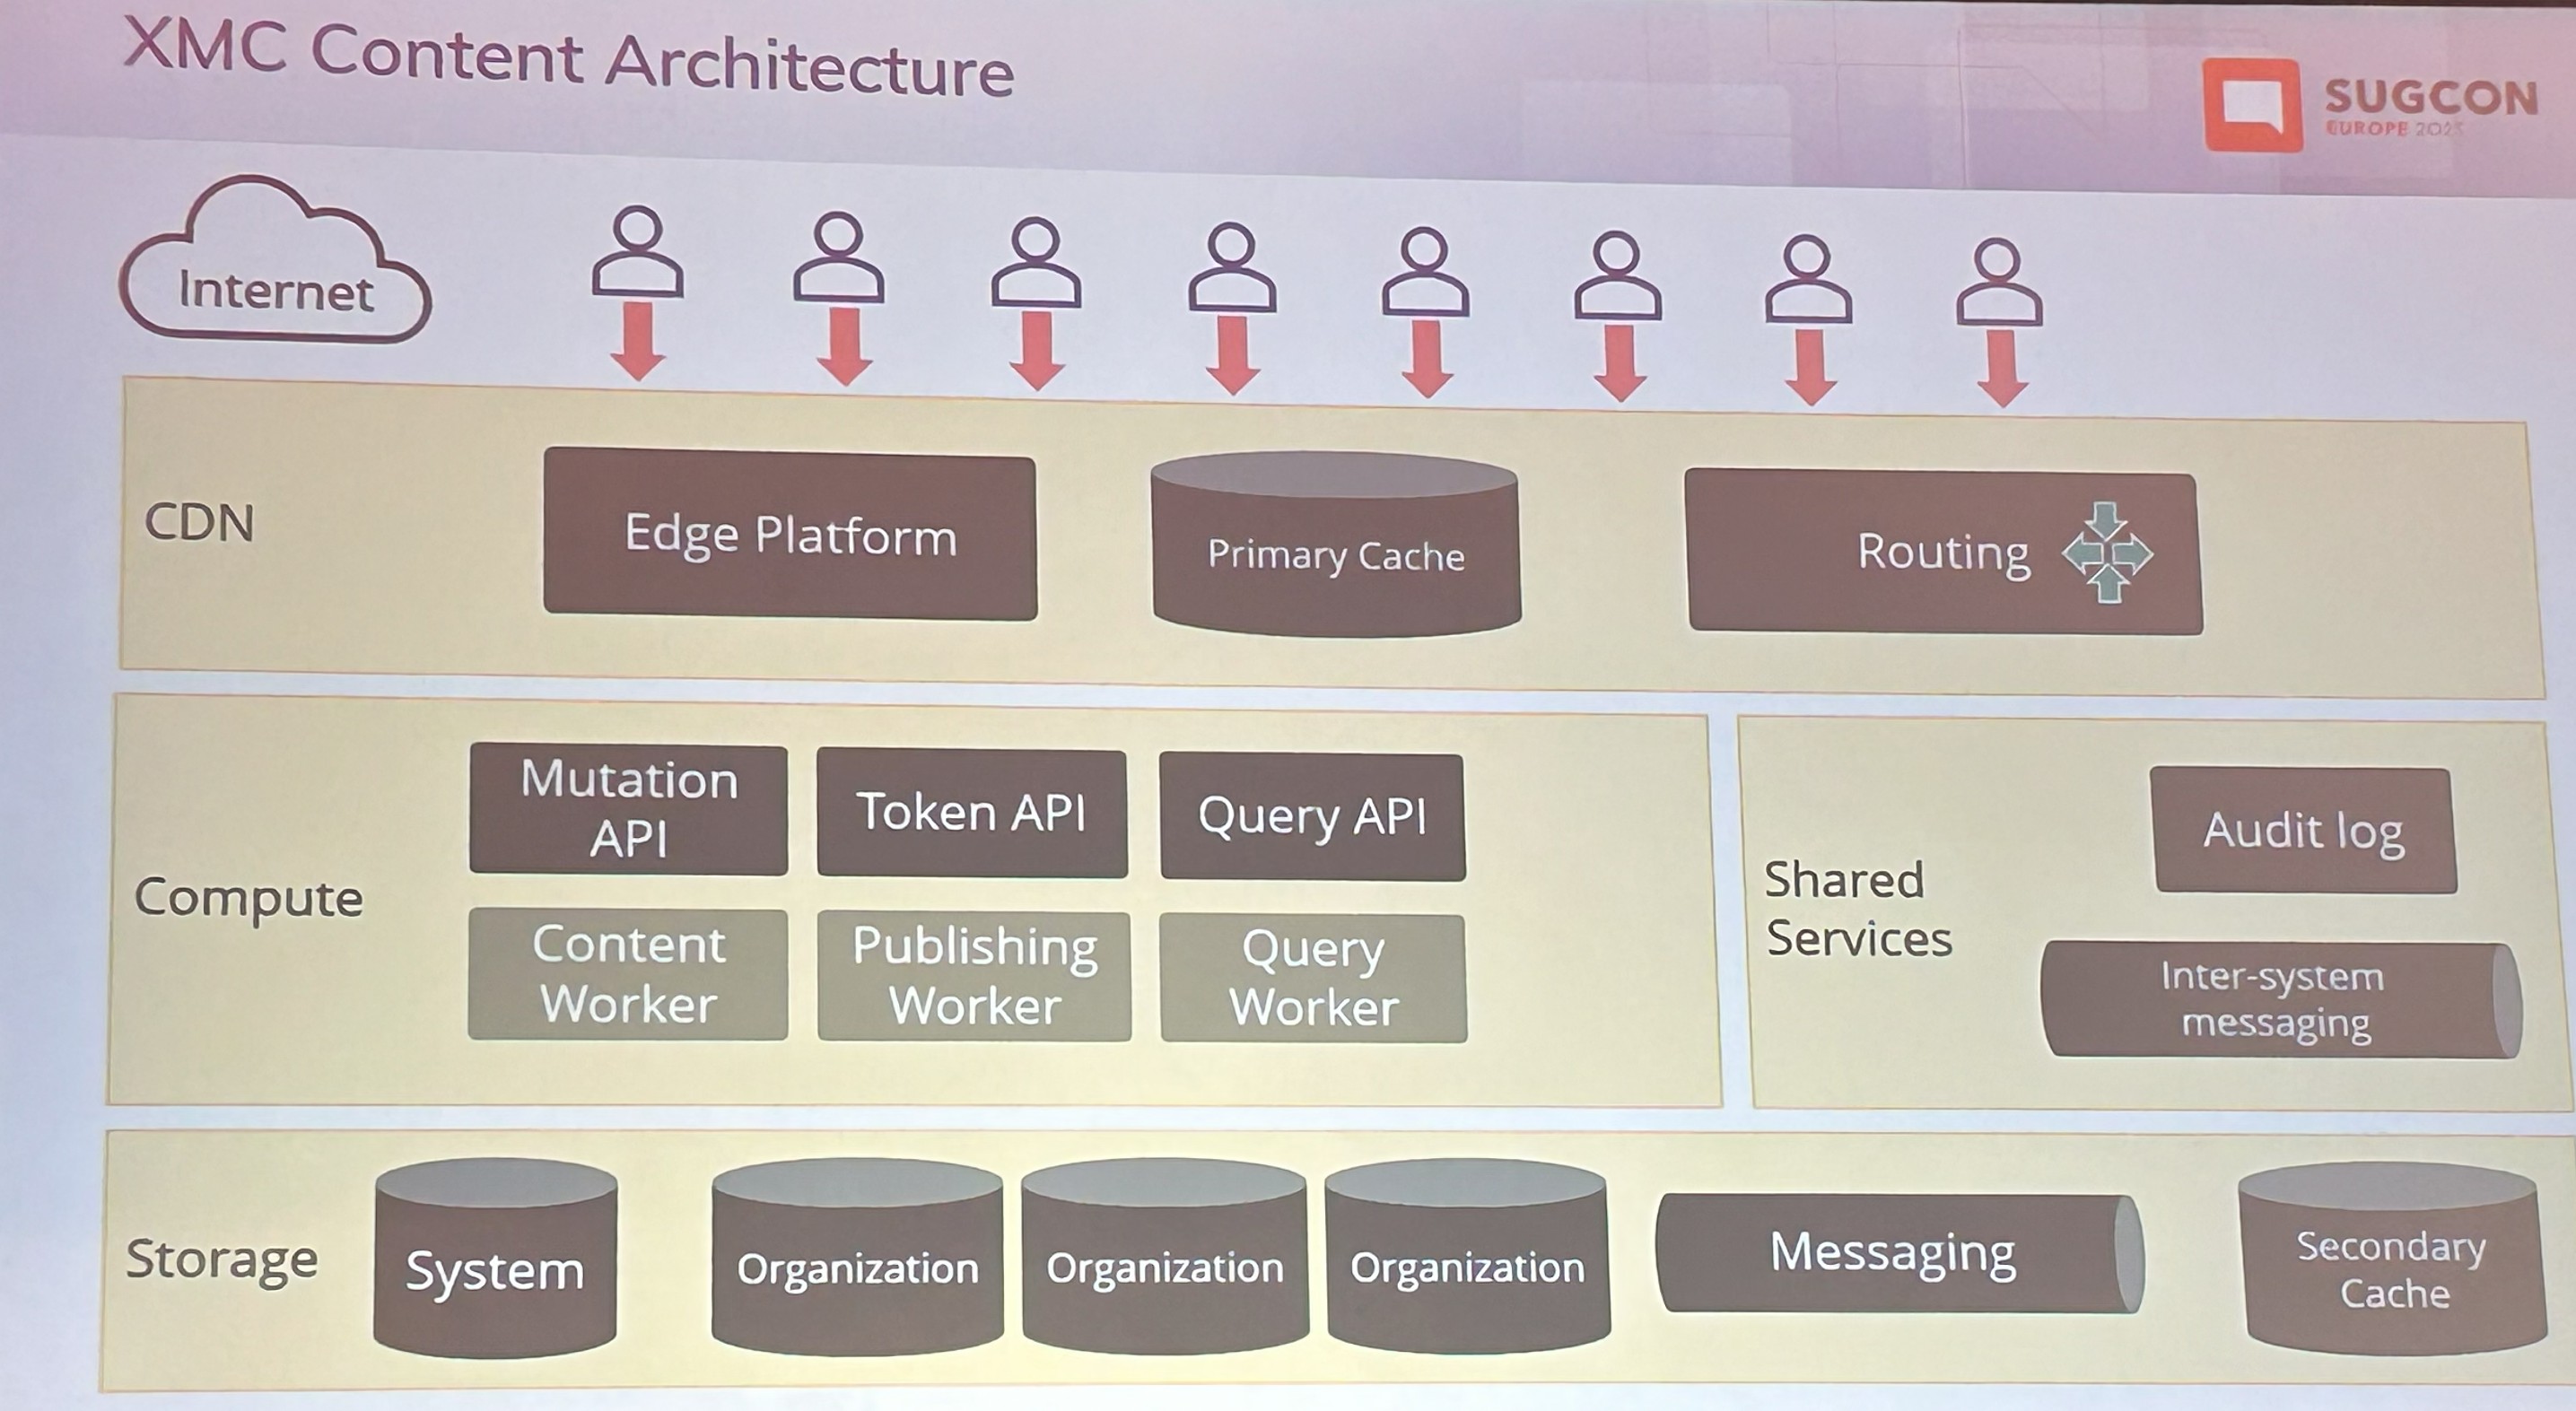
Alistair Deneys (System Architect, Sitecore) session focused on showcasing the progress made with the Enterprise-grade, innovative headless “CMS” which we now know will be called XM Cloud Content. He set context by giving the brief history and evolution of CMS from the monolith old days, through headless and a look at the future as XM Cloud Content. He also introduced the XMC Content Architecture, diving into domain models covering the following:
Content Types define structure
Taxonomies define classification
Content is stored in Content Items
Fragments allow composition. He highlighted the preference for composition over inheritance in the design
He gave a live demonstration of the core set of APIs that underpin XM Cloud Content, walking through various scenarios on how you can build content using API-first.
Some of the key capabilities from XM Cloud Content are:
Entity lifecycle – Draft/Published/Archived
Worksets – new concept of publishing
Content Delivery – GraphQL endpoints includes tenant name. “IsDirectQuery=false” keeps query cleaner. Persisted queries, restrict query tokens to specific persisted queries, schema pinning
Fragments with composition over inheritance enables re-usability of set of fields thus a mechanism of delivering “system functionality and extensions”
Separate queries for “Pages” content, say, articles, news, etc
Query Token security enhancements such as disabling of Introspection
Content management capabilities: environment merging, availability & archive dates on content items, more field types, content collections among others
Sitecore Change Logs are running from XM Cloud Content
Developers will be excited with XM Cloud Content, although what was demonstrated is still in early development. Watch this space and future announcements.
d) Modernizing the JSS SDK and Starter Kits for XM Cloud
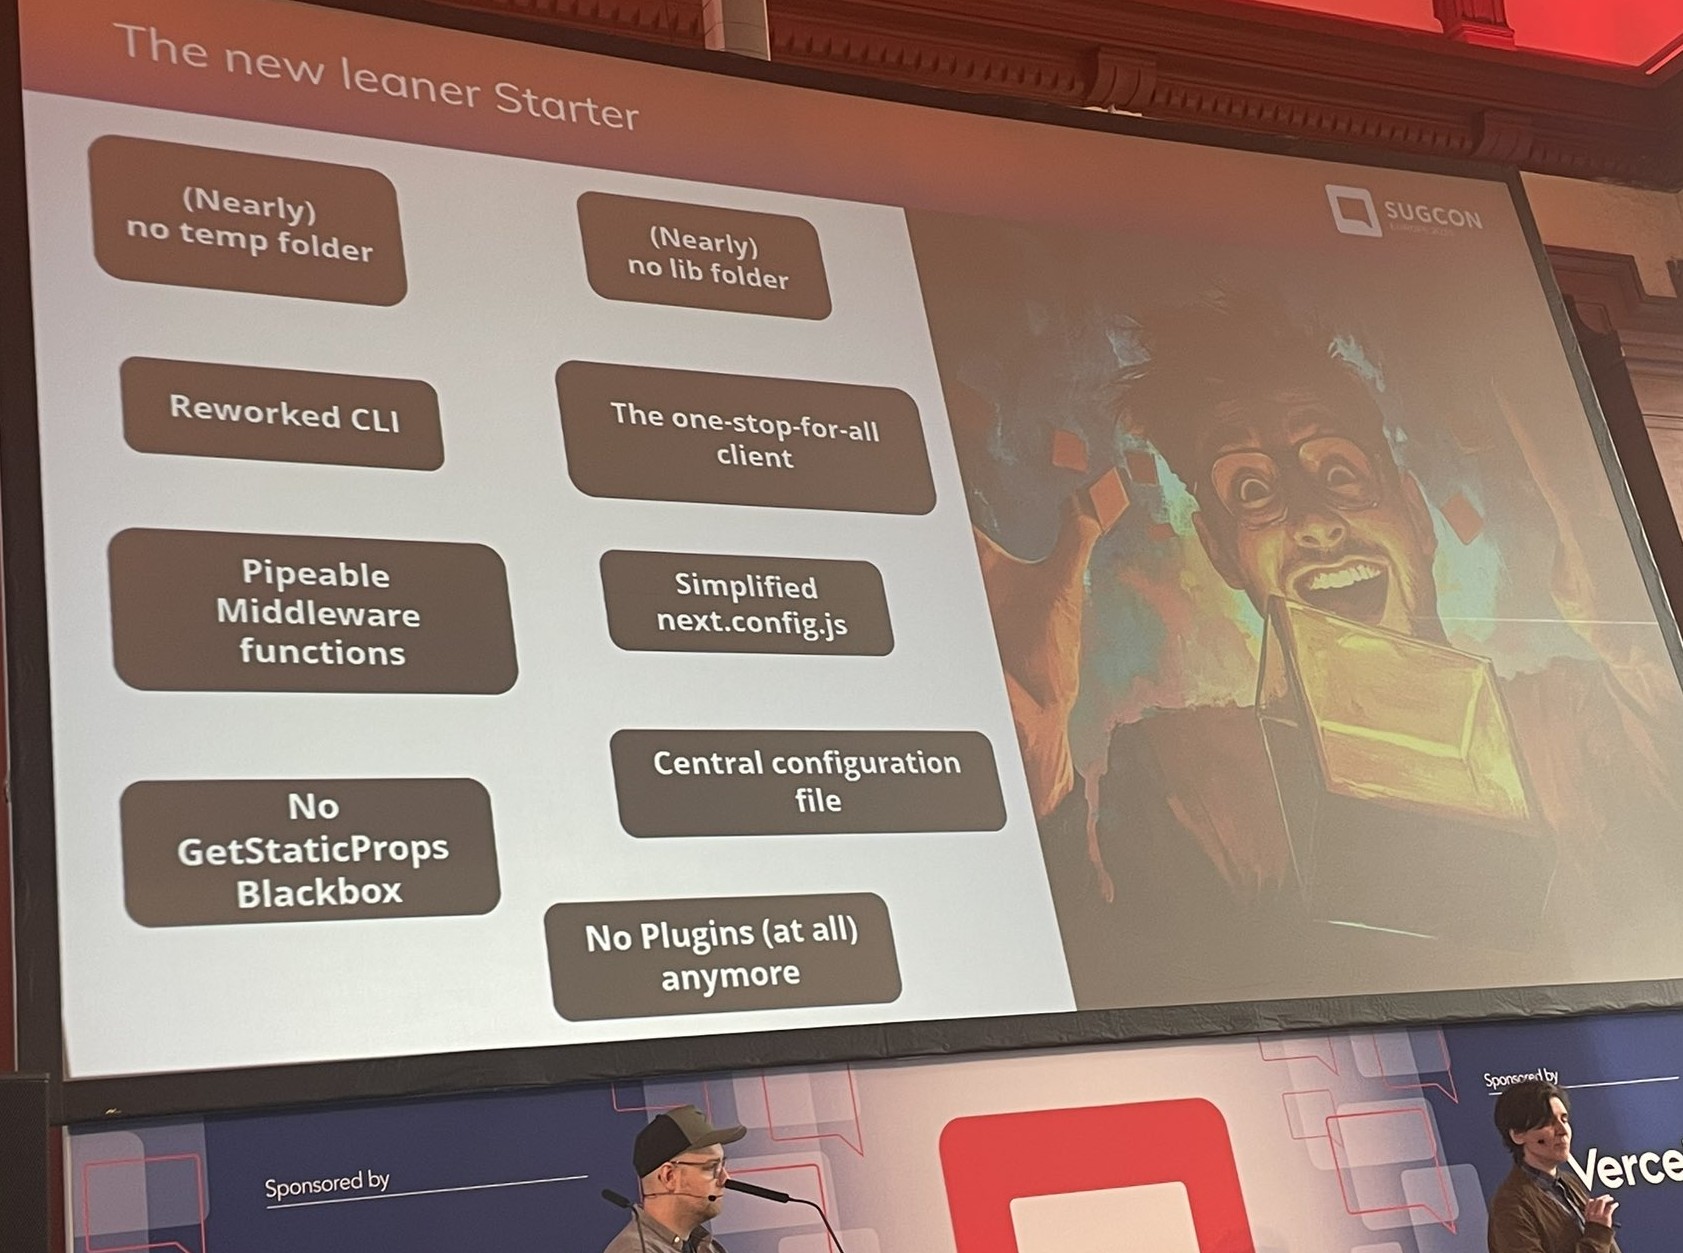
Liz Nelson (Product Lead of XM Cloud) and Christian Hahn (Technical Product Manager) unveiled groundbreaking updates to the JSS SDK and starter kits, designed to simplify workflows, eliminate legacy complexity, and enhance flexibility.
Welcome the “new” one. In summary, in the new solution
Split responsibilities
Only get what you really need
Reduce complexities and sizes
Some of key improvements shared in the session
disk size of the starter kit site folder reduced from 8MB down to 600KB
almost halving the bundle size
overall improvements in First Contentful Paint FCP metric of 200 milliseconds
editorial performance gains, with about 10x as many UI components can be added to an editable page
The SDK and documentation are available now, and currently in “Beta” but confident developers can start building new projects. Watch this space for announcements on the final releases which will be soon.
e) June 4th, 2025 – Future Innovation Announcement
Look out for an announcement from Danny Robinson(CTO, Sitecore) in June 4th
f) November 3-5, 2025 – Sitecore Symposium Orlando 2025
Sitecore Symposium 2025 is back and will be held at Walt Disney World Dolphin Resort, Orlando, the week of November 3, 2025. Ready to start your submission and step into the spotlight at Sitecore Symposium 2025 in Orlando, they are currently calling for speakers.
Key highlight sessions
With a total of about forty (40) sessions, it is impossible to attend them all. Below are some of my key highlight sessions that I attended. I will complete the list in a follow up blog post.
Session: XM/XP to XM Cloud Best Practices – Free Workshop
Summary: This was an early bird free workshop sponsored by Brimit which covered the best practices, decisions and considerations when migrating to XM Cloud. If you thinking of making the move, this session amplified what a migration path could look like. Sitecore provides XM/XP Migration Navigator as well and you can reach out directly to them.
Session: Optimizing your Content Hub development – Free Workshop
Summary: Another early bird free workshop sponsored by Brimit highlighting the productivity gains by leveraging Content Hub CLI in your workloads. A live CLI demo for developers and key takeaways in terms of best practices and optimising Content Hub DevOps journey.
Conclusion and Next steps
I observed a positive sentiment overall during the conference. There was positive energy and buzz throughout, and this was echoed in various social media posts as well. I look forward to reading and reviewing more feedback from other attendees. SUGCON Europe is a key event in our calendar and there is already talk about next year! We are also looking forward to SUGCON ANZ later in the year and Sitecore Symposium back again in Orlando during November 2025, with call for speakers now open.
I presume most of us are familiar with Sitecore XM Cloud plugin that provides the cloud command that help you manage XM Cloud projects, environments and deployments from the Command Line Interface (CLI). CLI plugins provide us with powerful tools that enable us to automate management of Sitecore XM Cloud workloads by leveraging existing DevOps processes and tooling. In this blog post, I will share some of my tips and tricks on how you can quickly stand-up on of these plugins to automate, say, migration of content between two Sitecore XM Cloud instances.
Anatomy of a CLI plugin – Sitecore XM Cloud plugin example
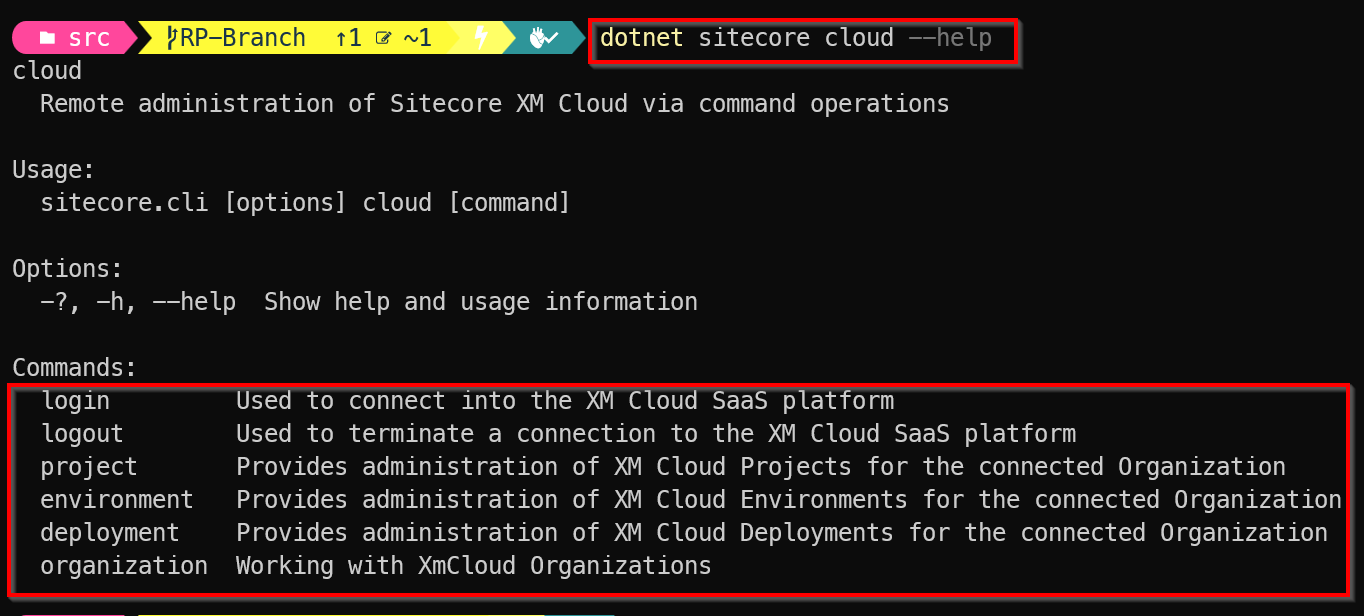
A CLI plugin typically consists of a command which has one or more subcommands. Using an example of Sitecore XM Cloud plugin, you can check the cloud command is available as shown below:
I have assumed that you have already installed the required pre-requisites on your local developer environment. If this is not the case, help is available on how to do this setup, from the official Sitecore XM Cloud docs.
Subcommands
As you can see from above screenshot, we have the cloud subcommands for login, logout, project, environment, deployment and organization
I will not be focusing on what these mean for now. You can read more about them in the official docs pages. The point I am simply illustrating the anatomy of the CLI plugin, demonstrating what the command is and subcommands are. We will apply this to our own custom plugin next.
Tips & tricks 1 – Creating your own custom CLI Plugin – command and subcommands
I am going to share tips and tricks of creating a custom plugin to extend the base sitecore plugin with an new migrate command, which has only one subcommand to start the migration.
A typical use-case is imagine using this command to start content migration from Sitecore XM Cloud environment A into environment B. After we have created the plugin, we can run it with the dotnet sitecore --help command to display the plugin info as shown below.
Notice the migrate command is now listed alongside the out of the box subcommands that come with sitecore command. Very cool, we have now extended the sitecore command.
And we can now explore the available subcommands for our custom plugin using dotnet sitecore migrate --help command as shown below.
Tips & tricks 2 – Creating a Visual Studio Project for CLI Plugin
To extend the base Sitecore CLI plugin, we need to create a new class library project.
In Visual Studio, select File > New > Project.
In the Create a new project window, select C#, Windows, and Library in the dropdown lists.
In the resulting list of project templates, select Class Library (with the description, A project for creating a class library that targets .NET or .NET Standard), and then select Next.
In the Configure your new project window, enter a name of your choice for the Project name, and then select Next.
In the Additional information window, select an appropriate Framework, and then select Create.
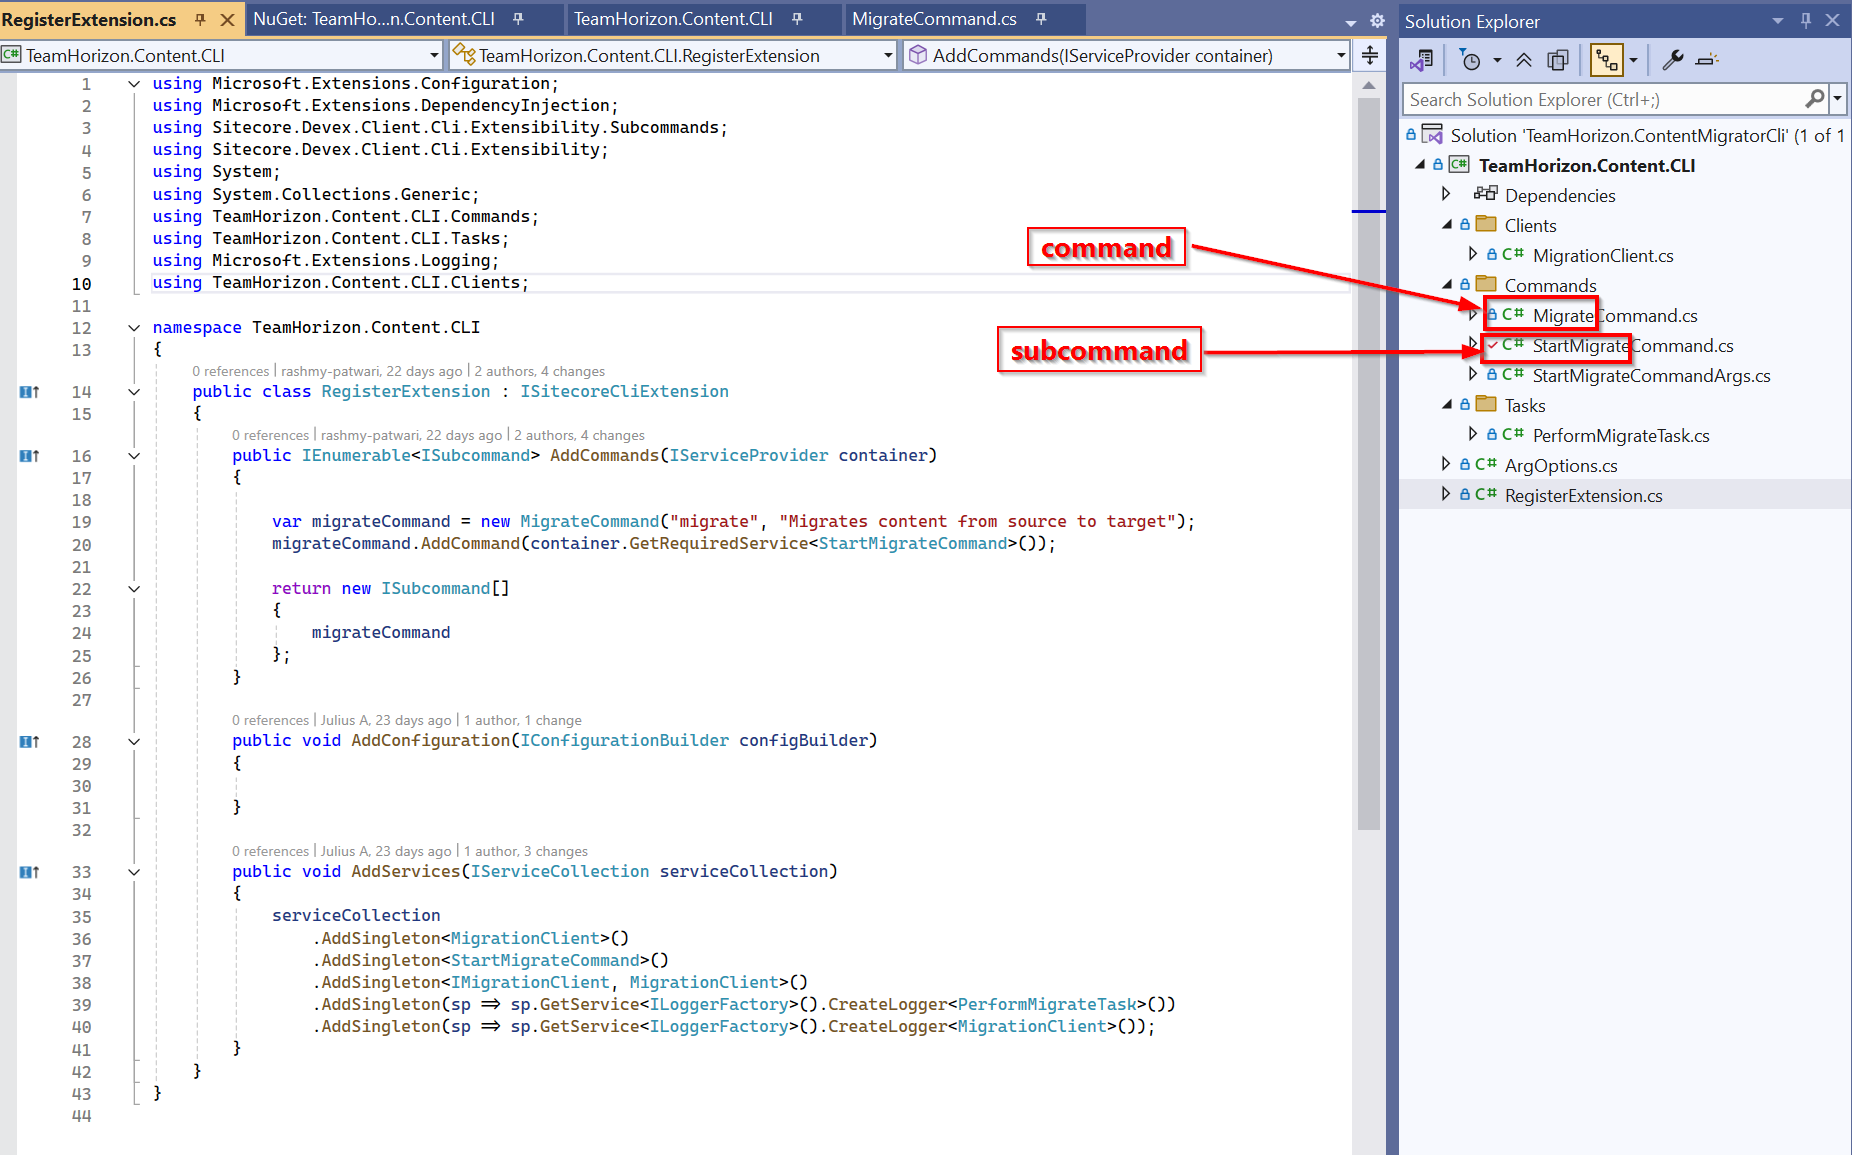
It is recommended we use the best practices such as have a clear project names to help clearly identify them and give a hint what the CLI plugin is all about. Below is a sample project skeleton, with all necessary classes needed for my CLI Plugin.
You will notice this project has the following structure. I will explain the main code classes below
MigrateCommand.cs – this is the class code file that gives my plugin the migrate command
StartMigrateCommand.cs – this is the class code file that adds my start subcommand to migrate command
StartMigrateCommandArgs.cs – this is the code file that defines any command line arguments needed for the migration process. Below are the arguments supported
source-url: The URL of the source XM Cloud environment
destination-url: The URL of the target XM Cloud environment
root-item: The GUID of root item you want to migrate
include-children: Whether to include child items (default is true)
PerformMigrateTask.cs – this is the code file that defines the tasks being accomplished by the subcommands
RegisterExtension.cs – This is the main entry point code file, and implements the ISitecoreCliExtension
The rest of the code files are used for the business logic for this plugin. In my case, I have encapsulated my business logic for content migration from Sitecore XM Cloud environment A into environment B within the MigrationClient.cs code file. Consider this a black-box for now.
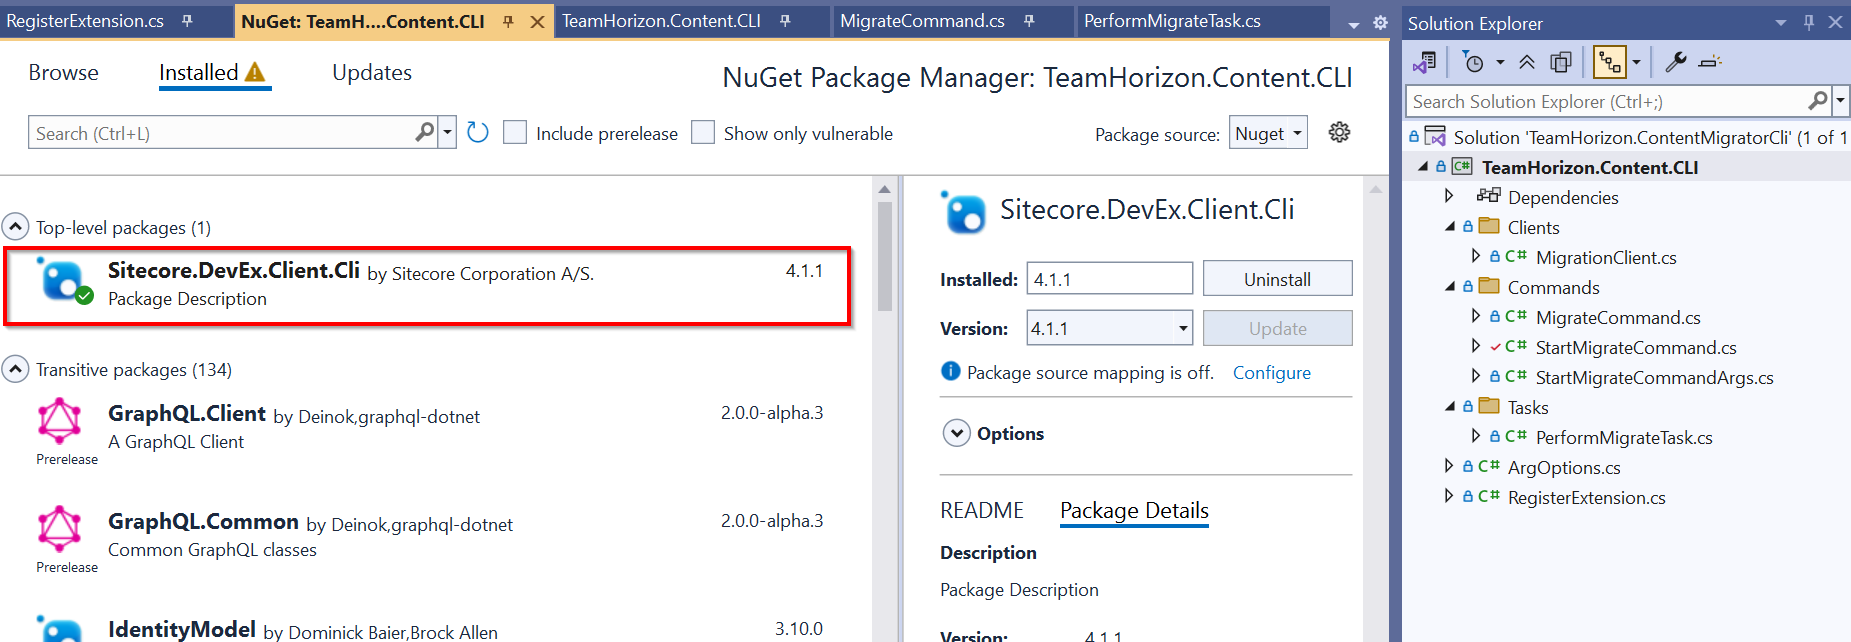
Which dependencies are needed for this project
We need to reference the Sitecore.DevEx.Client.Cli NuGet package from Sitecore, as shown below.
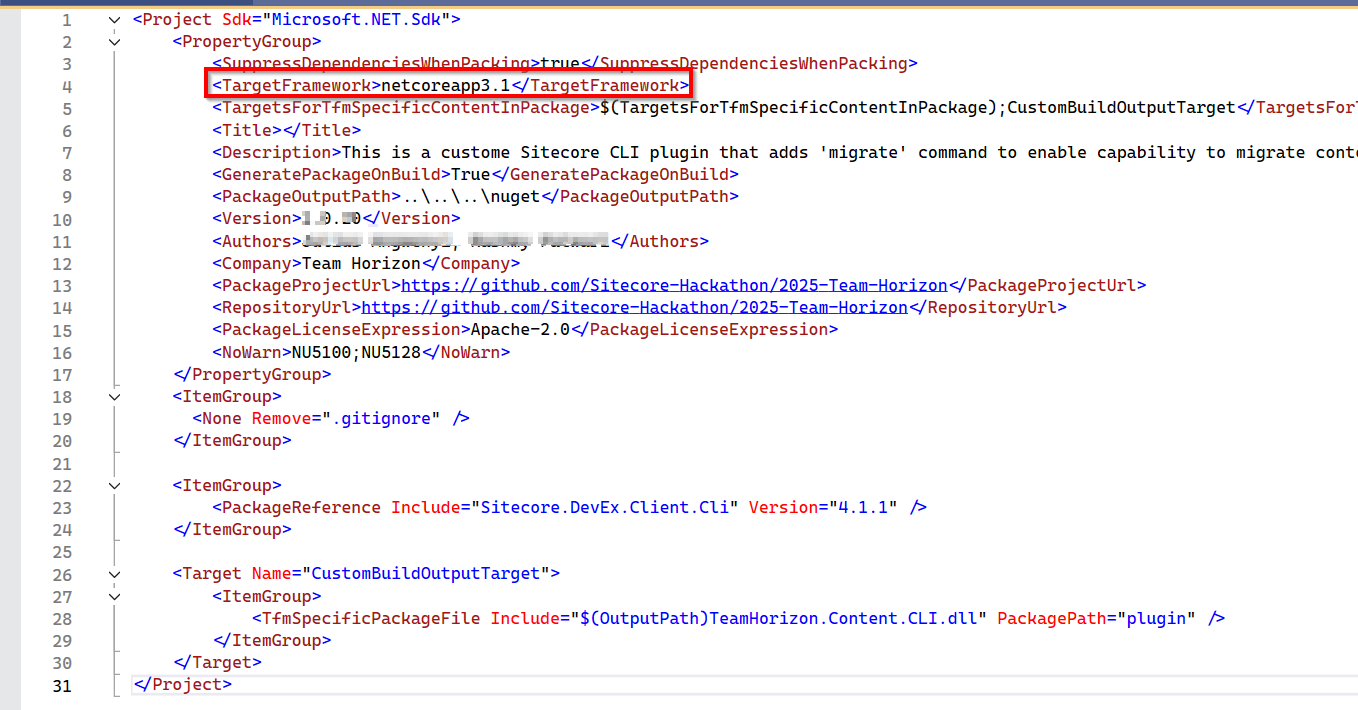
Verifying my project file (.csproj)
To ensure no errors with your CLI Plugin, you can verify your project file looks similar to the one shown below. Especially with Target Framework of netcoreapp3.1
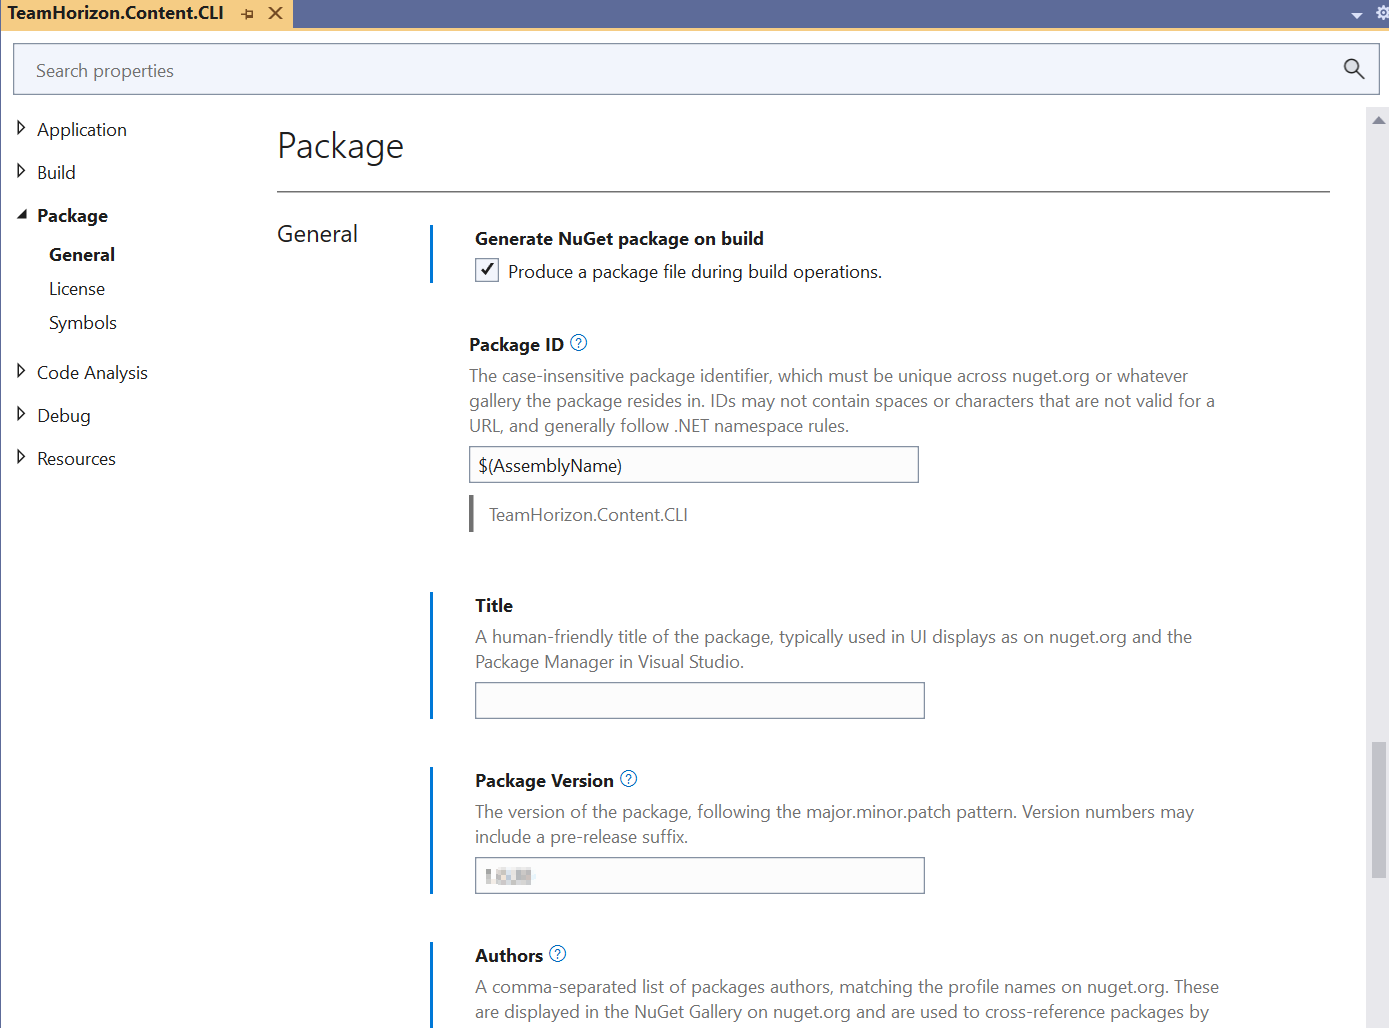
We are going to deploy this project as a NuGet package. So follow the steps below to configure package properties
Select your project in Solution Explorer, and then select Project > <project name> Properties, where <project name> is the name of your project.
Expand the Package node, and then select General.
Give your package a unique Package ID and fill out any other desired properties
Below is my sample settings:
Tips & tricks 4 -Publishing your CLI Plugin to NuGet public feed
Now that we understand the high level anatomy of a CLI plugin and how to create its C#/.NET project, I will also share some tips on how to publish it to a public repository or feed. This is to make it available for the community to use the plugin.
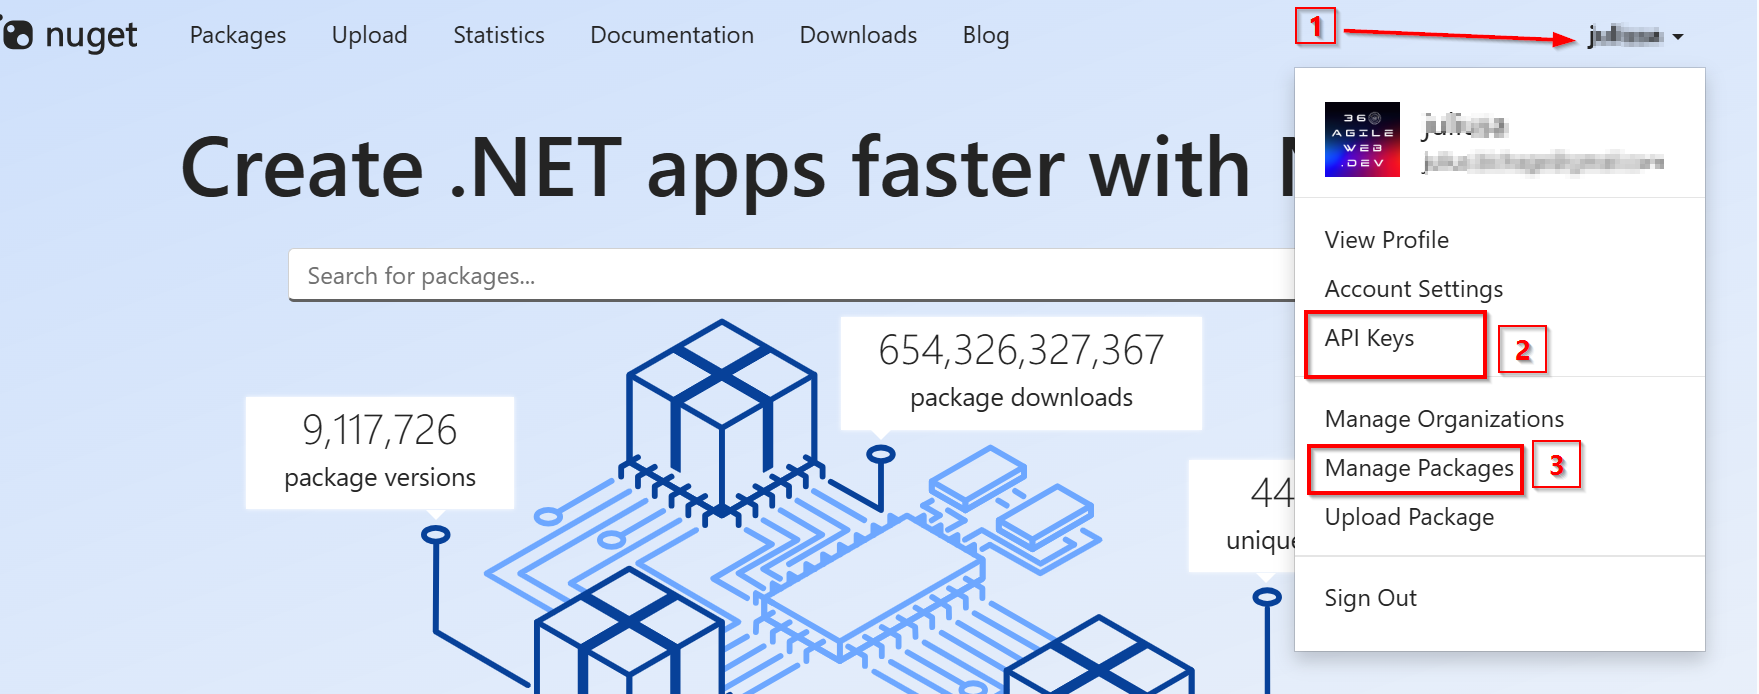
Head over to Nuget.org and register for an account. You will need a Microsoft account to sign in or sign up. On successful login, select your user name at upper right, and then select API Keys as shown in step 1 and step 2 in screenshot below
Follow these steps once on the API Keys page
Select Create, and provide a name for your key.
Under Select Scopes, select Push.
Under Select Packages > Glob Pattern, enter *.
Select Create.
Select Copy to copy the new key.
Important to note:
Always keep your API key a secret. The API key is like a password that allows anyone to manage packages on your behalf. Delete or regenerate your API key if it’s accidentally revealed.
Save your key in a secure location, because you can’t copy the key again later. If you return to the API key page, you need to regenerate the key to copy it. You can also remove the API key if you no longer want to push packages.
With our API-Key at hand, use the following command to publish your CLI Plugin. Notice we need to specify the name of our .nupkg file as well as API-Key when using the dotnet nuget push command.
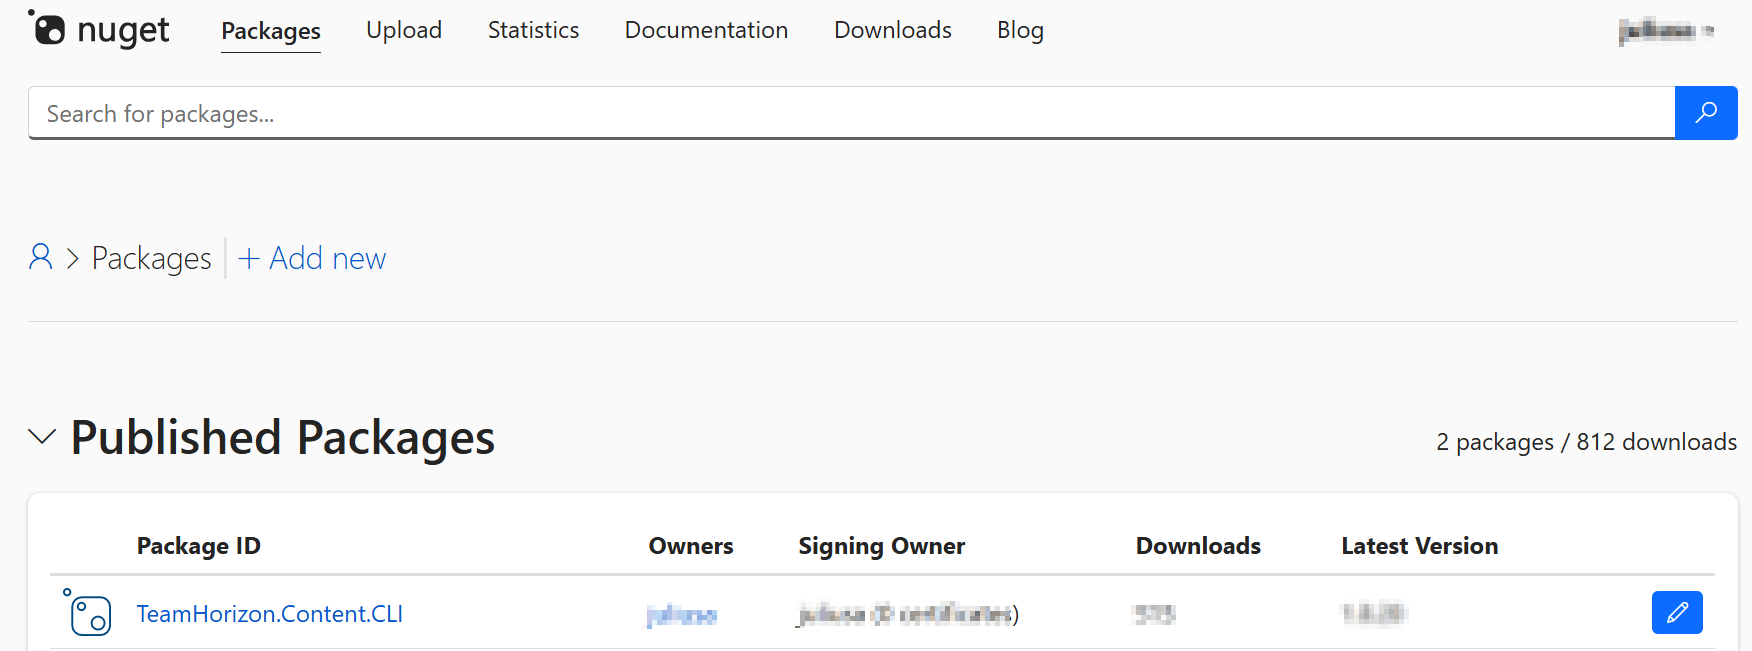
When successful, you can view the list of your published packages using the ‘Manage Packages’ in step 3 on the previous screenshot. You should see the package listed such as shown below
In this blog post, we have looked at tips and tricks on extending CLI for your XM Cloud instance. We looked at the CLI plugin architecture including how to create a sample .NET project for it. We also looked at how to package the CLI plugin and deploy to Nuget packages repository. I hope you find this useful and can adopt it for your own productivity use cases. Look out for a follow up blog post, where I will take a deep dive at some of the code I have used for my plugin. I intent to open up the black-box.
Stay tuned and please give us any feedback or comments.
If you are already leveraging enterprise observability in your enterprise, this blog post is about how you can plug your Content Hub data to gain actionable insights. If you are not, then this blog post can help you start your journey towards embracing enterprise observability, plug your Content Hub data to gain insights.
In today’s complex IT landscape, enterprise observability goes beyond traditional monitoring by aggregating data from diverse sources to provide deep, actionable insights. Your Sitecore Content Hub platform is an upstream data source that you can plug in. You can push your Content Hub data such Assets, Projects, raw events and reporting logs—turning raw data into meaningful, proactive decision-making insights about your content supply chain. You can understand, for example, how your assets are being utilized, download footprints among more actionable insights.
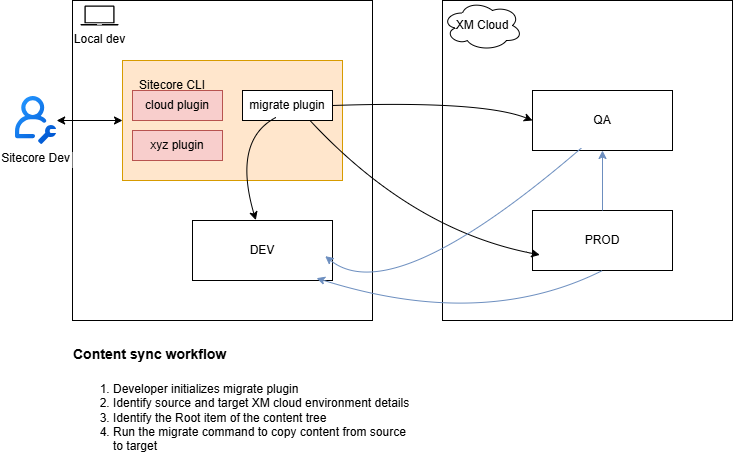
Reference Architecture
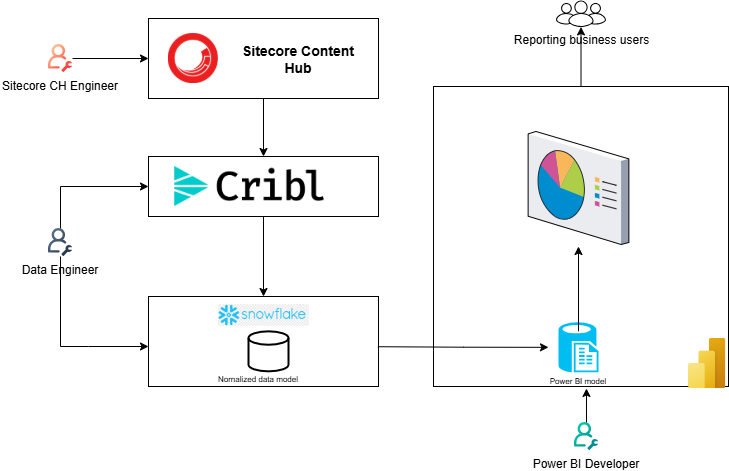
I have shared a reference architecture at the top of this blog, which you can adopt for your use cases. Broadly you will need the following architectural components so you can push data from Content Hub into your observability platform and its visualization.
1. ETL Tooling
You will need tooling that will connect to your Content Hub instance to extract the data. Typically this tooling will provide capabilities to allow you to also transform and load the data to your target data lake. This process is known as Extract-Transform-and-Load(ETL).
Tooling such as Cribl and others are perfect for this. These tools and techniques perform an ETL (extraction, transformation, and loading) type functions on the raw data and shape it into a format suitable for analysis.
I will recommend working with Data Engineers with specialist skills in ETL to help with this process.
2. Data lake tooling
A data lake is commonly referred to as a data warehouse architecture, provides the capability to read and write data in a cloud object storage. This is the central repository where data from your various sources gets aggregated at scale.
Data will be extracted from Content Hub, transformed and loaded into a Snowflake database for example. This is where it all comes together. The data lake tooling will allow you to create a logical data model to help with analysis of your data. I will recommend working with Data Engineers with specialist skills in ETL and Data lake to help with this process.
3. Reporting UX tooling
You will need to turn your data into visuals. This architecture component is a user-friendly report-creation tool such as Microsoft Power BI
How to extract data from Content Hub
Content Hub provides a REST API for querying data held within your instance. All objects in Sitecore Content Hub are modeled as resources that represent the state of objects at the time of a request. Standard HTTP requests and responses are used to query and manipulate object states and standard HTTP headers are used to augment the request and response
All data is sent and received as JSON.
Authenticating and securing REST APIs
Access to the REST API is restricted to authenticated users. You can authenticate requests using these three options:
An ASP.NET Forms Authentication ticket set via a cookie.
A custom header X-Auth-Token containing the token retrieved by using the Authenticate resource.
Querying API provides the most flexibility in terms of filtering data for specific entities using specific indexed metadata fields. This is a GET request type, and you access is such as shown below
GET http://<HOSTNAME>/api/entities/query/
For example, you can query all M.Asset entities by using the Definition.Name property as shown below
GET http://<hostname>/api/entities/query?query=Definition.Name=='M.Asset'
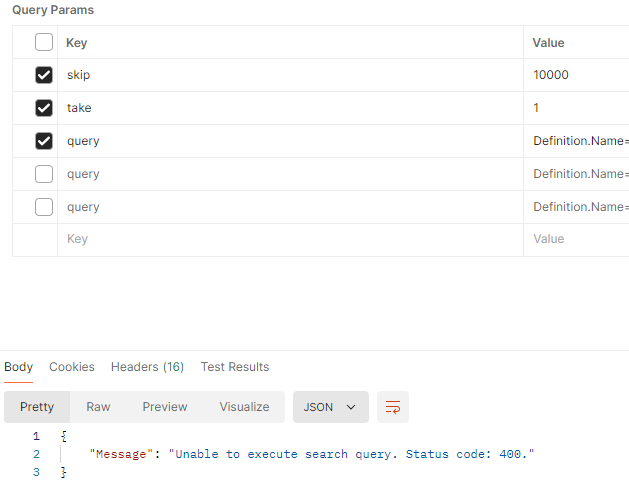
Due to deep paging restrictions, you can only retrieve up to 10,000 results. Any attempt to get more results results in an error message “Unable to execute search query. Status code:400” as shown below
Scroll API can be used to retrieve a large number of results (without the limitation seen in Querying API). Scroll only supports the GET method. The only difference with the Querying API is the paging arguments. This is also a GET request type, as shown below
GET http://<HOSTNAME>/api/entities/scroll/
This is the API I will recommend to be leveraged in scenarios when extracting all results from a single query from Content Hub into your Observability platform.
If you have concerns around data volumes and performance concerns for your Content Hub instance, reach out to your Sitecore Customer Technical Support for further guidance
Next steps
In this blog post, I have at a reference architecture that you can adopt to plug your Content Hub data into your Observability platform. I explained the various components of the architecture including some of the tooling you can leverage for your ETL and data warehousing and visualizations. I finished with strategies you can leverage to extract Content Hub data leveraging the Querying and Scroll APIs.
I hope my approach helps you address similar scenarios in your use-cases. Please let me know if you have any comments above and would like me to provide further or additional details.
Julius Angwenyi Recognized as a Sitecore Most Valuable Professional
Honored for commitment to sharing expertise with the global Sitecore community
London, United Kingdom, January 30, 2025 – 360Agileweb.dev, today announced that Julius has been named a Sitecore Most Valuable Professional (MVP) Technology by Sitecore®, a global leader in digital experience software. Julius was one of only 241 MVPs worldwide selected this year.
The program recognizes professionals who actively share their knowledge and expertise with online and offline Sitecore communities to help them use Sitecore solutions and AI to create and deliver innovative digital experience solutions that drive business results.
MVPs represent and elite group in the Sitecore community of 16,000 certified developers and over 30,000 active community participants. MVPs are recognized for the quality, quantity, and impact of the contributions they made over the past year. A panel of Sitecore developers and executives honor the MVPs for the quality, quantity and impact of the contributions they made in 2024.
“I am indeed honored to receive the MVP award and for the 4th time this year 2025. I would like to take this opportunity to congratulate my fellow MVPs on this achievement. I will also like to extend my sincere thanks to Sitecore community for recognizing my expertise and contributions. Cheers for the good work!”
“For nearly two decades, Sitecore has been honored to recognize the work of the experts who have distinguished themselves through continuous innovation and commitment to helping others build exceptional digital experiences,” said Roger Connolly, Chief Product Officer at Sitecore. “The MVPs are integral to the global Sitecore community and are looked to for their proven ability to build world-class solutions and dedication to sharing their knowledge.”
Content Hub permissions and security model is underpinned by the user group policies model, whereby Content Hub users can perform actions based on their access rights. The official docs provides clear definition of the anatomy and architecture of the user group policies. For example, a user group policy consists of one or more rules, with each rule determining the conditions under which group members have permissions to do something.
While all the technical details of group policies are nicely abstracted away from our business users, there are use cases when you will need to in fact grapple with technical details of the policies. Such as when you can’t delete your taxonomies or entities, simply because you have used them in one or more rules in your policies.
In this blog post, I will outline this pain point and recommend a solution.
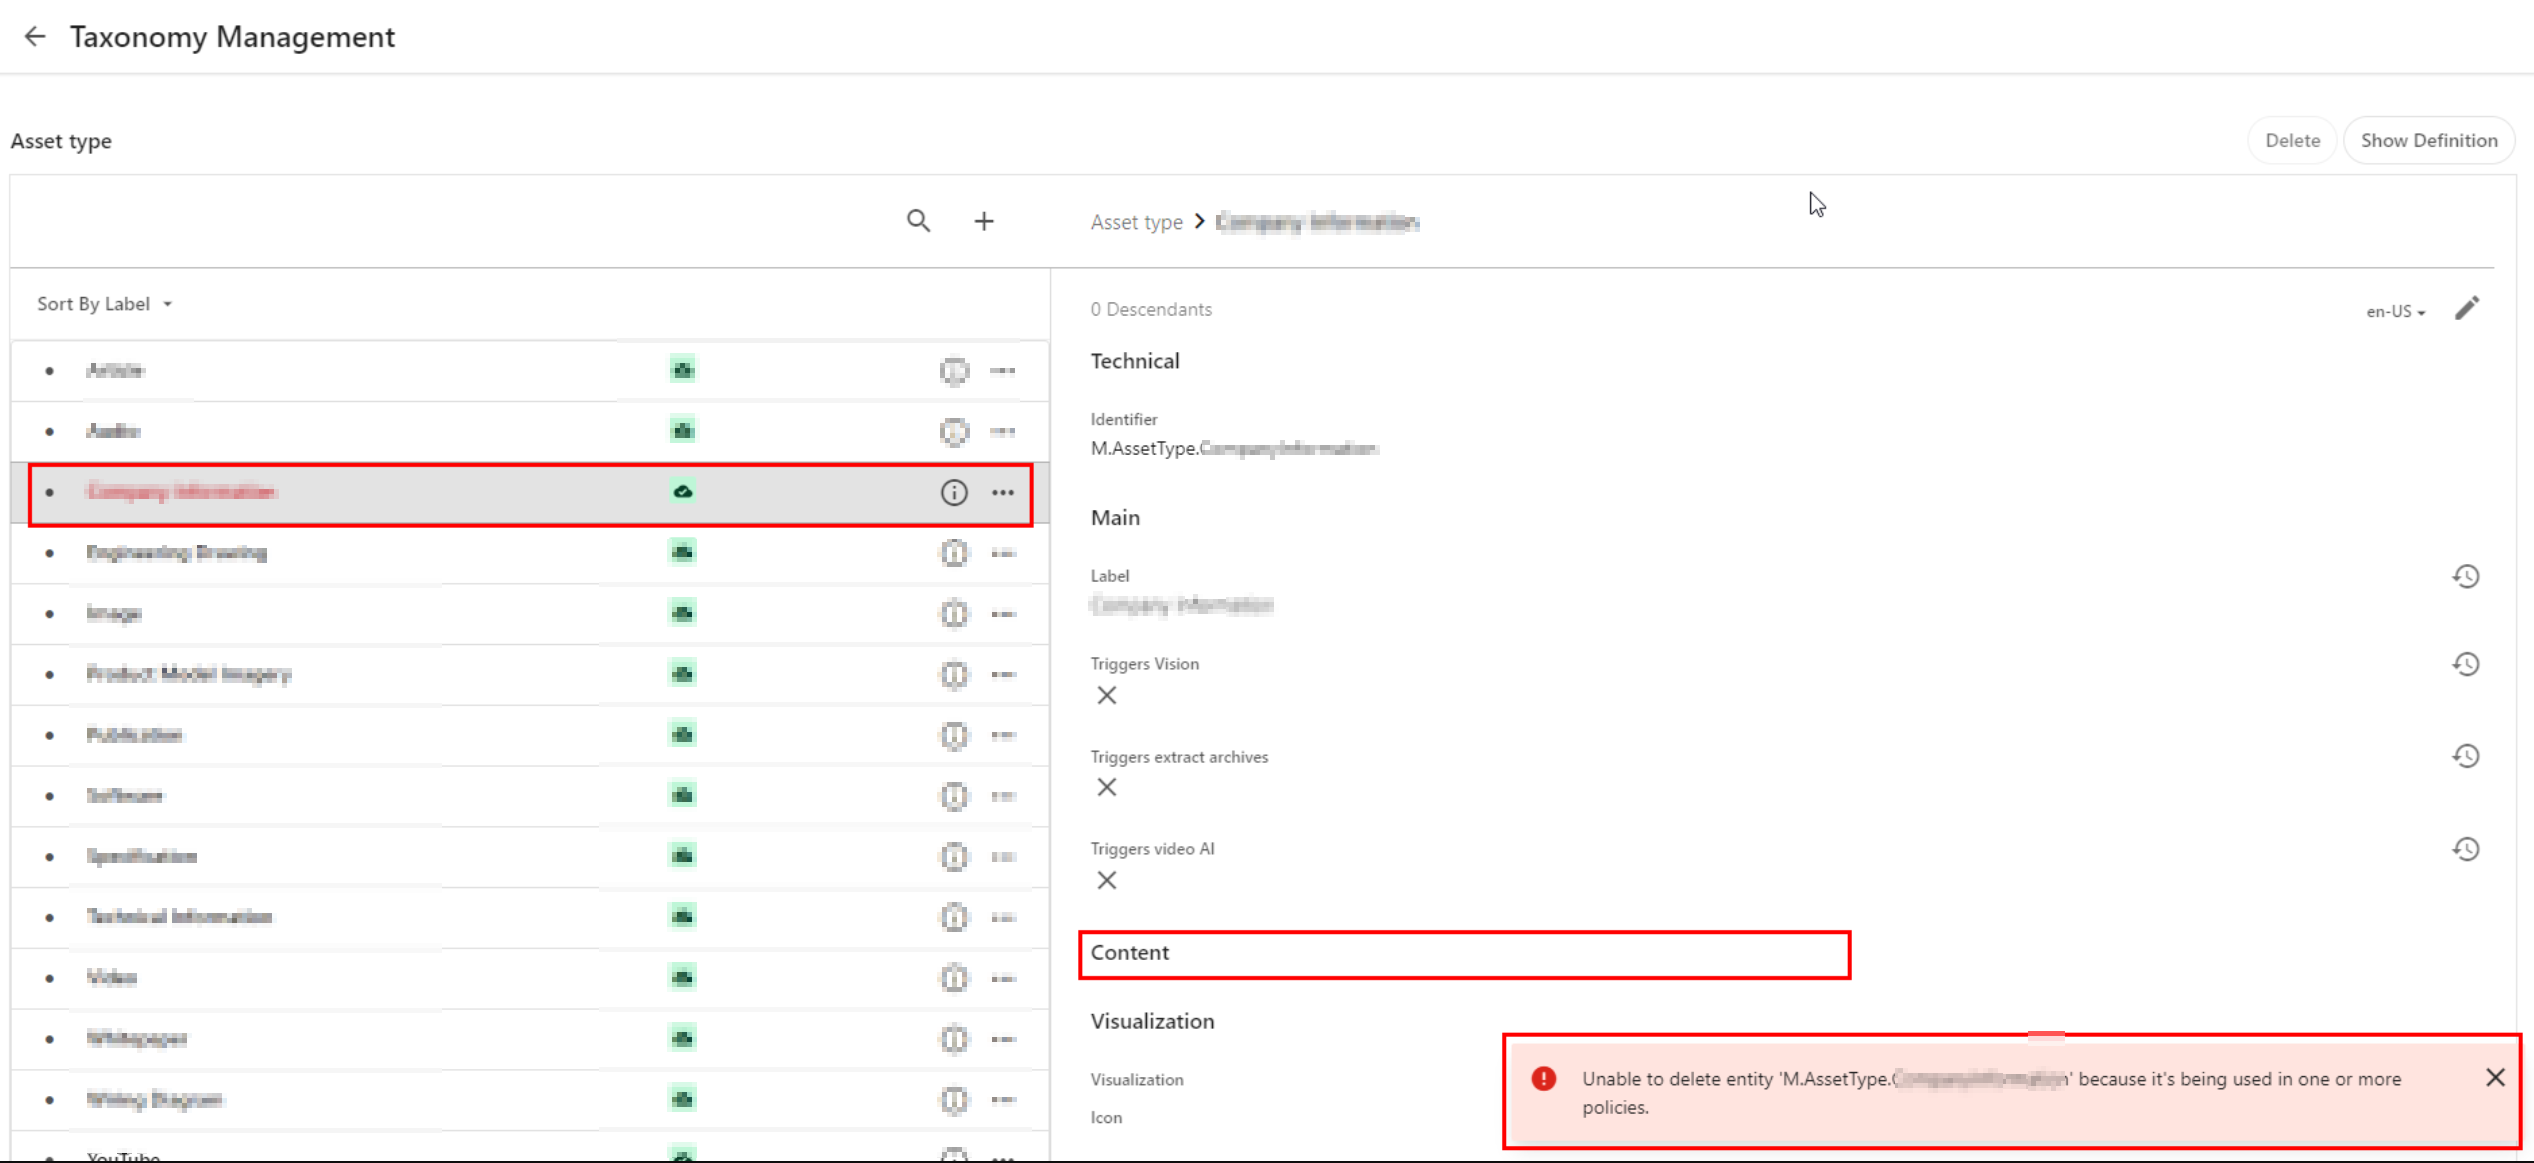
Unable to delete entity ‘…’ because it’s being used
Yes that is right. If you have used a taxonomy value or some other entity as part of your user group policy definition – then it makes sense you can not delete it. That is expected logic, we have a clear dependency within the system. In which case, we need to break or remove this dependency first.
Below is a sample screenshot of this error message. In this example, the highlighted taxonomy value can not be deleted yet, until the dependency has been removed.
User group policy serialization as JSON
If you haven’t set up DevOps as part of your Content Hub development workflow, then we need to cover some basics around user group policies serialization. You can leverage Content Hub Import/Export feature to export all polices into a ZIP package, as detailed below:
Using the Manage page, navigate to Import/Export.
On the Import/Export page, in the Export section, select only the Policies check box and click Export. This will generate a ZIP package with all policies.
Click View downloads at the right bottom of the screen.
On the Downloads page, click the Download Order icon when the status of the package is ready for download. This will download the ZIP package with all policies.
Unzip the downloaded package. This will have JSON files of all policies
Remember a group policy consists of one or more rules, with each rule having one or more conditions under which group members have permissions to do something.
I have highlighted one of the conditions within the first rule in this user group policy. This condition shows the dependency on one of the taxonomies, M.Final.LifeCycle.Status
On line 20, the reference (“href”) indicates which taxonomy child value is being used, which is M.Final.LifeCycle.Status.Approved
How to safely delete or remove taxonomy references from user group policy JSON file
The serialized user group policy JSON file is a plain text file. So any a text editor of choice can be used to edit this file, and delete all references to the taxonomy with a dependency. And then save the changes in updated JSON file. That is it.
Due care has to be taken to ensure that the rest of the JSON file is not modified.
Once all references are deleted and verified, you can create a new ZIP package with the changed files, to be imported back into Content Hub.
It is recommended your certified Content Hub developers should make these changes (and validate them, say, using a text file comparison tool such as Beyond Compare). For example, you need to compare the original ZIP package with the newly created one to make sure that their structure is the same.
The current pain point becomes a bread-and-butter problem to solve assuming you already embraced Content Hub DevOps.
With some business logic implemented as part of your CI/CD pipelines, all references to taxonomy values or entities can be safely and reliably deleted from user group polices. This can be done with automation scripts and other tooling that comes with DevOps, truly bringing you ROI in your DevOps infrastructure.
Sample/suggested CI/CD pseudo code
Define a CI/CD “user group policies clean-up” step to be invoked whenever we are deleting “entities” from your Content Hub instance.
Using a Regex, scan and systematically delete such entities from your user group policies JSON files (depending on how you’ve setup your DevOps, all policies should be serialized to policies folder)
Ensure your “user group policies clean-up” step runs ahead of any deletion of the entities (or taxonomy values). Remember you can’t delete an entity if it is being referenced in your user group policy.
Work with your DevOps engineers to validate the steps and test any changes in non-production environment(s), before applying to production environment.
In this blog post, I have discussed a common pain point when you are Unable to delete entity because it’s being used in one or more policies. I explained why this is the case, and looked into technical details of user group policy architecture. I provided a solution, which can be automated with a robust DevOps culture adoption for Content Hub.
I hope my approach helps you address similar scenarios in your use-cases. Please let me know if you have any comments above and would like me to provide further or additional details.
This year I mostly created content within Content Hub, Sitecore Experience Edge and Sitecore Personalize space. This is where I felt there were gaps based on industrial client work I have done this year. I believe I have produced content that meets expectations in terms of quality, quantity, and visibility and more importantly, adds value to our community. This has been through blog posts, code sharing via GitHub, YouTube content, Product Feedback via Gartner Peer Reviews among other social channels:
I have continued online and offline conversations and driven Sitecore community engagement throughout 2024 in order to amplify the content I have created.
I regularly provide answers to questions from Sitecore community as well on our engagement channels
Next steps
For 2025, I look forward keeping up producing more valuable content in terms of quality, quantity, and visibility to our Sitecore community. I will be putting myself forward for public speaking events throughout the calendar year. I intent to continue identifying any gaps and filling them, providing product feedback, improvements, and references
Stay tuned and best of luck with those submitting the Sitecore MVP 2025 applications.
Content Hub’s Marketing Resource Management (MRM) module provides a robust project management tool within the context of creation and development digital assets as part of the wider DAM solution. For example, you can capture project summaries and briefs, model your assets creative development process using stages, tasks or even jobs. Basically, you can use this tool to map to your ways of working, sharing responsibilities as you will do in a typical project. Only that MRM provides three default roles of Managers, Contributors and Readers which does what they say on the tin. But does this meet your needs?
In this blog post, I will share tips and tricks on how you can go a step further and enhance the default project roles so that you can have a more fine-grained control of permissions to meet the needs of your team members in your projects.
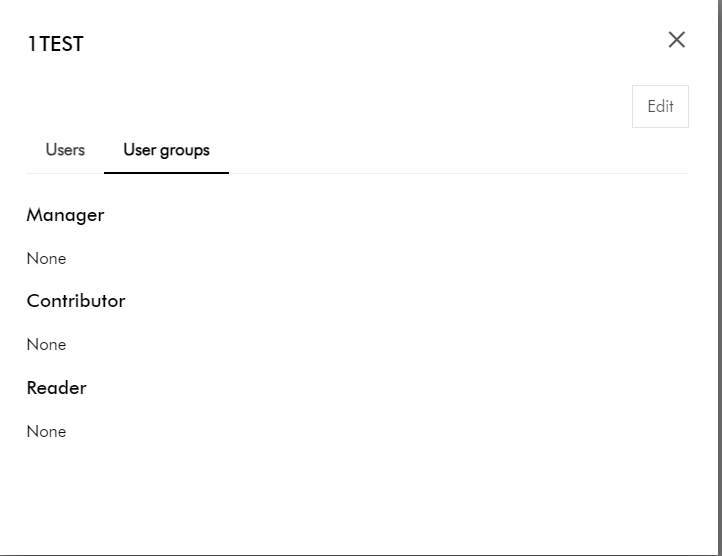
What you get with default Managers, Contributors and Readers project roles
In brief, project roles work like user groups. In a similar way that user group membership determines what you can access and the actions you can take so do project roles. The role you are assigned determines what you can access and the actions you can take for specific project.
Managers have overall visibility of the project, can create projects, edit project information, and manage all defined stages, tasks or jobs within the project
Contributors can make contributions to the project, such as add assets and fragments to projects.
Readers have read only access to assets and fragments in the project
Clearly these three broad definitions above will not always map exactly to your business use cases. For example, you may need your Readers to do more, such as download or preview some assets.
Stay tuned for details on how to get a detailed view of granular permissions available for each of these roles and tips you can use to enhance or extend them.
Can I modify or extend the default permissions for the project roles?
The good news is that these default project roles are not system-owned. These are simply role templates that you can extend yourself so that the permissions closely meet your business needs.
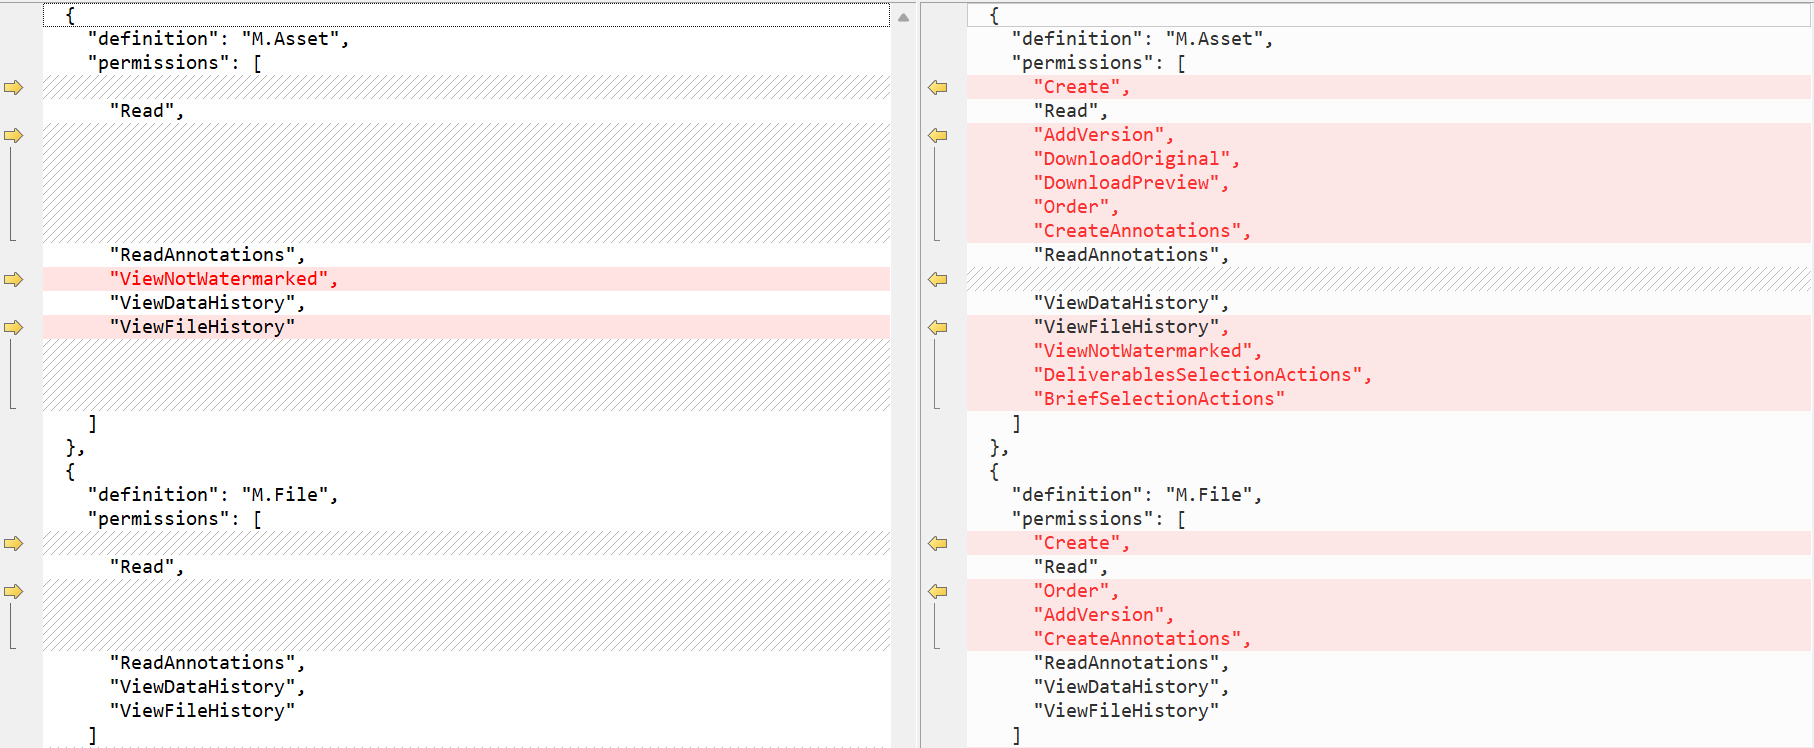
Below is a sample comparison of the default Readers (left-hand-side) and Contributors (right-hand-side)
For example, a Contributor role allows all permissions to M.Asset within Readers role plus the following additional permissions:
Create
AddVersion
DownloadOriginal
DownloadPreview
Order
CreateAnnotations, among others
Likewise, there are different permissions for M.File for both roles, as shown above.
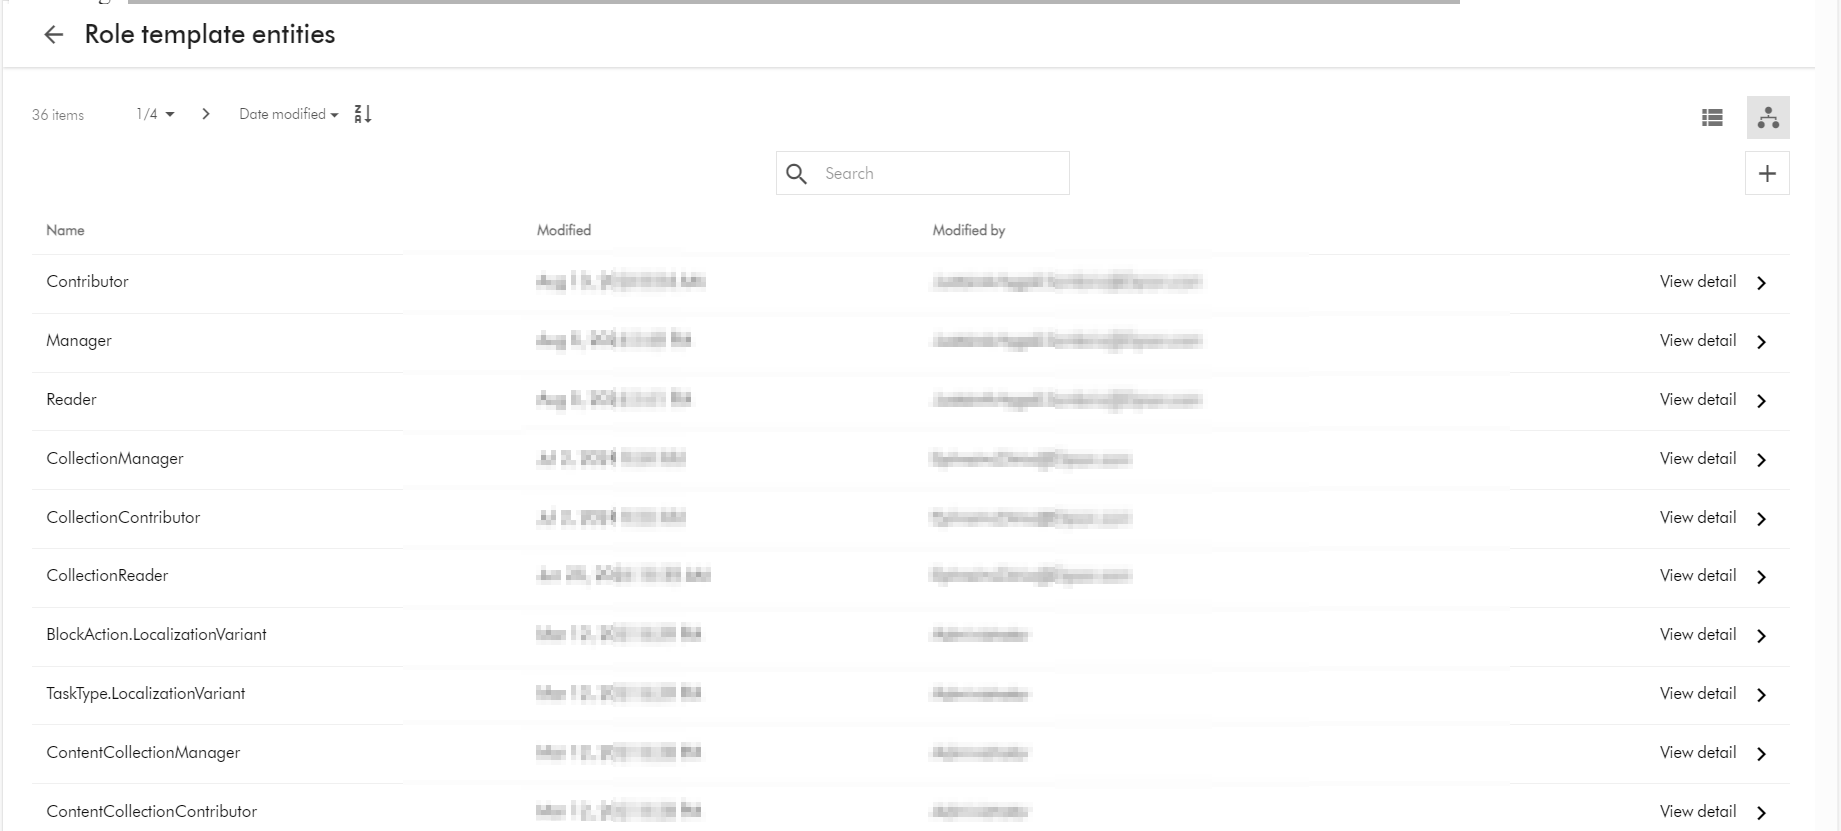
You can access the full list of all role templates in your Content Hub instance by accessing the URL below (assuming you have super user access). BASE_URL is your Content Hub instance base URL.
BASE_URL/en-us/admin/entitymgmt/entity/1471
also
BASE_URL/en-us//admin/entitymgmt/entities/50
And below is a sample list:
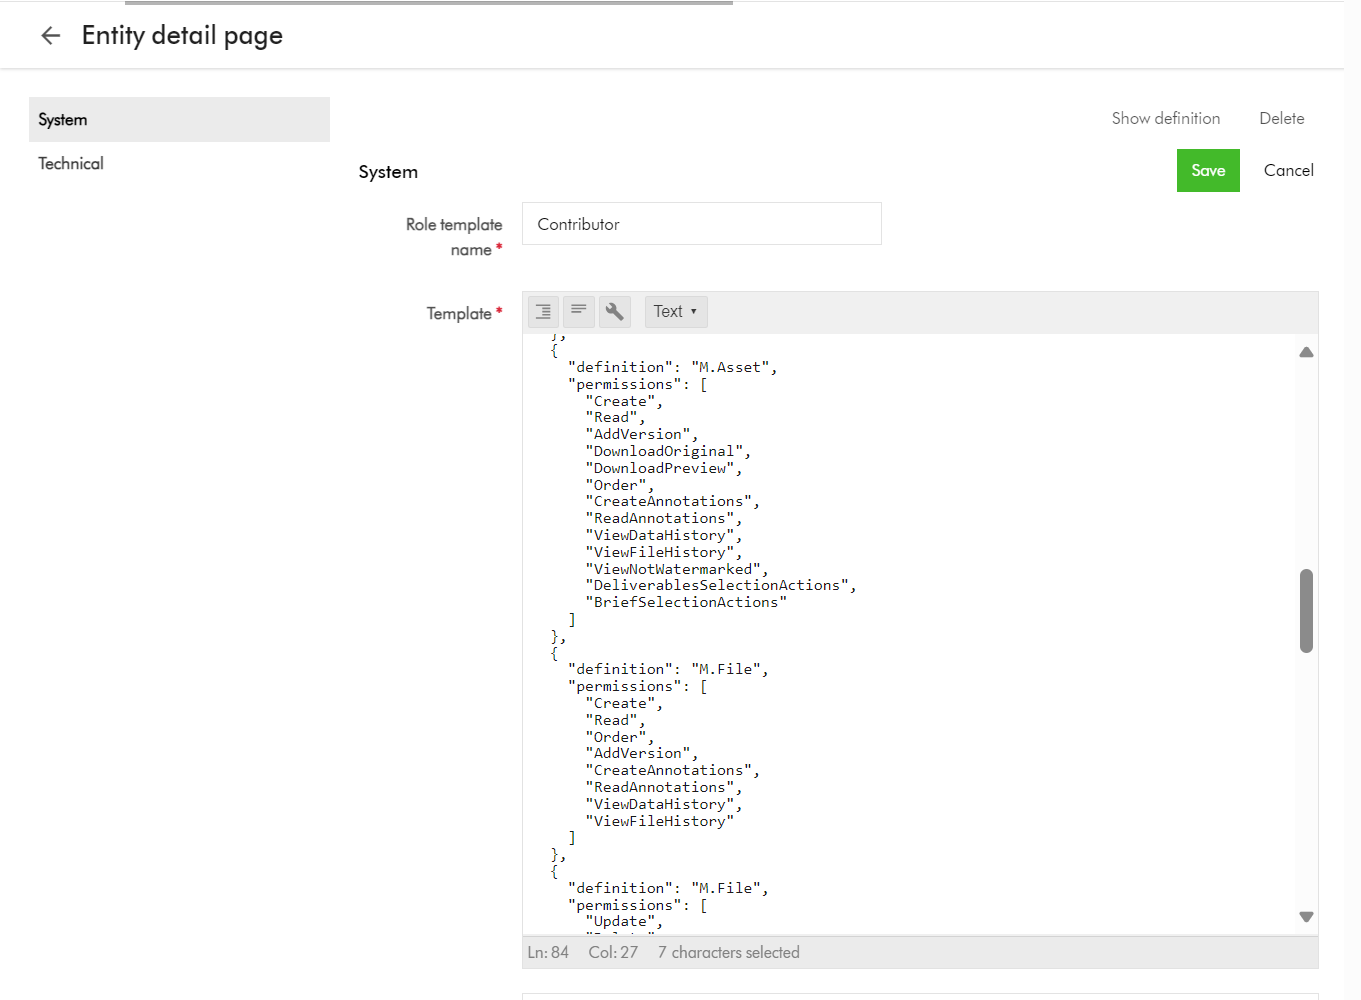
And below is the Details page for the Contributor role template, which you get by clicking on View detail link above.
Tip 2: Viewing and editing role template using entity management page
Warning: You have to take caution when making changes to the role templates. Ensure you are only making changes after consulting with business owners and assessed and agreed on required permission changes to be made.
Follow Tip 1 above to find and select a role template, say Contributor
Click on the Pencil or edit button shown below
This will open the edit page, shown below
You can copy the text and keep note of it before making any changes. You can repeat this step for all the default project role templates, so you can compare what is different between them, to further help you assess what you need to fine tune for your use cases.
Repeat step for all your role templates that need the updates.
Tip 3: Exporting role templates into Excel
Role templates are entities in your Content Hub instance, as such you can export them into Excel.
A typical use case is to export any changes made in a lower environment (say DEV) and apply them into another environment (say QA), by leveraging Excel import into target environment.
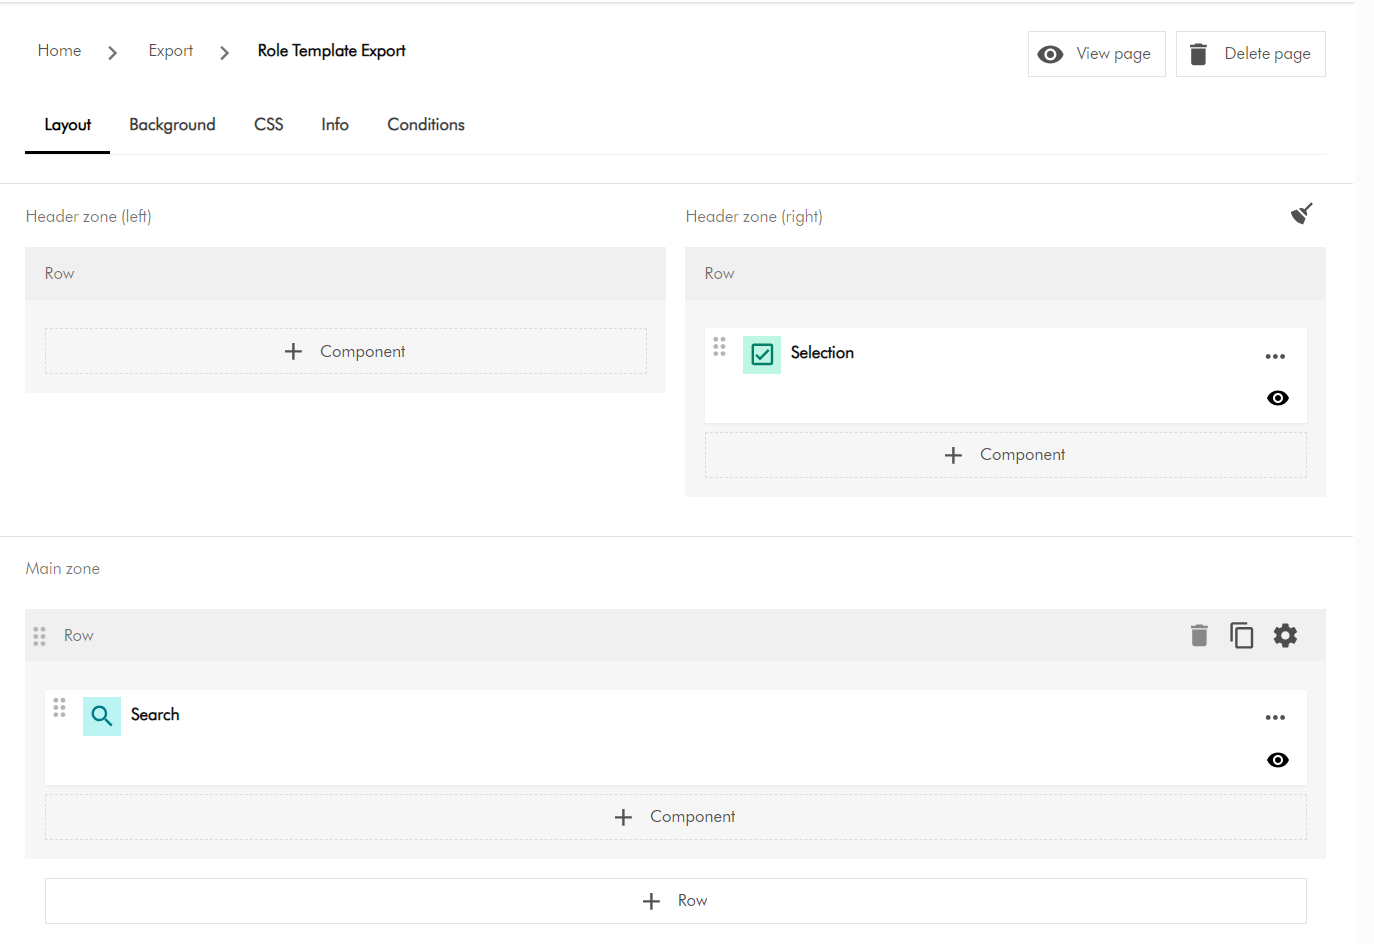
You need to create a new subpage to used for the export purposes. From Manage -> Pages. Then identify which section you will be creating the new page. Then select “Add subpage” option. Refer to detailed steps available on the docs for further guidance.
On your newly created subpage, add a Search component and a Selection component as shown below
Configure the Search component so we can search and display Role templates. You can use the Filters tab as shown below, and choose the M.RoleTemplate definition. You can refer to detailed steps available on the docs for further guidance.
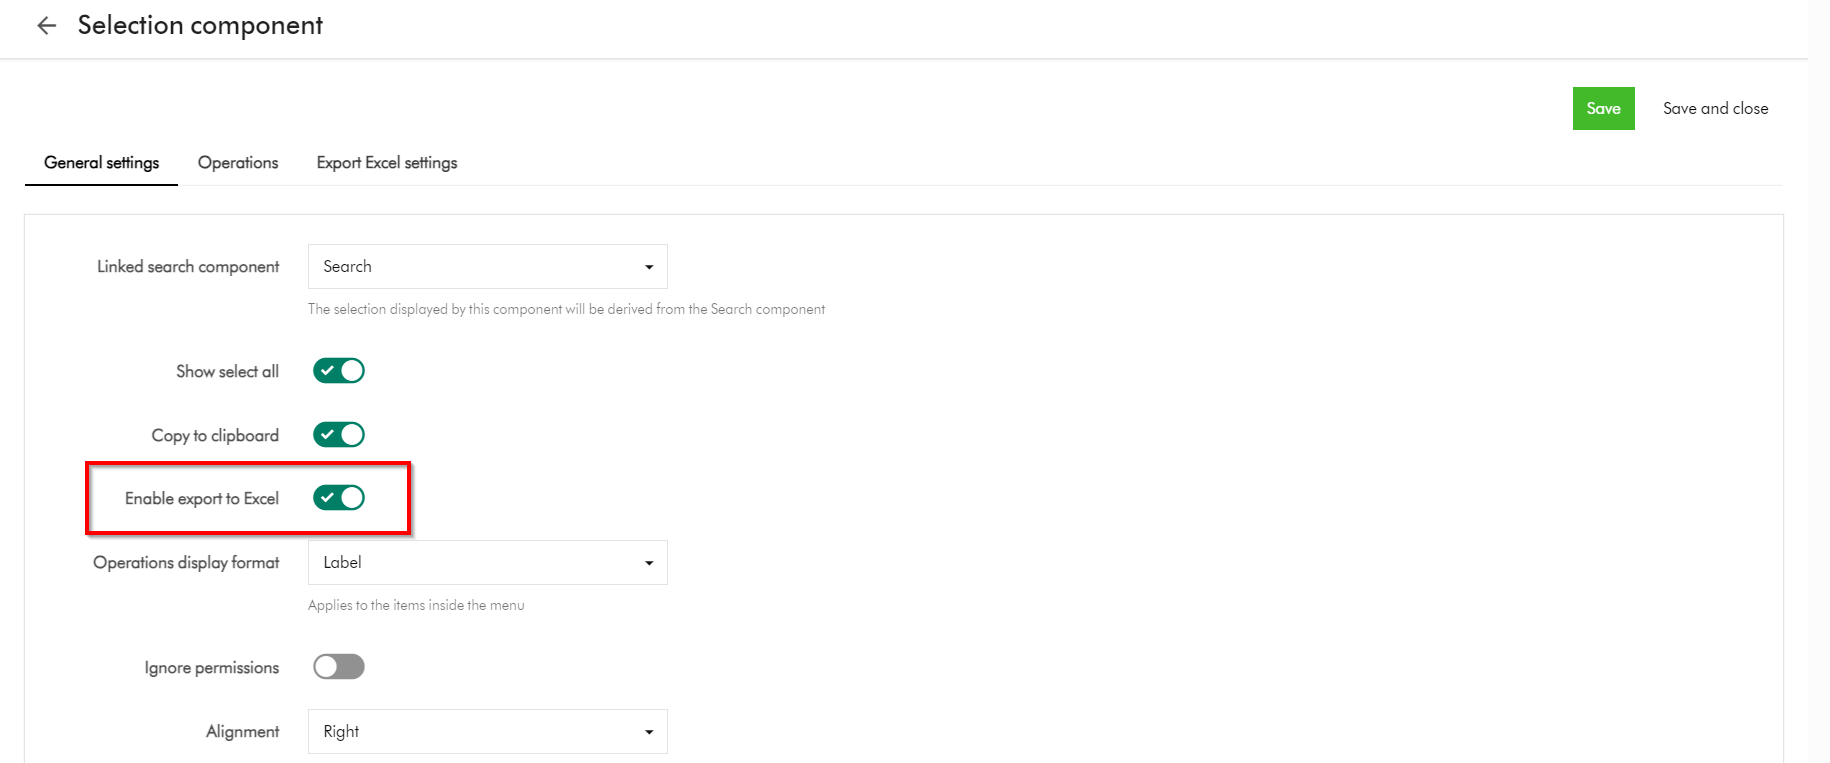
Then Enable export to Excel option on the Selection component as shown below
This is it, your subpage is ready.
On you subpage, select all the role templates that you need to export, and select Export to excel
Next steps
In this blog post, we have looked at Content Hub’s Marketing Resource Management (MRM) module. We looked at the default project roles of Managers, Contributors and Readers and what they offer. I shared some tips and tricks on how you can extend the permissions for these roles to closely meet the needs of your project management use cases. I hope you find this useful for your similar use cases.
Stay tuned and please give us any feedback or comments.