
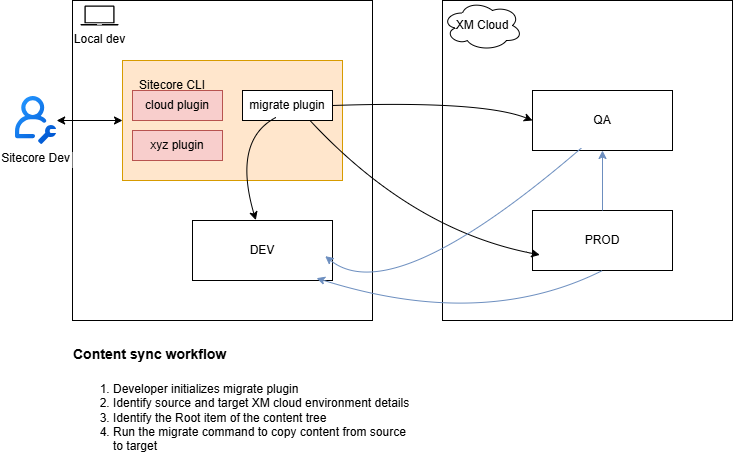
Context and background
I presume most of us are familiar with Sitecore XM Cloud plugin that provides the cloud command that help you manage XM Cloud projects, environments and deployments from the Command Line Interface (CLI). CLI plugins provide us with powerful tools that enable us to automate management of Sitecore XM Cloud workloads by leveraging existing DevOps processes and tooling. In this blog post, I will share some of my tips and tricks on how you can quickly stand-up on of these plugins to automate, say, migration of content between two Sitecore XM Cloud instances.
Anatomy of a CLI plugin – Sitecore XM Cloud plugin example
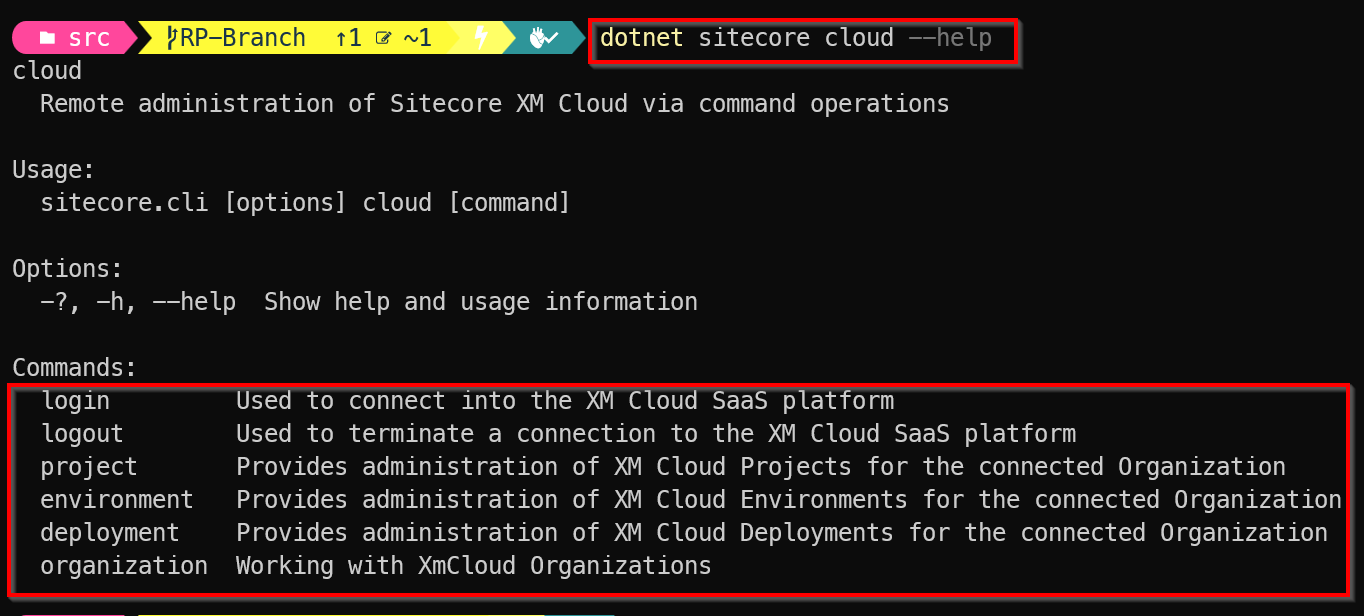
A CLI plugin typically consists of a command which has one or more subcommands. Using an example of Sitecore XM Cloud plugin, you can check the cloud command is available as shown below:
I have assumed that you have already installed the required pre-requisites on your local developer environment. If this is not the case, help is available on how to do this setup, from the official Sitecore XM Cloud docs.
Subcommands
As you can see from above screenshot, we have the cloud subcommands for login, logout, project, environment, deployment and organization
I will not be focusing on what these mean for now. You can read more about them in the official docs pages. The point I am simply illustrating the anatomy of the CLI plugin, demonstrating what the command is and subcommands are. We will apply this to our own custom plugin next.
Tips & tricks 1 – Creating your own custom CLI Plugin – command and subcommands
I am going to share tips and tricks of creating a custom plugin to extend the base sitecore plugin with an new migrate command, which has only one subcommand to start the migration.
A typical use-case is imagine using this command to start content migration from Sitecore XM Cloud environment A into environment B. After we have created the plugin, we can run it with the dotnet sitecore --help command to display the plugin info as shown below.

Notice the migrate command is now listed alongside the out of the box subcommands that come with sitecore command. Very cool, we have now extended the sitecore command.
And we can now explore the available subcommands for our custom plugin using dotnet sitecore migrate --help command as shown below.

Tips & tricks 2 – Creating a Visual Studio Project for CLI Plugin
To extend the base Sitecore CLI plugin, we need to create a new class library project.
- In Visual Studio, select File > New > Project.
- In the Create a new project window, select C#, Windows, and Library in the dropdown lists.
- In the resulting list of project templates, select Class Library (with the description, A project for creating a class library that targets .NET or .NET Standard), and then select Next.
- In the Configure your new project window, enter a name of your choice for the Project name, and then select Next.
- In the Additional information window, select an appropriate Framework, and then select Create.
It is recommended we use the best practices such as have a clear project names to help clearly identify them and give a hint what the CLI plugin is all about. Below is a sample project skeleton, with all necessary classes needed for my CLI Plugin.
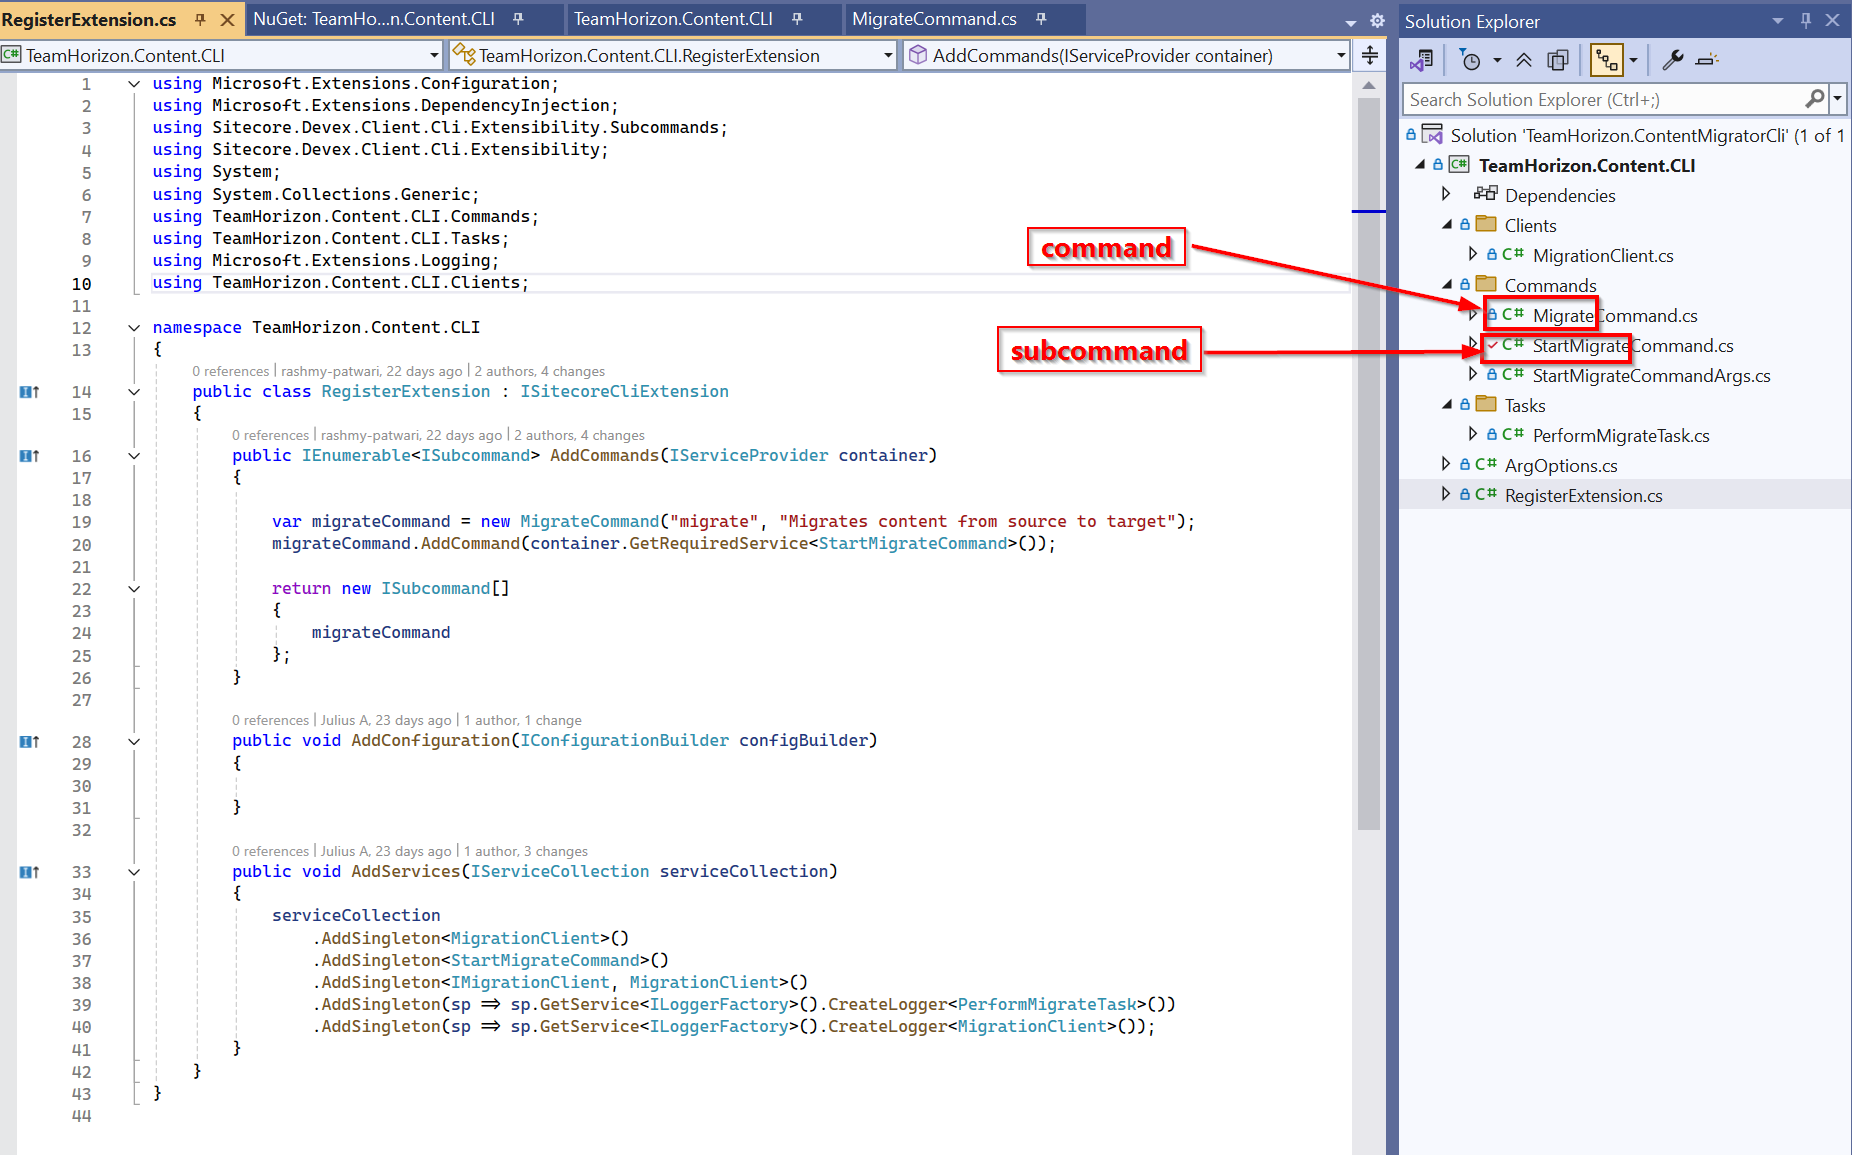
You will notice this project has the following structure. I will explain the main code classes below
- MigrateCommand.cs – this is the class code file that gives my plugin the
migratecommand - StartMigrateCommand.cs – this is the class code file that adds my
startsubcommand tomigratecommand - StartMigrateCommandArgs.cs – this is the code file that defines any command line arguments needed for the migration process. Below are the arguments supported
source-url: The URL of the source XM Cloud environmentdestination-url: The URL of the target XM Cloud environmentroot-item: The GUID of root item you want to migrateinclude-children: Whether to include child items (default is true)
- PerformMigrateTask.cs – this is the code file that defines the tasks being accomplished by the subcommands
- RegisterExtension.cs – This is the main entry point code file, and implements the ISitecoreCliExtension
The rest of the code files are used for the business logic for this plugin. In my case, I have encapsulated my business logic for content migration from Sitecore XM Cloud environment A into environment B within the MigrationClient.cs code file. Consider this a black-box for now.
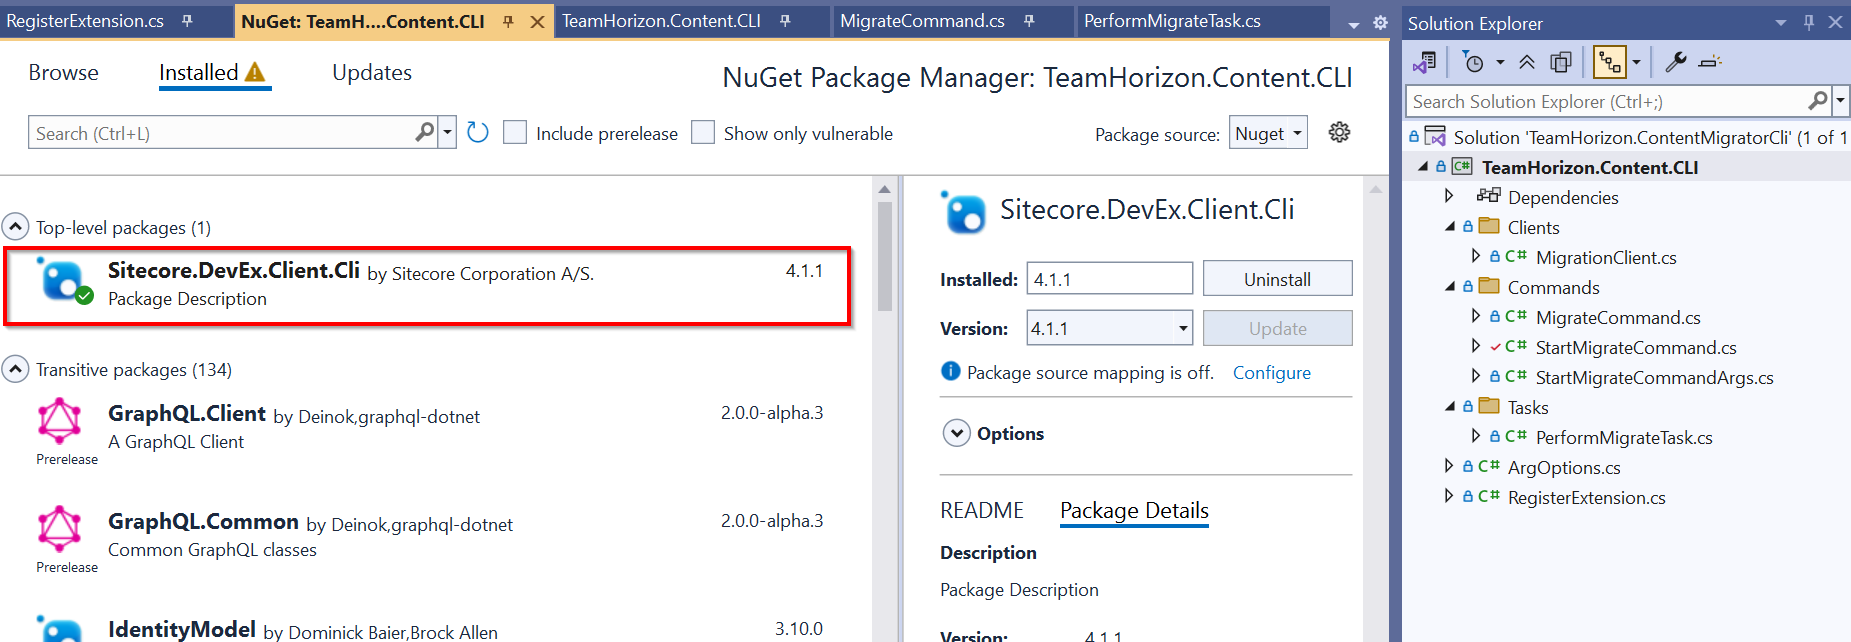
Which dependencies are needed for this project
We need to reference the Sitecore.DevEx.Client.Cli NuGet package from Sitecore, as shown below.
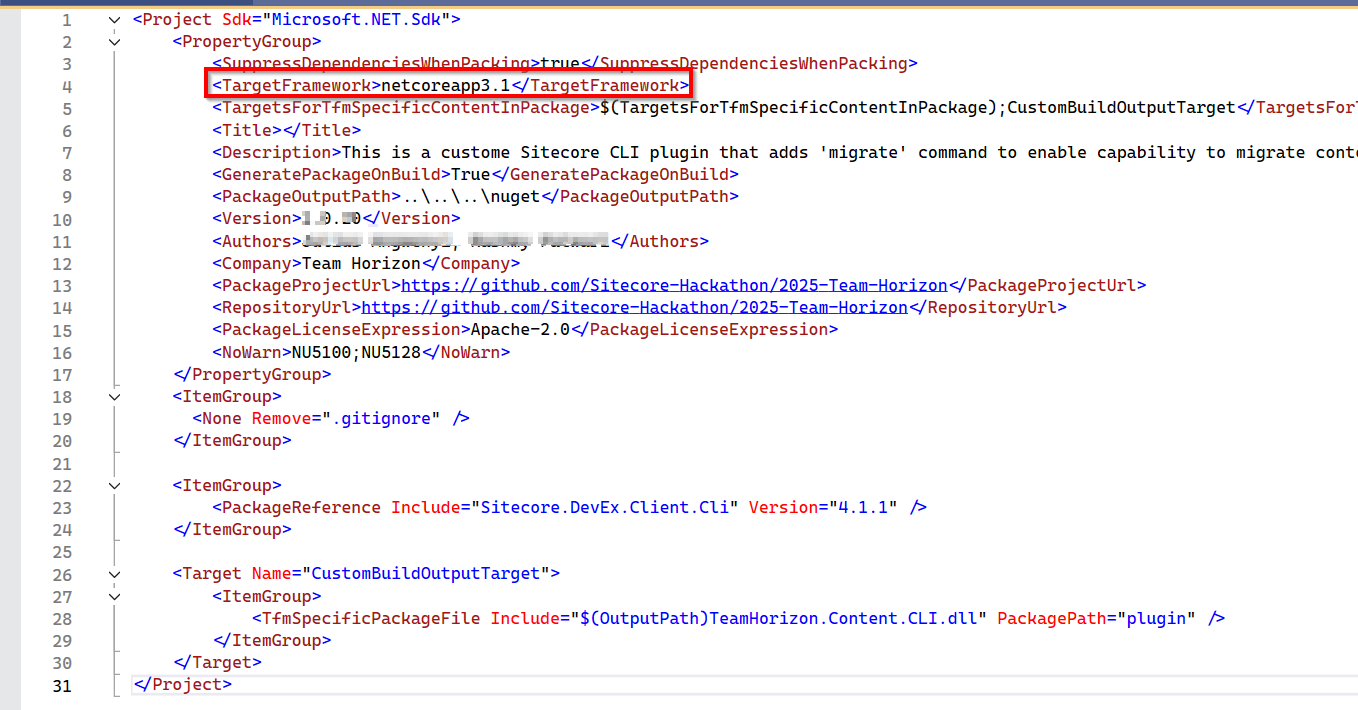
Verifying my project file (.csproj)
To ensure no errors with your CLI Plugin, you can verify your project file looks similar to the one shown below. Especially with Target Framework of netcoreapp3.1
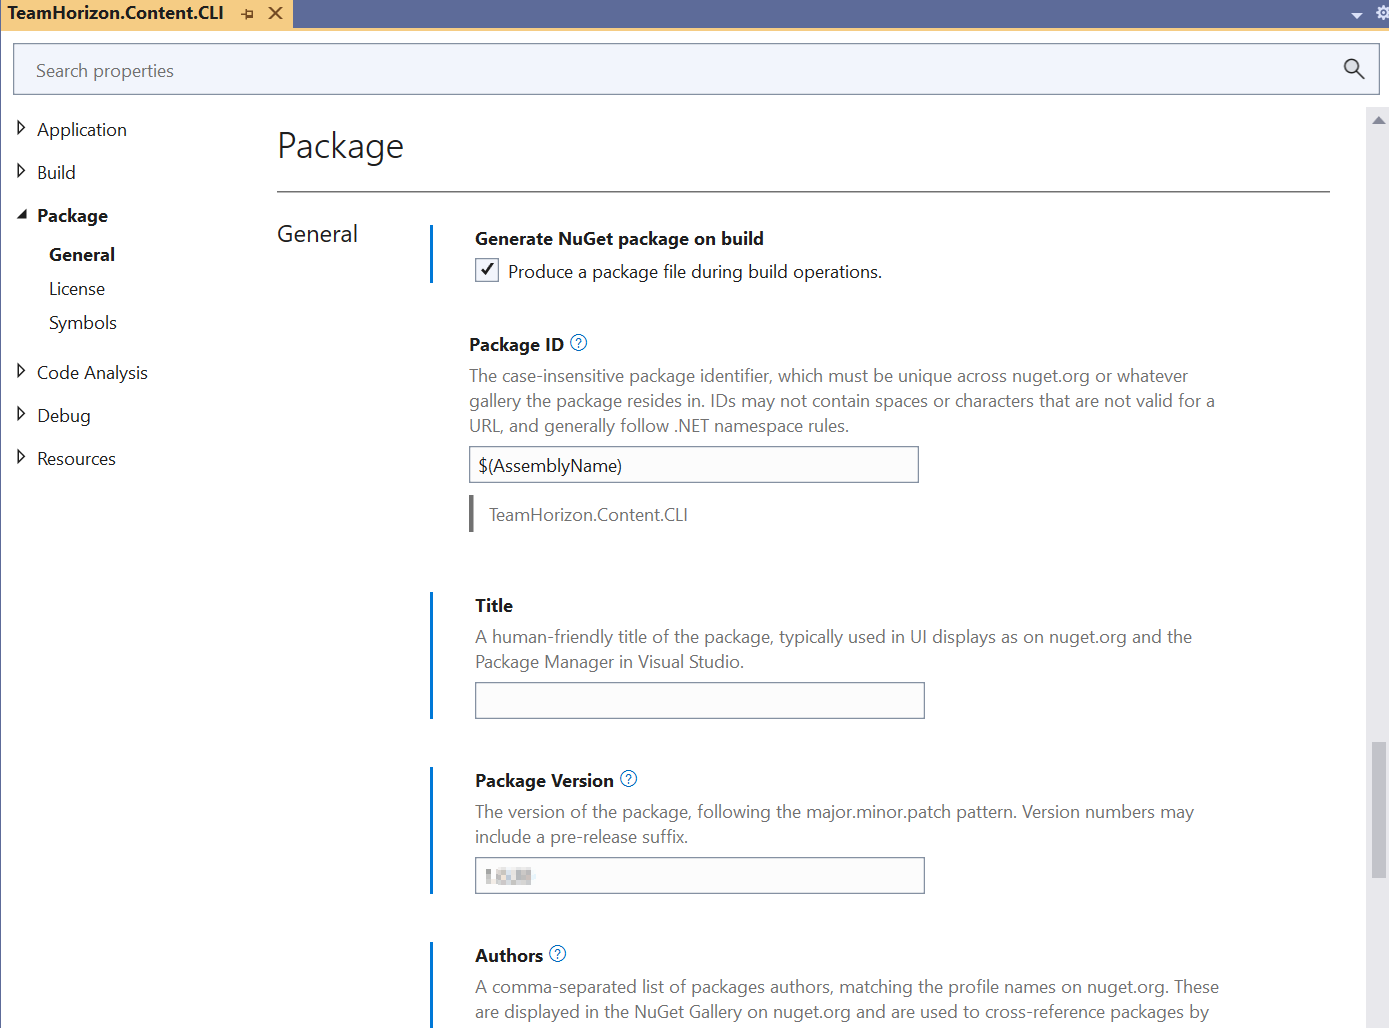
Tips & tricks 3 – Configure NuGet package properties
We are going to deploy this project as a NuGet package. So follow the steps below to configure package properties
- Select your project in Solution Explorer, and then select Project > <project name> Properties, where <project name> is the name of your project.
- Expand the Package node, and then select General.
- Give your package a unique Package ID and fill out any other desired properties
- Below is my sample settings:
Tips & tricks 4 -Publishing your CLI Plugin to NuGet public feed
Now that we understand the high level anatomy of a CLI plugin and how to create its C#/.NET project, I will also share some tips on how to publish it to a public repository or feed. This is to make it available for the community to use the plugin.
Head over to Nuget.org and register for an account. You will need a Microsoft account to sign in or sign up. On successful login, select your user name at upper right, and then select API Keys as shown in step 1 and step 2 in screenshot below
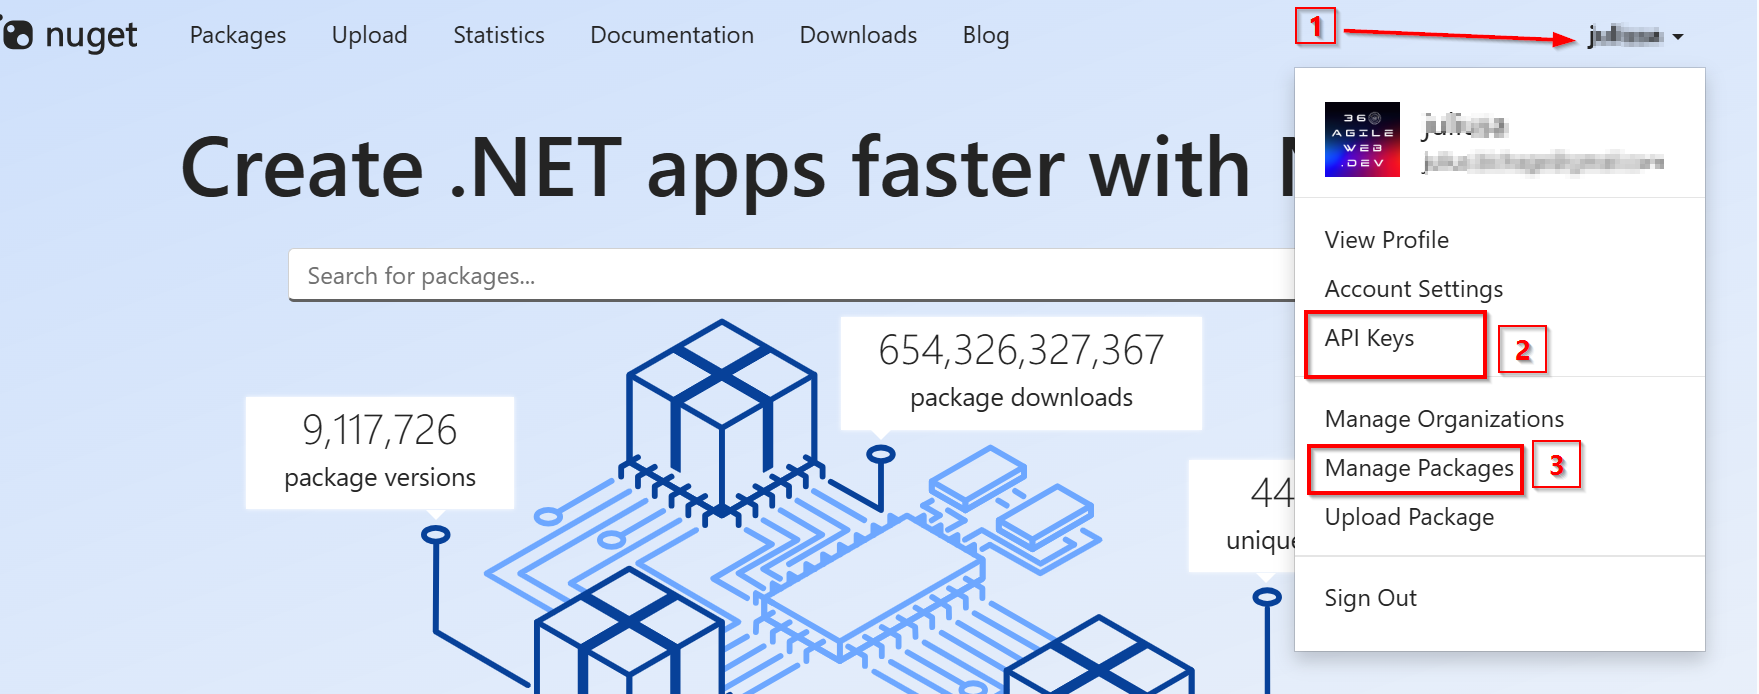
Follow these steps once on the API Keys page
- Select Create, and provide a name for your key.
- Under Select Scopes, select Push.
- Under Select Packages > Glob Pattern, enter *.
- Select Create.
- Select Copy to copy the new key.
Important to note:
- Always keep your API key a secret. The API key is like a password that allows anyone to manage packages on your behalf. Delete or regenerate your API key if it’s accidentally revealed.
- Save your key in a secure location, because you can’t copy the key again later. If you return to the API key page, you need to regenerate the key to copy it. You can also remove the API key if you no longer want to push packages.
With our API-Key at hand, use the following command to publish your CLI Plugin. Notice we need to specify the name of our .nupkg file as well as API-Key when using the dotnet nuget push command.

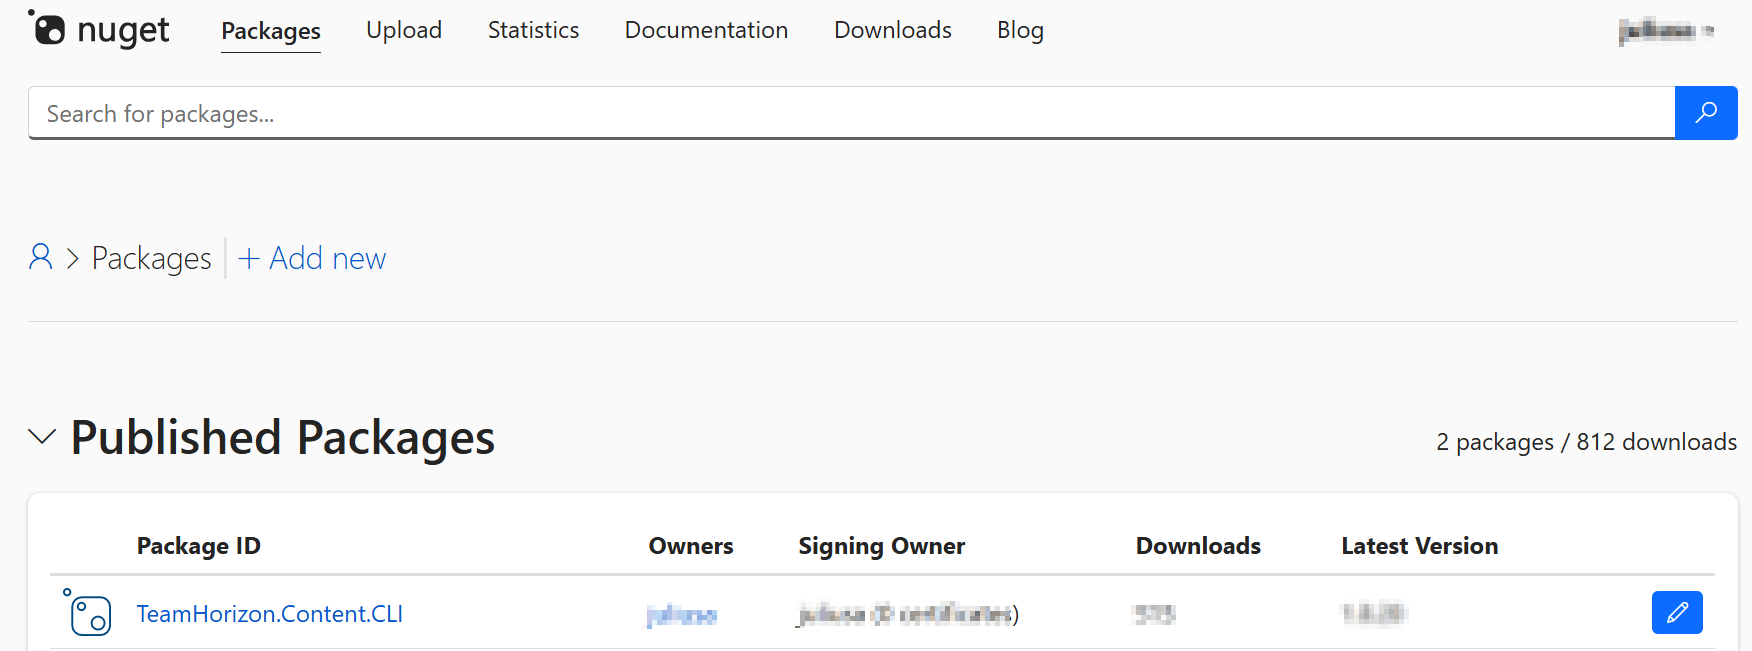
When successful, you can view the list of your published packages using the ‘Manage Packages’ in step 3 on the previous screenshot. You should see the package listed such as shown below
For detailed guidance and further reference, follow the Microsoft Learn tutorial on NuGet packages.
Next steps
In this blog post, we have looked at tips and tricks on extending CLI for your XM Cloud instance. We looked at the CLI plugin architecture including how to create a sample .NET project for it. We also looked at how to package the CLI plugin and deploy to Nuget packages repository. I hope you find this useful and can adopt it for your own productivity use cases. Look out for a follow up blog post, where I will take a deep dive at some of the code I have used for my plugin. I intent to open up the black-box.
Stay tuned and please give us any feedback or comments.
