This is a white paper I wrote sometime back on how to leverage ADFS within your standard .NET web application. You will find it useful, especially when transitioning your on-premises .NET web application into the cloud.

This is a white paper I wrote sometime back on how to leverage ADFS within your standard .NET web application. You will find it useful, especially when transitioning your on-premises .NET web application into the cloud.
With modern and mature DevOps, we all want smooth, sleek and painless automated deployments with zero-downtime. Sitecore deployments are no exception. Have you embraced zero-downtime deployments? This is not a new topic. If you look around Sitecore community, you see an odd question popping here and there regarding this topic.
The journey towards achieving zero-downtime deployments for any application in fact starts with your code base. So, in this series of blog posts, we will refresh ourselves on concepts like “Code Freeze” and the CI/CD process before deep diving into implementing Sitecore zero-downtime deployments.

The infographic above shows a typical Azure PaaS architecture for Sitecore XP scaled topology. In summary we have:
You will notice in this architecture, we have Blue-Web and Green-Web databases, which are corresponding to the BLUE-GREEN deployment slots for the CD App Service. We need separate web databases to enable us achieve content-safe deployments
The CM App Service also has BLUE-GREEN deployment slots specifically for code deployment, but with a shared master database. There is no compelling reason to have BLUE-GREEN master databases purely on basis of complexity introduced by such architecture (although it is not impossible to implement if you prefer this approach).
The rest of our XP scaled topology resources are shared
The Azure DevOps organisation typically will have access to run the CI/CD pipelines, is also included in the architecture.
App Service Settings section can be leveraged to manage your Sitecore configuration settings including Sitecore connections Strings

Required steps:
Some notes:
This example doesn’t have BLUE-GREEN for the CM instance, as I want to keep it simple – This though means your content editors will have to wait for deployment to finish to use the CM. If you really need CM zero down time, then you need to deploy CM BLUE-GREEN deployment slots as well. Alternatively, you can keep the deployment time to CM to a minimum and avoid BLUE-GREEN
You can be more also be creative with your Sitecore templates changes such that your changes are always backward compatible between successive releases (e.g. don’t delete fields immediately, mark them as obsolete) This means you can safely rollback your changes without breaking the application
Sitecore using Containers makes use of Azure Kubernetes Service. This infographics shows a very simplified AKS blue-green strategy allows us to achieve zero downtime deployments.

How does it work?
Below we have a typical Sitcore XP Azure Kubernetes Service architecture for Sitecore XP scaled topology – the AKS cluster containing various pods running our containers.

You can see the scaled out Sitecore XP application roles running as individual Pods within this AKS cluster backed by a Windows Node Pool.
We also have access to Sitecore databases as well as other services such as Azure Key Vault, Azure Redis cache, App Insights among others.
I am showing our Azure DevOps organisations which will typically have access to run the CI/CD pipelines
Similar to the Azure PaaS architecture, AKS zero downtime deployments will make use of BLUE-GREEN deployment strategy for CD or CM instance
How do we do that? we don’t need to provision a separate cluster for GREEN environment. Instead, we define an additional GREEN deployment with its corresponding service and then label it accordingly, alongside our BLUE deployment.
For content-safe deployments, we will also be pointing to a copy of web database (Green) as shown.
Once we have tested and are happy with our new GREEN deployment, we switch traffic or routing to point to GREEN. We do this by updating our Ingress controller specification

In the above infographic, you can see now our end-users can access V2 in the GREEN deployment
BLUE deployment is on stand-by in case of roll back. And can be deleted if no longer required.
Note as previously discussed in PaaS deployments, you can implement BLUE-GREEN for the CM if required

An this is a wrap. This post concludes this series of blog posts where we looked into implementing Sitecore Zero Downtime deployments. I hope you found this useful and can start your own journey towards achieving Zero Downtime deployments with your Sitecore workloads. If you have any comments or queries, please leave me a comment at the end of this post.
With modern and mature DevOps, we all want smooth, sleek and painless automated deployments with zero-downtime. Sitecore deployments are no exception. Have you embraced zero-downtime deployments? This is not a new topic. If you look around Sitecore community, you see an odd question popping here and there regarding this topic.
The journey towards achieving zero-downtime deployments for any application in fact starts with your code base. So, in this series of blog posts, we will refresh ourselves on concepts like “Code Freeze” and the CI/CD process before deep diving into implementing Sitecore zero-downtime deployments.

In software engineering, blue-green deployment is a method of installing changes to a web, app, or database server by swapping alternating production and staging servers
Wikipedia
In its purest form, true BLUE/GREEN deployments means that we need two separate but identical environments, one is live (BLUE) and the other is on stand-by (GREEN). When you have new version of your application, you deploy to the staging environment (GREEN) , test it without affecting BLUE. When you are happy with this new version, you can then swap it to be LIVE instance.
However, in practice, it doesn’t always make sense to run a copy of every resource. Furthermore, this may introduce some complexity to the process.
This is why we now have some shared resources as you can see in the infographic above, while others belong to BLUE or GREEN environment.
As part of this architecture, we need some way of switching or routing incoming traffic between the two environments.
Blue-Green deployment strategy effectively enables us to achieve zero down time deployments. This is because your users will not notice any downtime during deployments.

On the top part of the infographic above, – BLUE is currently production environment and our users accessing this environment. When we have, a new version of our application, it is deployed to GREEN environment, without affecting our users.
On the bottom part of the infographic above, – now GREEN is the production environment and our users are accessing this environment. This leaves the BLUE environment available for us to deploy the next version of our application
We deploy to BLUE and GREEN in turns, this achieving zero downtime deployments. The process repeats in each deployment cycle.
If you haven’t already adopted the cloud for your Sitecore workloads – be it PaaS or Containers, then perhaps you need to start thinking about this seriously as there are benefits you will get.
“Blue-green deployments made easier with the cloud.”
fact
The cloud provides tooling you need to:
Hopefully, these blog post help you understand key concepts about BLUE-GREEN deployments.
In the next blog post in this series, we will look at implementing Sitecore Zero Downtime deployments.
With modern and mature DevOps, we all want smooth, sleek and painless automated deployments with zero-downtime. Sitecore deployments are no exception. Have you embraced zero-downtime deployments? This is not a new topic. If you look around Sitecore community, you see an odd question popping here and there regarding this topic.
The journey towards achieving zero-downtime deployments for any application in fact starts with your code base. So, in this series of blog posts, we will refresh ourselves on concepts like “Code Freeze” and the CI/CD process before deep diving into implementing Sitecore zero-downtime deployments.

Sitecore can be deployed to the cloud using IaaS, PaaS or Containers. Microsoft Azure cloud is preferred, although you can deploy to other providers like AWS

When working outside of containers, you would typically build your application and then push it directly to the IaaS or PaaS instances hosting them. Using Containers changes this process slightly. The infographic below captures this process in detail

Hopefully, these blog post help you understand how to manage Sitecore Container based CI/CD process going forward. If you still struggling, engage your digital partners to look for long term solutions.
In the next blog post in this series, we will look at BLUE-GREEN deployments and how to leverage this strategy to implement Sitecore Zero Downtime deployments.
With modern and mature DevOps, we all want smooth, sleek and painless automated deployments with zero-downtime. Sitecore deployments are no exception. Have you embraced zero-downtime deployments? This is not a new topic. If you look around Sitecore community, you see an odd question popping here and there regarding this topic.
The journey towards achieving zero-downtime deployments for any application in fact starts with your code base. So, in this series of blog posts, we will refresh ourselves on concepts like “Code Freeze” and the CI/CD process before deep diving into implementing Sitecore zero-downtime deployments.
A Code freeze is an adopted milestone from the Waterfall days.
“No changes whatsoever are permitted to a portion or the entirety of the program’s source code. Particularly in large software systems, any change to the source code may have unintended consequences, potentially introducing new bugs”
Wikipedia
Typical Code Freeze Challenges:
All these challenges may mean you introduce some “code freeze” when preparing for your deployments. Naturally, this is not where you want to be. If not managed properly, this becomes a blocker, a barrier from a true CI/CD process and your journey to your Sitecore zero down time deployments. Let’s refresh ourselves on some tips to help address some of the issues.
Solving Code Freeze Challenges:
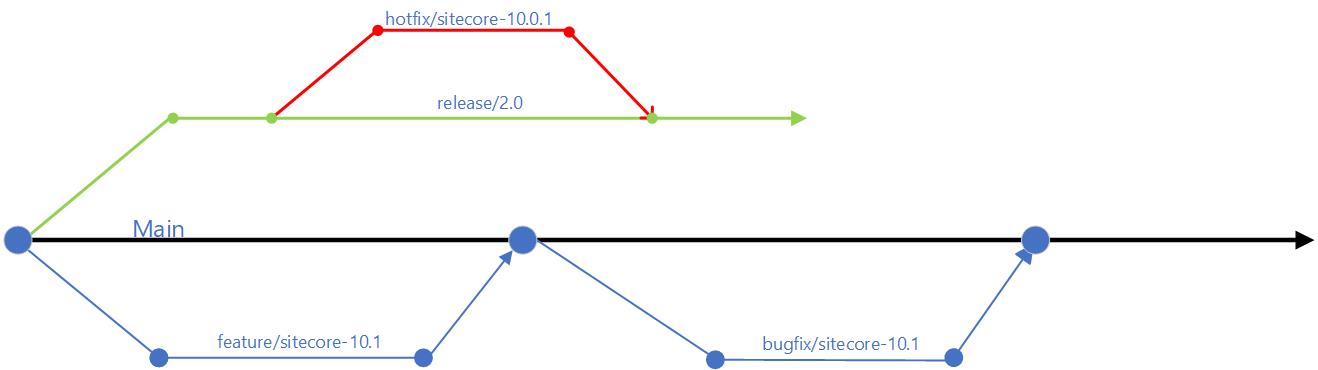
Git Branching Strategy
Embracing Microservices
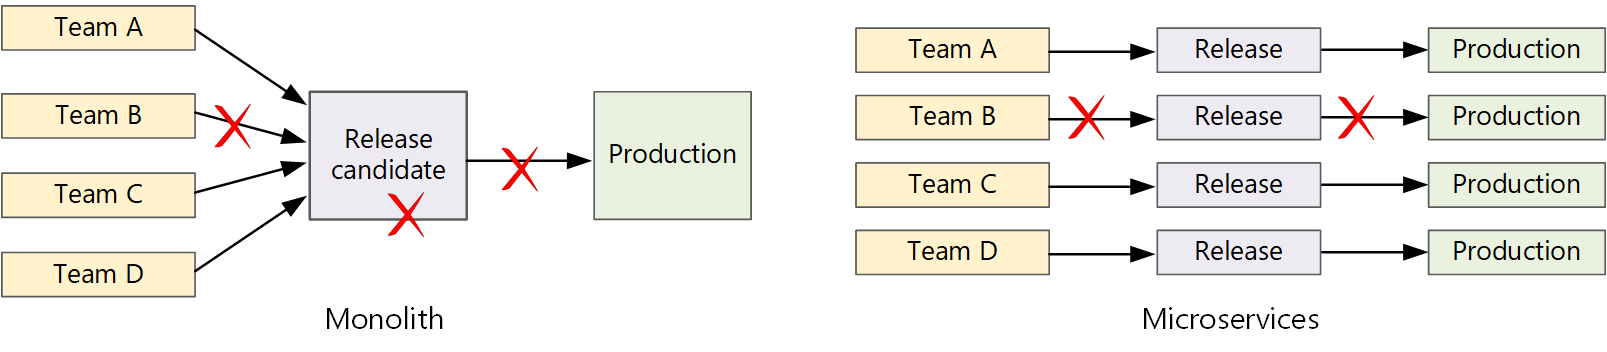
Let us now look how Microservices make life easier. A traditional monolithic app on the left, there is a single build pipeline whose output is the application executable. All development work feeds into this pipeline. If team B break, the whole thing breaks. In contrast with microservices philosophy on the right, there should never be a long release train where every team has to get in line. The team that builds service “A” can release an update at any time, without waiting for changes in service “B” to be merged, tested, and deployed.
Hopefully, these tips help you address “Code Freeze” problem going forward. If you still struggling, engage your digital partners to look for long term solutions.
In the next blog post in this series, we will look at Sitecore CI/CD processes to support Sitecore Zero Downtime deployments.

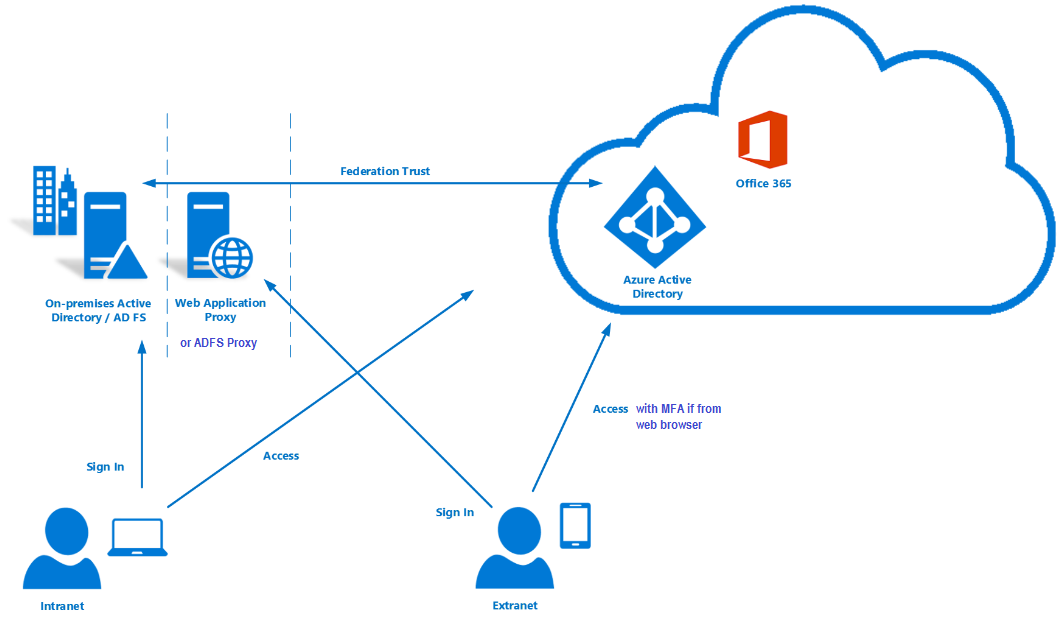
Faced with deprecated AD module, let us look at possible upgrade options to Sitecore version 9.3 or 10 to for your Sitecore Identity Management
If you choose to stop using on-premises AD with your Sitecore instance, THEN:
If you choose to keep your on-premises AD with your Sitecore instance. THEN you will need to make it work with latest Sitecore 9.3 or 10. To achieve this:
Depending on your cloud transformation strategy, this is probably what you should be considering at some point
We have a couple of options here such as using Azure AD Connect or Azure AD connect Health to help with the transformation. I will also recommend working with your digital transformation partner to explore further options.
Sitecore Identity Server is your answer going forward!
You can now watch the accompanying videos on my YouTube channel. You can also read on detailed step-by-step guide on creating an ADFS plugin. Stay tuned for more posts!

In this series of blog posts, we will revisit the recently concluded Sitecore Symposium 2020 where I will examine my key takeaways from the event.
This year saw the biggest Symposium ever with more than 5,500 people registering across more than 70 countries. I somehow managed to get myself an All-Access ticket, which I got as reward for being a speaker during the event.
Having an All-Access ticket meant you had access to all Live, Featured and On-Demand sessions. As of the time of going to press, you can still access the Video On-demand which is very cool in case you need to re-play any of the sessions you might have missed.
In this blog, I will start with revisiting the sessions presented by the Avanade teams.

At Avanade, we are a Sitecore Platinum partner and this year we proudly sponsored the Symposium 2020 event as Connector Sponsors.
Our teams were available round the clock in the Partner Pavilion where we engaged attendees in the Virtual Chats covering the following areas:
Attendees had a chance to also watch our webinars below:
On the other hand, we had our speakers running the following sessions during the Symposium:
Bringing life-changing hearing health to a global audience with Demant
This Digital & Business Transformation session saw Christian Bennich our Digital Marketing Lead in Avanade Nordic interviewing Troels Kjær Rasmussen the Head of Customer Facing Applications, Demant Group.
I really enjoyed this session as it captures what we do best at Avanade, your digital transformation partner. In the session, Troels describes how 5 years ago, Dermant Group had a challenging Business landscape with aggressive acquisitions, branding equity and other technology challenges. This impacted their Total Cost of Ownership too. Fast forward to today, the Avanade partnership has helped “Establish one strategic platform that could cater for the combined needs of the entire group”. Worth mentioning that at the core of this transformation journey is the Microsoft Azure cloud and Sitecore Experience platform.
The key takeaways from Troels includes to always aim for long term success through a repetitive model of: Realize, Learn, Scale.
I would highly recommend watching this session on-demand for the full interview.
Defining new ways to transact with Sitecore Experience Commerce 9 and Azure IoT
This Experience-focused Commerce on-demand session was presented by Benjamin Adamski, Solution Architect, Avanade and Boris Brodsky, Director of Architecture, Avanade.
During the session, Boris and Benjamin outlined the case for IoT as there is marketplace expectations for seamless and automated commerce to extend into the physical world.
Armed with staggering statistics, the Avanade duo put forward a compelling case for taking IoT seriously:
Some of the key takeaways include driving the business outcomes with IoT and Connected Commerce leveraging:
This is one of those session you will want to replay and replay again, as Boris and Benjamin go on and on How to implement IoT with Sitecore leveraging Headless Sitecore Experience Commerce.
Even the losing experience is a win!
This Featured Sitecore Fundamentals session was presented by Andy Leonetti, Digital Strategist, Avanade and Leah Feldman, MarTech Strategist, Avanade.
Tapping into Andy’s 10+ years with Customer Engagement and plenty of Digital Marketing experience from Leah, the Avanade duo put together “Your guide to experimentation” with Sitecore experiences.
This session tells the story behind the framework for testing and optimising the Microsoft Partner Network that will inspire you to get testing if you are not already!
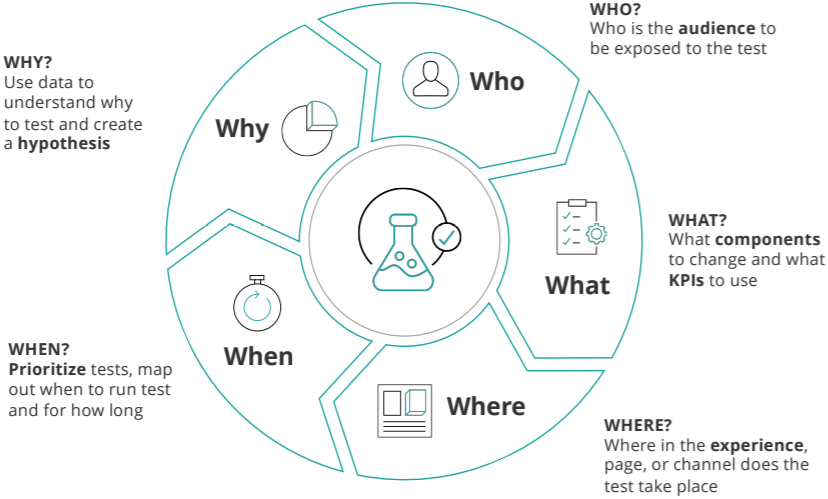
Key takeaway for me is how easy it is to leverage out-of-the-box Sitecore Experience Optimization capabilities to test and learn.
Andy and Leah summarised their session with the pointers below:
Use Sitecore Host plugin architecture to transition on-prem Active Directory workloads onto Azure
I have previously blogged about my session and how I prepared for it. You can revisit the post here.

My session was themed Problem Solving Through Technology, and I discussed how you can leverage the Sitecore Host architecture to resolve the issue of deprecated Sitecore AD module as you transition into the cloud.
Key takeaways from my session is how easy and quick to leverage Sitecore Host architecture to create custom Sitecore Identity host plugins, including free sample code samples
This concludes part one of this series of blog posts revisiting the recently concluded Sitecore Symposium 2020. Until next time, keep watching!

The wait is over. Sitecore Symposium 2020 is here. This year we will have the first all-digital Sitecore Symposium. Are you excited?
Well, I am very excited indeed for two main reasons. Firstly, I am lucky that I will be presenting for the first time in a Sitecore Symposium. More about my session in a second. Secondly, I am very excited at the content and sessions that the Symposium team have put together this year.
Join me for my on-demand session on Transitioning on-prem Active Directory workloads onto Azure
You will need to Register to watch my session
As I promised earlier, I will walk you through how I prepared for my session.
I had two review sessions with Sitecore technical teams to help review my session content and tailor it for my audience. I found these sessions useful and it helped me reduce the number of my slides in my presentation as well as amplify the right message.
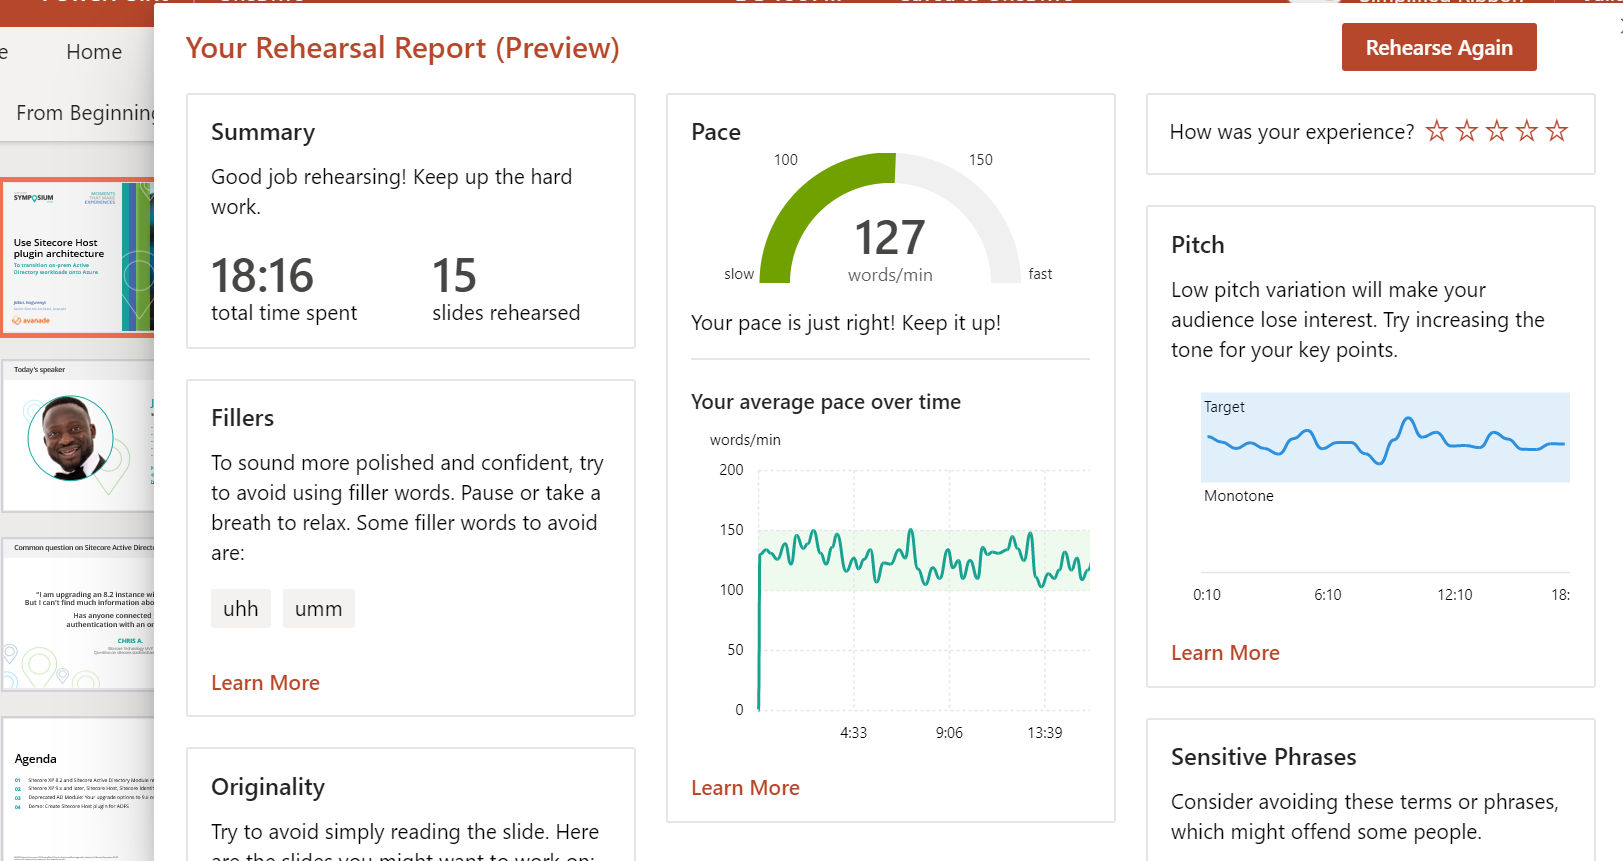
All on-demand sessions should be 20 minutes long. To this end, I had to practise and rehearse my presentation using the Presenter Coach tool from Microsoft. This is a great tool to hone your presentation pace and provides great feedback such as shown in the screenshot below. I will highly encourage you give this ago
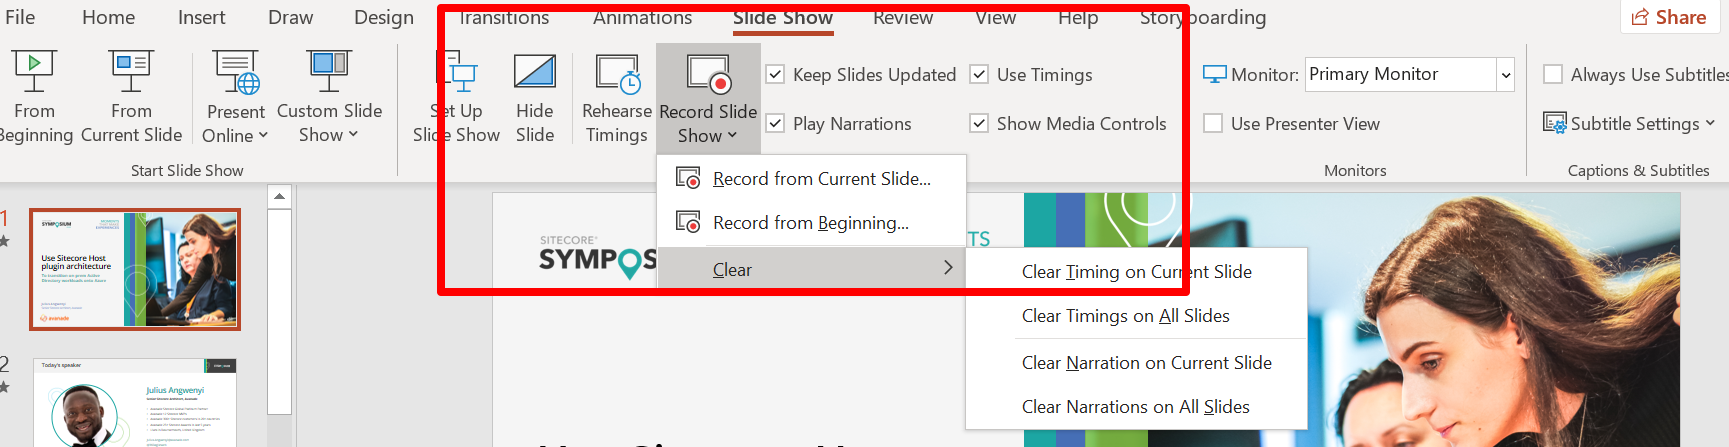
The actual session recording was done using the Microsoft PowerPoint recording tool. I found this tool very versatile as I could record each slide at time, watch it back and re-do it without having to start the entire recording all-over again. Below is the screenshot on how to access this tool:
My session also include a demo, which I recorded using an open-source the Screen Recording tool OBS Studio. I have used various screen recording tools before, but I prefer OBS due to versatility it has in terms of actual recording experience and editing afterwards.
Update: My session recording available here
Please remember to register so you have un-limited access to all on-demand sessions. Follow this session link to access my presentation titled “Use Sitecore Host plugin architecture to transition on-prem Active Directory workloads onto Azure”
The screenshot below shows the agenda at glance Please remember to select your region so that you get the localised time so you don’t miss your favourite sessions

I am looking forward to seeing you all at the Symposium!
Sitecore Experience Platform 10.0 is available now, a testament to Sitecore’s vision not only the global leader in digital experience management software, but to embrace latest cloud technologies and respond to end users and developer community.
In this version, Sitecore now officially has support for Docker, Kubernetes and other image repositories. This is a feature that will bring smiles to Sitecore community given the already buzz around containerisation and breadth of knowledge in the Sitecore community. This for sure will help delivery teams move to now famous continuous delivery model, making infrastructure-as-code deployments for Sitecore “bread and butter stuff”.
In my previous posts, I have extensively looked in Sitecore Host. In this version, Sitecore has delivered the addition of the ASP.NET Core SDK and headless rendering host architecture also provides developers with a new way of building their solutions allowing for faster development iterations. With .NET 5 release on the horizon, you get a feeling Sitecore still watching this space before committing to a long term strategy with Sitecore Host.
This version focuses on product updates and enhancements that provide more development and deployment options, increase usability and improve overall performance – all centered around enabling both Marketing and IT teams equally, thus making it easier and faster to launch and evolve digital customer experiences.
I am looking forward to installing this latest version and sharing in detail the experience on this blog.
Until next time.

Today we will walk through steps about extending your Sitecore Identity Server 9.3 to work with Facebook sub-provider. We will be creating a Sitecore Host plugin, which you should be familiar if your have read my previous blog on Sitecore Host Plugins.
The scenario is that you would like your front door visitor to your Sitecore based website to be able to authenticate using their Facebook logins.
The good news is that Sitecore Identity Server can be configured as a federation gateway which means we can leverage Facebook as external provider with little effort.
Head to Facebook for Developers portal. On the portal, follow the link to create a new application. This will require you to specify the application display name after which, you will get a dashboard similar to this below.
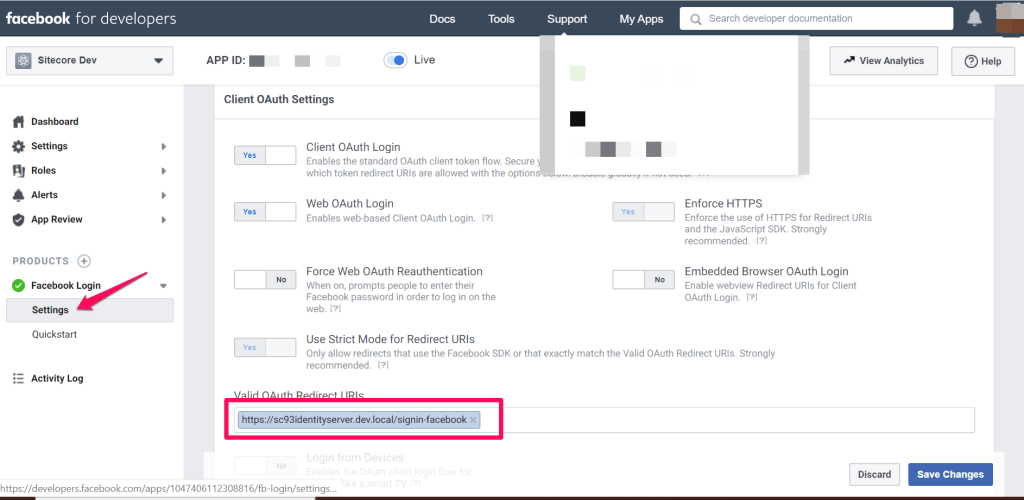
Ensure you configure a redirect URL for your Sitecore Identity Server instance and save your changes. This will be of the format below:
https://Your_SI_Base_Url/signin-facebook
For example, my SI redirect URL is https://sc93identityserver.dev.local/signin-facebook

I have previously blogged on how to create a Visual Studio project for your Sitecore Host plugin. I will recommend you have a read before proceeding further.
We need to reference the Microsoft.AspNetCore.Authentication.Facebook package needed for Facebook login functionality for ASP.NET core applications. This is it.
Within our Sitecore Host Plugin configuration file, we will define two properties as follows:
AppId – This will be mapped to the Application Identifier available from Facebook for Developers portal
AppSecret – This will be mapped to the Application secret availabe form Facebook for Developer portal
As per Sitecore Host Plugin requirements, we need to configure services for the subprovider according to the instructions for this provider, and specify the SignInScheme setting as idsrv.external
To use authentication middleware, we must have an object of the type Microsoft.AspNetCore.Authentication.AuthenticationBuilder
To initialise this object, we must use
new Microsoft.AspNetCore.Authentication.AuthenticationBuilder(services)
instead of services.AddAuthentication()
Notice how we use AuthenticationBuilder(services).AddFacebook() pipeline below, which is available to us via the Microsoft.AspNetCore.Authentication.Facebook package we referenced earlier.

After successful deployment of this plugin to your instance of Sitecore Identity server, you should see the Sitecore Identity login screen below.
Please note you will need to re-start your IIS to pick the plugin changes.

This is it. You now have a working Facebook Plugin that you can deploy to your Sitecore Identity Server 9.3 instance. The full source code for this plugin is available on my public GitHub Repository.
