Foundry IQ – Agentic retrieval solution – part 2

Context

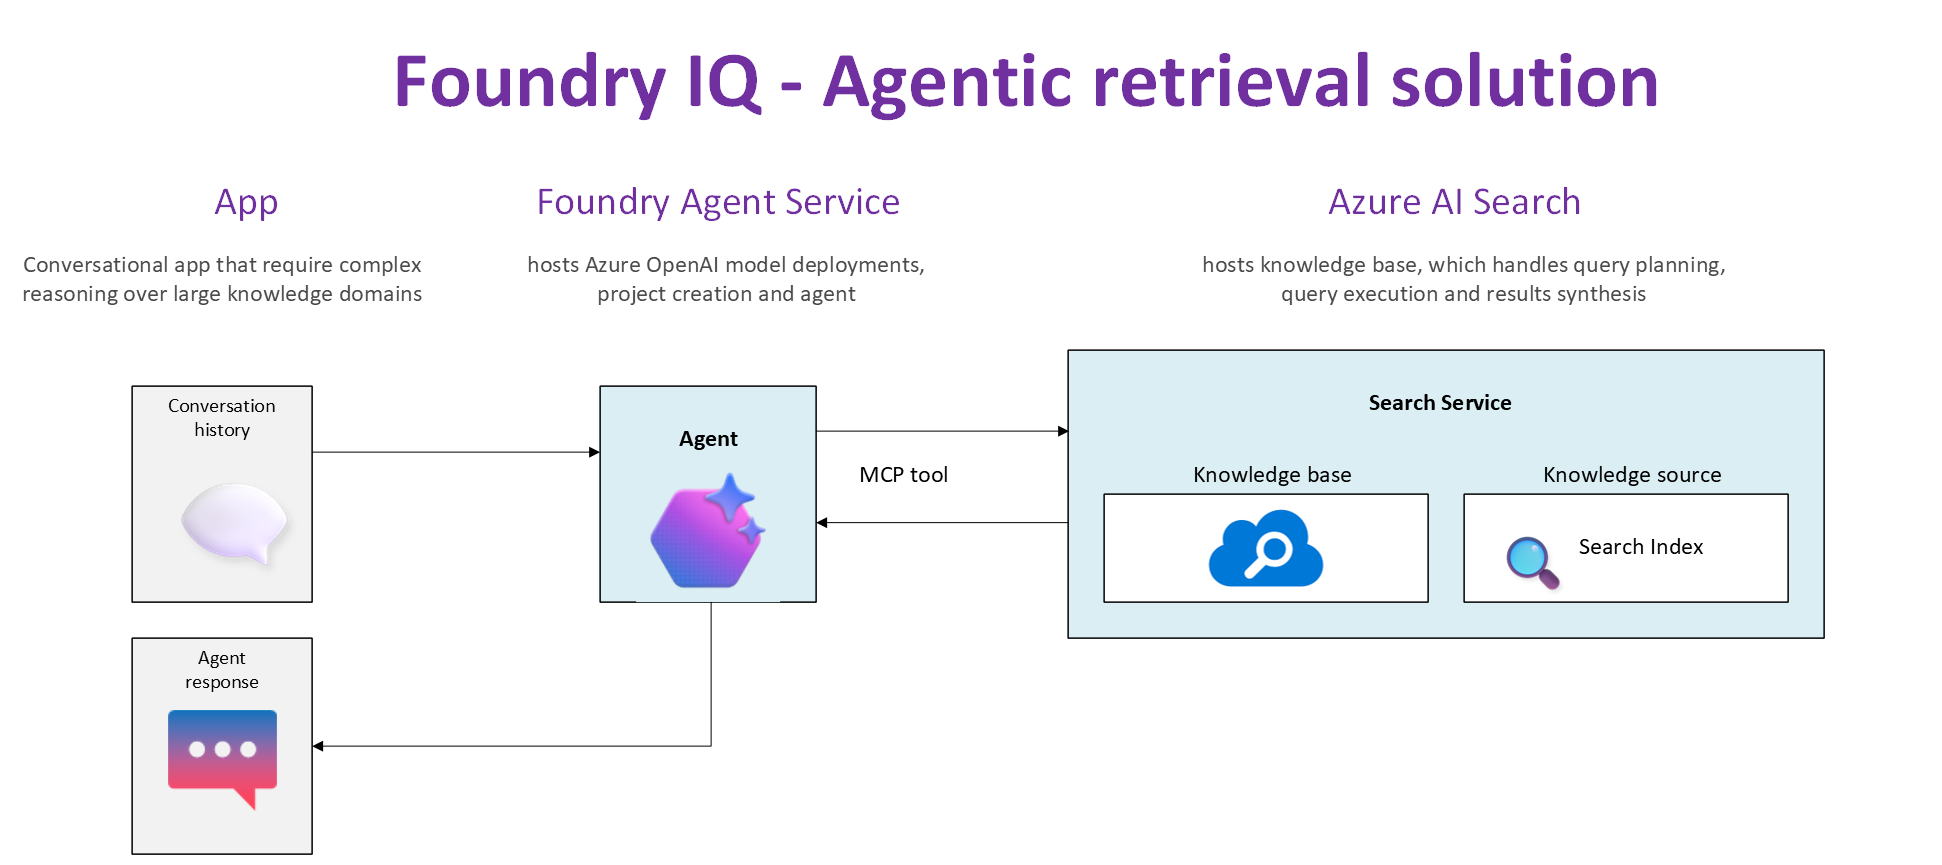
In this blog post, we are going to deep dive into the end-to-end solution, including a walk through of the source code. For background, please ensure you have read part 1 of the Foundry IQ solution.

I also presume you now have your Foundry Project as well as your local development environment setup as per the guidance provided in part 1.

Let us jump in!

Is your local Dev environment ready

In part 1, we covered Local dev environment setup. You can access the source code used in this solution from my GitHub repository to get started.

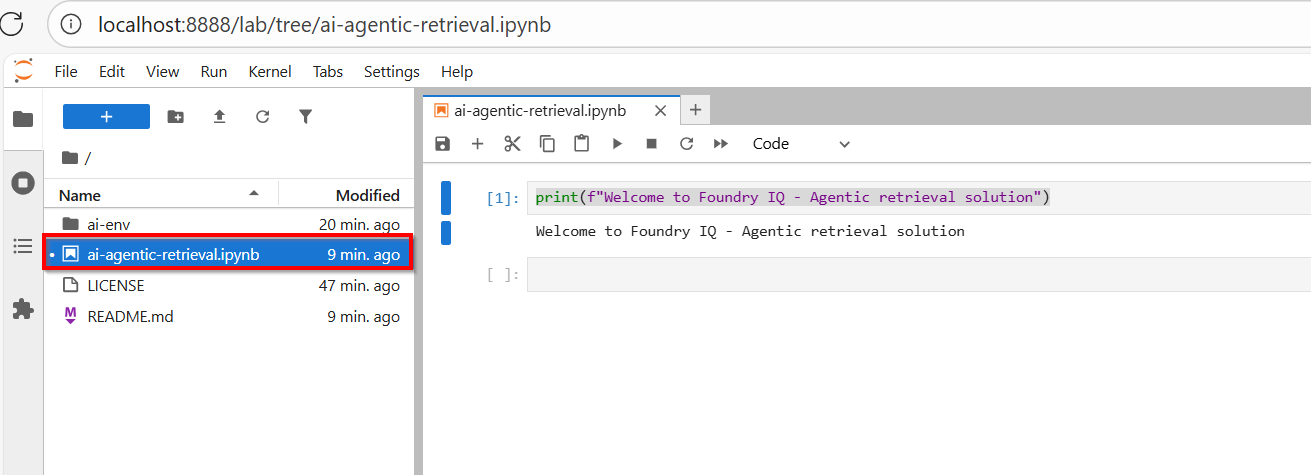
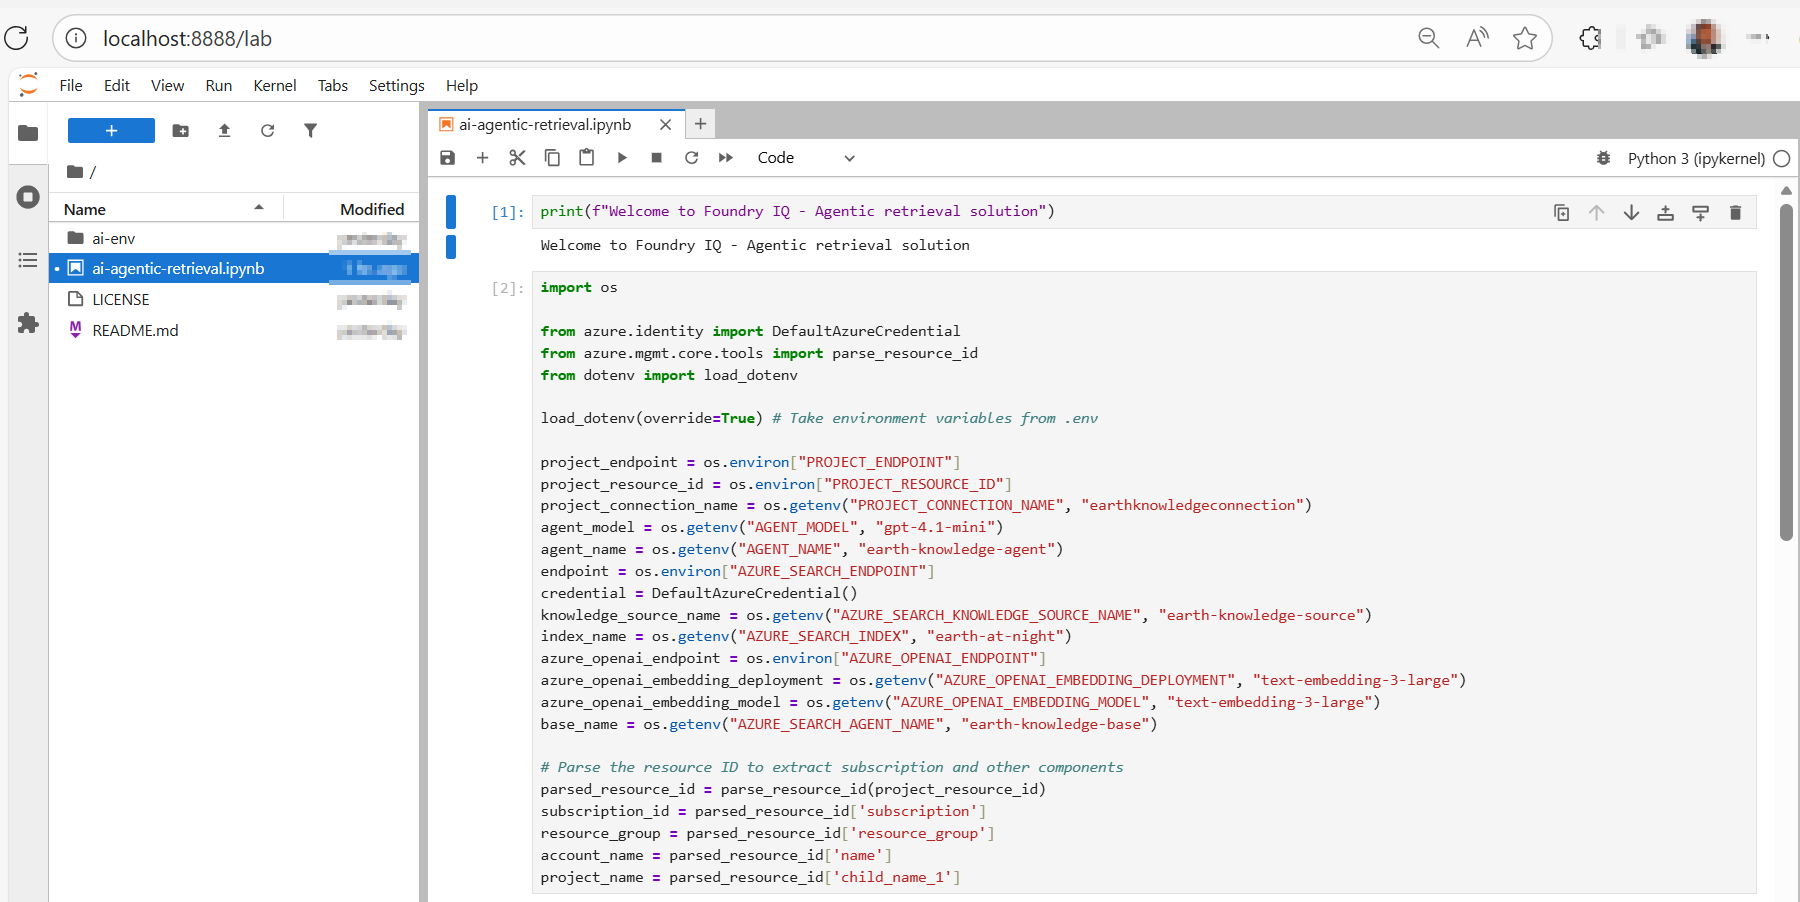
Your solution should look like the screenshot below:

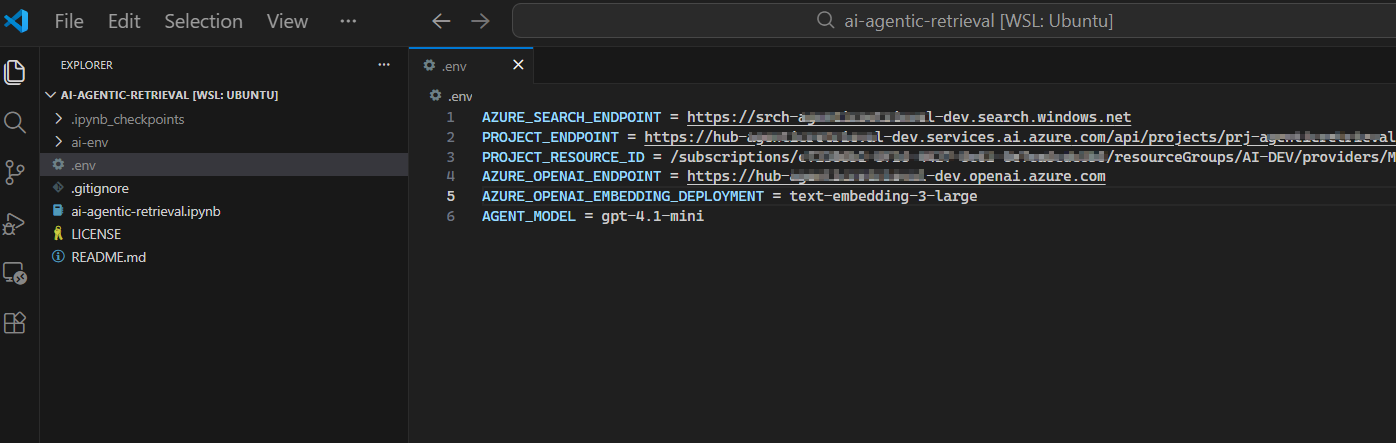
Ensure you have a file named .env within the solution folder, where we are configuring the endpoints and other settings that we need for this solution.

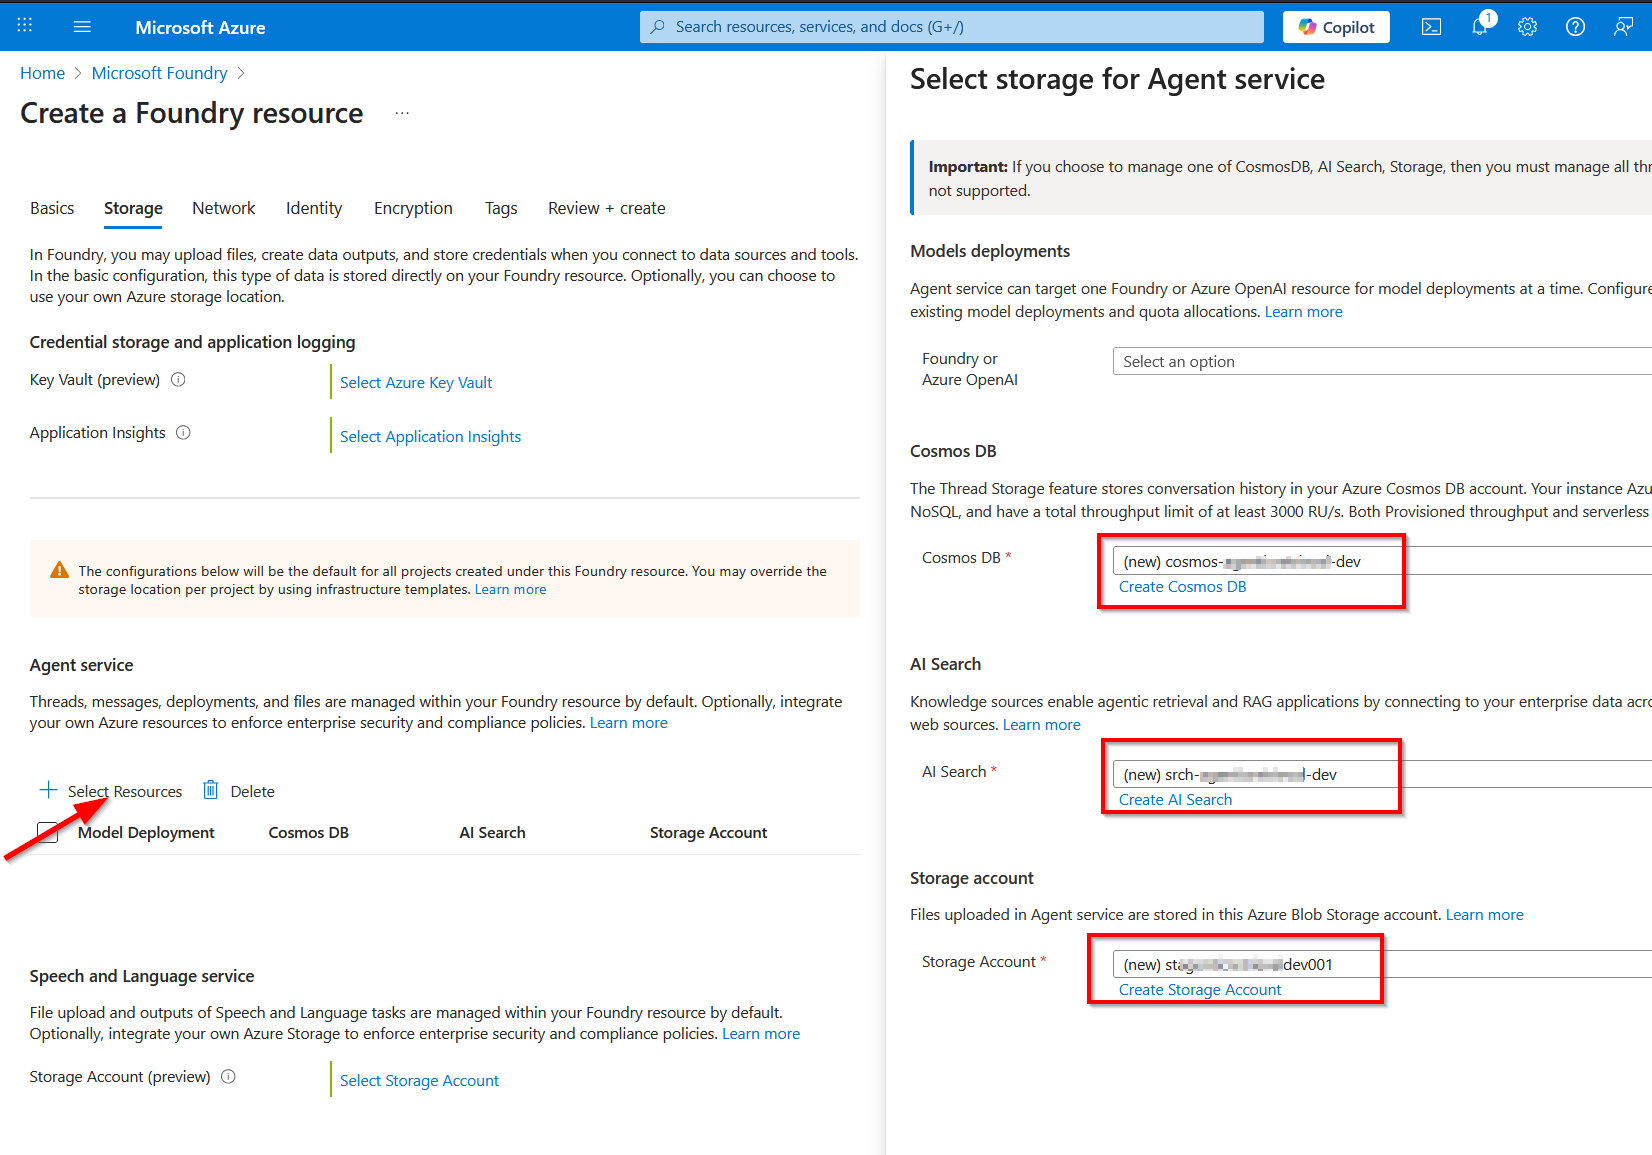
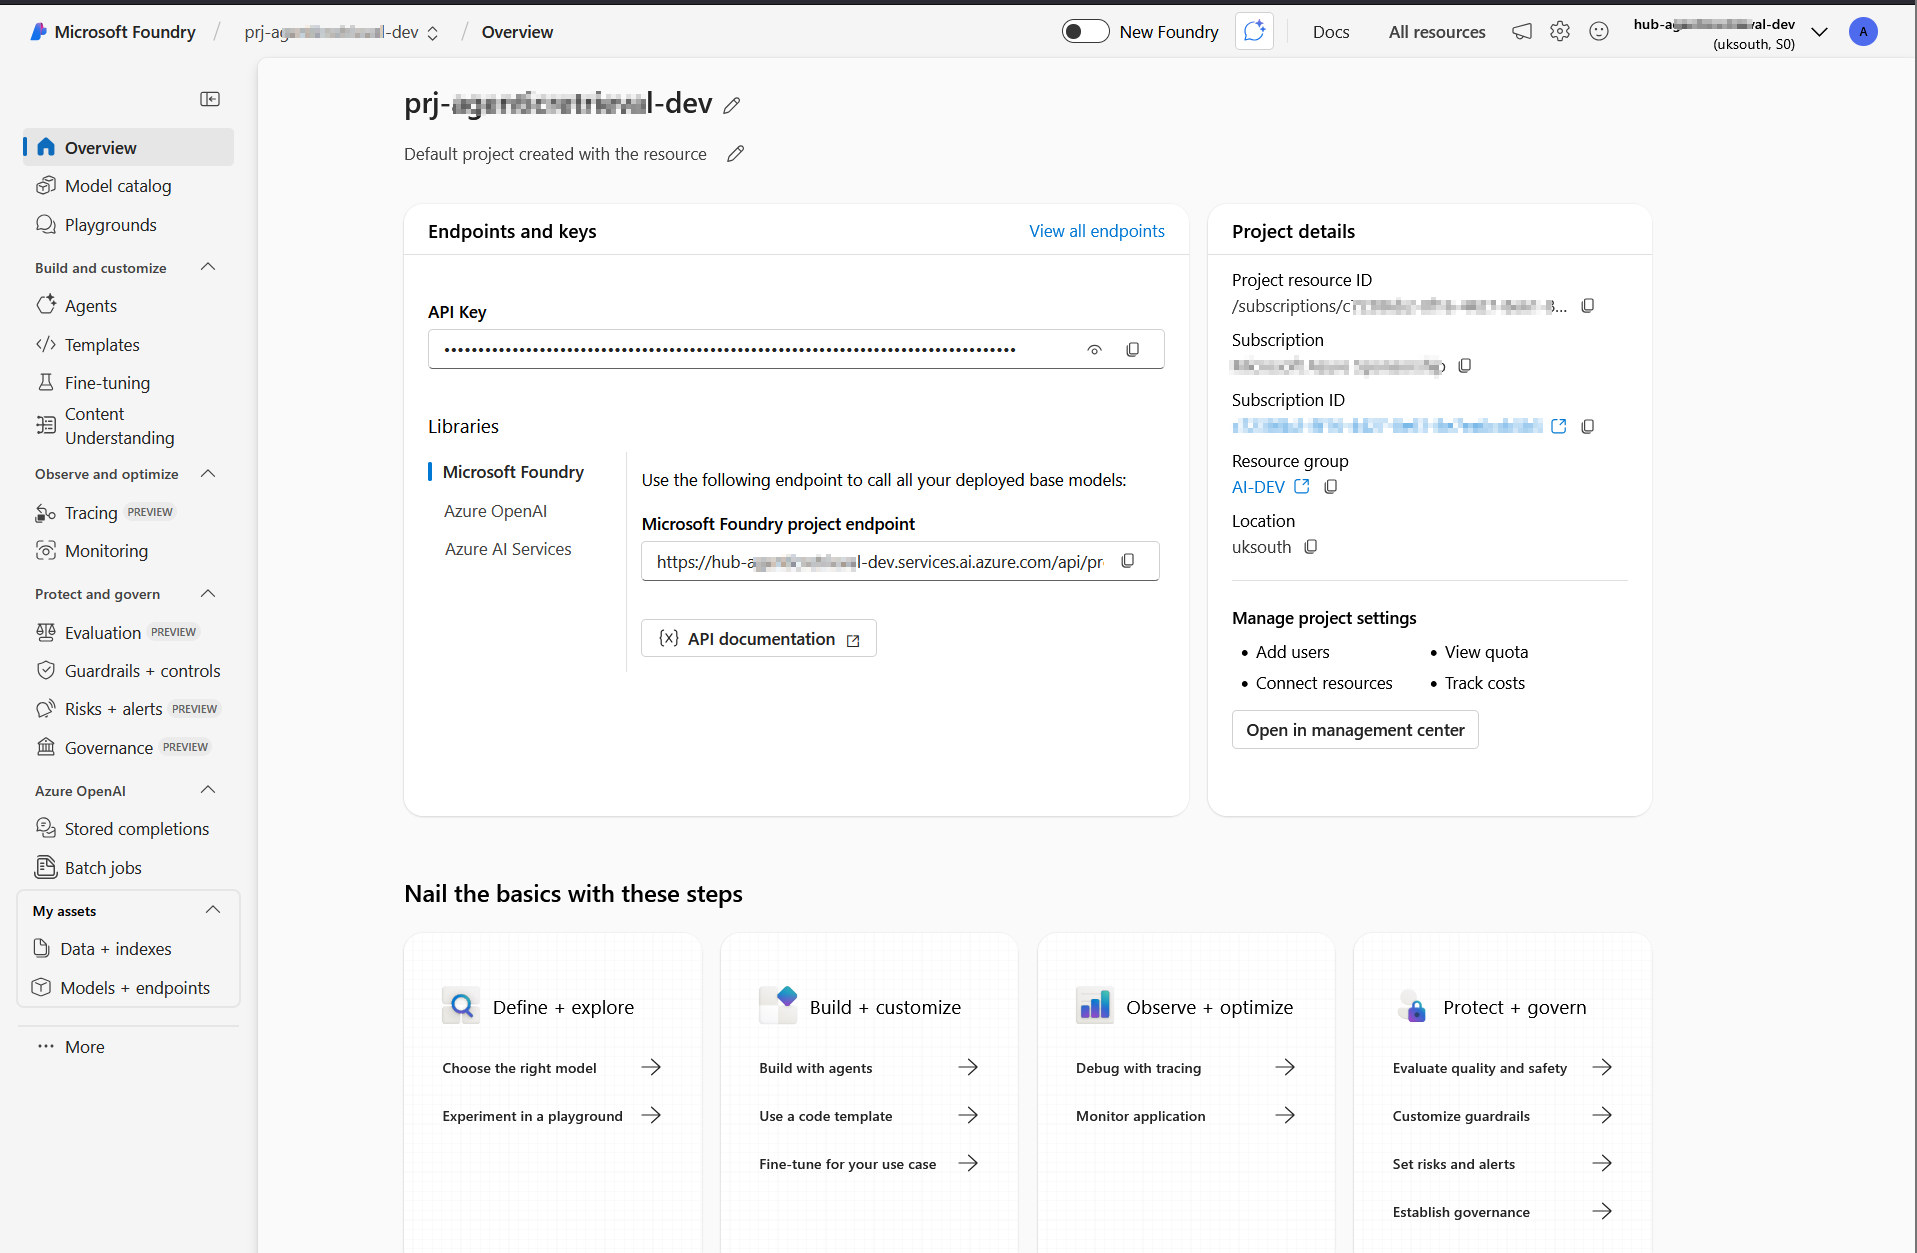
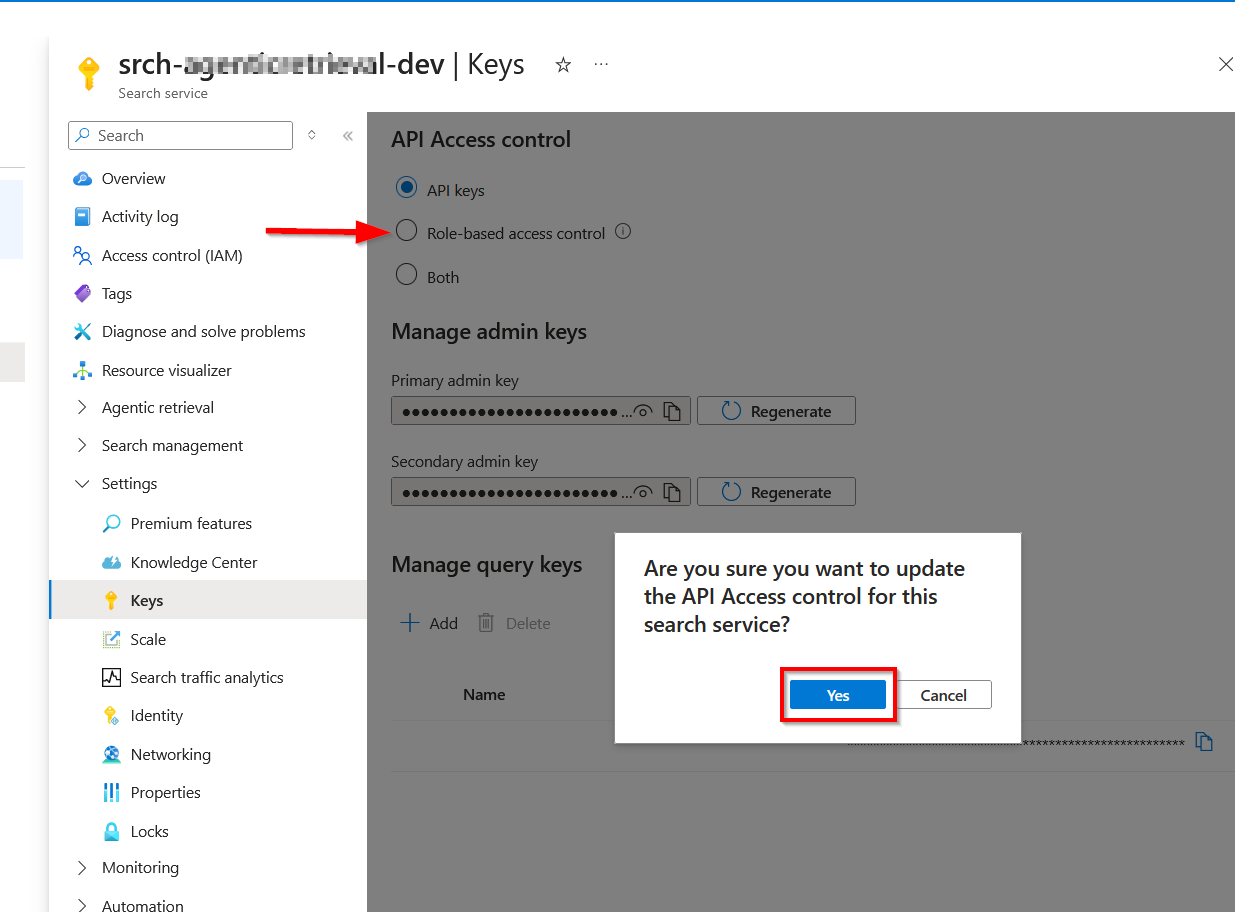
These endpoints and resource ID are available in the Azure portal (within Foundry portal as shown below).
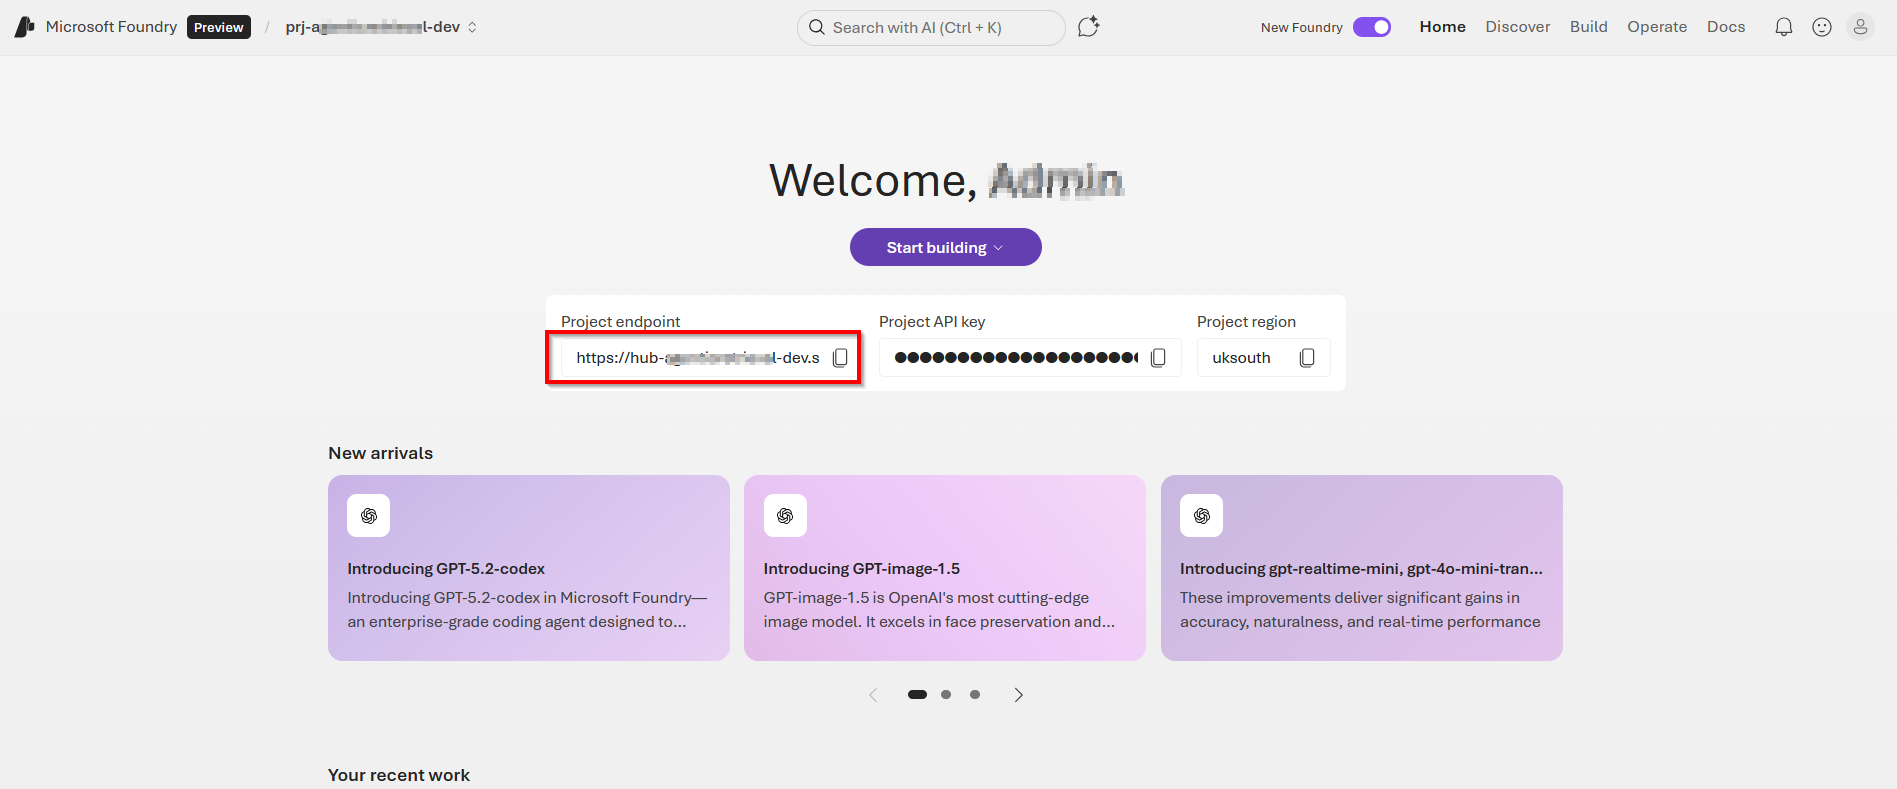
  • AZURE_SEARCH_ENDPOINT is on the Overview page of your search service.
  • PROJECT_ENDPOINT is on the Endpoints page of your project.
  • PROJECT_RESOURCE_ID is on the Properties page of your project.
  • AZURE_OPENAI_ENDPOINT is on the Endpoints page of your project’s parent resource

Below is a sample .env file with these endpoints and settings populated and explained

AZURE_SEARCH_ENDPOINT = https://{your-service-name}.search.windows.net
PROJECT_ENDPOINT = https://{your-resource-name}.services.ai.azure.com/api/projects/{your-project-name}
PROJECT_RESOURCE_ID = /subscriptions/{subscription-id}/resourceGroups/{resource-group-name}/providers/Microsoft.CognitiveServices/accounts/{account-name}/projects/{project-name}
AZURE_OPENAI_ENDPOINT = https://{your-resource-name}.openai.azure.com
AZURE_OPENAI_EMBEDDING_DEPLOYMENT = text-embedding-3-large
AGENT_MODEL = gpt-4.1-mini

Activate the environment

Use the steps below to activate your Python virtual environment. These were already covered in part 1, however I am sharing them again here for your convenience.

  • For macOS / Linux (in Terminal) source ai-env/bin/activate
  • For Windows (in Command Prompt or PowerShell): .\ai-env\Scripts\activate
  • You’ll know it worked because your terminal prompt will change to show the name of your environment, like this: (ai-env) C:\Users\YourName\Desktop\MyProject>.

Install required packages

With the environment active, install required packages 

#Bash
pip3 install azure-ai-projects==2.0.0b1 azure-mgmt-cognitiveservices azure-identity ipykernel dotenv azure-search-documents==11.7.0b2 requests openai

Authenticate with Azure CLI

For keyless authentication with Microsoft Entra ID, sign in to your Azure account.

From your Terminal, run az login as shown below. Follow the prompts to authenticate

If you have multiple subscriptions, select the one that contains your Azure AI Search service and Microsoft Foundry project.

Start Jupyter Notebook

To start the application, type:

#Bash
jupyter-lab

If successful, you will have JupyterLab launcher accessible on your browser. For example, on http://localhost:8888/lab

Start building and running code

At this point, we are setup to run code snippets in our ai-agentic-retrieval.ipynb Notebook, as shown below

How to run Jupyter Notebook code listings

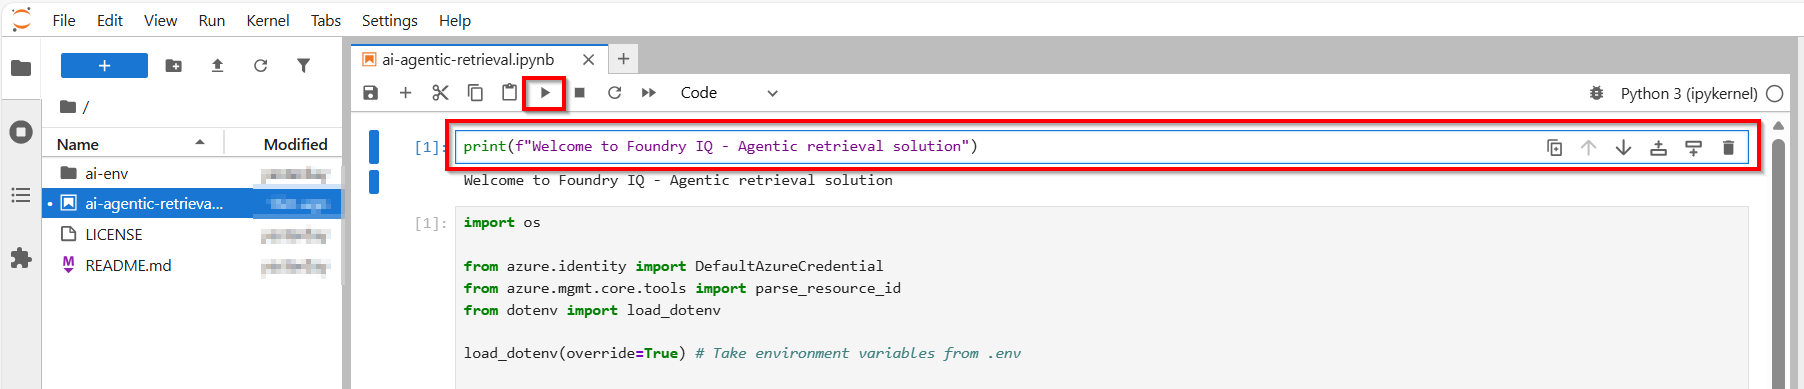
To run the code, simply select and highlight the cell or code block within the Jupyter Notebook. Once highlighted, press the ‘Run’ or ‘Play’ button on the top navigation bar.  Alternatively, you can press Shift + Enter keyboard short cuts as well.

Any expected response or output will then appear below the cell or code block, as shown below.

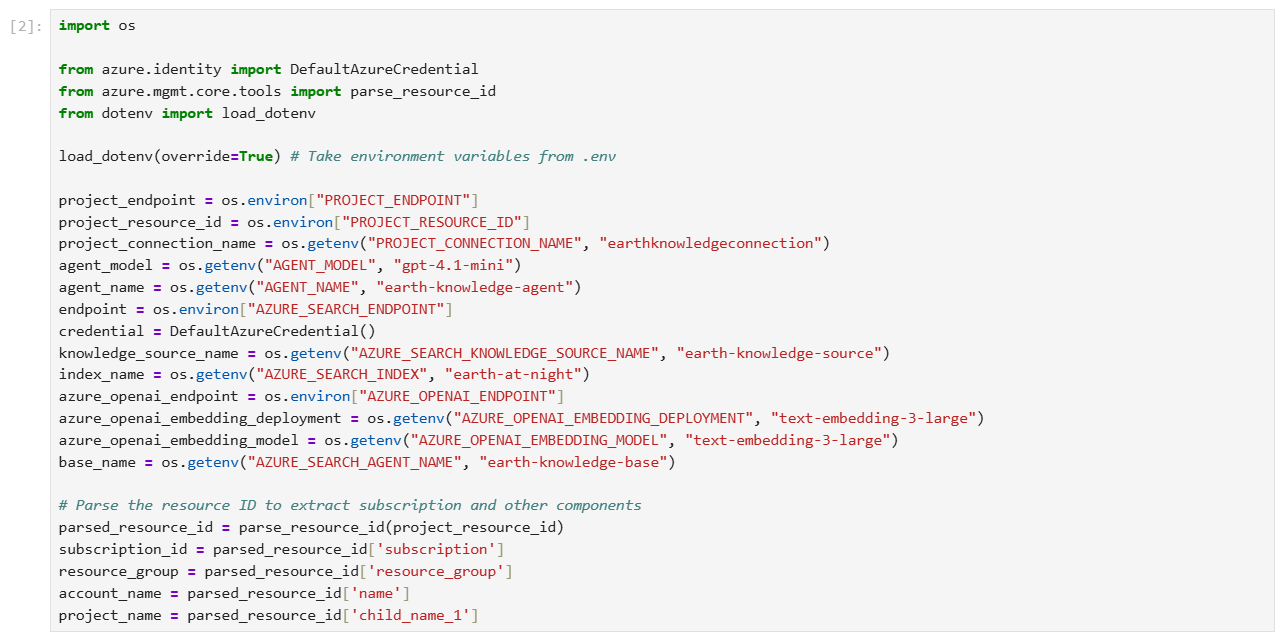
Step 1 – run code to Load environment variables

The following code loads the environment variables from your .env file and establishes connections to Azure AI Search and Microsoft Foundry.

Step 2 – run code to Create a search index

In Azure AI Search, an index is a structured collection of data. The following code creates an index to store searchable content for your knowledge base.

The index schema contains

  • field for document identification
  • field for page content
  • embeddings
  • configurations for semantic ranking and vector search

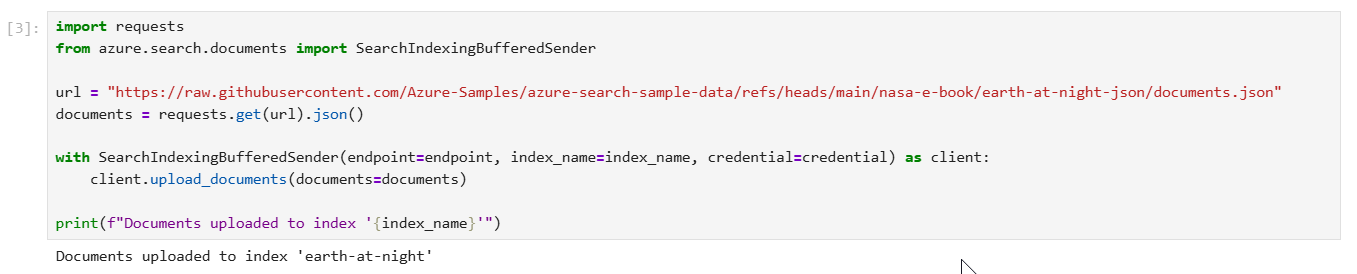
Step 3 – run code to Upload documents to the index

The following code populates the index with JSON documents from NASA’s Earth at Night e-book. As required by Azure AI Search, each document conforms to the fields and data types defined in the index schema.

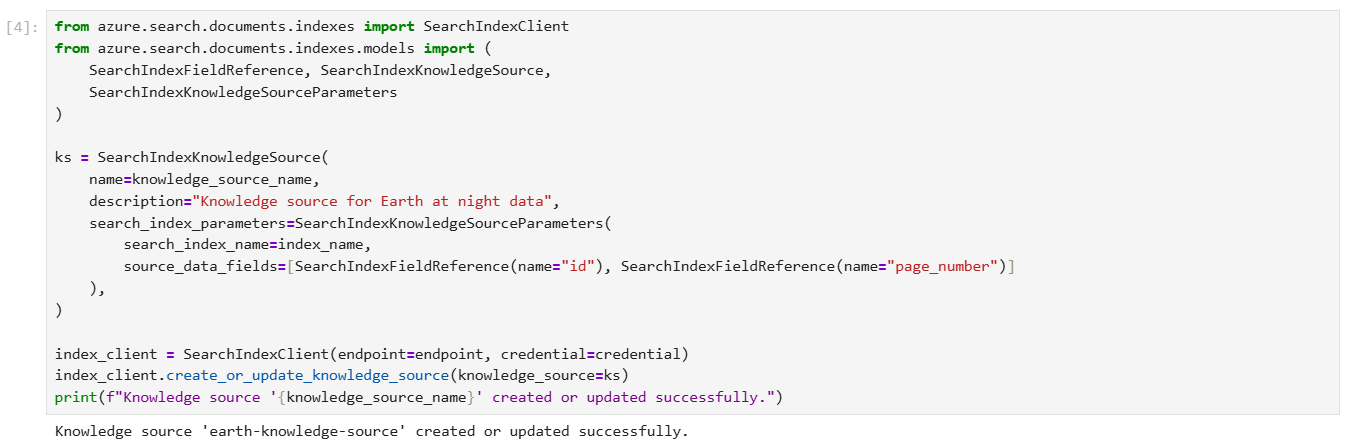
Step 4 – run code to Create a knowledge source

A knowledge source is a reusable reference to source data. The following code creates a knowledge source that targets the index you previously created.

source_data_fields specifies which index fields are included in citation references. This example includes only human-readable fields to avoid lengthy, uninterpretable embeddings in responses.

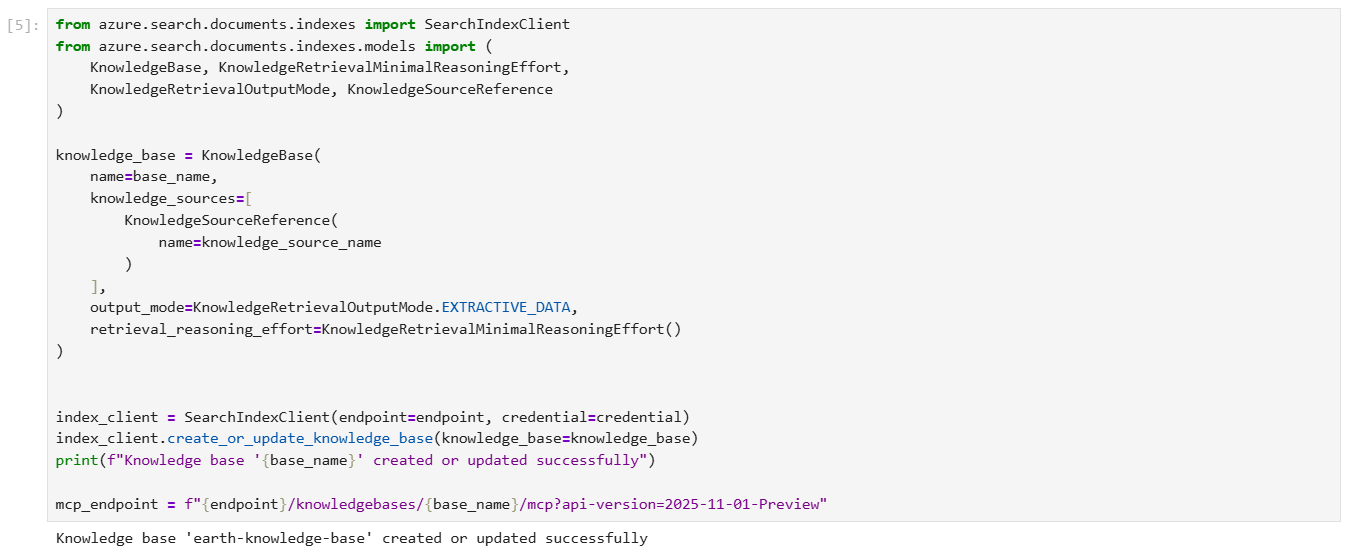
Step 5 – run code to Create a knowledge base

The following code creates a knowledge base that orchestrates agentic retrieval from your knowledge source. The code also stores the MCP endpoint of the knowledge base, which your agent will use to access the knowledge base.

For integration with Foundry Agent Service, the knowledge base is configured with the following parameters:

  • output_mode is set to extractive data, which provides the agent with verbatim, unprocessed content for grounding and reasoning. The alternative mode, answer synthesis, returns pregenerated answers that limit the agent’s ability to reason over source content.
  • retrieval_reasoning_effort is set to minimal effort, which bypasses LLM-based query planning to reduce costs and latency. For other reasoning efforts, the knowledge base uses an LLM to reformulate user queries before retrieval.

Step 6 – run code to Set up a project client

Use AIProjectClient to create a client connection to your Microsoft Foundry project. Your project might not contain any agents yet, but if you’ve already completed this tutorial, the agent is listed here.

Step 7 – run code to Create a project connection

The following code creates a project connection in Microsoft Foundry that points to the MCP endpoint of your knowledge base. This connection uses your project managed identity to authenticate to Azure AI Search.

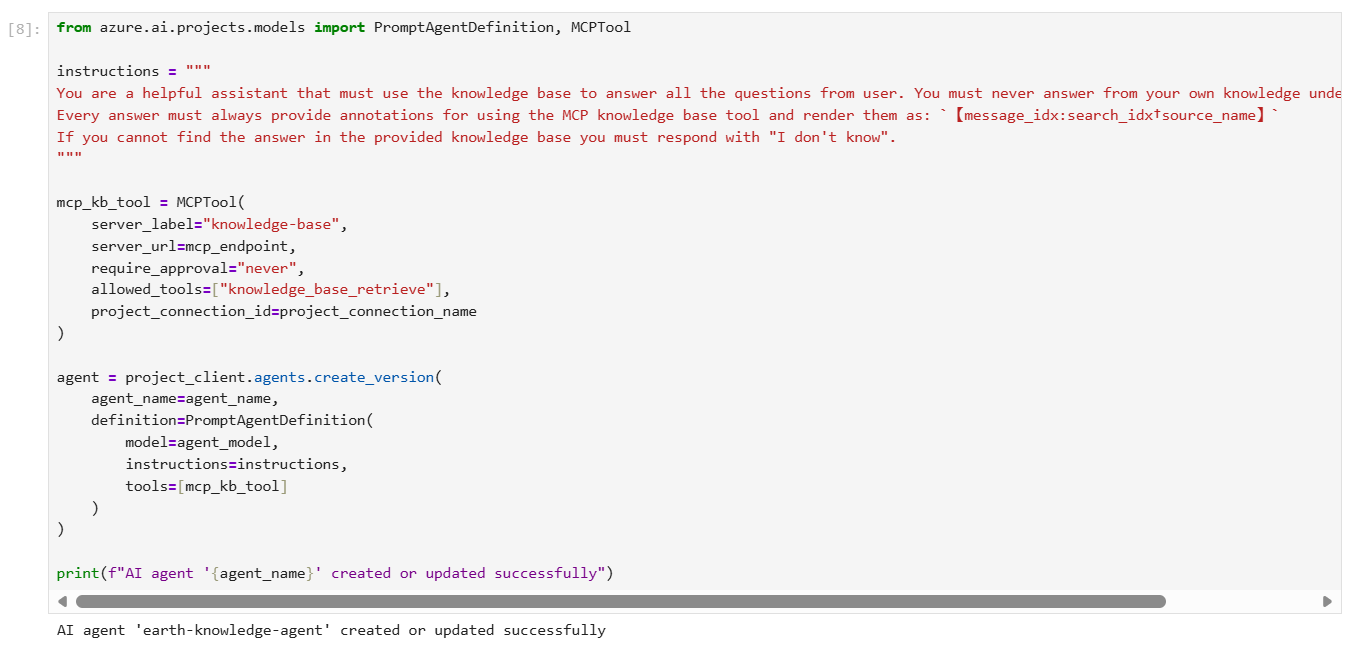
Step 8 – run code to Create an agent with the MCP tool

The following code creates an agent configured with the MCP tool. When the agent receives a user query, it can call your knowledge base through the MCP tool to retrieve relevant content for response grounding.

The agent definition includes instructions that specify its behavior and the project connection you previously created. Based on our experiments, these instructions are effective in maximizing the accuracy of knowledge base invocations and ensuring proper citation formatting.

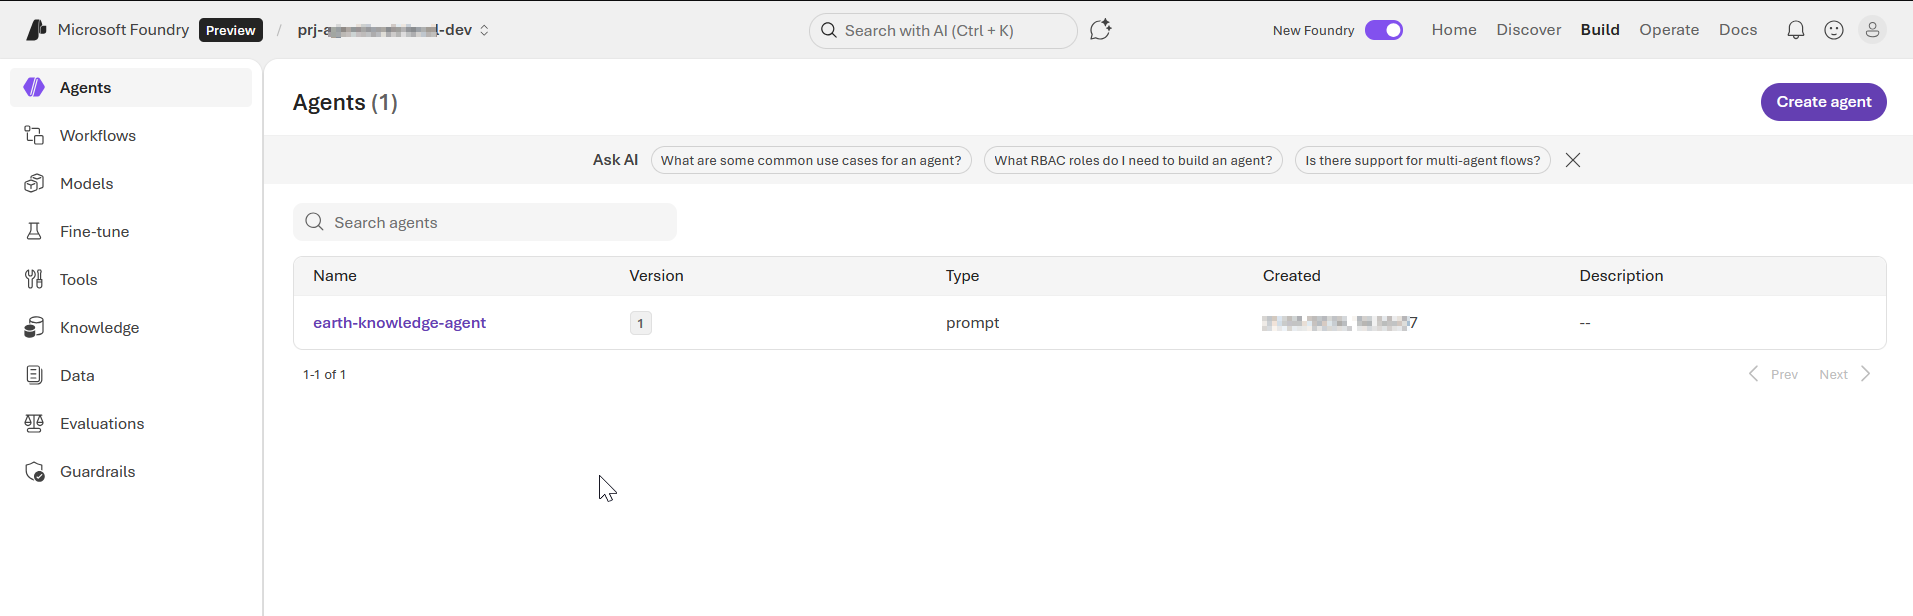
Review of Foundry portal changes

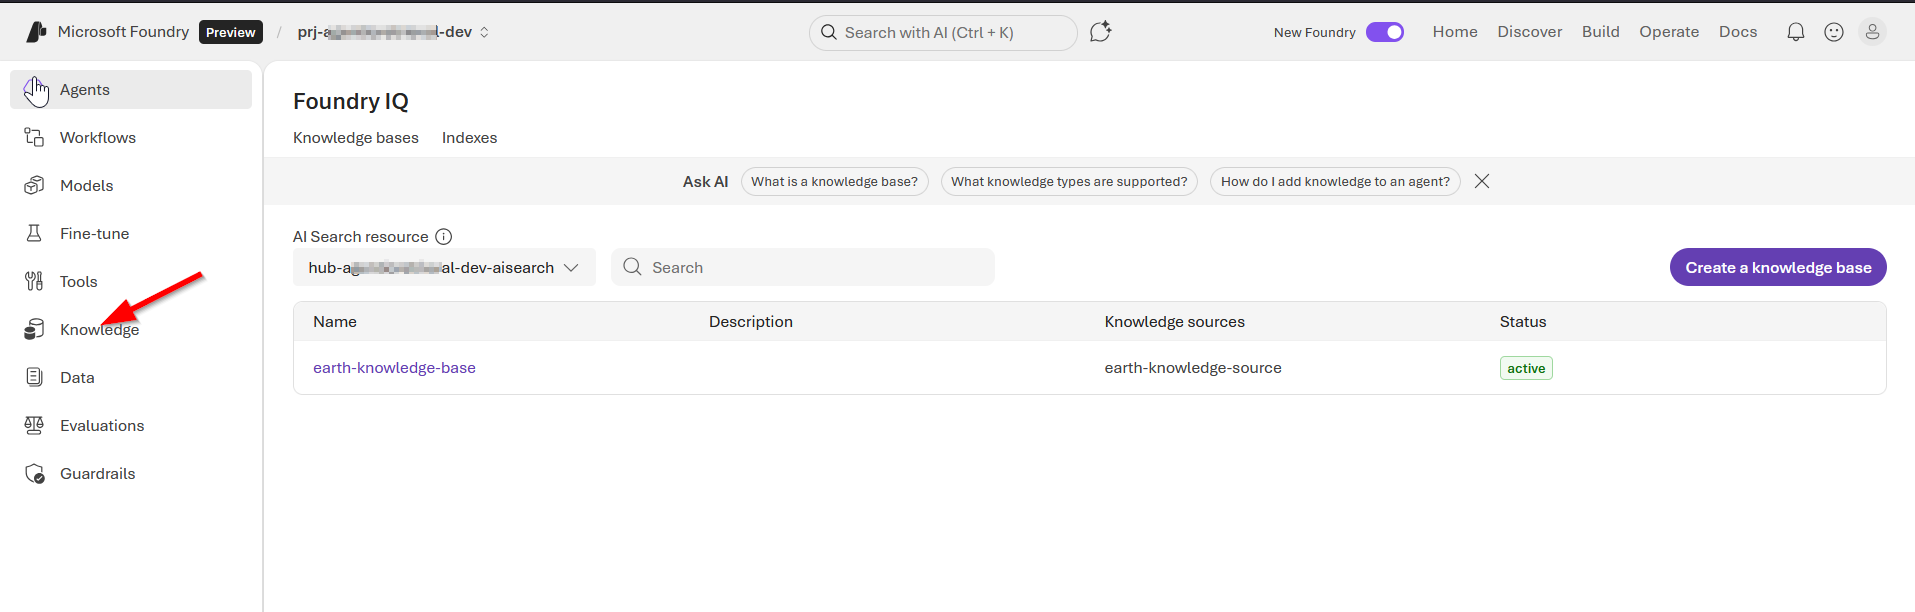
At this point, you can explore Foundry portal to review our agent, the knowledge base among other resources we created for this solution,

Screenshot 1 – Agents page

Screenshot 2 – knowledge base page

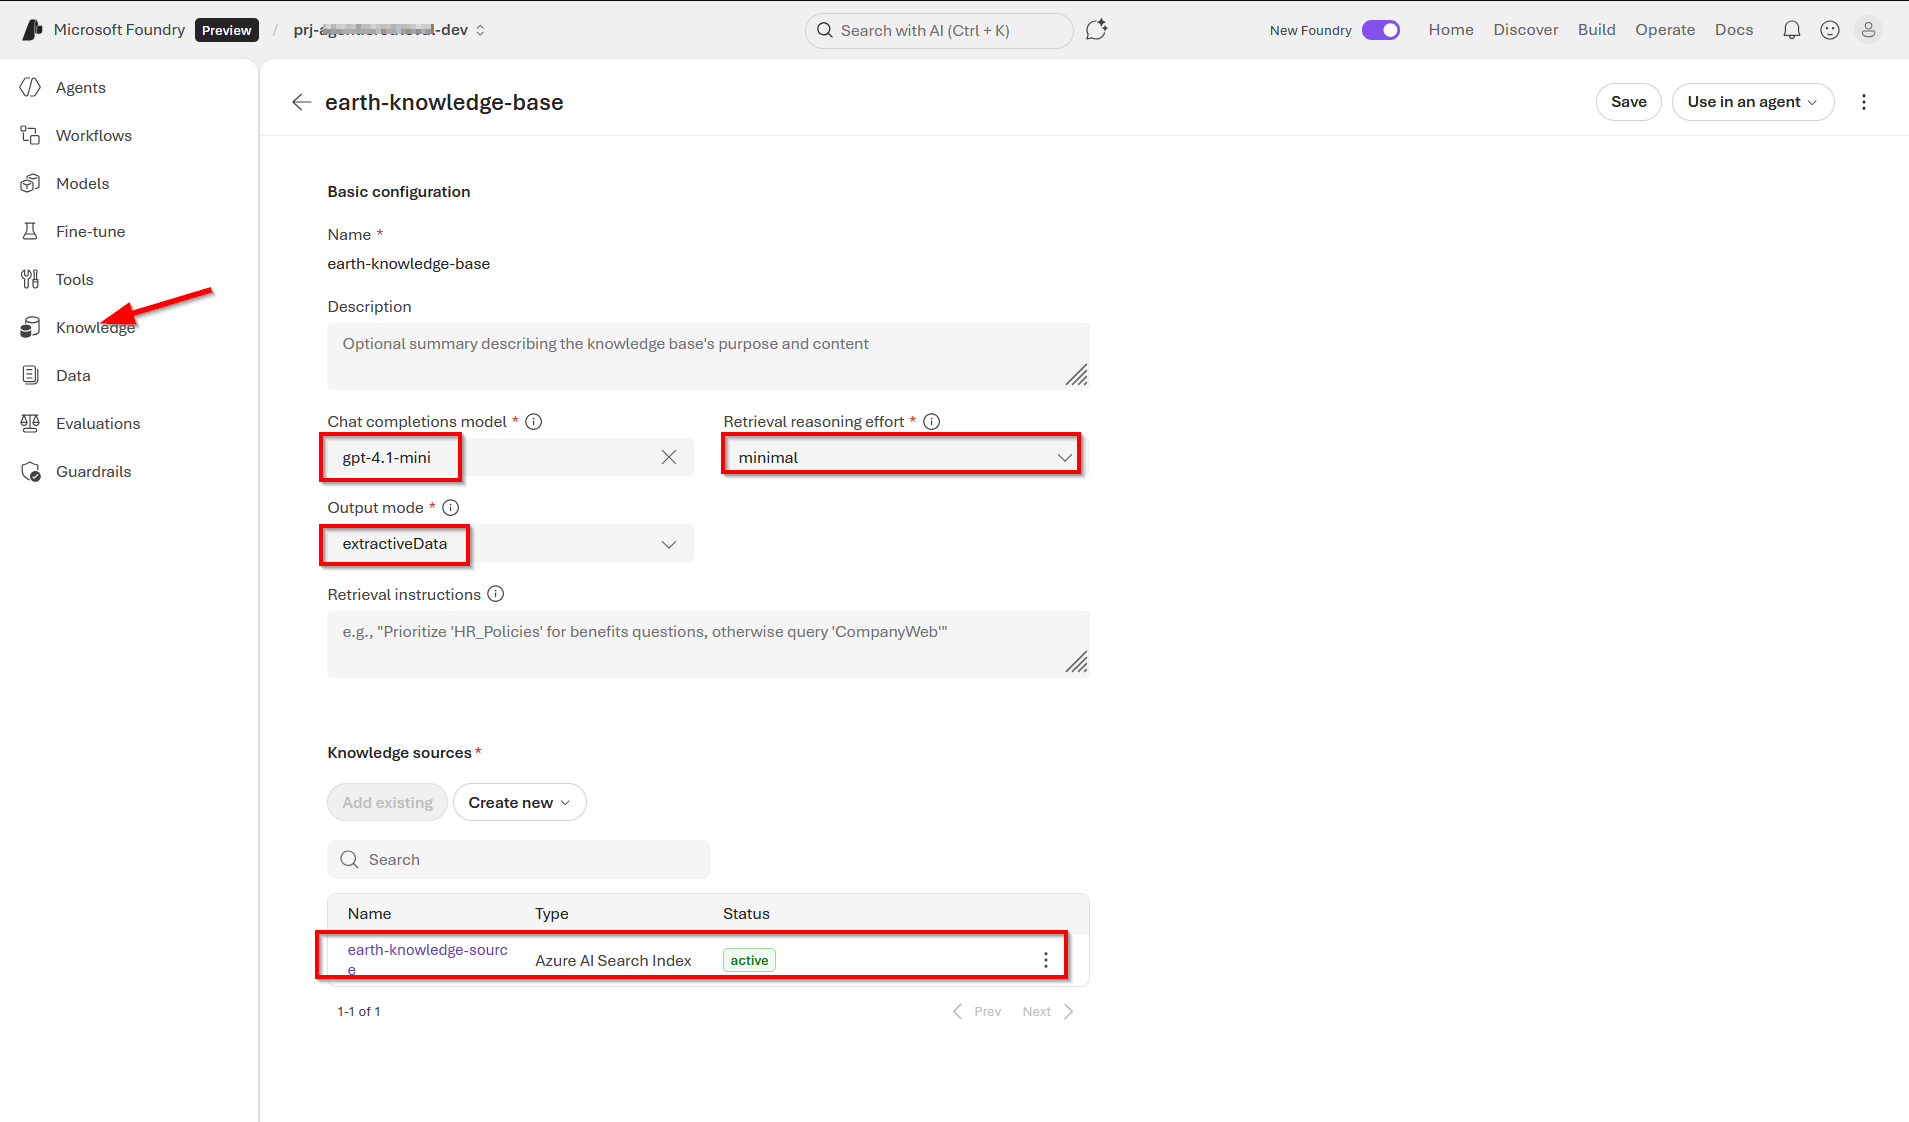
Screenshot 3 – our knowledge base details page

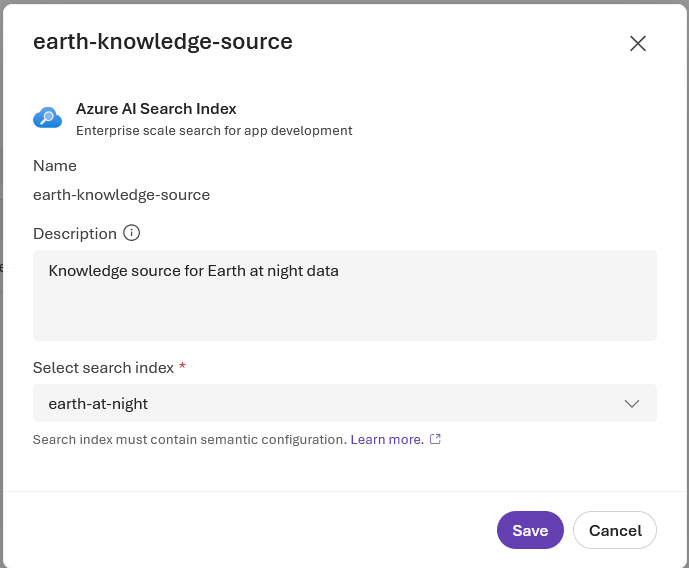
Screenshot 4 – our knowledge source (showing Azure AI Search index)

Step 9 – run code to Chat with the agent

Your client app uses the Conversations and Responses APIs from Azure OpenAI to interact with the agent.

The following code creates a conversation and passes user messages to the agent, resembling a typical chat experience. The agent determines when to call your knowledge base through the MCP tool and returns a natural-language answer with references. Setting tool_choice="required" ensures the agent always uses the knowledge base tool when processing queries.

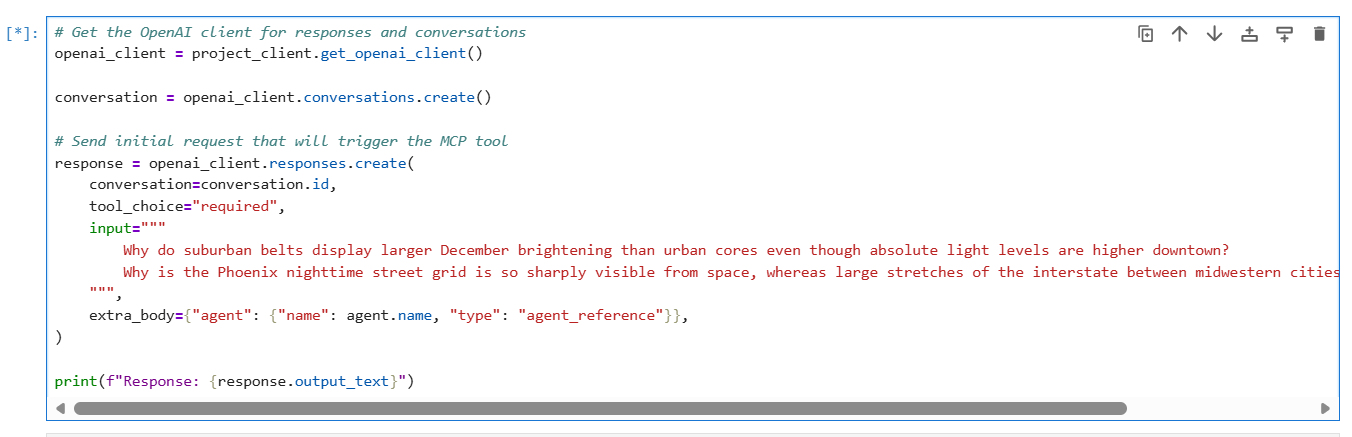
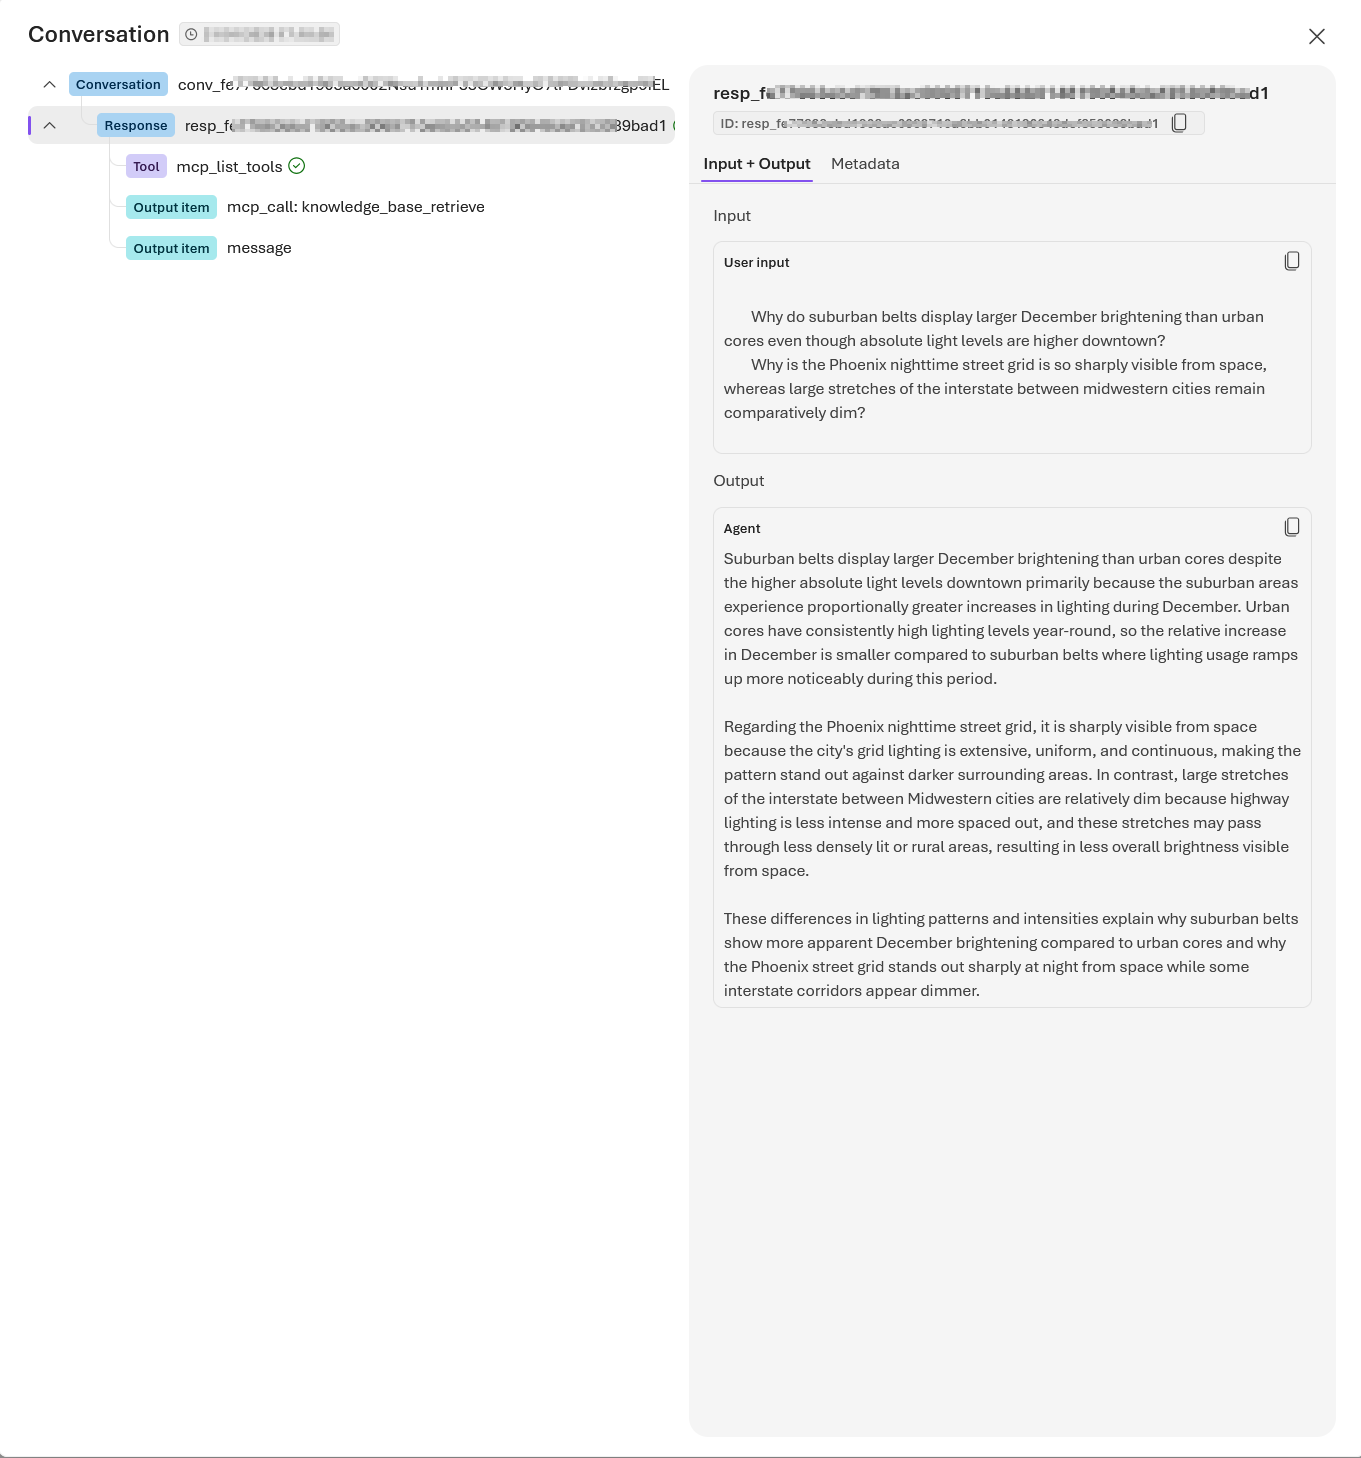
The response should be similar to the following:

Step 10 – run code to Clean up resources

When you work in your own subscription, it’s a good idea to finish a project by determining whether you still need the resources you created. Resources that are left running can cost you money.

In the Azure portal, you can manage your Azure AI Search and Microsoft Foundry resources by selecting All resources or Resource groups from the left pane.

You can also run the following code to delete individual objects:

Full source code and references

You can access the full source code used in this solution from my GitHub repository. It is worth mentioning that I have adopted my solution from a similar tutorial from Microsoft Learn page.

Next steps

In this blog post, we deep dived into part 2 of our Foundry IQ – Agentic retrieval solution. We leveraged Jupyter Notebook to run through the various steps for our source code for implementing the end-to-end solution. The complete code listing in GitHub repository was also shared for your reference.

Stay tuned for future posts, feel free to leave us comments and feedback as well.

Foundry IQ – Agentic retrieval solution – part 1

Context

In this blog post, we are going to explore how to leverage Azure AI search and Microsoft Foundry to create an end-to-end retrieval pipeline. Agentic retrieval is a design pattern intended for Retrieval Augumented Generation (RAG) scenarios as well as agent-to-agent workflows.

With Azure AI search you can now leverage the new multi-query pipeline designed for complex questions posed by users or agents in chat and copilot apps.

Using a sample end-to-end solution, complete with screenshots, I will walk you through creating this Foundry IQ solution.

What is Foundry IQ

Foundry IQ creates a separation of concerns between domain knowledge and agent logic, enabling retrieval-augmented generation (RAG) and grounding at scale. Instead of bundling retrieval complexity into each agent, you create a knowledge base that represents a complete domain of knowledge, such as human resources or sales. Your agents then call the knowledge base to ground their responses in relevant, up-to-date information.

This separation has two key benefits:

  • Multiple agents can share the same knowledge base, avoiding duplicate configurations.
  • You can independently update a knowledge base without modifying agents.

Powered by Azure AI Search, Foundry IQ consists of knowledge sources (what to retrieve) and knowledge bases (how to retrieve). The knowledge base plans and executes subqueries and outputs formatted results with citations.

High level architecture

The diagram shown above shows a high-level architecture of a Foundry IQ solution. The elements of the architecture are explained below.

1. Your App

This your agentic application, a conversational application that require complex reasoning over large knowledge domains

2. Foundry Agent Service

Microsoft Foundry is your one-stop shop for hosting your Azure OpenAI model deployments, project creations and agents

3. Azure AI Search

Azure AI Search is a fully managed, cloud-hosted service that connects your data to AI. It hosts the knowledge base, which handles query planning, query execution and results synthesis

Microsoft Foundry project setup

Follow the following steps to setup a Microsoft Foundry project

  1. Navigate and login to your Azure portal subscription.
  2. Search and select Microsoft Foundry
    • Azure portal Microsoft Foundry resource
  3. On the Microsoft Foundry overview page, select Create a resource
  4. Specify the Subscription details, Resource group to use, the Foundry Resource name, Region as well as Foundry Project name. Ensure you use the recommended naming conventions and best practices for your resources. Also ensure the Region selected supports Azure AI Search.
    • Below is Basics dialog page
    • Below is the Storage dialog page. You will notice I have created new CosmosDB, AI Search and Storage account for my Foundry project.
    • On the Identity dialog page, ensure you Enable a system-assigned managed identity for both your search service and your project.
    • Review and Create the Foundry Resources and Project. This may take a short while to complete
    • When completed, you will see confirmation page below. You can then view the resources using Got to resource button
  5. Go to resource will redirect to the Microsoft Foundry portal as shown below.
    • This is where to retrieve key settings that we will be using in this solution. Such as the following
      • AZURE_SEARCH_ENDPOINT is on the Overview page of your search service.
      • PROJECT_ENDPOINT is on the Endpoints page of your project.
      • PROJECT_RESOURCE_ID is on the Properties page of your project.
      • AZURE_OPENAI_ENDPOINT is on the Endpoints page of your project’s parent resource.
  6. On your search service, enable role-based access and assign the following roles. First, navigate to the Keys section and enable role-based access control
    • Then assign these roles shown below
RoleAssigneePurpose
Search Service ContributorYour user accountCreate objects
Search Index Data ContributorYour user accountLoad data
Search Index Data ReaderYour user account and project managed identityRead indexed content

On your project’s parent resource, assign the following roles.

RoleAssigneePurpose
Azure AI UserYour user accountAccess model deployments and create agents
Azure AI Project ManagerYour user accountCreate project connection and use MCP tool in agents
Cognitive Services UserSearch service managed identityAccess knowledge base

Local Dev environment setup

We will be using Python in this sample solution. I presume you already have Python installed in your development environment.

To verify Python is setup and working correctly, open your command line tool and type the following commands:

Bash
# Check the Python version.
python3 --version
# Check the pip version.
pip3 --version

If you are on Ubuntu, you should see similar output as my screenshot below:

Follow the steps provided in the README file in my accompanying source code repository for steps on how to set up your local a virtual environment. When successful, your ai-agentic-retrieval.ipynb Jupyter Notebook should look like the one shown below:

Source code repository

You can access the source code used in this solution from my GitHub repository.

Next steps

In this blog post, we looked at a Foundry IQ – Agentic retrieval solution. We started with a high-level architecture and the various elements within the Foundry IQ solution. I also walked you through the process of creating a project within Microsoft Foundry and configured access needed. I also shared steps of preparing your local development environment, ready for the Foundry IQ solution. In the follow-up blog post, we will deep dive into the end-to-end solution, including a walk through of the source code.

Stay tuned for future posts, feel free to leave us comments and feedback as well.

Everything AI – RAG, MCP, A2A integration architectures

Context

In this blog post, we are going to explore Agentic AI prominent integration architectures. We are going to discuss RAG, MCP and A2A architectures. If you are not familiar with these terminologies, don’t worry as you are in good company. Let us begin with how we got here in the first place.

What is an Agentic AI?

An AI agent is a system designed to pursue a goal autonomously by combining perception, reasoning, action, and memory. Often built using a large language model (LLM) and integrated with external tools. These agents perceive inputs, reason about what to do, act on those plans, and whilst also remembering any past interactions (memory).

We will now expound more on some of the key words below:

  • Perception – this is how your agent recognises or receives inputs such as a user prompt or some event occurring
  • Reasoning – this is the capability to break down a goal or objective into individual steps, identify which tools to use and adapt plans. This will usually be powered by an LLM
  • Tool – is any external system the agent can call or interact with, such as an API call or a database
  • Action – is the execution of the plan or decision by the agent, the act of sending an email for example, or submitting a form. Agent will perform the action leveraging the tools

What is Retrieval Augmented Generation (RAG)?

Carrying on with our AI agent conversation, suppose we need to empower our agent with deep, factual knowledge of a particular domain. Then RAG is the architectural pattern to use. As an analogy, think of RAG as an expert with instant access to your particular domain knowledge.

This pattern allows us to connect an LLM to an external knowledge source, which is typically a vector database. Therefore, the agent’s prompts are then “augmented” with this more relevant, retrieved data before the final response is generated.

Key benefit

With RAG, agents drastically reduces “noise” or “hallucinations” ensuring that the responses and answers are based on specific and latest domain knowledge or enterprise data

Some use cases

  • Q&A scenarios over Enterprise Knowledge – think of an HR agent that answers employee questions by referencing HR policy documents. Ensures the answers are accurate and citations of policies
  • Legal Team agent – that analyses company data rooms, summarizing risks and cross-referencing findings with internal documents and playbooks

What is Model Context Protocol (MCP)?

MCP is an open-source standard for connecting AI applications to external systems. As an analogy, think of MCP as a highly skilled employee who knows exactly which department (API) to call for a particular task.

MCP architecture, adapted from: https://modelcontextprotocol.io/docs/getting-started/intro

This is an emerging standard for enabling agents to discover and interact with external systems (APIs) in a structured and also predicable manner. It is like a USB-C for AI agents

Key benefit

MCP provides a governable, secure and standardized way for our agents to take action and interact with enterprise systems, doing more and going beyond simple data retrieval as in the use cases for RAG

Some use cases

  • Self-service sales agent – think of a Sales agent that allows a salesperson to create a new opportunity in a company CRM, then set up and add standard follow-up tasks as required. The agent does discovery of available CRM APIs, understand the required parameters and executes the transactions securely.
  • An accounting agent – think of automated financial operations where upon receiving an invoice in a email inbox, the agent calls the ERP system to create a draft bill, match it to Purchase Order and schedule a payment.

What is Agent-to-Agent (A2A)?

This does what is says on the tin. Multiple, specialized or utility agents collaborate to solve a problem that is too complex for a single agent. The graphic below illustrates this collaboration. As an analogy, think of a team of specialists collaborating on a complex project.

Key benefit

A2A enables tackling highly complex, multi-domain problems by leveraging specialized skills, similar to a human workforce.

Some use cases

  • Autonomous product development team – think of an autonomous product development teams consisting of “PM agent”, “Developer agent”, “QA agent” all working together. PM writes specs, Developer writes code and QA tests the code, iterating until a feature is completed. Specialization means agents can achieve higher quality of outputs at each stage of a complex workflow.

So which is it, RAG, MCP or A2A?

As architects we often rely on rubrics when we need to make architectural decisions. With Agent AI solutions, you can use a set of guidelines that best helps you assess the business domain problem and come up with the right solution. Below is an example rubric to help with your assessments and criteria when to leverage RAG, MCP or A2A.

Start with a goal

Agentic AI solutions are not any different. There is no “one size fits all” solutions. Always start with a goal, business objective so you can map the right Agentic AI solution for it. Sometimes Agentic AI many not be the right solution at all, don’t just jump on the bandwagon.

Trends and road ahead

Agentic AI is at very early stages and expect more emergence patterns in coming days and months. We may need to combine RAG and MCP and leverage a hybrid approach to solving AI problems. We already seeing the most valuable enterprise agents are not pure RAG or MCP but a hybrid.

Next steps

In this blog post, we looked at prominent integration architectures in this age of Agent AI. We explored RAG, MCP and A2A architectural patterns. We also looked at some of the use cases for each as well as key benefits we get from each pattern. We finished with a sample architecture rubric that can be leveraged.

Stay tuned for future posts, feel free to leave us comments and feedback as well.

Step-by-step guide to integrating with Sitecore Stream Brand Management APIs

I previously blogged about Sitecore Stream Brand Management and looked at a high level architecture on how the Brand Kit works under the hood. Today, I continue this conversation and look at a more detailed step-by-step guide on how you can start integrating with the Stream Brand Management APIs.

As a quick recap, Sitecore have evolved the Stream Brand Management to provide a set of REST APIs to manage life-cycle of the brand kit as well as getting a list of all brand kits. You can now use REST APIs to create a new brand kit, including sections and subsections, and create or update the content of individual subsections. You can also upload brand documents and initiate the brand ingestion process.

  • Brand Management REST API (brand kits, sections/subsections)
  • Document Management REST API (upload/retrieve brand documents).

These new capabilities opens opportunities such as allowing you to ingest brand documents directly from your existing DAM. You could also integrate them with your AI agents so that you can enforce you brand rules

Step 1 – Register and get Brand Kit keys

Brand Management REST APIs use OAuth 2.0 to authorize all REST API requests. Follow these steps below:

a) From your Sitecore Stream portal navigate to the the Admin page and then navigate to Brand Kit Keys section, as shown below.

b) Then click on Create credential button which opens the Create New Client dialog similar to one shown below. Populate with the required client name and a description, then click on Create

c) Your new client will be created as shown below. Ensure you copy the Client ID and Client Secret and keep them in a secure location. You will not be able to view the Client Secret after you close the dialog.

Step 2 – Requesting an access token

You can use your preferred tool to a request the access token. In the sample below, I am leveraging Postman to send a POST request to the https://auth.sitecorecloud.io/oauth/token endpoint.

  • client_id This is the Client ID from previous step
  • client_secret This is the Client Secret from previous step
  • grant_type This defaults to client_credentials
  • audience This defaults https://api.sitecorecloud.io

If successful, you will get the response that contains the access_token as shown below

  {
    "access_token": "{YOUR_ACCESS_TOKEN}",
    "scope": "ai.org.brd:w ai.org.brd:r ai.org.docs:w ai.org.docs:r ai.org:adminai.org.brd:w ai.org.docs:w ai.org:admin",
    "expires_in": 86400,
    "token_type": "Bearer"
  }

Step 3 – Query Brand Kit APIs

You can start making REST APIs securely by using the access token in the request header.

Get list of all brand kits

Below is a sample request that I used to get a list of available brand kits for my organisation. I am leveraging Postman to send a GET request to the https://ai-brands-api-euw.sitecorecloud.io/api/brands/v1/organizations/{{organizationId}}/brandkits endpoint.

You can get your organisationId from your Sitecore Cloud portal

https://portal.sitecorecloud.io/?organization=org_xyz

Full list of Brand Kit REST APIs

Sitecore API Catalog lists all the REST APIs plus sample code on how to integrate with them. Below is a snapshot of the list of operations at the time of writing this post:

Ensure you are using the correct Brand Management server. Visit Sitecore API catalog for list of all the servers. Below is a snapshot of the list at the time of writing this post:

Next steps

Have you started integrating Sitecore Stream Brand Management APIs yet? I hope this step-by-step guide helps you start exploring the REST APIs so you can integrate them with your systems.

Stay tuned for future posts, feel free to leave us comments and feedback as well.