On this blog post, I wanted to share details on how to setup your Visual Studio project and solution as well us how to deploy or publish the connector to your Microsoft Azure cloud.
Create a function app project
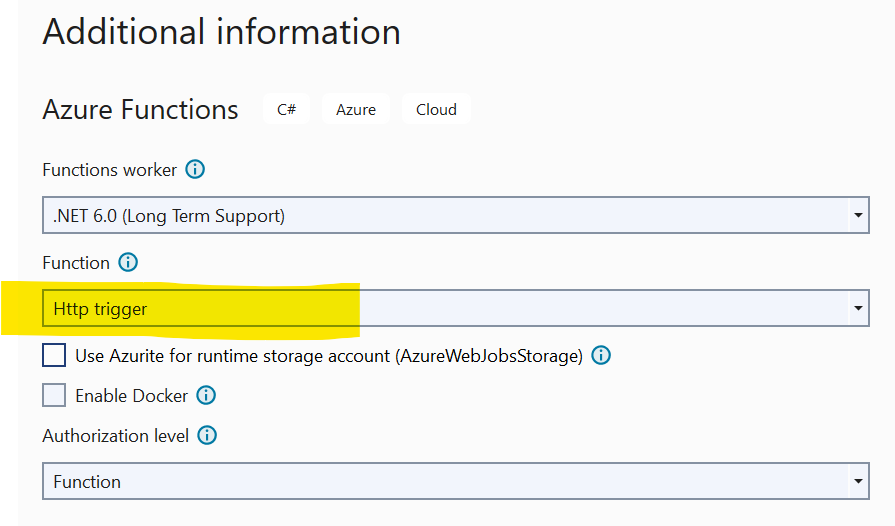
Using latest Visual Studio IDE, create a new Azure Functions project, using C# template as shown below
Choose a meaningful name for your project and progress through the next step. Ensure you select Http triggered function as show below.
Finalise the create project wizard to get your project created.
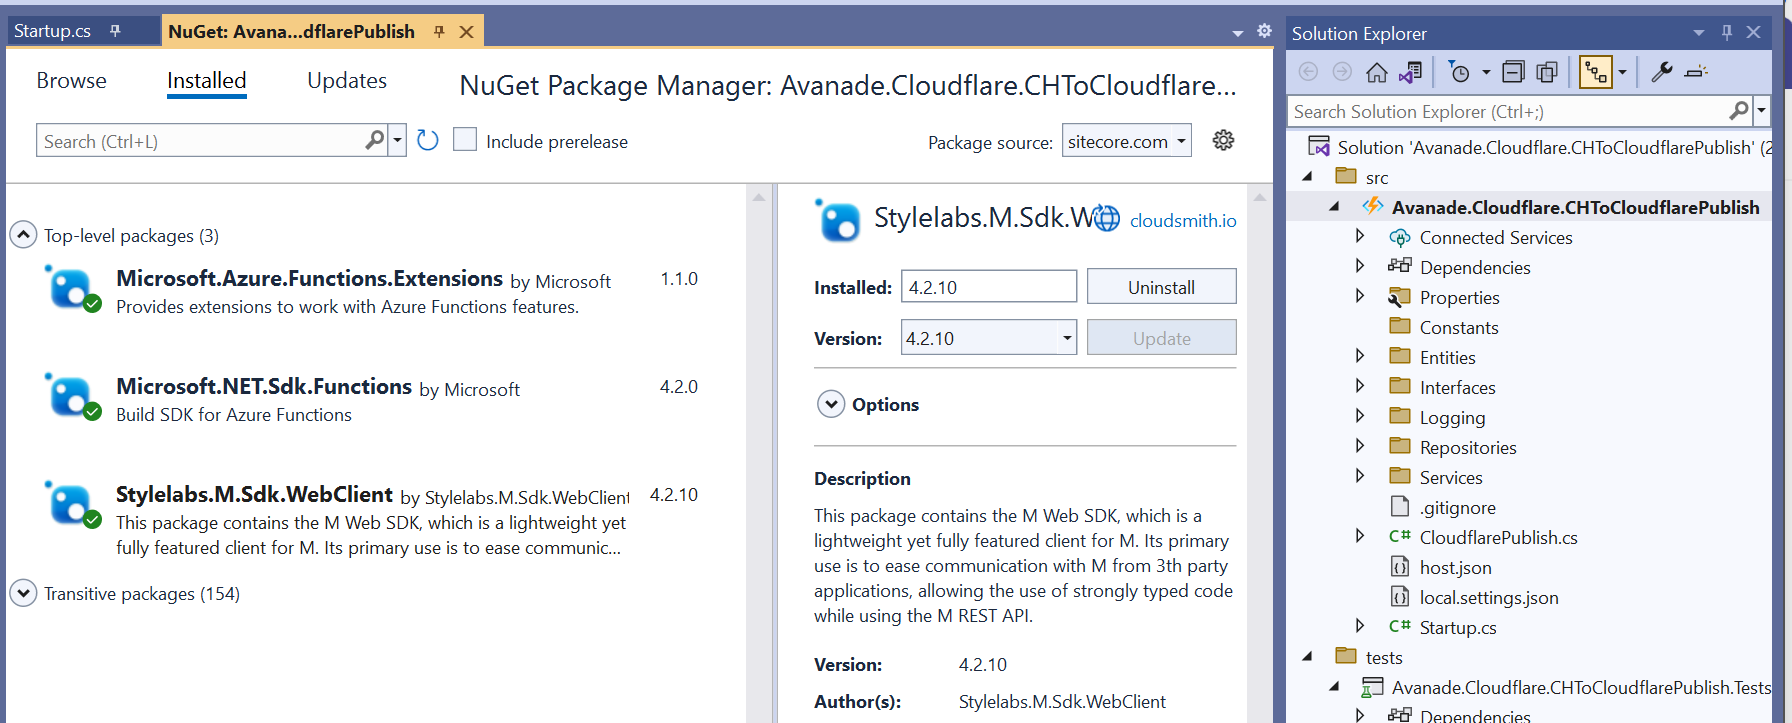
In addition, ensure you have added the Microsoft NuGet Packages below to enable dependency injection to your Func app.
Enabling FunctionStartup in your Func app
To enable dependency injection in your project, add a Startup class similar to the one shown below. The Startup class needs to inherit the FunctionStartup, which allows us to configure and register our interfaces.
Creating Function App on Microsoft Azure portal
As explained in the video playlist, you will need to publish your Func app into your Microsoft Azure subscription.
You will need to create a Function App app in your Microsoft Azure subscription using the create template as shown below. Ensure you select relevant Subscription, Resource Group and .NET Runtime stack.
Progress through the create wizard screens to stand up your Function app in the portal.
Getting publish profile from the Microsoft Azure portal
On your newly created Function app, navigate to the Deployment Center as shown below
Clicking on the the Manage publish profile link should present a pop up window, from which you can download the publish profile. Keep note on the location where you have downloaded this publish profile file.
Importing publish profile into your Visual Studio project
Right-click on your project within VS, which should pop-up the menu shown below.
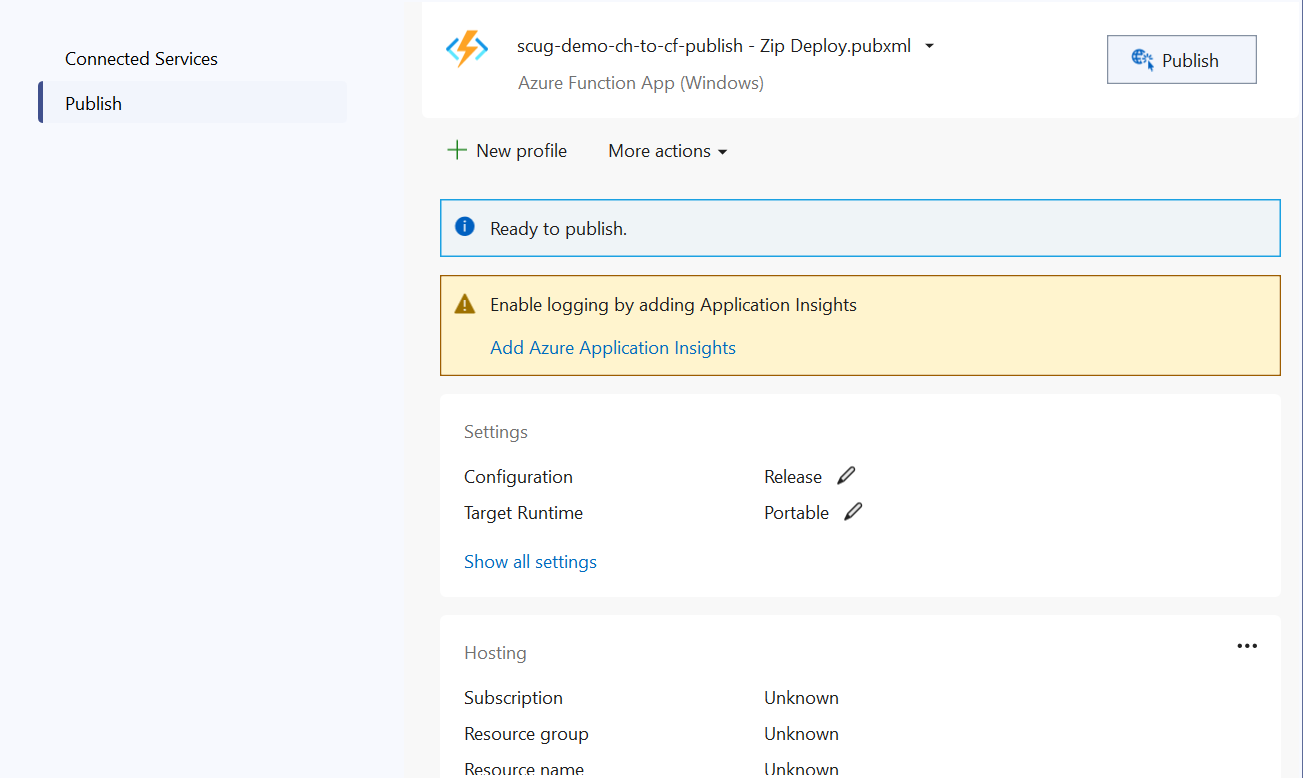
Click on the Publish… menu to launch the Publish window similar to the one shown below.
Using the Import Profile option will allow you to browse and select the publish profile file that you previously downloaded from Microsoft Azure portal. This will then successfully setup the publish profile to your Microsoft Azure subscription.
Publishing the custom connector from VS into Microsoft Azure portal
On the Publish window, you will notice your publish profile is selected, similar to one below.
Clicking on Publish button will deploy the Function app to your Microsoft Azure subscription.
Next steps
In this blog post, we have explored at how to set-up a Function app in your local developer environment, add required NuGet Packages as well us publishing it to your Microsoft Azure subscription
I have had a relatively productive year compared to 2022, and below is a summary of my contributions:
Content contributions
I believe I have created content that adds value mostly within Content Hub, Sitecore Experience Edge, Sitecore Personalize among the Sitecore composable stack. I believe I have produced content that meets expectations in terms of quality, quantity, and visibility and more importantly, add value to our community. This has been through blog posts (x14 Sitecore blogs in 2023, with a total views: 2400+ so far), code sharing via GitHub, reference Architectures, YouTube content among other social channels:
I have provided feedback using the Sitecore Slack Channels directly to Sitecore Product Teams and answered questions from Sitecore community around Sitecore Personalize, Content Hub among other products, https://app.slack.com/client/T09SHRBNU/search?cdn_fallback=2
Next steps
For 2024, I look forward keeping up producing content that meets expectations in terms of quality, quantity, and visibility. Keep up and drive further engagement of wider Sitecore community by leveraging my previous MVP credentials and strong social profile. I am putting myself forward for public speaking events throughout the calendar year. I intent to continue identifying any gaps and filling them, providing product feedback, improvements, and references
Stay tuned and best of luck with those submitting the Sitecore MVP 2024 applications
Most businesses already have existing investments in some form of a video streaming platform, which they are leveraging to deliver marketing material such as video content to their customers. Their digital marketing teams are already familiar with tools such as YouTube, Brightcove among others, which they work with as part of their daily jobs.
Your company has recently made investments in Content Hub as strategic solution for your DAM needs in your business. With such an investment, your marketing, content, film and production teams will start using Content Hub as single repository for your videos and imagery to cater for all needs in your business.
How do you ensure your video assets within Content Hub are synced with your existing streaming channels?
You will need a connector, but we have you covered
Unfortunately, Sitecore doesn’t provide an out-of-the-box connector that you can leverage for this. You will need to build such a connector yourself, so you can have an integration between Content Hub and your existing video streaming channel.
Line 1 to 5 has all the required libraries being used in the script
Line Line 7 & 8 has logic for extracting the id of the content item, which we are gathering the data in this script. Data from the web API request is specified in Context.Data, which is a JToken. The script expects it to be a JObject containing a contentId property.
Line 10 to 14 contains logic for checking whether the content id could not be extracted from the data. In which case, a response http status-code 400 (bad request) together with a user-friendly error-message is returned. This is done with help of helper function SetError, as shown below:
Line 16 to 19 contain the EntityLoadConfiguration we are going to use when loading the assets linked to our content item. Only Filename, Title and Description as well as AssetToSubtitleAsset relation will be loaded in our use case.
Line 21 to 24 similarly contain the EntityLoadConfiguration we are going to use when loading the content item (our blog post content type). Blog_Title, Blog_Quote, Blog_Body as well as CmpContentToMasterLinkedAsset & CmpContentToLinkedAsset relations will be loaded here. CmpContentToMasterLinkedAsset relation holds the link to the master image associated with this item. CmpContentToLinkedAsset relation has the assets linked with this item, such as the video asset.
Line 26 to 31 contain the logic for loading the content (Blog post), by leveraging MClient.Entities.GetAsync function and specifying the content id and the EntityLoadConfiguration already defined above. We have a check on line 27 whether the content entity was actually found, and return a response http status-code 400 (bad request) together with a user-friendly error-message, when none was found.
Line 33 to 37 start preparing the output object for our script. We have created a new JObject which has the shown properties. We have added the values of properties Blog_Title and Blog_Quote and Blog_Body. We are going to add more properties as we walk through the rest of the script.
Second part of the script
The code listing from line 39 through to 83 has the logic for loading the video asset linked with this content item.
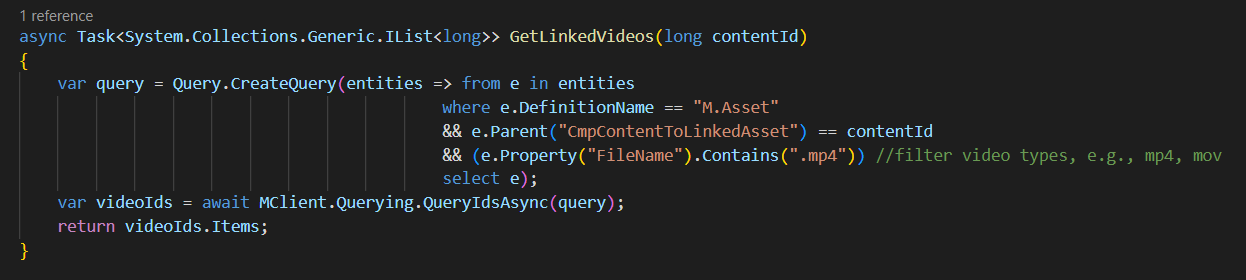
Line 39 get the list of video asset ids by using a helper function GetLinkedVideos shown below. This function makes use of the LINQ query, which filters down only entities of type M.Asset which are linked to current content id (parent in the CmpContentToLinkedAsset relation). In my use case, I have used the file extension .mp4 to identify video asset (but you could use any other property or combination of properties to meet your specific use cases)
Line 40 checks if our GetLinkedVideos found any video ids, in which case the rest of the logic will try and process them
Line 42 extract the first video id that was found. I have used the MCient.Logger.Info method to log user friendly messages that helped me show which video ids were found. These message appear on the Action Script’s View Logs window.
Line 45 to 46 contain the logic for loading the video asset entity, by leveraging MClient.Entities.GetAsync function and specifying the video asset id and the EntityLoadConfiguration already defined before in first part of the script. Line 46 checks to ensure the video asset was found, for us to do further processing
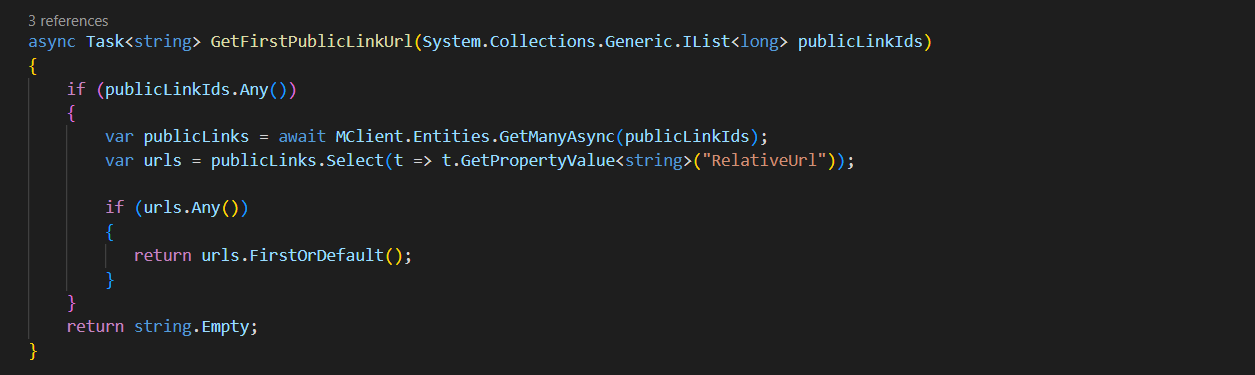
Line 48 and 49 contains the logic for getting the video asset public link, which is required as part of the output from the script. On line 48, I am leveraging GetPublicLinks function, which I have defined as shown below. I am interested in the original rendition of my video asset. Please note that if the video asset does not have original public link generated, nothing will be retrieved.
Which is why the code on line 49 further makes use of a function named GetFirstPublicLinkUrl which helps load the M.PublicLink entity and inspect the RelativeUrl property, as shown below.
Line 50 to 55 we are now creating a new JObject which has the shown properties as expected the output of the script. This object is added to videoAsset section of our main result object.
Line 57 contain logic for getting the video asset subtitles. The AssetToSubtitleAsset is a IParentToManyChildrenRelation, so we get hold of subtitles using the Children property from this relation. In essence, a video subtitle is an asset in its own right. So the code listing from Line 59 is trying to load each of the subtitle asset and we are interested in the Title property as well as the Public Link (original rendition). This is now familiar to how we got public link for the video asset itself. We add each of these properties in a JArray, which in turn, is added to the result.
Part three of the script
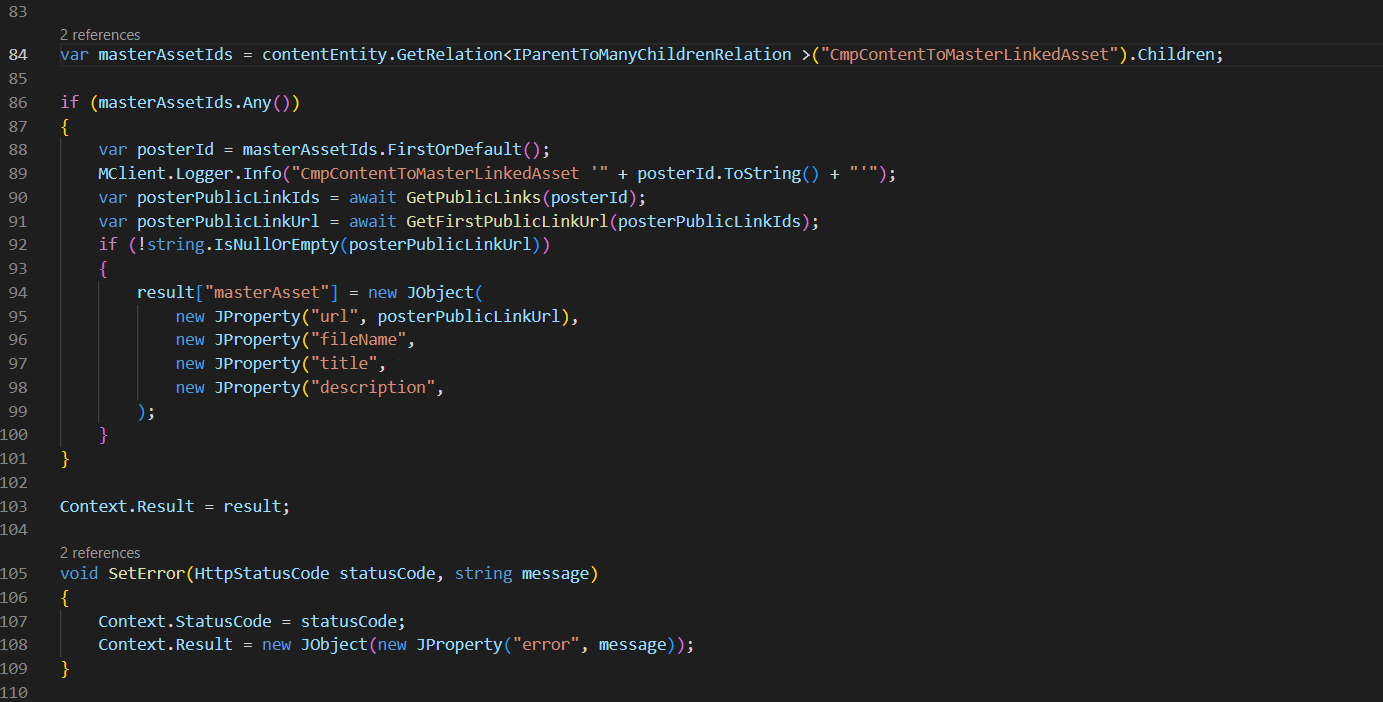
In the last part of the script, we also get the master asset linked to our content item. In this case, we are interested in the asset Public Link, asset file name, Blog_Title and Blog_Body properties. We create a new JObject which has the shown properties as expected and added to the result object.
Line 103 stores our result object that we have been preparing onto the Context. This tells the script to return it to the user.
Final script output
The script output is similar to the one shown below.
Within Content Hub CMP, the content metadata can be stored in various places including the properties and related entities. For example, a Blog post content item can have multiple attachments, such as Imagery and Video assets linked from the DAM, as shown below.
Imagine you wanted to query all these metadata for your blog post, plus all the linked attachments. For the assets, you would like to also get video subtitles or even public links for them. Sounds complicated enough?
Well, this blog post will explore a Content Hub hidden gem to save your day. Please read on.
Web Scripts
Luckily for us, Content Hub supports creation of Action scripts that are designed to be executed using a Web API. This is a very powerful capability since we can leverage such a script to aggregate metadata from various Content Hub entities, whether this is stored within properties or relations. We can then execute this script using a single Web API, thereby avoiding unnecessary multiple trips to fetch such data.
How to create an Action Script
To create a new script, navigate to Manage -> Scripts page
Then click on +Script button
This will pop-up a screen similar to this shown below. Enter Name, specify Action Script type and optionally enter Description. Click Save
The Action script will be created and appears on the scripts list, similar to below:
How to add code/edit, build and publish your script
Click on your script from the script list, which will open Script details page
Click on the Edit button on top of the page to enable editor section, as shown below. Use the editor section to add the source code for your script
Click on Build button to compile the source code for your script.
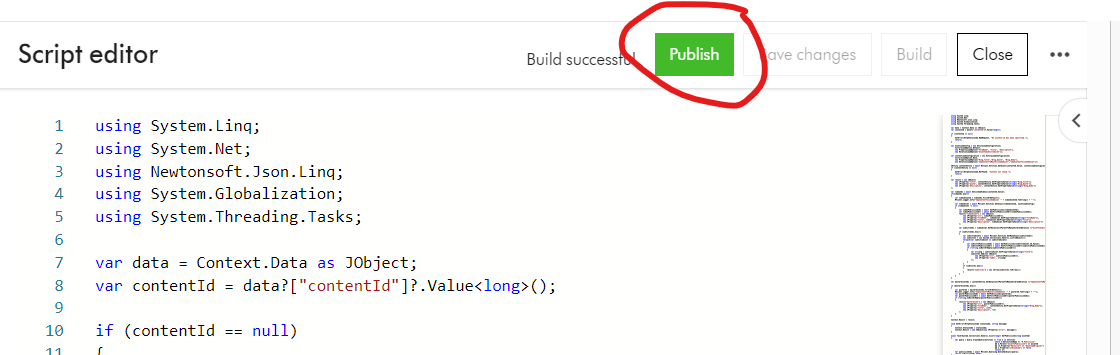
Click on Publish button to publish the script and make code changes take effect.
Finally, remember to Enable the script from the script list, to make it available for use
Executing your Action Script
To execute your Action script, simply send an HTTP POST request to the script endpoint, using a tool such as Postman or CURL. Below is a Postman sample. ch_base_url is your Content Hub instance base URL. SCRIPT_ID is the script identifier
In the sample request above, I have specified the request body with a parameter containing the CMP content identifier that I would like to aggregate all the metadata. I will cover more on the workings of this script in a follow up blog post.
If successful, you will get an output similar to the one below.
You can see within a single Web API call, we are able to get all the metadata related to a CMP Blog post content item:
M.Content properties for the Blog post such as Title, Quote and Description
M.Content relations such as CmpContentToMasterLinkedAsset and CmpContentToLinkedAsset
M.Asset properties such as Filename, Title and Description
M.Asset relations such as AssetToSubtitleAsset
Video asset subtitle properties such as Filename, Title and Description
M.Asset public links such as DownloadOriginal URLs
Next steps
In this blog post, I have introduced the first part on Content Hub Action Scripts for Web API use cases. We have walked through steps of creating a new script, editing and build the source code, publishing and enabling it for use. We have also looked at how to execute the Web script using a Postman tool.
GraphQL is a kind of query language and server-side runtime technology used widely for application programming interfaces (APIs) that ensure that the client gets the required data. Nothing less or nothing more. Created by Facebook, GraphQL has a lot of aims and functions:
A powerful data-fetching API
API interface that’s easy to learn and work with
An open-source query language making APIs fast and flexible
An effective method to streamline security management for the API
A way to give developers and business analysts the ability to develop APIs with desirable methods
A query language that gets along with a given integrated development environment easily and effectively
The facility to develop APIs that will function the way the client/end-user wanted or expected
GraphQL Playground
The easiest way to compose GraphQL queries to query your Sitecore Experience Edge is to make use of the GraphQL playground. I am presuming that you already have your Sitecore Experience Edge instance connected to your Sitecore Content Hub instance or Sitecore XM Cloud instance. To refresh your memory, you can visit this blog post where I have detailed steps to help you with the set up
In this blog post, I will be working with my Sitecore Content Hub instance to share a few tips and tricks. You will find these tips and tricks applicable to Sitecore XM Cloud as well.
Preview and Delivery APIs
Before you can access the GraphQL playground, you need to decide whether you are going to be using the Preview API or the Delivery APIs.
Preview API: The Preview API is a GraphQL endpoint that exposes a preview of your content. Use the Preview API to access content that is not approved yet, including drafts. This can be useful when you want to test content in a staging environment before going to production. This is accessible using endpoint {ContentHubURL}/api/graphql/preview/v1 where ContentHubURL is your Sitecore Content Hub instance url.
Delivery API: The Delivery API is a GraphQL endpoint that exposes approved and published content. Use this API for all production-related actions. This is accessible using endpoint https://edge.sitecorecloud.io/api/graphql/v1
You will also need access to API Keys to use with your Preview or Delivery APIs. You can obtain your API keys as follows:
Navigate to Manage -> API Keys to launch the API Keys management screen
On the API Keys screen, you need to provide the required name and scope of the API Keys, then click the call to action to generate the Preview or Delivery API keys. Please keep a note of them as you get only once chance to view and copy them. I recommend storing these keys securely on your Key Vault or similar tool.
Launching GraphQL Playground
To launch the GraphQL playground, open your browser and specify the following URL:
Preview IDE: {ContentHubURL}/api/graphql/preview/ide This will launch the Preview API playground
Delivery IDE: https://edge.sitecorecloud.io/api/graphql/ide This will launch the Delivery API play ground
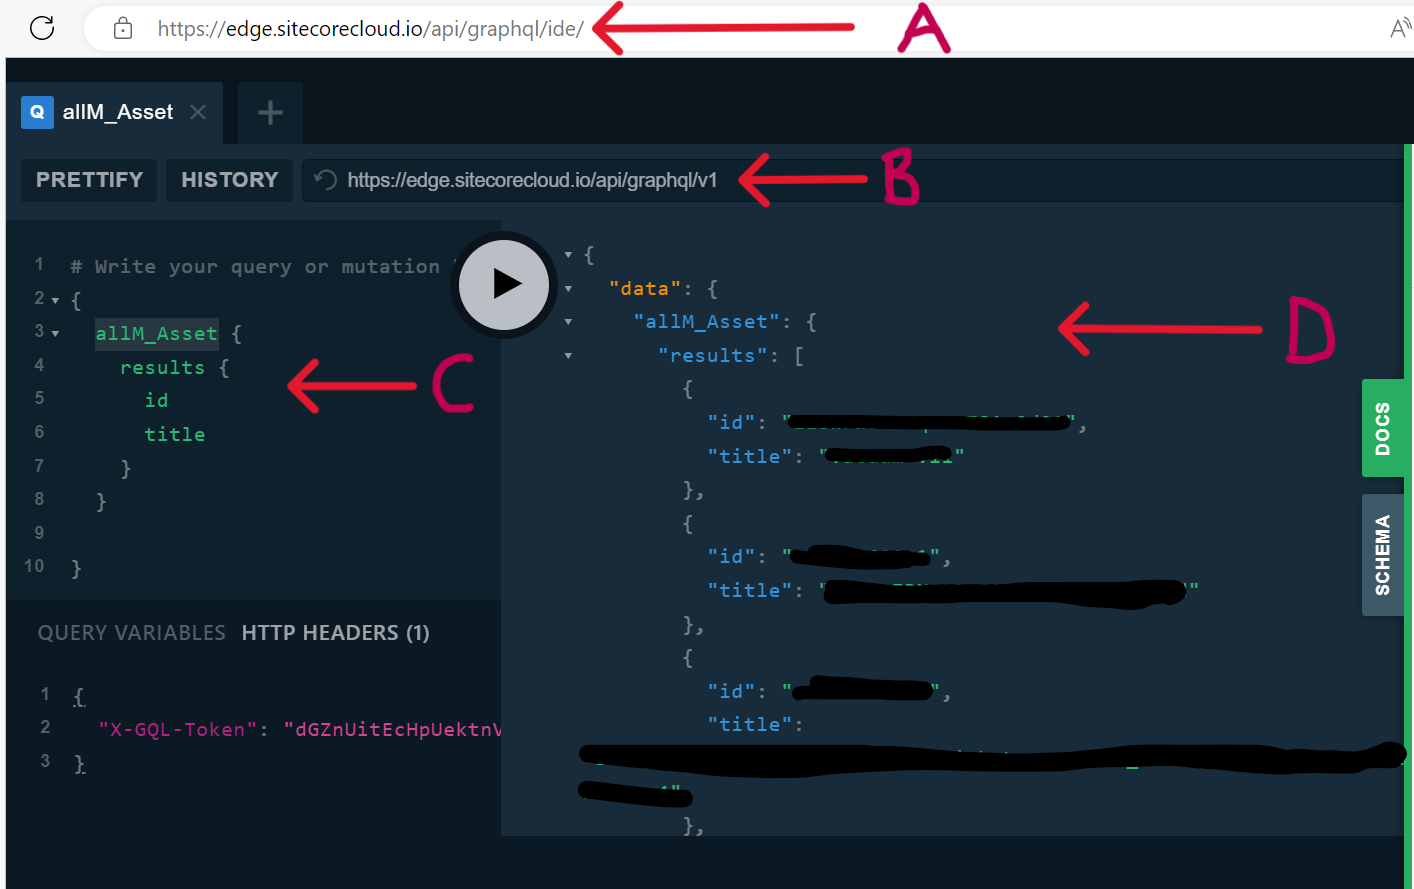
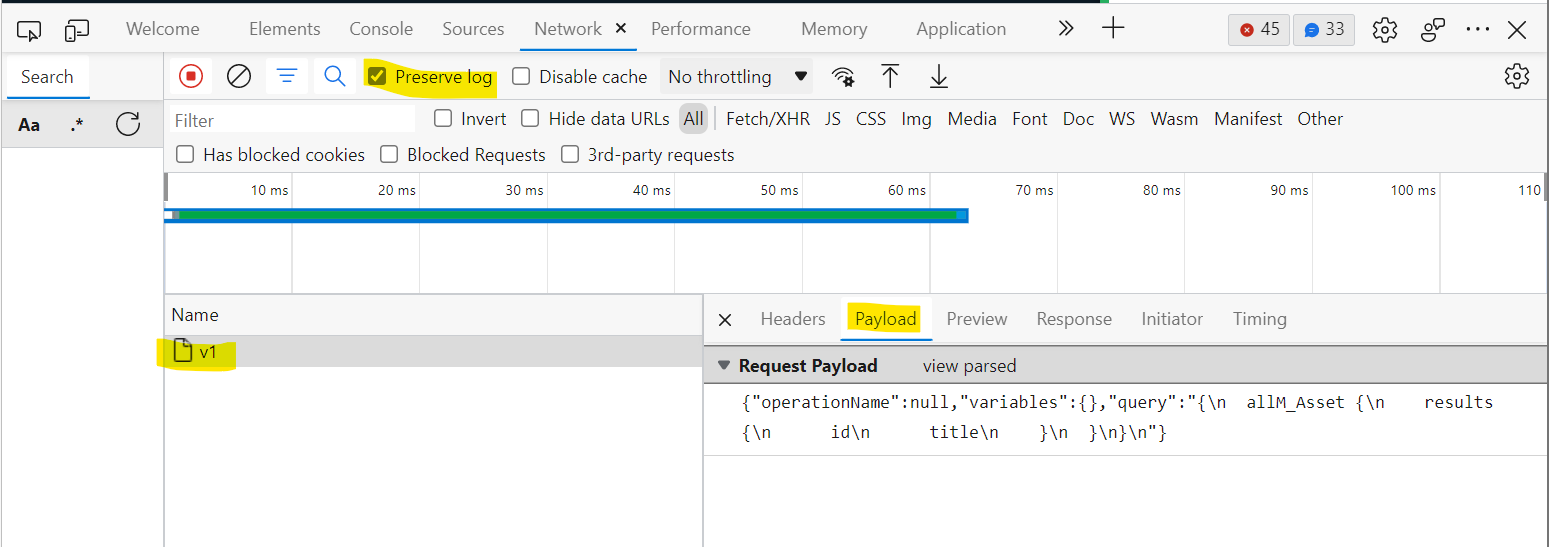
Below is a screenshot of Delivery API playground
A – This is the Delivery IDE URL
B – This is the Delivery API endpoint
C – This the GraphQL query section, where you will specify the queries. In my example, this the query to list all published assets, by using the predefined object allM_Asset
D – This is the output of the GraphQL query, showing the results as JSON object. Notice only the id and title are returned, as specified in my query. This is one of the main advantages of using GraphQL, you get nothing less or nothing more than what you specify.
HTTP Header – this is where we specify our API Key using the “X-GQL-Token” header. In this example, I have used the Delivery API key as I am querying my Delivery instance.
Troubleshooting tips and tricks
I am presuming you have so far been successful getting your GraphQL playground working. If you encounter any issues, try and troubleshoot as follows:
Do you have your Delivery Platform setup correctly? ?Check that your Sitecore Content Hub has a license for Delivery platform, and this has been enabled. One way of verifying this is by having Manage -> Delivery Platform icon on your dashboard, as shown below. If you are missing it, contact Sitecore Support to have it enabled.
Are you using correct Delivery API or Preview API Keys? Do not get the Delivery or Preview API keys mixed. To avoid any potential mix up, ensure you assign your API keys names to reflect Delivery or Preview scope when generating them. If you are not sure anymore, you can always discard and generate new ones (Please note in Production environments, deleting and generating new API keys may affect production services, plan this carefully
Are you accessing the correct GraphQL Playground? Similarly to above, ensure your browser is pointing to Delivery IDE or Preview IDE accordingly. For example, if you haven’t published all your Assets, you may get discrepancy in the assets output within Delivery IDE and Preview IDE. Please note Preview IDE will show content that is not approved yet, including drafts.
Have you checked Browser Developer Tools? Your browser “Network” section captures detailed logs on requests and responses. An example screenshot below will help verify the response coming back from GraphQL server:
GraphQL tips and tricks
Using filters with your query
Suppose you want to control how many items to query, then you will need to filter the query results. Below is an example, where we are getting a single asset with id value of "some_asset_id"
Using parameters with query filters
Suppose you want to use a parameter with your filter the query. A use case is to be able to dynamically filter the list of assets based on some condition. Below is an example, where we are using a parameter for the id value of "some_asset_id"
A – We make use of the Query Variables section to define parameters. In this case it is named "assetId"
B – We define the parameter using the arguments to the query as shown here. ID is the strong scalar type for the Asset Identifier field
Next steps
This completes this blog, where I have walked you through GraphQL and Sitecore Experience Edge. I hope you find this useful, and feel free to leave me any comments or thoughts. See you soon in my next blog post.
Proper data retention policies are a crucial component of any effective cybersecurity strategy. As per the above architecture, the data tier has the following capabilities.
Redis Labs Enterprise provides data storage capabilities in Content Hub. This persistent storage is for the metadata of each Content Hub instance, including asset, product, and content details.
Azure Blob Storage is used for Media assets and other important files used by the Content Hub application are stored securely for access when and where needed.
Elastic Cloud Enterprise is a responsive service for users to find the desired content when they need it.
Which are the data backup rules?
Resource
Description
Redis DB
Redis DB backups are scheduled to execute every night. They are retained daily for one month and weekly for 52 weeks.
ElasticSearch
ElasticSearch index backups are retained for three weeks since they hold append-only data.
What are soft delete rules?
Below is the period the soft deletions are delayed:
Production blobs are hard deleted after 30 days.
QA blobs are hard deleted after 7 days.
DEV blobs are immediately deleted.
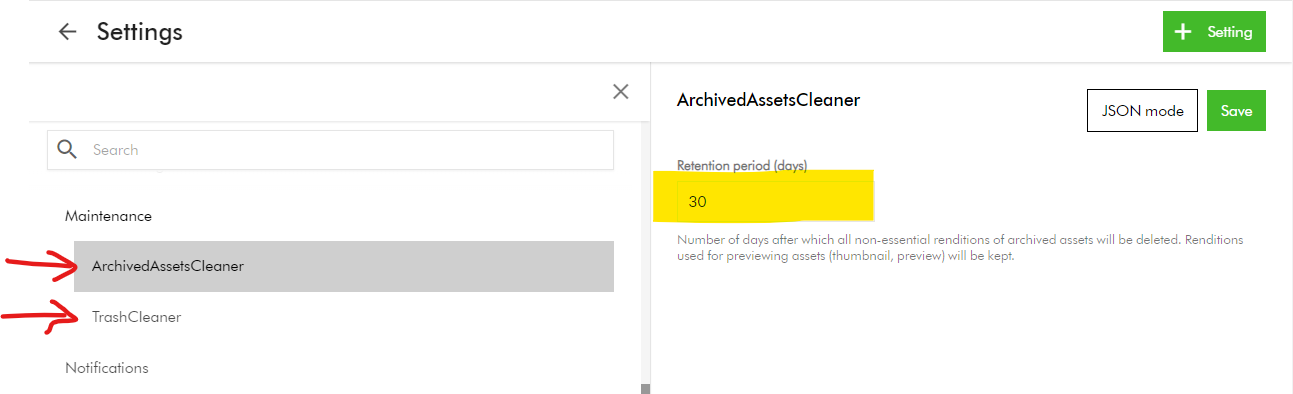
How to configure maintenance settings?
You can configure maintenance settings related to the archival and deletion of assets, including the following:
ArchivedAssetsCleaner – Number of days after which all non-essential renditions of archived assets will be deleted. Renditions used for previewing assets (thumbnail, preview) will be kept.
TrashCleaner – Number of days after which items in the trash will be deleted forever.
To configure these settings:
On the menu bar, click Manage -> Settings
On the Settings page, search and click Maintenace.
Then, select ArchivedAssetsCleaner or TrashCleaner.
Set Retention period (days) to a numerical value between 1 and 999.
Click Save.
Content Hub Audit logs retention policy
Sitecore Audit logs provide a comprehensive record of all activities that occur within your Content Hub system. These includes:
System events
User actions
Changes to data
Sitecore retains these audit logs for a “retention period” to meet regulatory compliance and accountability purposes.
Types of audit logs data retention
Below are the types of data retention policies used in Content Hub:
Online retention: data is available through Content Hub search, reporting, or API.
Offline retention: data is not available through Content Hub search, reporting, or API, but can be made available for download through a service request.
Expired data: once the retention period ends, the data may be permanently deleted. To keep the data beyond this period, you must request and store it securely before it is deleted.
Retention policy – Production environments
Audit log category
Online retention time
Offline retention time
User or security events
2 years
7 years
Audit events
2 years
7 years
Operational logs
3 months
N/A
Retention policy – Non-production environments
Audit log category
Online retention time
Offline retention time
User or security events
3 months
2 years
Audit events
3 months
N/A
Operational logs
1 month
N/A
Next steps
On this blog post, we have looked at how to configure your Content Hub data retention policies. Proper data retention policies are a crucial component of any effective cybersecurity strategy.
Stay tuned for future posts as well look and feel free to look around at my existing posts on Sitecore platform.
I recently got asked the following question via email:
Just wondering if you can help, I’m wanting to change which Collections appear on the homepage and I’m not sure how to do it, do you know, how?
In the spirit of Scott Hanselman’s advise below, I have put together this blog post to answer this question.
“Don’t reply to random emails with long emails. Each question is a gift. Write a blog post and send them the link. If you get repeats, you’ve got links to send. Do this for 20 years and you’ll be a mid-level tech blogger like me, with a blog full of random answers to gifts.”
@shanselman
Asset collections on your home page?
To personalise the asset collections on your home page, you need to locate this component, enable custom settings and adjust them accordingly.
This is how to go about it.
If you have asset collections defined in your Content Hub instance, your home page will appear like the hero image at the beginning of this blog. A collection is a group of assets, which can be shared with other users, allowing collaboration on that collection.
By default, you will see the latest (up to four (4) collections) on your home page. You can of course customize this list to meet your use cases.
Step-by-step guide on customizing asset collections list
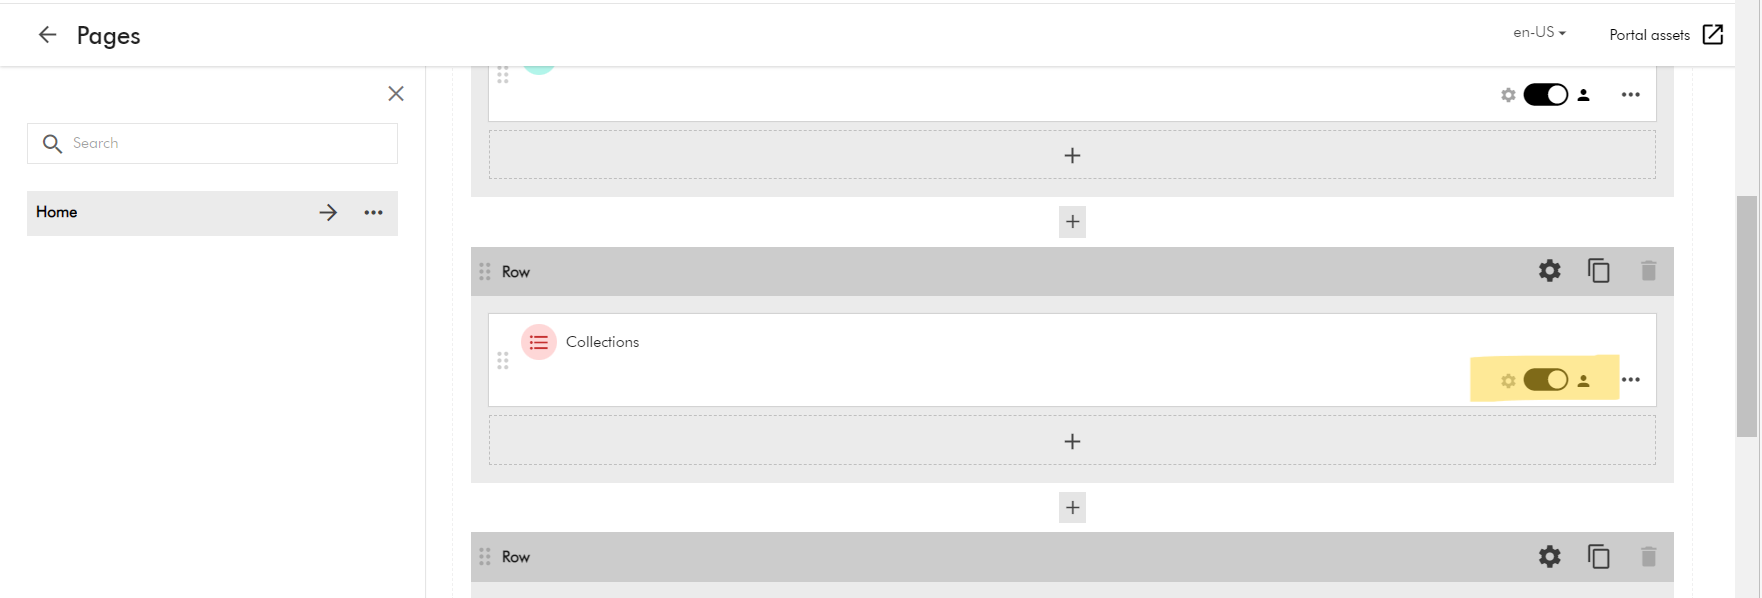
Navigate to Pages using Manage -> Pages
Select the Home page item. You will see page similar to below:
Now scroll to the middle part of the home page. You will see the Row section with “Collections” component.
Using the toggle button “Enable custom settings”. This will allow you to click on “Collections” component.
In our case, we are using this to display the asset collections (M.Collection)
Entity list component configuration settings are grouped into six tabs:
Select
Output
Template
Components
Labels
Advanced
On the Select tab, adjust the entity definition query to match your use cases. You can create the query on the Entity definitions column, such as the following.
Take: this has the count of collections shown, e.g., 4
Enable sorting: allows you to define sort criteria for your collection list
Sorting property: This has the sorting property, e.g., date created (Descending or Ascending)
You can apply filters to this query. In this case, only items that match the query and the filters are displayed.
Note: Your changes should be applied on the fly as shown on the Results column on the right-hand side
Once you are happy with your changes, click on Save and Close button. Now navigate to your home page, you should see your changes applied.
Next steps
On this blog post, we have looked at how to personalise the asset collections list on your Content hub home page. I am keen to hear your feedback or comments. Please do use the comments section for that.
Stay tuned for future posts as well look and feel free to look around at my existing posts on Sitecore platform.
However, Sitecore Content Hub is a great platform with many hidden gems. In this blog post, I will be exploring the hidden gems on how the bulk import CMP content items. Hopefully save you valuable time of having to figure out on your own.
A Content Marketing Platform allows the planning, authoring, collaboration, curation and distribution of the different content types that drive the execution of a content marketing strategy while allowing campaign management. CMP is a central hub providing an overall view of all content and how it is performing. It is an essential platform to help with planning and analyzing content marketing campaigns and individual pieces of content.
For my use case, I will be looking at Blogs, which is one of the out of the box content types in CMP.
Creating a Blog entity within Content Hub CMP
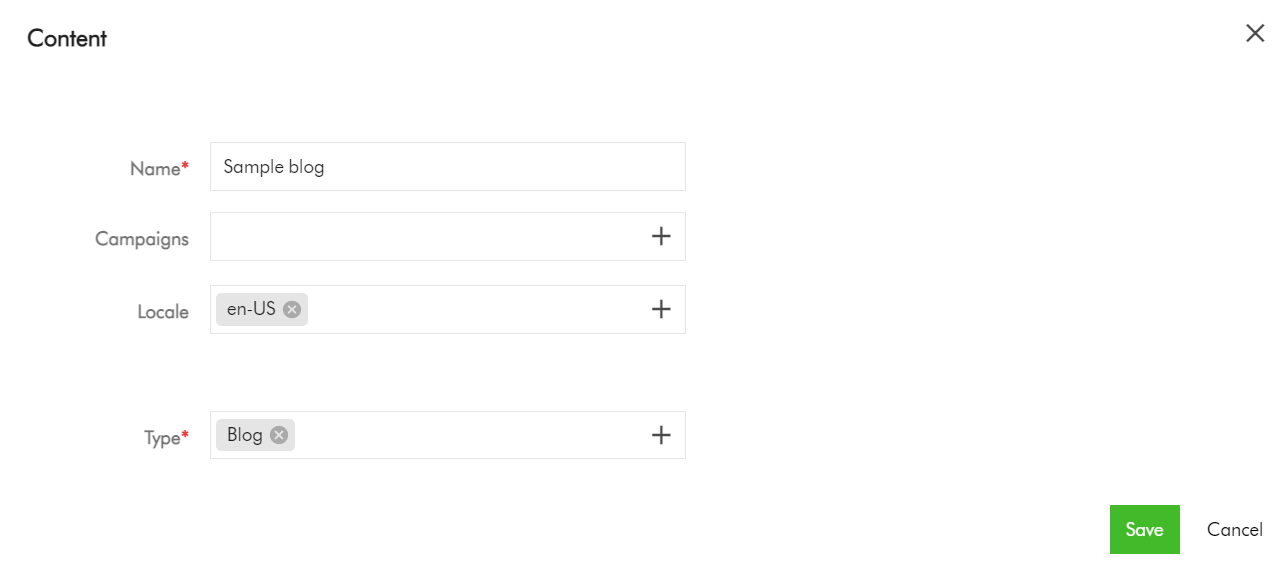
To create a Blog entity, on the Content creation page, select Add Content
On the add Content dialog, enter the Name and Type, which are mandatory fields. For Type, select Blog from the list of available Content Types. You can also specify the Locale (although this will default to your current Locale). Click Save to save your entry.
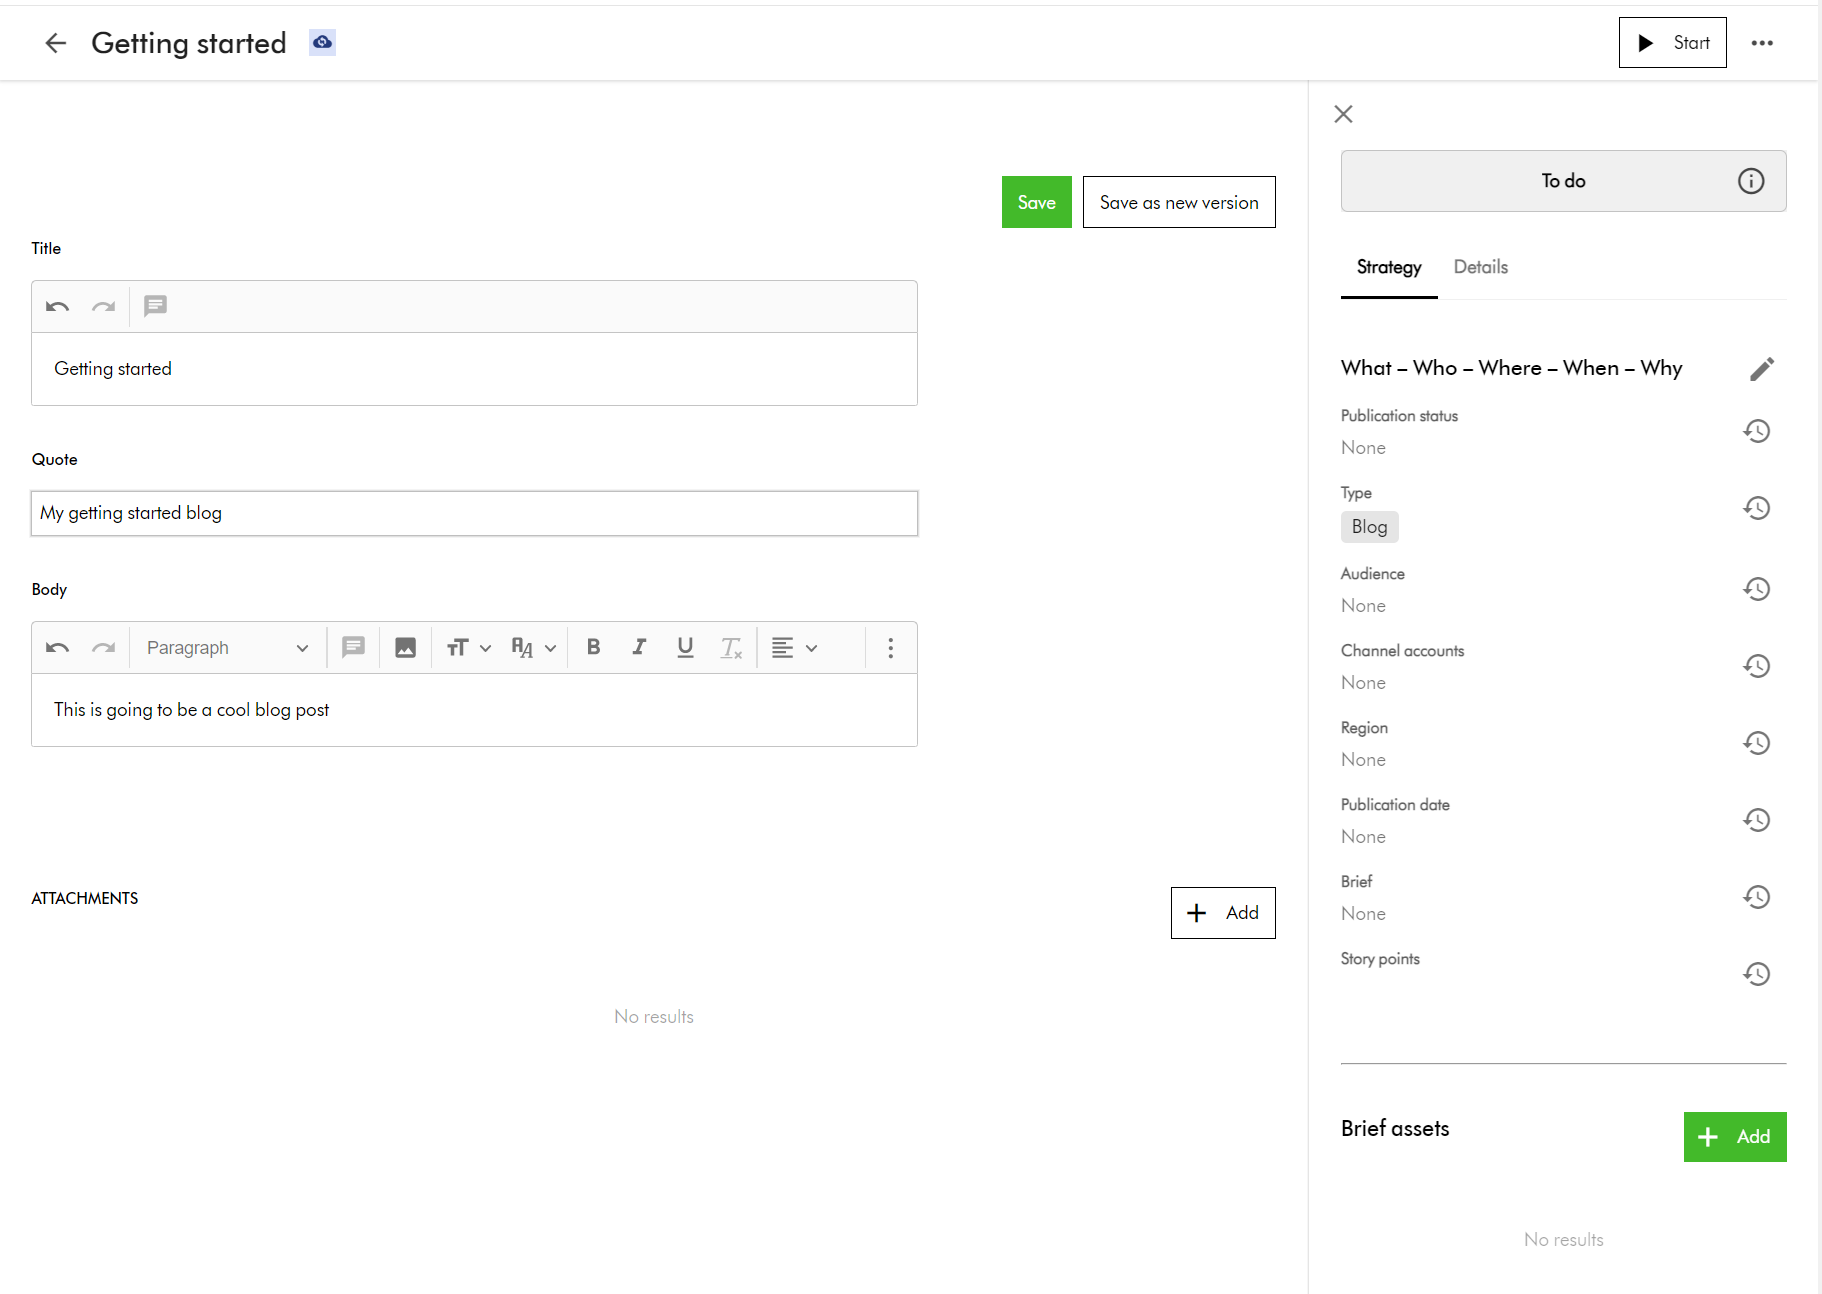
Now select your new Blog item to edit. You should see the edit screen shown below. Enter content for the blog title, quote and body, then click Save to commit your changes.
Adding translations for multi-languages for your Blog entity
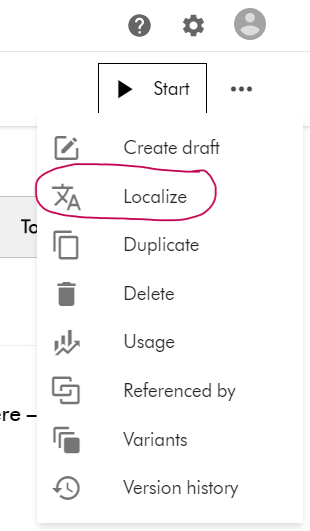
To add a new translation, select the Localize action item from the Action menu, available from the top right-hand side of the edit screen.
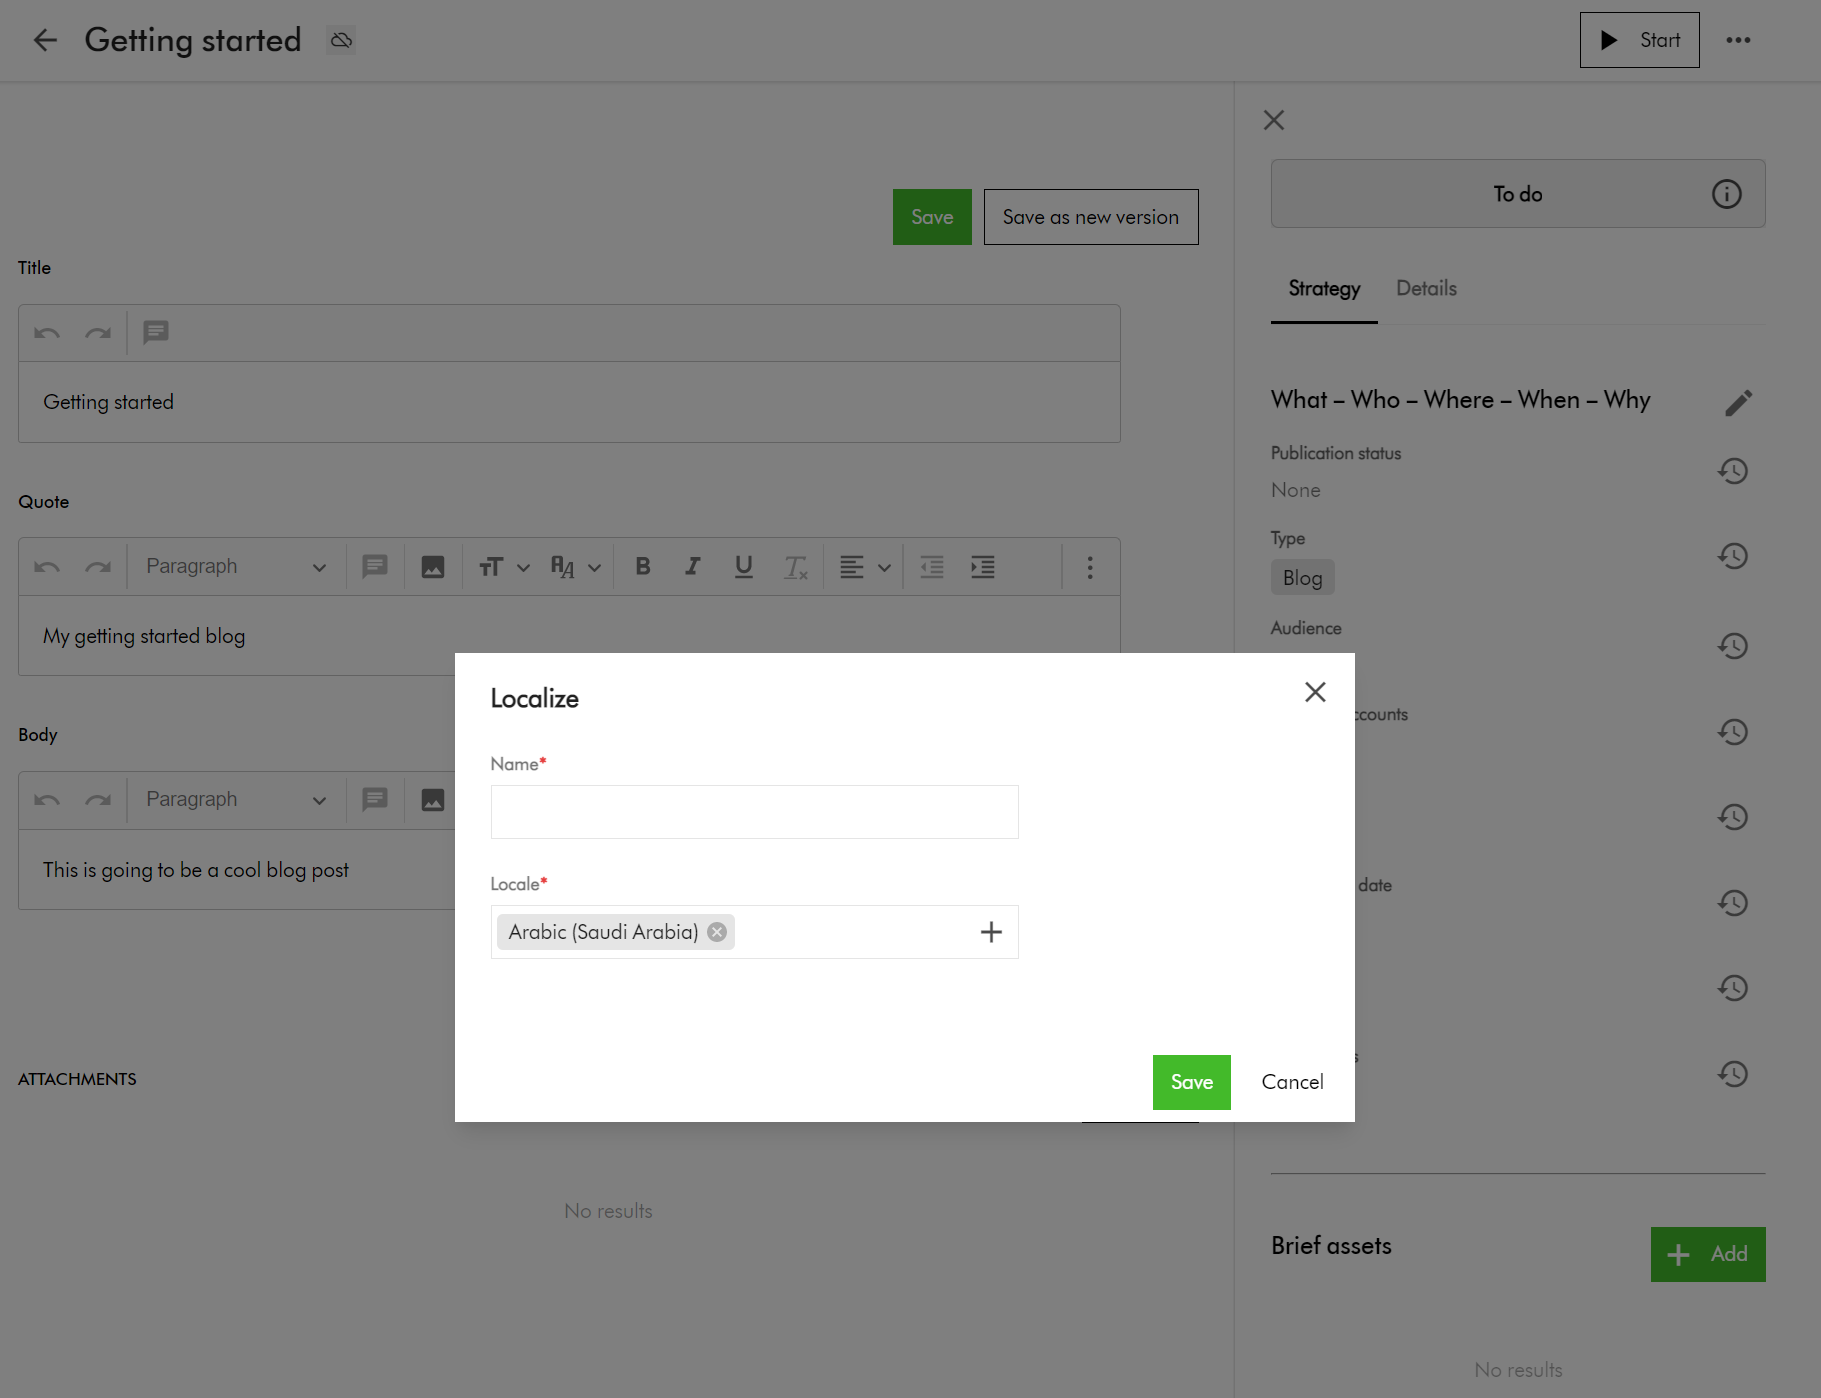
This will prompt you to enter name and locale on a popup shown below.
Click Save to create this variant for the selected language
This will then open the edit screen for you to edit the translated content for the blog item.
Preparing your CMP content items for Bulk Import
Now that we have familiarized ourselves on how to add a single Blog item and a single translation using the portal, let us look at bulk import.
Row 1 – this is the default blog entity based on your default language, e.g., en-US
Row 2 through 4 – these are the variants of the blog entity for my localized languages. In your case, you many more or less, as per your localized languages you are supporting.
Pay special attention to the ContentToContentVariant:Parent which is how the variants are linked to the default blog entity using identifier id123456789-blog-en-US in my example.
Pay special attention to the ContentToContentVariant:Child which is how the default blog entity is linked to all variants. This will have pipe delimited list of variant identifiers (e.g., id123456789-blog-ar-AE|id123456789-blog-zh-CN|id123456789-blog-da-DK)
Please note, you need to pre-generate unique values for the identifier column for your variant blog entities. This ensures you can script and control how to link them with parent blog as shown above. This will be key to successful bulk import of the blog entities with multi-language support.
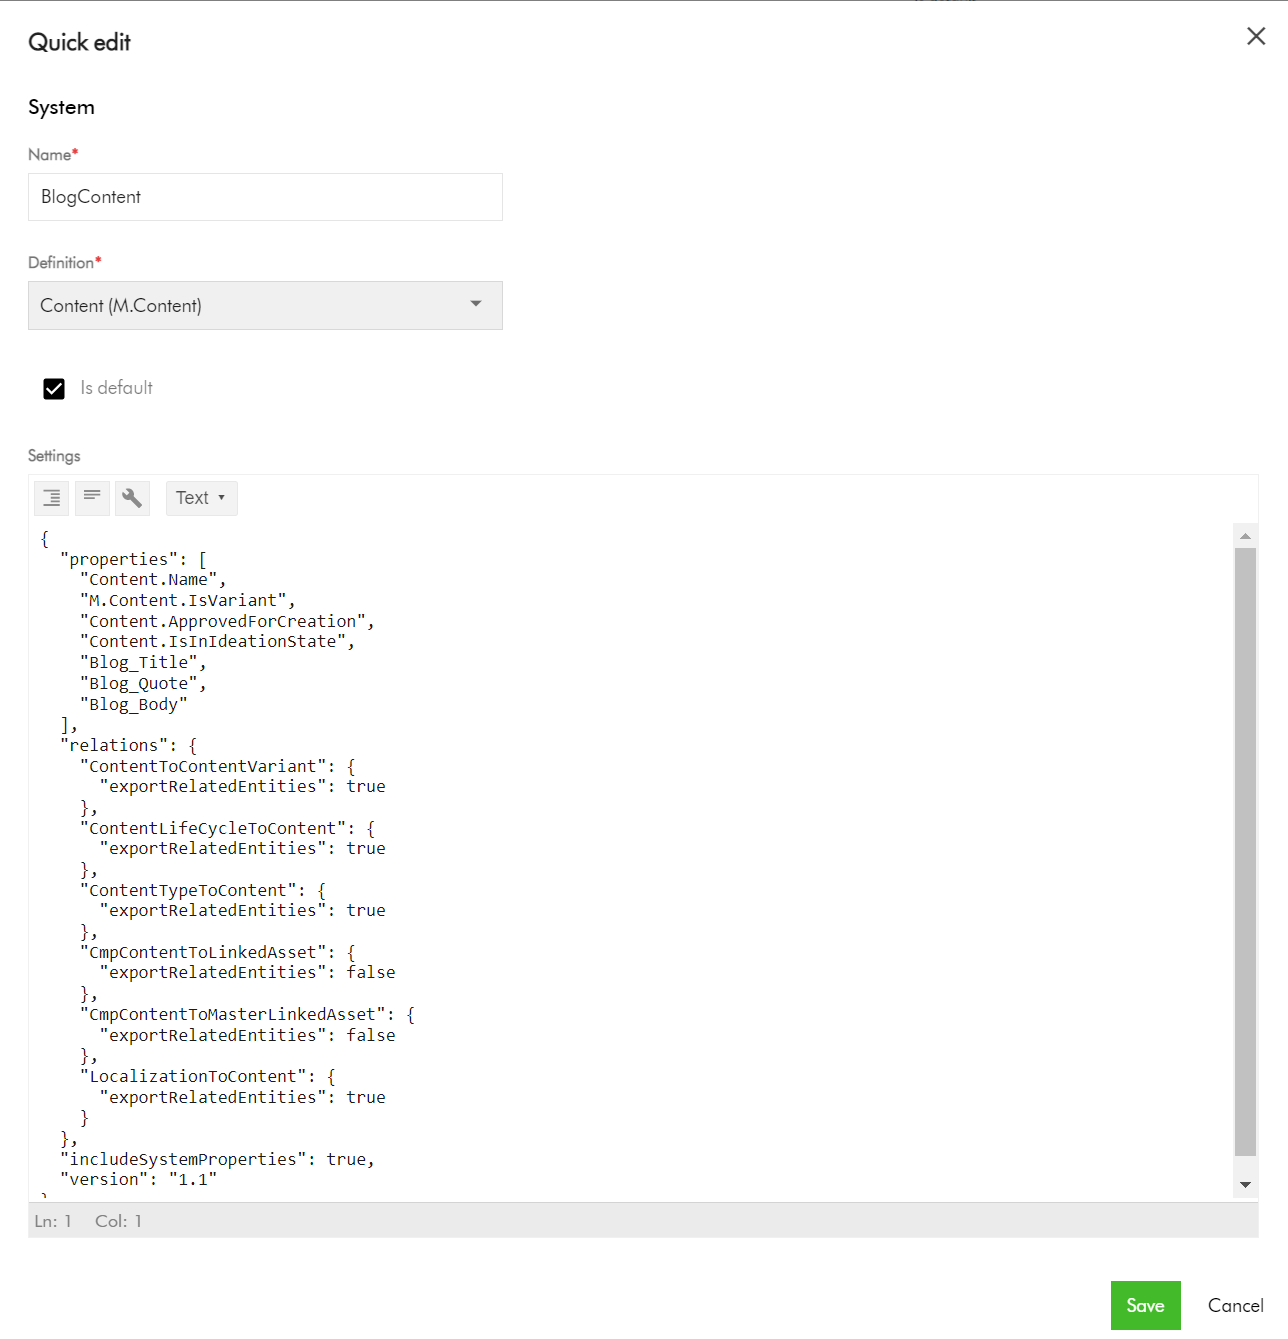
Use M.Content.IsVariant to mark which blog entities are variants
Use the CmpContentToLinkedAsset column to link the blog entities to existing assets (images or videos) from your DAM if required. You can link multiple assets by using a pipe delimited list of assets identifiers.
Use the CmpContentToMasterLinkedAsset column to assign a Cover Image to the blog entities
The LocalizationToContent has the M.Localization taxonomy values corresponding to each localized language
I have provided default values for the columns Content.ApprovedForCreation, Content.IsInIdeationState, ContentLifeCycleToContent as per my use case. In your case, provide appropriate values that meet your content strategy.
Finally, let us do bulk import of Blog entities into CMP
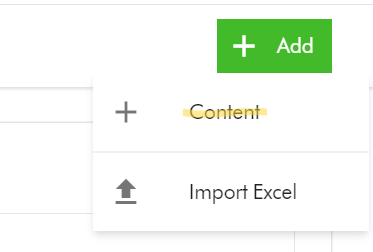
And finally, to bulk import, use the Content Creation page. Ensure the creation component on your page has Import Excel option enabled.
On the Content creation page, select Import Excel
Do one of the following:
Drag the Excel file you want to upload into the dialog box.
Click browse, then pick the Excel file you want to upload.
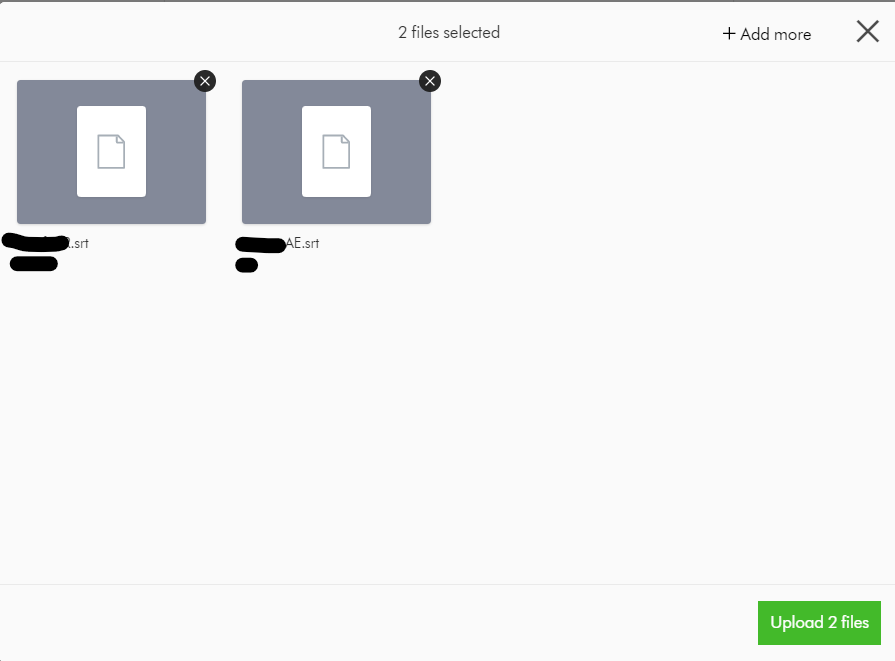
Optionally, click Add more to add more files if needed.
Click Upload files.
Next steps
On this blog post, we have looked at how to bulk import Blogs to your Sitecore Content Hub CMP. I am keen to hear your feedback or comments. Please do use the comments section for that.
Stay tuned for future posts as well look and feel free to look around at my existing posts on Sitecore platform.
I recently was working on a cool project that required migration of hundreds of videos from a legacy video platform to Sitecore Content Hub as part of a digital modernization strategy. These video assets happened to have subtitles for multiple languages, which presented a significant challenge in itself.
If you are familiar with Sitecore Content Hub DAM, we have a capability to do a bulk import of DAM assets using the Excel import feature. There is also a fair number of blogs with guidance on how to go about this process. However, if you are looking for a quick guide on performing bulk import of video subtitles, there seems to be lack of documentation or step by step guidance.
I thought I document this process to fill this gap and share my story of overcoming this challenge.
First things first – recap on importing video subtitles via Portal page
I am assuming you already have a video asset imported into your Sitecore CH instance.
After selecting your video asset, the asset details page will look like this one below.
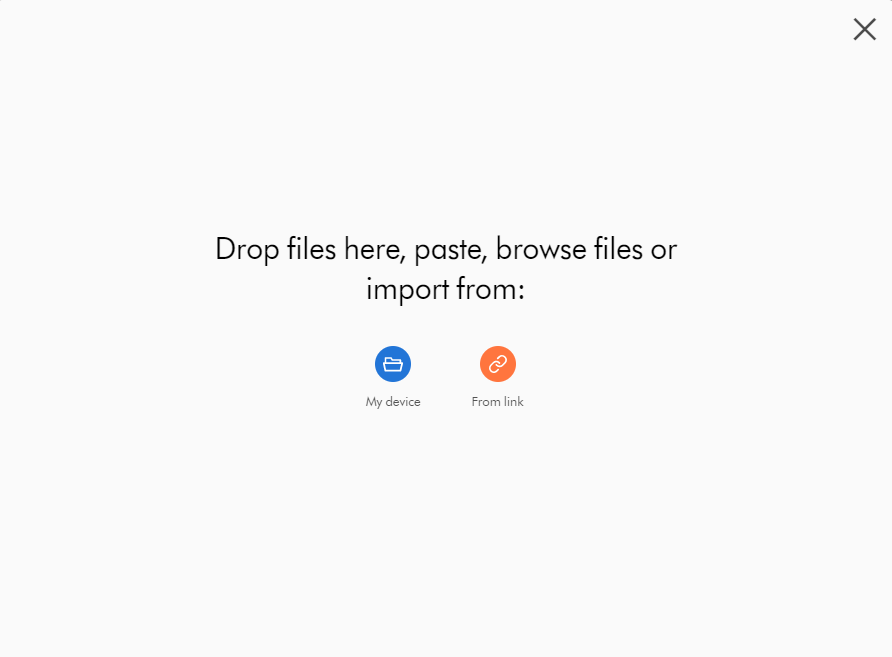
Clicking Upload files button will prompt with a dialog box shown below:
Click My device, navigate to the location of the files, select them, and then click Open. Optionally, to add more files, click + Add more; otherwise click Upload files.
Click From link, paste links to the files you want to upload, and then click Import.
After successful upload of the subtitle files, your Video subtitles section will look like this below.
At this stage, we haven’t specified the localised language for the subtitle file. To do this, click the file name or click Edit language and, in the Edit language dialog box, select the language from the drop-down list and then click Save.
Congratulations! You can now have the closed caption option (CC) show in the media player, which lets you select the uploaded subtitles to play along with your video.
Where are my subtitle files stored?
As you may have guessed it right, the subtitle files uploaded are actually M.Asset entities which as stored within the M.Content.Repository.Subtitle Content repository. You can view these files using your All-assets portal page, and filter the Subtitle Content repository.
How are the subtitle files linked to the video asset?
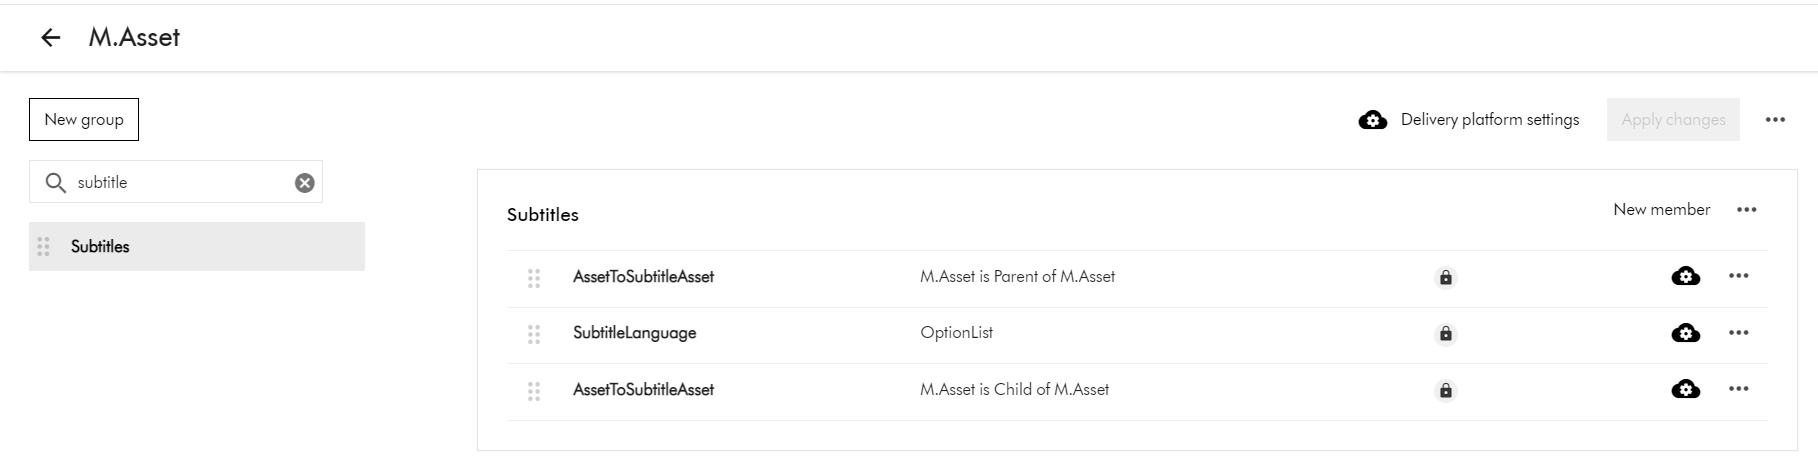
To view the subtitle and video asset relationship, head on to the Schema section by navigating to Manage -> Schema -> M.Asset
On the M.Asset schema page, search for subtitle. This will filter the schema for subtitles as show below.
This means that:
the video asset is the Parent of the Subtitle asset (AssetToSubtitleAsset:Parent)
the subtitle asset is the Child of Video asset (AssetToSubtitleAsset:Child)
Now that we know subtitle are M.Asset entities, we will leverage the Excel Import template to achieve the bulk import.
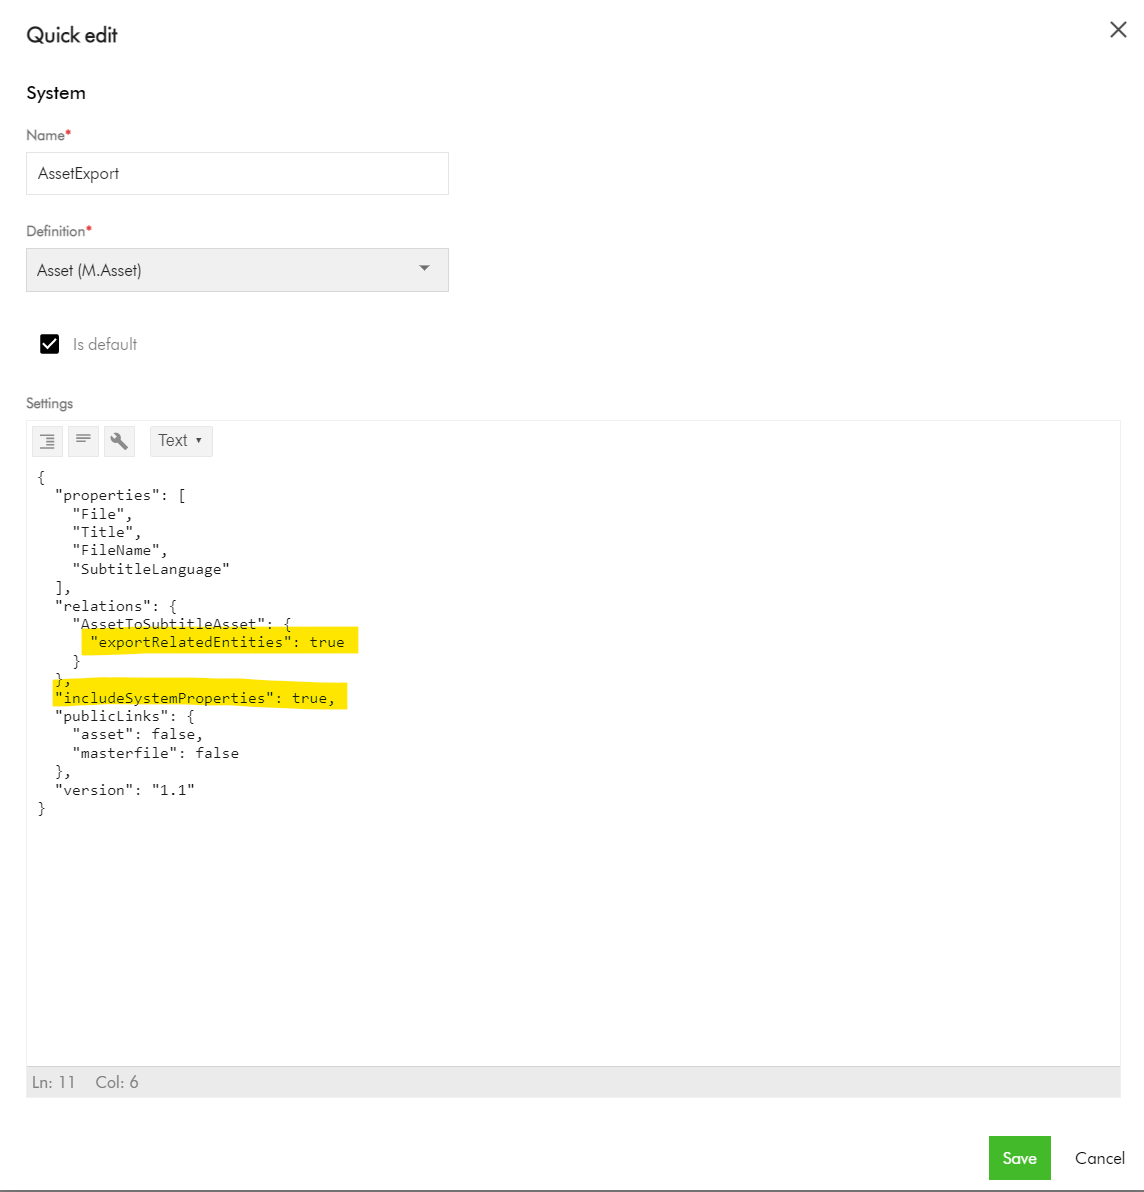
When importing an Excel file, ensure that the name of each worksheet matches the name of the corresponding definition. For example, to import assets, a worksheet must be called M.Asset
Pay attention to the Relations section, where we are enabling the export of the AssetToSubtitleAsset related entities. Also, ensure includeSystemProperties is enabled.
Export your sample video asset into Excel
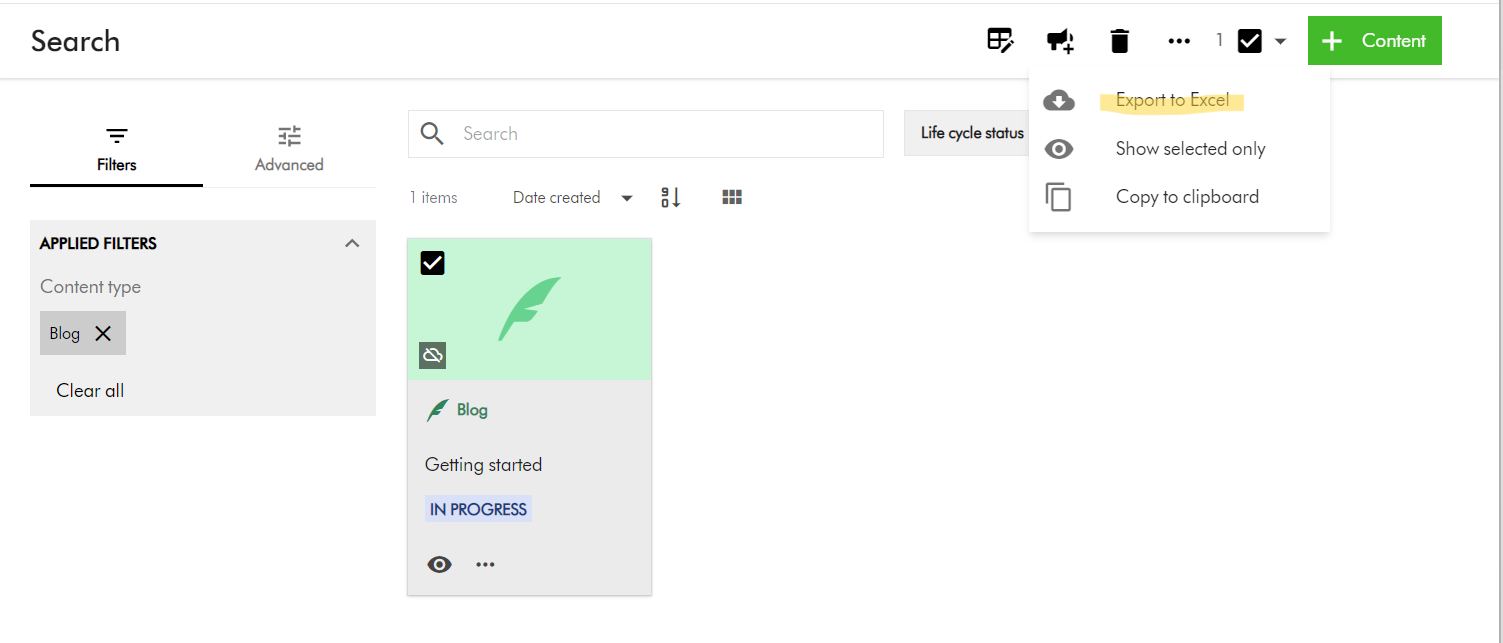
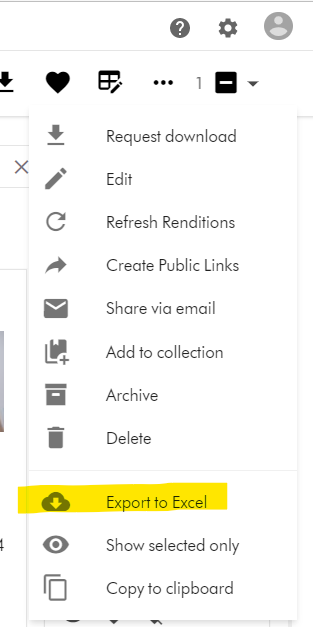
Navigate to your Assets portal page.
Search and locate your video asset.
Select the video asset (tick the checkbox of your selection component)
On the right-hand side, access the Actions dropdown menu, and click on “Export to Excel”
Your download should be ready and accessible from Profile -> Downloads link
M.Asset Video Subtitles Import template
Your M.Asset video subtitles import template will look similar to this one below.
Row 1 – this has the M.Asset entity properties in your Sitecore CH instance
Row 2 and 3 – these have the entries for the two subtitles that we configured.
Row 4 – this is the entry for the video asset.
Pay special attention to the AssetToSubtitleAsset:Parent which is how the subtitles are linked to the parent video asset using identifier id123456789 in this example
Pay special attention to the AssetToSubtitleAsset:Child which is how the video asset is linked to all subtitles. This will have pipe delimited list of subtitles identifiers (e.g., id123456789-viralvideo-ar-AE|id123456789-viralvideo-fr-FR)
Please note, you need to pre-generate unique values for the identifier column for your subtitles, in order to be link them with parent video as shown above. This will be key to successful bulk import of the subtiltes.
Use the File column for the URL to the actual video asset and subtitle assets.
And finally, the bulk import from Excel
To bulk import, use the Asset Creation page.
On the menu bar, click Create.
On the Create page, in the top-right corner, click Add and then select Import Excel.
Do one of the following:
Drag the Excel file you want to upload into the dialog box.
Click browse, then pick the Excel file you want to upload.
Optionally, click Add more to add more files if needed.
Click Upload files.
Next steps
On this blog post, we have look at how to bulk import video subtitles to your Sitecore Content Hub instance. I am keen to hear your feedback or comments. Please do use the comments section for that.