On the previous post, I looked at how to securely share your DAM assets externally by leveraging collections. Among other things, we covered four options you can use to secure the asset collections. One of the options involved defining a permissions policies on M.Asset (model for your assets) based on M.Collection (model for your asset collections). However, this option seems to come with some nuances and will not work by default. I will carry on the conversation to demonstrate how to make this option to work.
Why doesn’t the policy definition work?
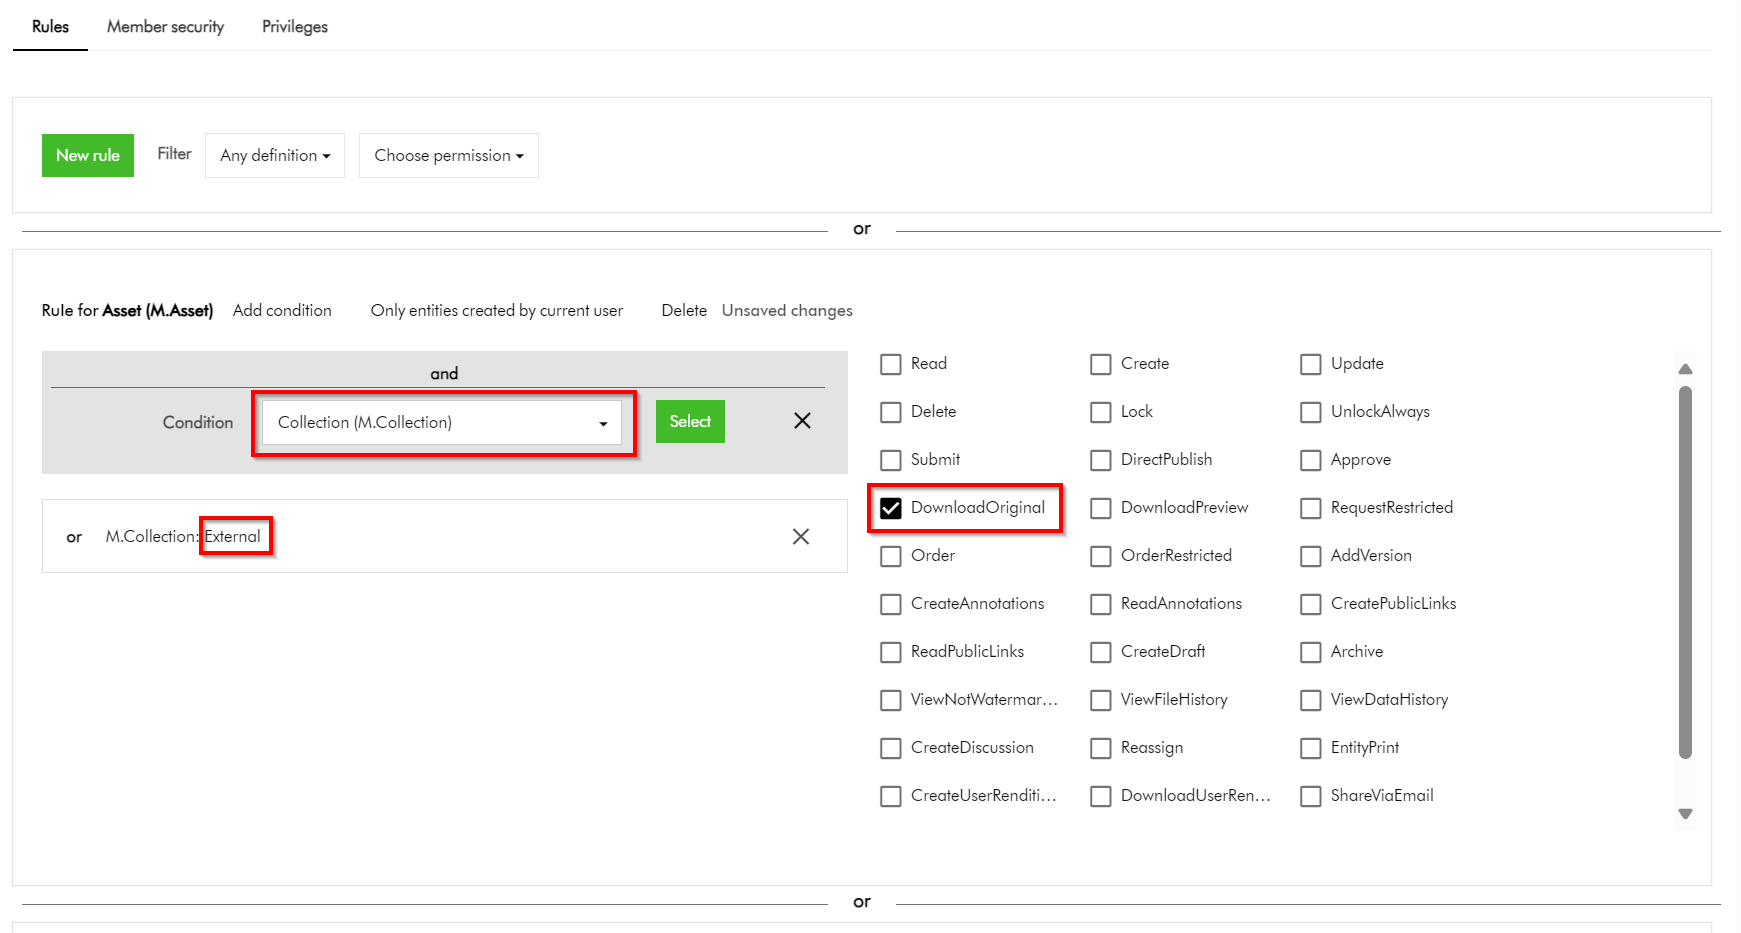
In simple terms, the above policy states that we would like to allow all assets belonging to our collection named “External” to be downloadable. Simple. But it doesn’t work.
But why?
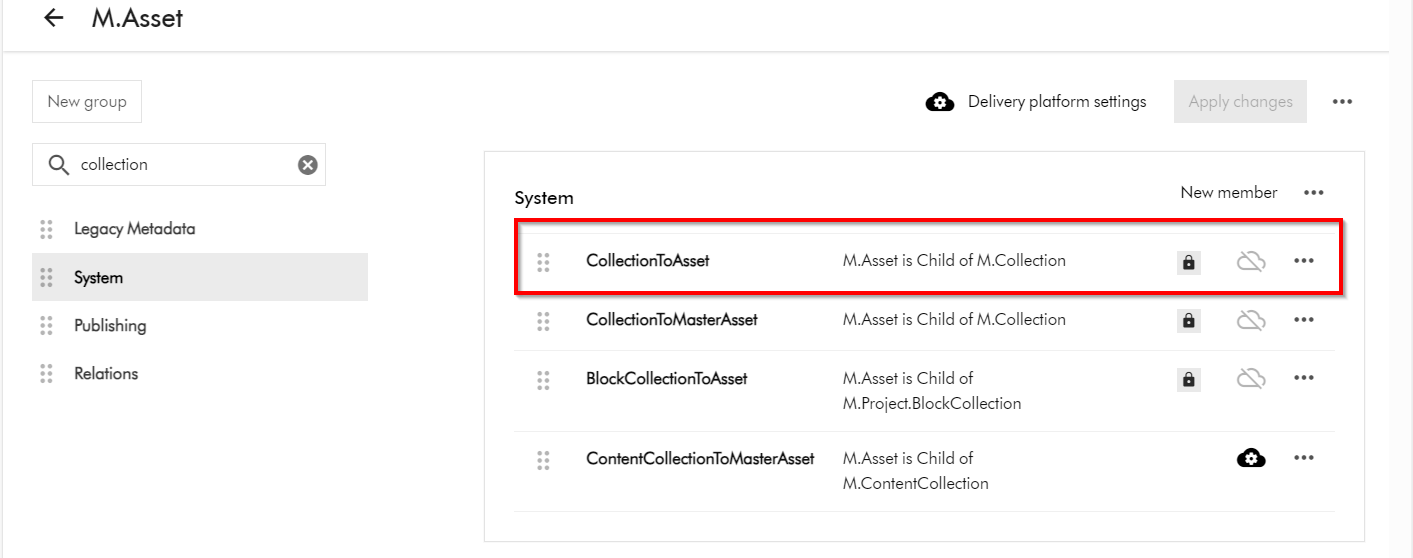
This is because the “Inherits security” setting for the CollectionToAsset relation is turned off by default. In other words, this means security related metadata (from the parents towards the children) can not be inherited while this setting is turned off.
M.Asset is a child of M.Collection (as shown below in the schema details for M.Asset definition). To access M.Asset schema page, click on Manage -> Schema -> then search for M.Asset
How do I turn on “Inherits security” for the CollectionToAsset relation?
Short answer is you can’t modify this by yourself. You will need support from Sitecore Technical Support to make this change for you. Please note CollectionToAsset is a system relation and is locked down to Super users as well.
You can raise Sitecore Support Cases using the Support portal and request the team to enable the “Inherits security” on CollectionToAsset on your environments. This should be actioned swiftly after which your policy definitions can start to work as expected.
Next steps
In this blog post, we have looked at how to make user group permissions policies on M.Asset based on M.Collection work. We looked at nuances that make this not to work by default and how to resolve and get it working. I hope you find this useful for your similar use cases.
Stay tuned and please give us any feedback or comments.
One of the great values you get with your investments in Sitecore Content Hub platform is the collaboration capabilities with your external partners and users in your content supply chains. Siecore Content Hub provides out-of-the box the Asset Collections capability, which enables you to group your assets. Which seamlessly allows collaboration on that asset collection through comments, for example.
However, there is a catch.
When you create an asset collection and want a fine grained control on whether these assets should be downloadable, this doesn’t always seem to work as expected.
For example, you have a collection named “External” with only “Asset test 1” and “Asset test 2” included. And you need these two assets to be downloadable. However, when this collection is shared, there are scenarios when other additional assets will seem to appear within External collection, instead of just “Asset test 1” and “Asset test 2” as expected.
In this blog post, I will be sharing some top tips and tricks on how you can be in control of this process, ensuring you only share assets that need to be shared, securely.
In the top-right corner of the Collections page, click + Collection.
In the Collection dialog, populate the details of the collection you are creating
Click Save.
How do I add assets to my asset collection
Again, the existing official docs provide robust step-by-step guide on how to add asset to a collection. Please note that it is best practice to add existing assets to your collection – which are at the correct stage of your content lifecycle. Avoid uploading new assets directly at this stage.
How do I share my asset collection
You can share the collection by following the following three main steps:
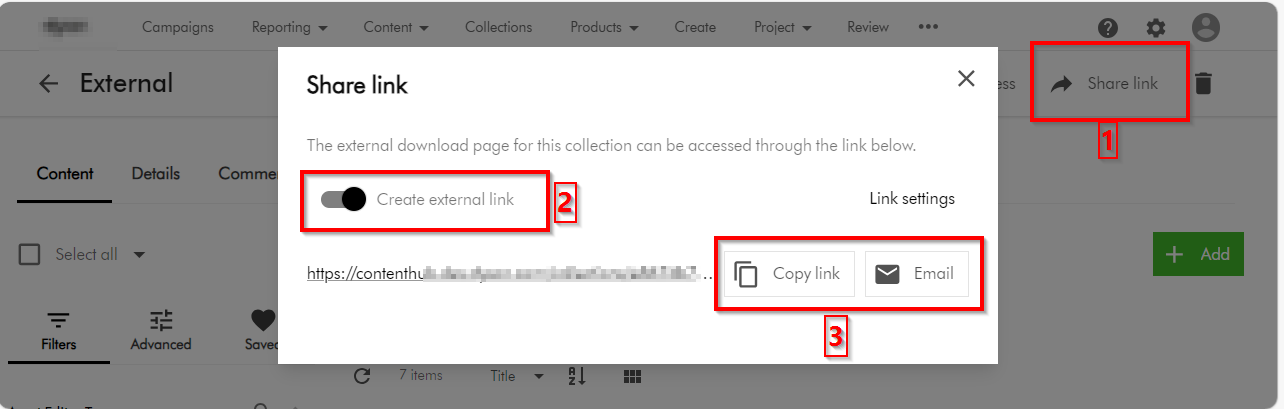
On the collection details page, click Share link.
In the Share link dialog, turn on the Create external link switch. This will then generate for you a link
To share the link via email, use the Click Email button, which should prompt for emailing details. You can alternatively use the Copy link button to copy the URL and share it as well
Tips and tricks on securing you asset collections
Now that we have covered the basics on how to create an asset collection and share it, I will focus on top tips and tricks of ensuring we are sharing the collection using best practices and for the correct external collaborators.
Top tip 1 – Leverage user groups to manage external collaborators
User groups underpins the permissions model within Content Hub. Members of a user group are granted permissions and privileges according to the user group policies assigned to that group. By managing permissions and privileges using groups, you can streamline how they are assigned.
Read-only external collaborators – Define a separate user group for your external collaborators who need a read-only access. These are not expected to make any contributions, but may be to give them a status update of your assets.
Contributor external collaborators – Define a separate user group for your external collaborators who you would like to give you comments and feedback on shared assets.
Download external collaborators – Define a separate user group for your external collaborators who you would like download your shared assets. The use case is when you would like them them to use download the shared assets for allowed activities such are offline brands channels.
Add external collaborators to a user group – Always add external collaborators as users in your Content Hub instance, then assign them one of the above user groupings. Sitecore Content Hub allows users belonging to an external domains to be added using Users Manager (and they can sign in with their username and passwords) Depending on your security policies and governance, it is possible to also leverage Single sign on with External domains. If you need guidance, reach out to your Security and Identity team or Sitecore Technical support.
Top tip 2 – Leverage user group policies to lock down UX and pages
You need to make a decision which pages your external collaborators can view. For example, should they access your Asset details page, which will potentially give them access to additional meta data?
If you have followed Top tip 1 above, all you need to do is define user group policies for each relevant user groups.
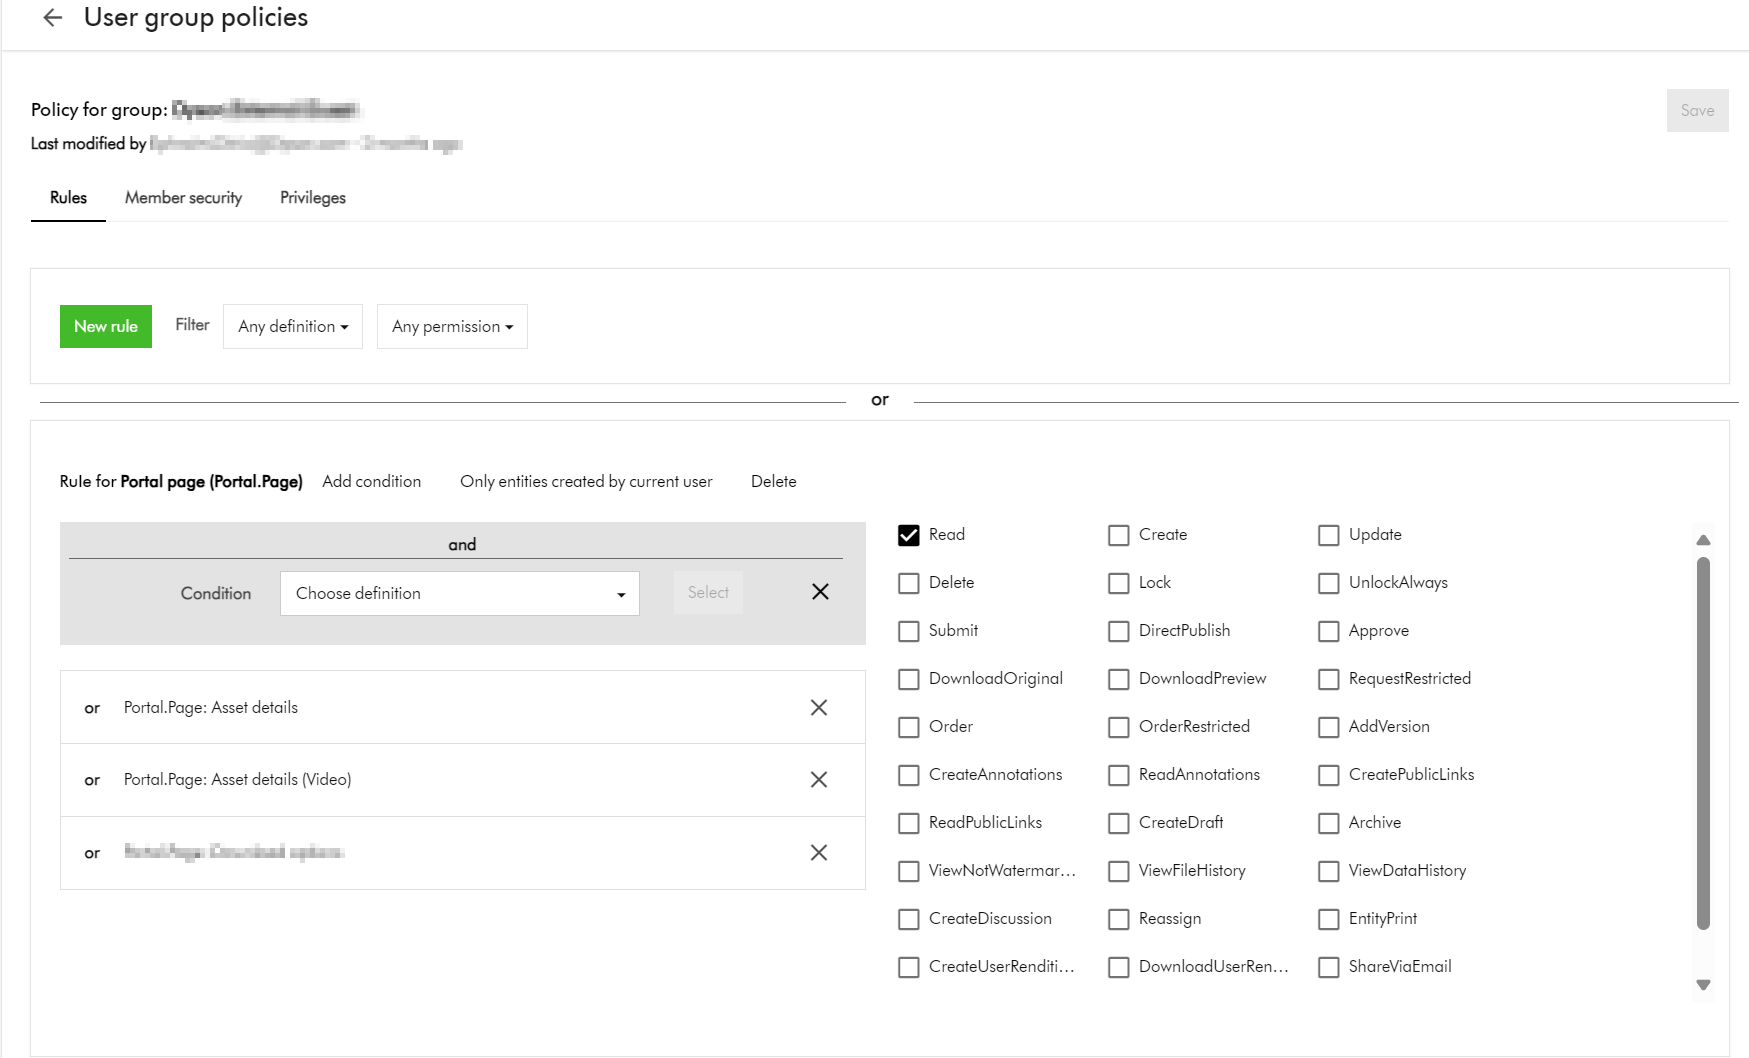
Below is an example of how you can give access to allow viewing Asset details page(s) such as Asset details or Video asset details page as shown below.
Top tip 3 – Additional policies – downloadable assets based on a taxonomy value
You recall the scenario I described at the start of the blog. You have a collection named “External” with only “Asset test 1” and “Asset test 2” included. How will you go about ensuring only these two assets are downloadable?
Define taxonomy, use this to tag and identify external assets:
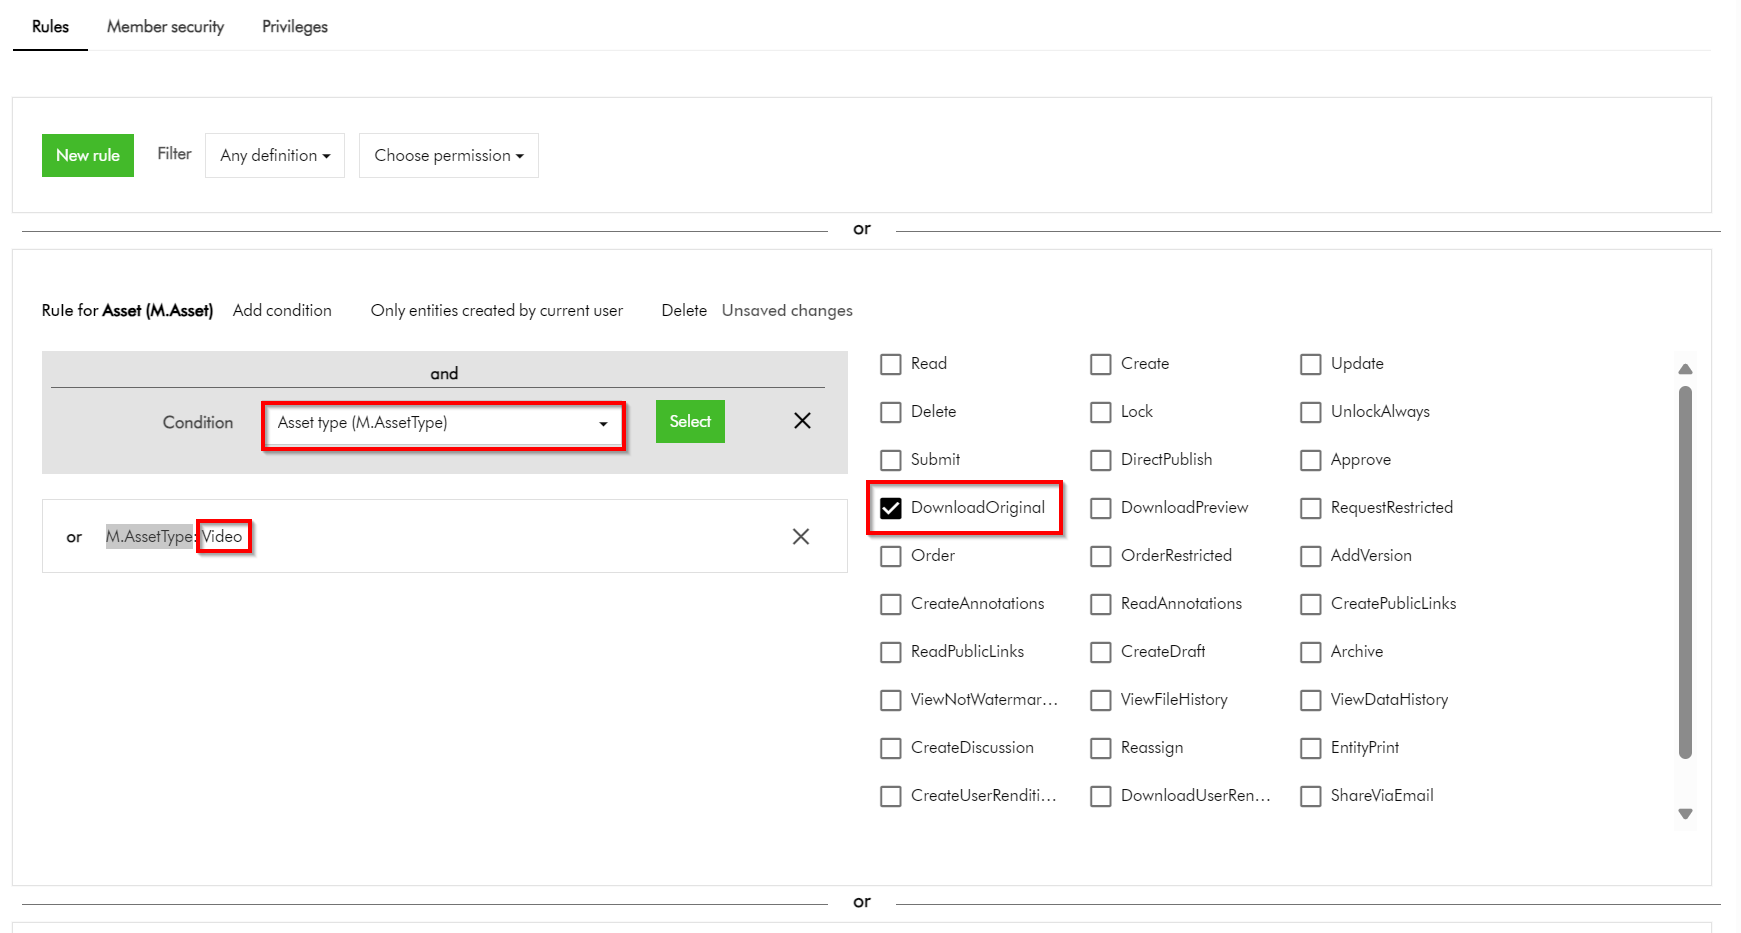
This option requires you to define some form of Taxonomy, say, ExternalAsset which entities Yes or No. For all externally shareable assets, you will need to tag them with value of Yes. You can then leverage this Taxonomy within your User Group policies definitions to narrow down which assets can be downloadable. As an example, this policy below shows how I can narrow which asset is downloadable based on M.AssetType value of Video
This clearly works. However, with this option you will need to ensure all assets are tagged accordingly before sharing them externally. This could add more work to your content workflows.
Top tip 4 – Additional policies – downloadable assets based on current asset collection
You could be asking, why can’t I apply the additional policy for downloadable assets based on the current asset collection? Good question.
If you try this approach, your User group policy will look like this instead.
This is perfectly fine. You could have thought this will work, right?
This option does not work. It seems you can not define a policy on M.Asset (model for your assets) based on M.Collection (model for your asset collections) by default.
In this blog post, we have looked at Content Hub asset collections a great feature for collaboration capabilities with your external users during your digital assets lifecycle. We have looked at some of the top tips you can leverage to secure your collections when sharing them with your external collaborators. I hope you find this useful for your similar use cases.
When working with automated CI/CD pipelines with you Sitecore Content Hub, you need to be aware of the development lifecycle for your Action Scripts. This is to ensure your source code repo for your scripts doesn’t get ‘bloated with orphaned‘ script code files. In this blog post, I will cover how to manage the development lifecycle of your Action Scripts to mitigate against this problem.
What happens when you serialize action scripts into source control
I have previously blogged on Content Hub DevOps, especially on leveraging Content Hub CLI to extract a baseline of your Content Hub components. For example ch-cli system export --type Scripts --wait --order-id command allows you to export Actions, Scripts and Triggers package. When you unzip or extract the files within this package, you will notice there is a scripts folder. This will have two types of files: .json files and .csx files (assuming your actions scripts are written in C#.NET)
Script .json file type
For each action script packaged from your Sitecore Content Hub instance, it will have two files. One of them is the script .json file. Below is a sample action script json file:
This file contains all the relevant meta-data about the action script. In particular, you will notice that it is referencing a second file using the ScriptToActiveScriptContent relations property. Using our sample above, this json file is referencing this code file “ZOGG4GbbQpyGlTYM7r1GfA“
Script .csx code file
The code file based on C#.NET, is similar to the sample shown below.
What happens when you modify the code in your scripts
Each time you make changes to your Action Script source code and successfully build it, Content Hub will generate a new code file version behind the scenes. This will be automatically linked to its corresponding script .json file.
To visualise this, you will notice that when you serialise your Action Script again from your Content Hub instance, a new code file will be generated.
If you now compare the previous code file with the new one, it will become obvious which changes Content Hub has made to the .json file. Below is a sample comparison.
What should you do with the ‘old’ code file
We have now established what is going on whenever the source code in your action script is changed and successfully rebuilt. Each time, a new file will be generated. The old file will remain in your source code repository, unused and effectively ‘orphaned’.
My recommendation is to design your DevOps process that will always clean-up or delete all files from your scripts folder in your source code, before pulling the latest serialised files from your Content Hub instance.
You can do this in an automated way leveraging the Content Hub CLI commands. Alternatively, you can do it old school way leveraging PowerShell commands to delete all files from scripts folder before serializing new ones again. Whichever mechanism you leverage, ensure old and used code files do not bloat your source code repo.
Next steps
In this blog post, I have discussed what happens when you make code changes to your action scripts. I explained why you will have ‘old’ or ‘orphaned’ code files within your script folder that will bloat your source code repo. I also covered steps you can take to mitigate this problem.
I hope my approach helps you address similar scenarios in your use-cases. Please let me know if you have any comments above and would like me to provide further or additional details.
If you currently leveraging Action scripts as part of your Content Hub solution, you probably noticed that any updates done to your entities are tagged as Created by or Modified by ‘Scriptuser’. You may as well not be aware that actually this is how the Content Hub platform works by design. At present, all scripts operate under the Scriptuser account
But how do I override the ‘Scriptuser’ account?
Frustratingly, there isn’t much documentation around this ‘Scriptuser’ on the official docs. You are not alone in this. That is why I have put together this blog post to help provide a solution to this problem.
It is not all doom and gloom. In fact, if you look around in Sitecore docs, the IMClient provides a capability to impersonate a user, using the the ImpersonateAsync method.
Below is a definition from Sitecore docs:
ImpersonateAsync(string)
Creates a new IMClient that acts on behalf of the user with the specified username. The current logger will be copied to the new client.
So we will need a function to get an impersonated MClient
Looks like we have a solution then. All we need to do now is define function within our Action Script, that will create an instance of an impersonated MClient. This impersonated client will in effect allow us to override the Scriptuser with the current user triggering our Action Script. Which is the solution to our current problem.
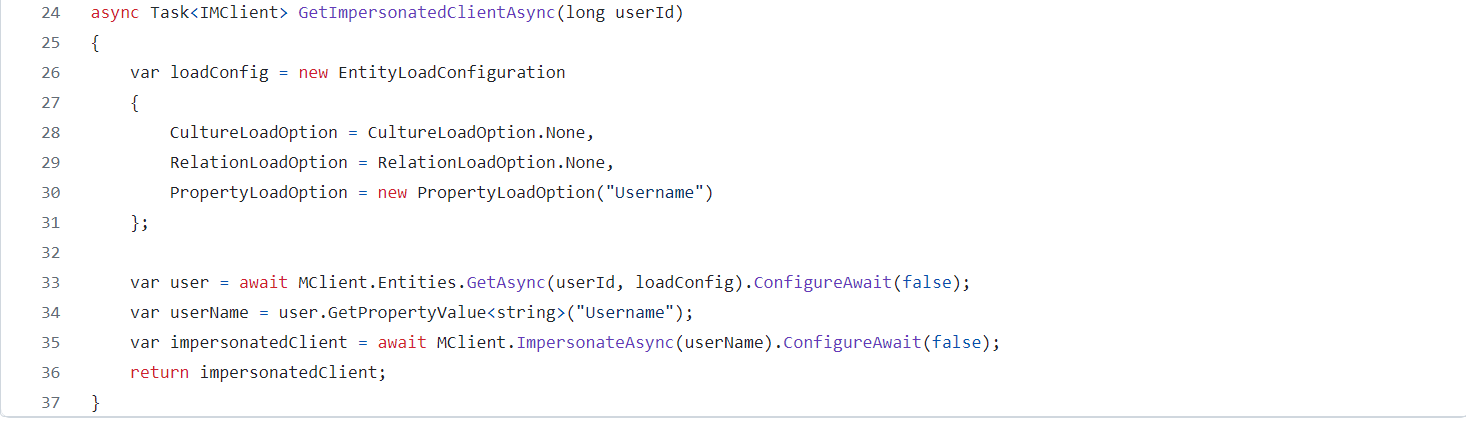
Good news, I have already defined such a function for you. I have named this function GetImpersonatedClientAsync, a shown below.
You should be familiar on how to load an entity property, by leveraging the PropertyLoadOption in your EntityLoadConfiguration, as shown above. That is how I am able to retrieve the Username property from the current user entity (currently authenticated user within Content Hub). This will be the user that has triggered our Action Script.
It is need as a parameter when calling the MClient.ImpersonateAsync as shown on line 35 above.
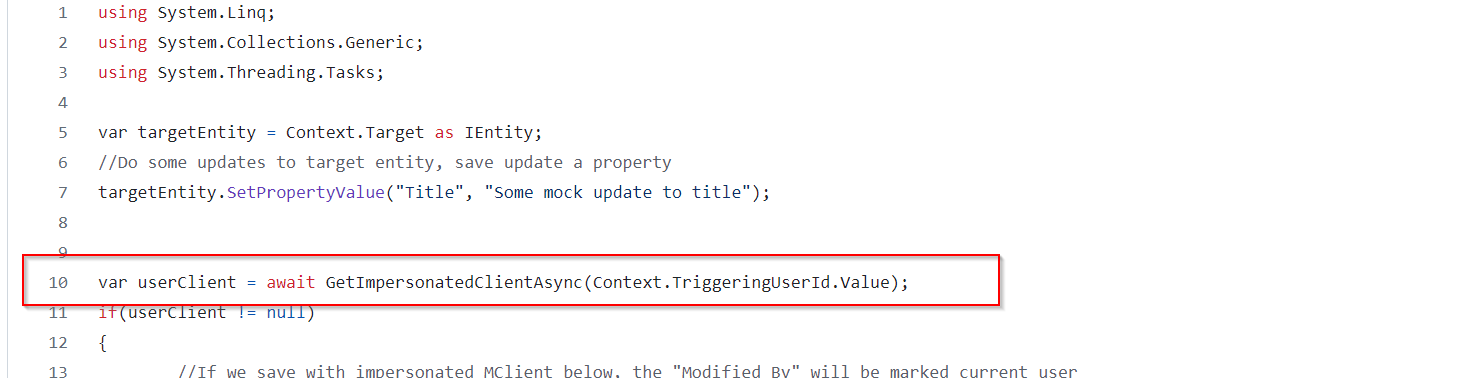
However, I would like to call out that the UserId of the authenticated user is always available within the Action Script via accessing the Context object. Below is a snippet of how I have done this on line 10.
Saving changes with Impersonated MClient
We now need to use the impersonated MClient in all instances where we are saving changes in our Action Script. Below is a code snippet on how to achieve this. You can see on line 15, I am using the impersonated userClient. You can easily compare this with line 20, which is a fallback option that uses default MClient.
In this blog post, we have looked at a how to override the Scriptuser within an action script. I have walked you through a sample action script and also shared sample source code for your reference. I hope you find this useful for your similar use cases.
Stay tuned and leave please us any feedback or comments.
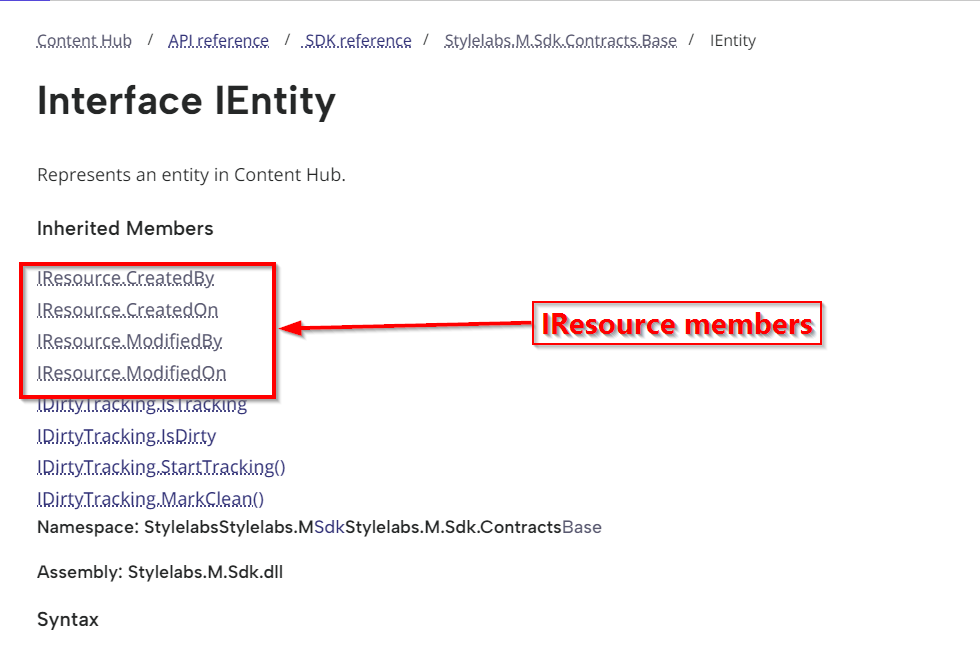
I have previously blogged about creating Action Scripts to help aggregate your Content Hub data for sharing with external or third party integrations. In this blog post, I wanted to demonstrate how to access your entities audit data such as when the entity was created and who created it. Also when it was last modified and who made the modification.
Below is a snippet of an action script, to demonstrate how to access these audit fields.
And below is the sample output from the above script.
Script explanation
Line 14 through 27 demonstrates how to get the entity object within your action script. The Context object provides you with the triggering context properties. In this case we are can try obtain the entity from Context.Target as shown on Line 14. The rest of the code checks if we succeeded to get the entity object, in which case we can try load it using a custom function GetEntity as shown in Line 20. I will cover details about this in a minute.
Line 29 demonstrates how to obtain the entity definition name
Line 32 through 35 demonstrates how to obtain the entity auditing metadata.
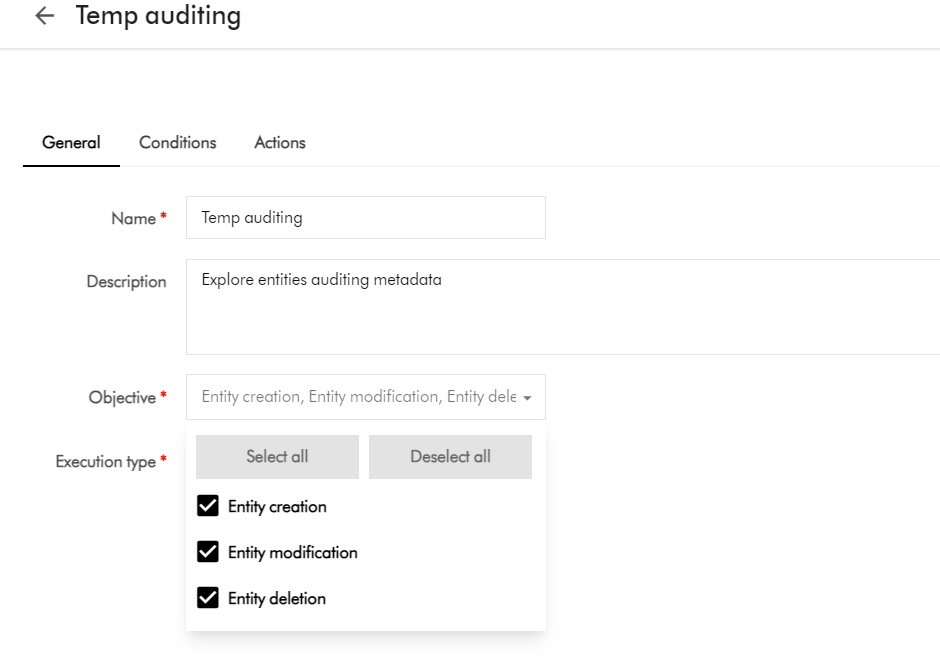
Below is a sample trigger, indicating the triggering events we are interested in. As you can see, our trigger will fire whenever an entity has been created, modified or deleted within Content Hub.
In this blog post, we have looked at a how to access an entity’s auditing metadata within an action script. I walked you through a sample action script and a sample output, and also shared sample source code for your reference. I hope you find this useful for your similar use cases.
Stay tuned and leave please us any feedback or comments.
When you are searching for assets within Content Hub, the search is underpinned by a search component within your page. You can also leverage the same search component, within the Search API to integrate the search results to an external or third-party system. One such use case, for example, is where you would like your business users to search for your assets on an external portal, without gaining direct access to Content Hub.
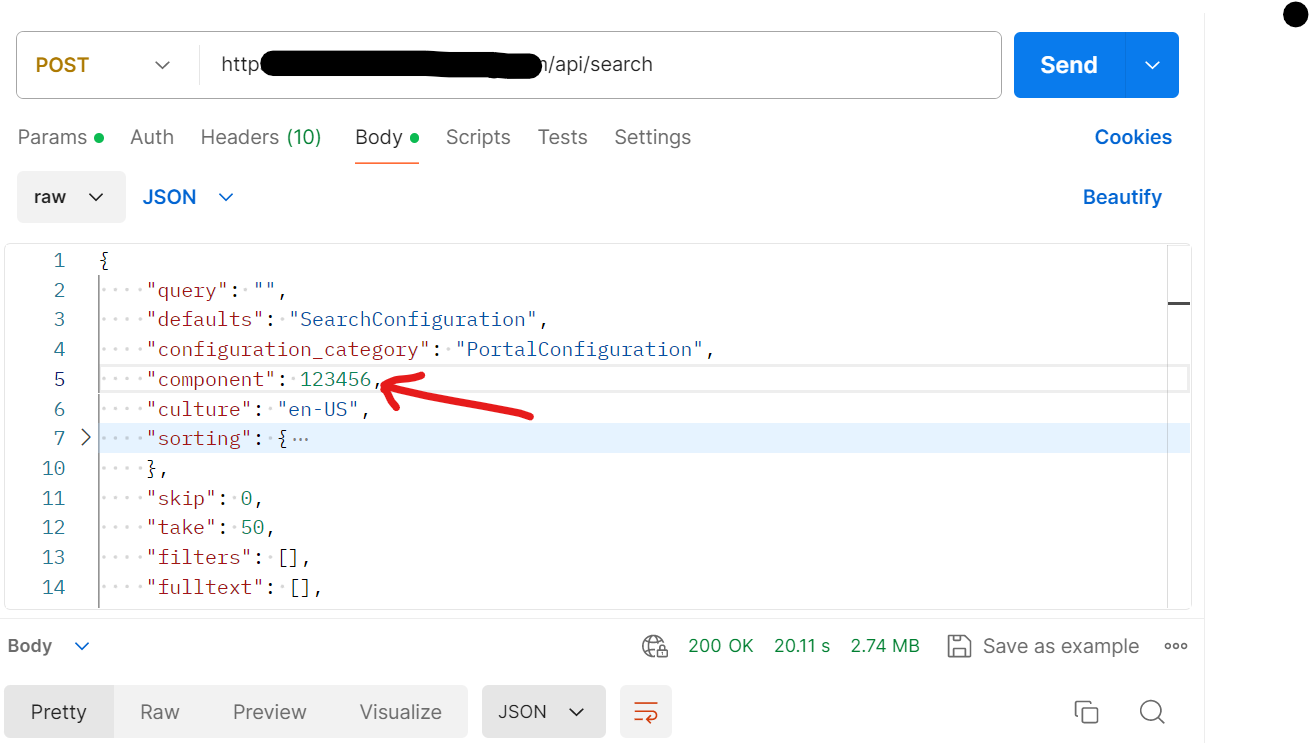
Search API – postman request
Below is an example of a POST request, indicating the search component Id within the request body. Of course you will also need to specify the required X-Auth-Token header to authenticate your request. (I am assuming you know how to go about this, and I have skipped these details)
Delivery links default expiry duration is only 20 mins
The response that you receive from Search API will contain a list of your assets that meet the search criteria. Each item in the response will contain the asset metadata details defined in your search component. In addition, you will get Thumbnail delivery link for the asset. This is particularly of interest for me, as the default expiry time is set to 20 minutes and is not enough for my current scenario. Below is a snippet of such response, indicating the thumbnail delivery link. Notice the expires url param indicated.
How to extend the default expiry duration for delivery or rendition link
The good news is that this expiry duration is configurable within Content Hub. This behavior is related to the media processing task. When a media processing task is created, it is possible to enable the store output functionality and configure rendition links for these tasks with the needed parameters.
Steps to follow:
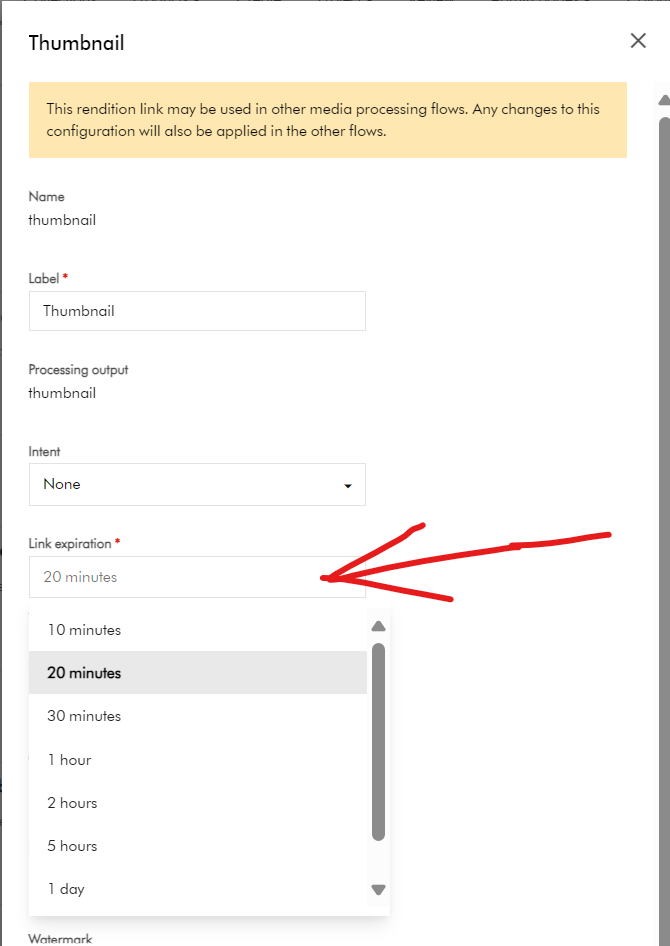
Open Manage -> Media Processing -> Images -> thumbnail task -> Outputs tab -> the “Edit” Rendition link button
Find the “Link expiration” field and change it to the required value.
Save the task. Publish the changes on the Manage -> Media Processing page
After these steps, when you send a request to the search API, it should return the rendition link with the new expiration time.
Next steps
In this blog post, we have explored that the Search API will return a response which has thumbnail delivery links expiry of 20 minutes. I have explored how to update this configuration within the Media Processing tasks, so you can choose a longer expiry to meet your needs.
Please let me know if you have any comments regarding above and if would like me to provide further or additional details.
I recently worked on an exciting Content Hub project which required automation of deployments from DEV environments to QA/TEST and PROD. One of the challenges I faced was how to handle environment specific variables and settings. One particular use case is the API call Action type, which has references to some API call endpoint and using an Api Key. Typically, such an API call will point to a non-production endpoint in your QA/TEST Content Hub and a production facing endpoint for the PROD Content Hub
Sounds familiar, should be easy right?
I thought so. I thought I put this question to my favourite search engine to see what is out there. The truth is Content Hub DevOps is nothing new really. There is plenty of documentation on how to go about it, including this blog post from the community From the Sitecore official docs, you can also find details about how to leverage Content Hub CLI to enable your DevOps workflows.
However, I couldn’t come across an end-to-end guide that solves my current problem. Nicky’s blog post “How to: Environment Variables in Content Hub Deployments” was pretty good actually and I have to say I found the approach quite compelling and detailed. However, I didn’t adopt Nicky’s approach as I would like to use automated end-to-end DevOps pipelines. Unfortunately, Nicky’s approach doesn’t.
My approach
Below is a high level process I have used.
Leveraging Content Hub CLI to extract a baseline of your Content Hub components. For example ch-cli system export --type Scripts --wait --order-id command allows you to export Actions, Scripts and Triggers package, which you can extract all yours Actions, Scripts and Triggers as JSON files. These can then be source controlled, allowing you to track future updates on a file-by-file basis. For a full list of components that you can export, you can pass --help param as shown below.
Without DevOps, you will typically package and deploy your Actions, Scripts and Triggers, say from DEV Content Hub into QA Content Hub instance. You will then have to manually update any of your API call Actions with the QA specific endpoint URL.
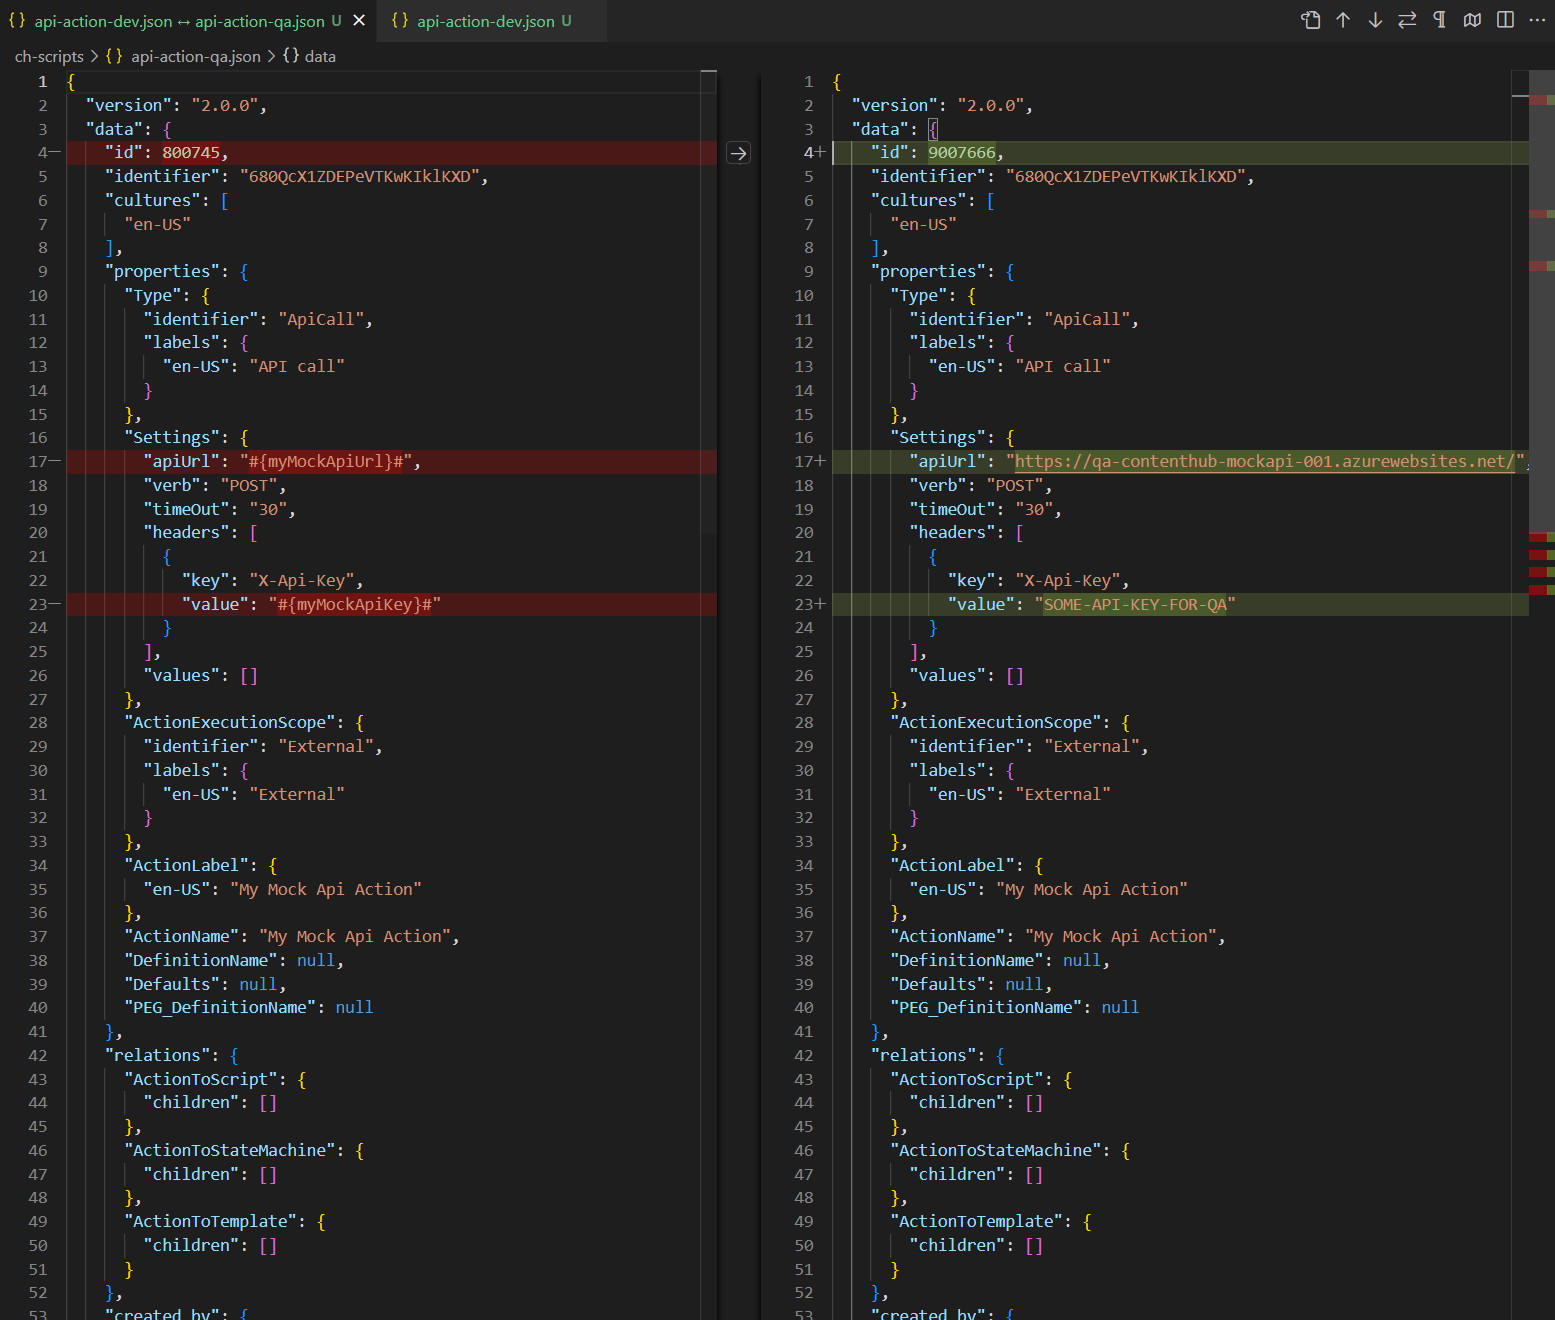
With Content Hub CLI, I am able to source control and compare my Content Hub DEV and QA files as shown below. Left-hand side is my DEV mock API action, right-hand side is my QA. Please keep note the identifier is the same (680QcX1ZDEPeVTKwKIklKXD) to ensure the same file can be deployed across to Content Hub QA and PROD
This is quite powerful, since I can take this to another level and define Environment specific variables for my mock API action, as shown below. I have identified I will need #{myMockApiUrl}# and {myMockApiKey} variables.
Notice I am leveraging the ReplaceTokens Azure pipelines task. Left-hand side is my DEV mock API action, this time I have parameterised the variables. Right-hand side is my QA to help illustrate the differences. During the QA deployment, my CI/CD pipelines will transform the source controlled file on the left-hand side into QA file on the right.
This is it, I have solved my problem. I have identified which component(s) have environment specific variables and parameters. I can now leverage DevOps CI/CD pipelines to package all my components, generate a deploy package specific for Content Hub QA environment.
Deploying a package using Content Hub CLI uses this command: ch-cli system import --source "path to your deploy package.zip" --job-id --wait
Wearing my DevOps hat, I am able to write a complete end-to-end CI/CD pipelines to automate the deployments.
One capability you can leverage is the Azure variables template definitions to allow you to define Content Hub QA and PROD variables, such as below. Please notice #{myMockApiUrl}# and {myMockApiKey} variables in this template file. They now have Content Hub QA specific values. We will need a similar file to hold Content Hub PROD variables.
Referencing Azure variables template file in main pipeline
The Azure variable template file for QA (qa-variable-template.yml, in my case) can then be linked to the main Azure CI/CD pipeline yaml file, such as shown below:
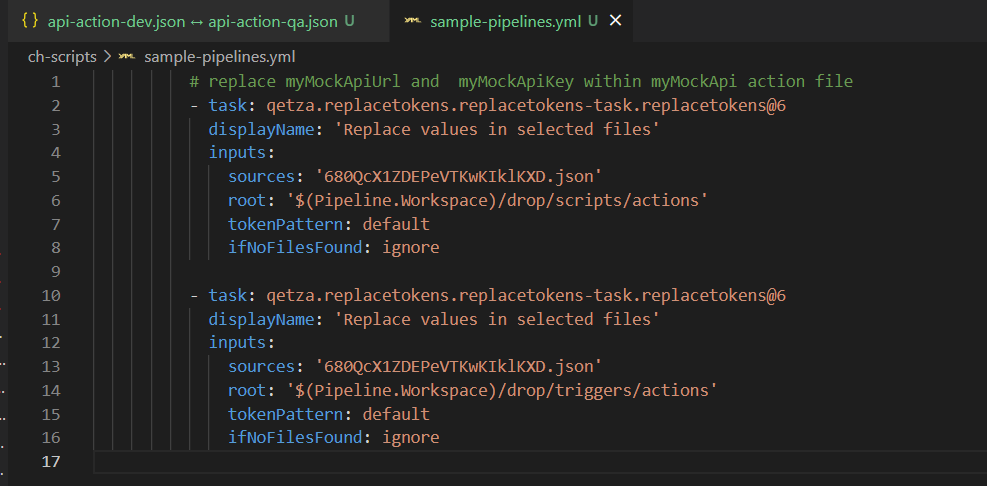
Replacing tokens in main pipelines
Replacing tokens sample is shown below. Please notice the API call Action Identifier 680QcX1ZDEPeVTKwKIklKXD that was referenced in my previous screenshots above
Next steps
In this blog post, I have introduced the problem and use-case when you need to manage and deploy Content Hub environment specific variables. I have used an API call Action type to illustrate this use case. I have also covered how to leverage Content Hub CLI to serialise Content Hub components and demonstrated an example of using Actions, Scripts and Triggers components. I finished with my own approach and how I did an implementation of an end-to-end automated DevOps process. I hope my approach helps you address similar scenarios in your use-cases. Please let me know if you have any comments above and would like me to provide further or additional details.
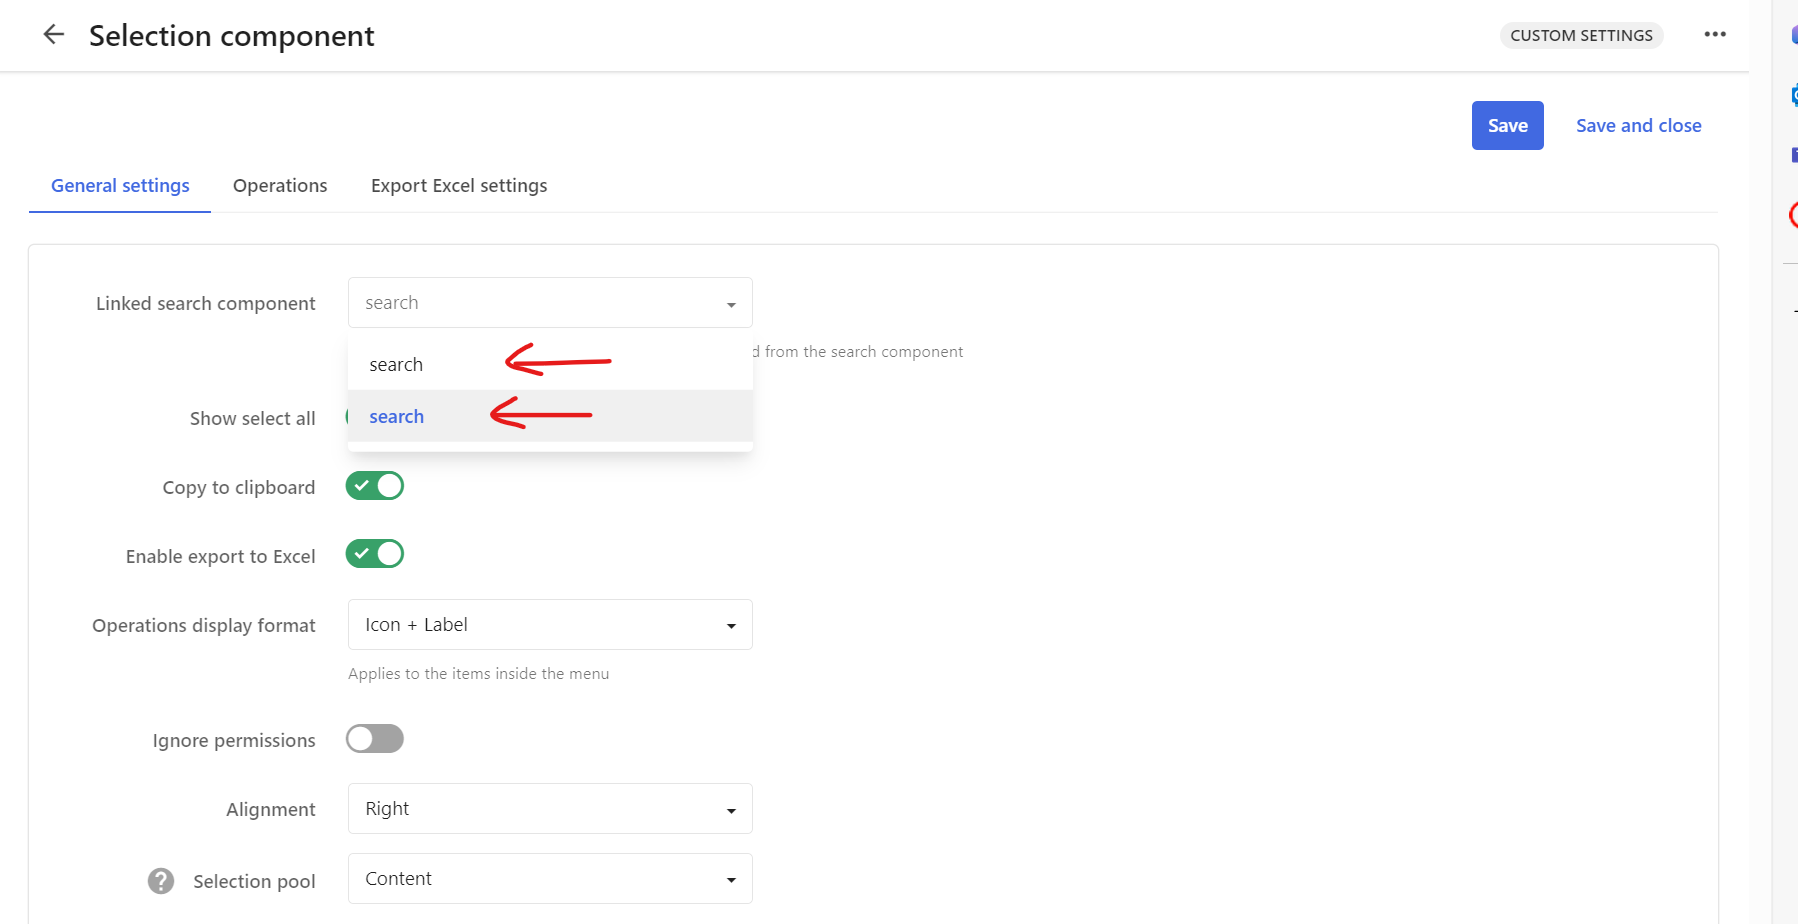
Consider the scenario as per the screenshot above. You are configuring a second Search component on your Assets search page. You make a genuine mistake and name your second Search component identical with your existing one, as shown. In this case, you would like to link your second Search component with your existing Selection component as shown.
Selection component shows ‘duplicates’
I know that I have made a genuine mistake of using the same ‘search‘ name for my second Search component. My selection component will display the following.
This is obviously confusing and we don’t know which is which. Now I will try rectify my mistake, and rename my second Search component.
Renaming Search component
Do rename my second Search component, I click on the Settings button shown below
Which opens the Settings pop up, from where I will specify a new Title as shown below and Save it.
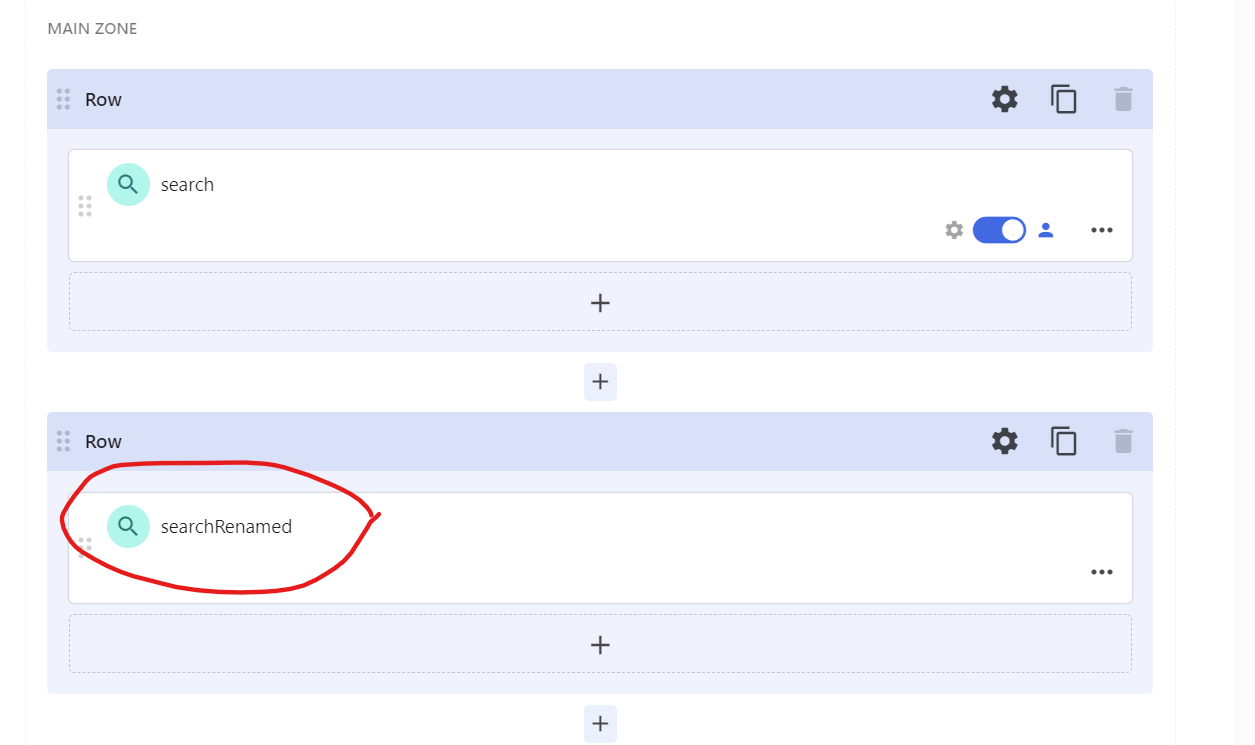
Below is the outcome showing my second Search component renamed.
Selection component still shows ‘previous’ name
After this change, I was expecting my Selection component to show ‘searchRenamed’. However, I still have the same problem as shown below.
Sitecore Technical support have logged a product bug
I reached out to Sitecore Technical support and shared my use case above. Below is the response I received.
Hi Julius,
Based on the provided information we would like to define the scope of the current case:
Issue definition: in the drop down list the PageComponent.Name property is used instead of PageComponent.Title in the Linked search component (in the Selection component). Investigation target: we will work diligently to help find the root cause and a resolution to the defined issue.
Additional notes:
[Redacted]
The issue reported has been registered as an issue in the Content Hub product.
The reference of the bug report is the following: MONE-44866, which can be further reviewed and followed-up via the support portal in the “My Product Issue” page
Update:
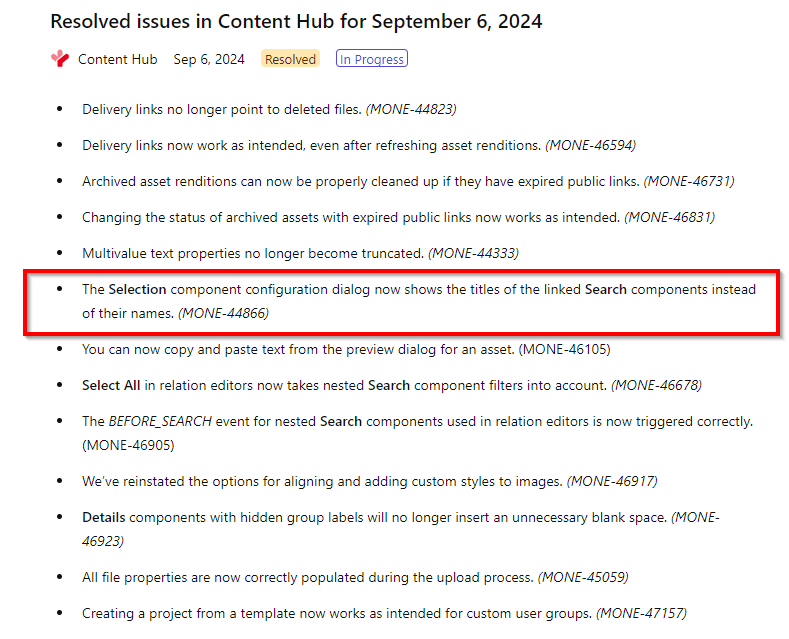
Glad to report that Content Hub product team have resolved this issue in September 6, 2024 release
Tips and tricks
Currently, the Selection component’s Linked search component drop down list uses the PageComponent.Name instead of PageComponent.Title. While Sitecore have acknowledged this as product bug, you can easily work around this issue.
If you are going to create more than one Search Component, ensure you name the appropriately with distinct and easily identifiable titles. This is because the title will be used as the component name in the backend, which will ultimately be displayed on the list when linked to Selection component.
If you initially assign your second Search Component the same name as the first one, then renaming the second component will NOT resolve the issue as I have explained in this blog post. Either delete the second Search component and create a new one with a unique Title.
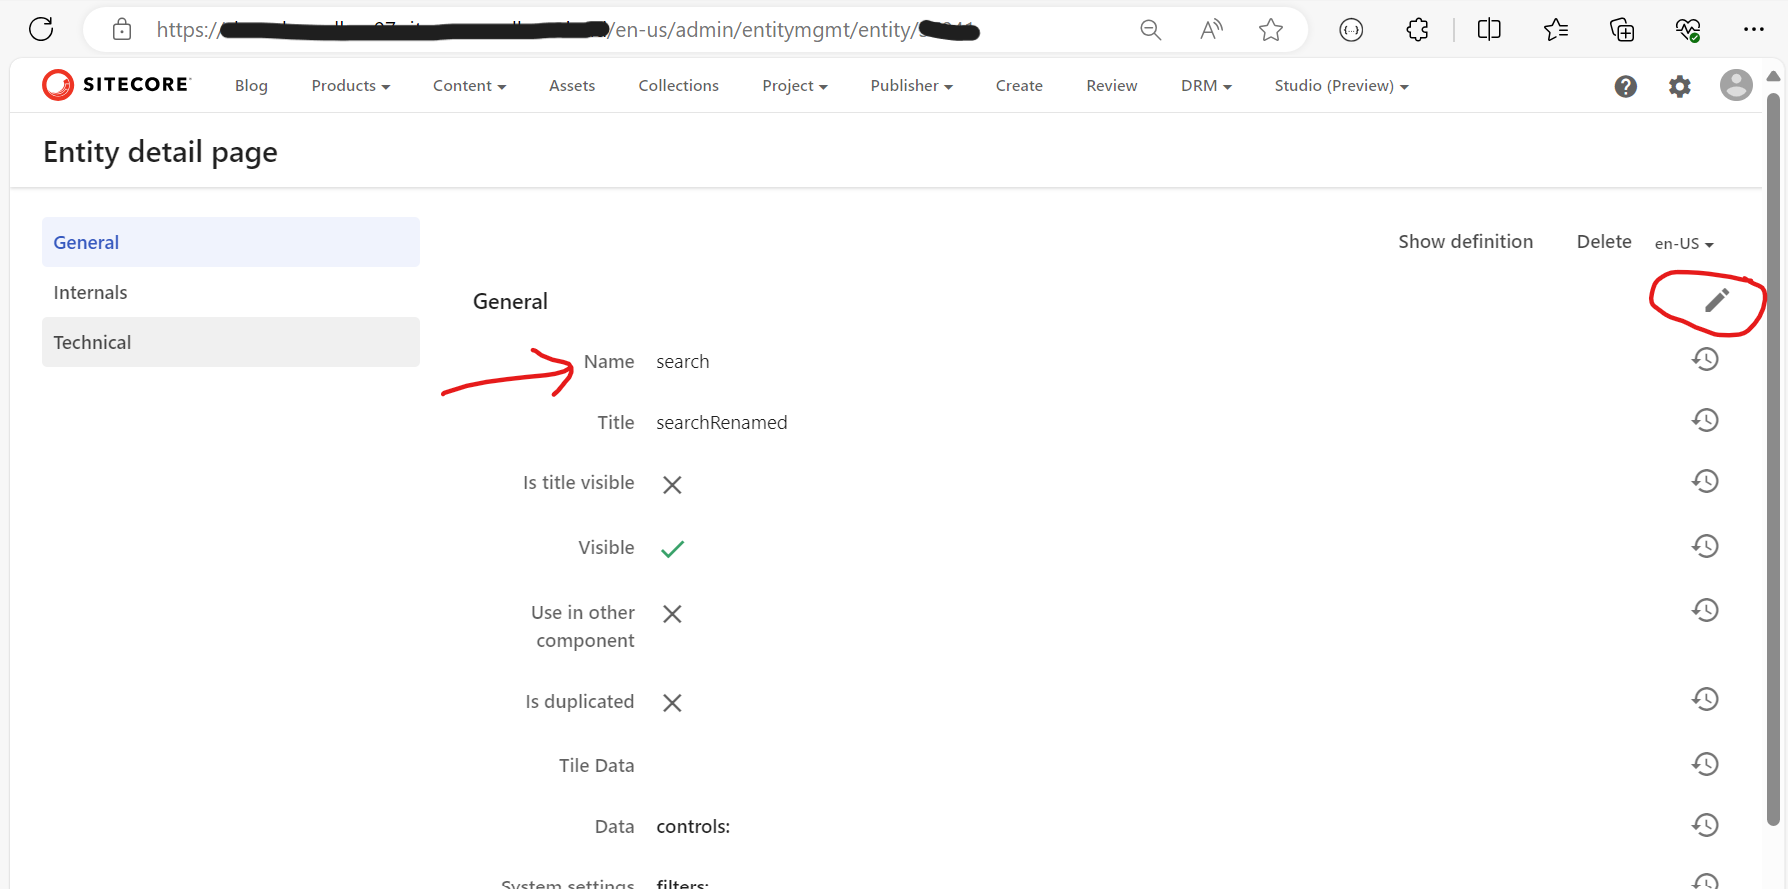
Or, use the Entity Management page to rename the Name of the second Search component to make it unique, as shown below. You will need to know the Entity Id of your second Search component.
Entity Management page can be accessed using the URL below
In this blog post, we have looked at a scenario where having more than one Search components with the same name causes ‘duplication’ issue with your Selection component Linked Search component list. I have shared some tips and tricks to help you work around this issue.
Stay tuned and leave please us any feedback or comments.
Displaying linked assets on the Asset Details page
As discussed in the previous blog post, a typical use case for self-referencing relations is to link a set of assets to a parent or master asset.
Below is a mockup of the parent or master asset details page to illustrate this use-case.
This is a typical asset details page that you get out-of-the-box with your Content Hub instance. I have done one customization to this page, to allow me to display our Linked assets panel as highlighted above.
As you can notice:
I am displaying panel heading ‘Linked assets’.
I have ‘+ Add existing items’ CTA button. This is the button when clicked, allows me to search for existing assets that I would like to link to the current parent or master asset.
I have a refresh button. This allows me to refresh the linked assets list without re-loading my entire page
A have list of linked three (3) assets shown in a tabular form, including the asset meta data of ID, Title and Article Type To Asset
We will now look at how I have built this linked assets panel.
Modifying Asset Details page
To customize the existing Asset details page, we need to view the Page designer component. From the ‘Manage’ dashboard, select ‘Pages’ component, which will open the ‘Pages’ window.
Search for ‘Asset details’ page, as shown below. As you can see, I have added a new section to the existing page layout. This section has the ‘Linked assets’ panel.
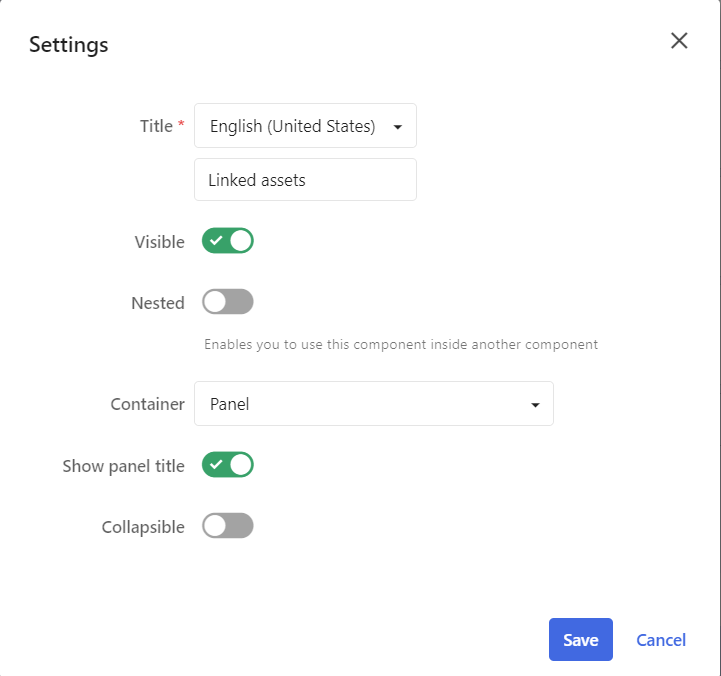
Linked assets – this is the panel component which contains the display components for linking the assets. Below is the settings popup for this panel.
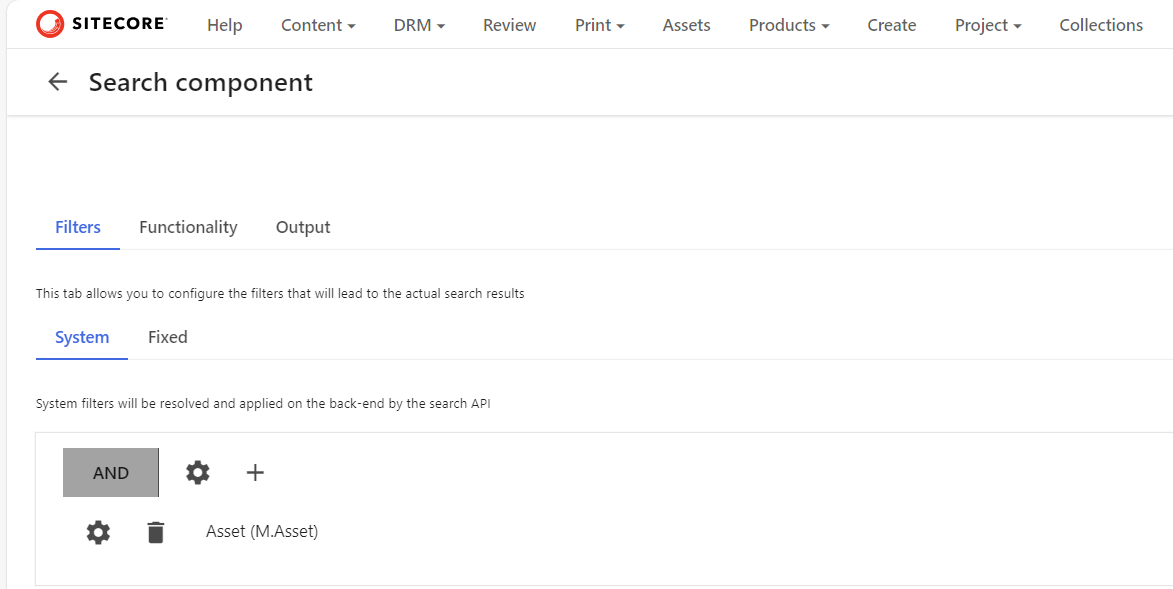
SearchEligibleAssets – this is the Search component that I have configured to search and filter existing assets that will be linked to the parent or master asset. Below is the configuration settings for this search component.
Notice we are searching and only linking existing assets that have not been deleted.
The ‘SearchEligibleAssets’ component should be set to be ‘Nested’ component as we are using it from within our ‘Linked assets’ componet.
Linked assets panel component
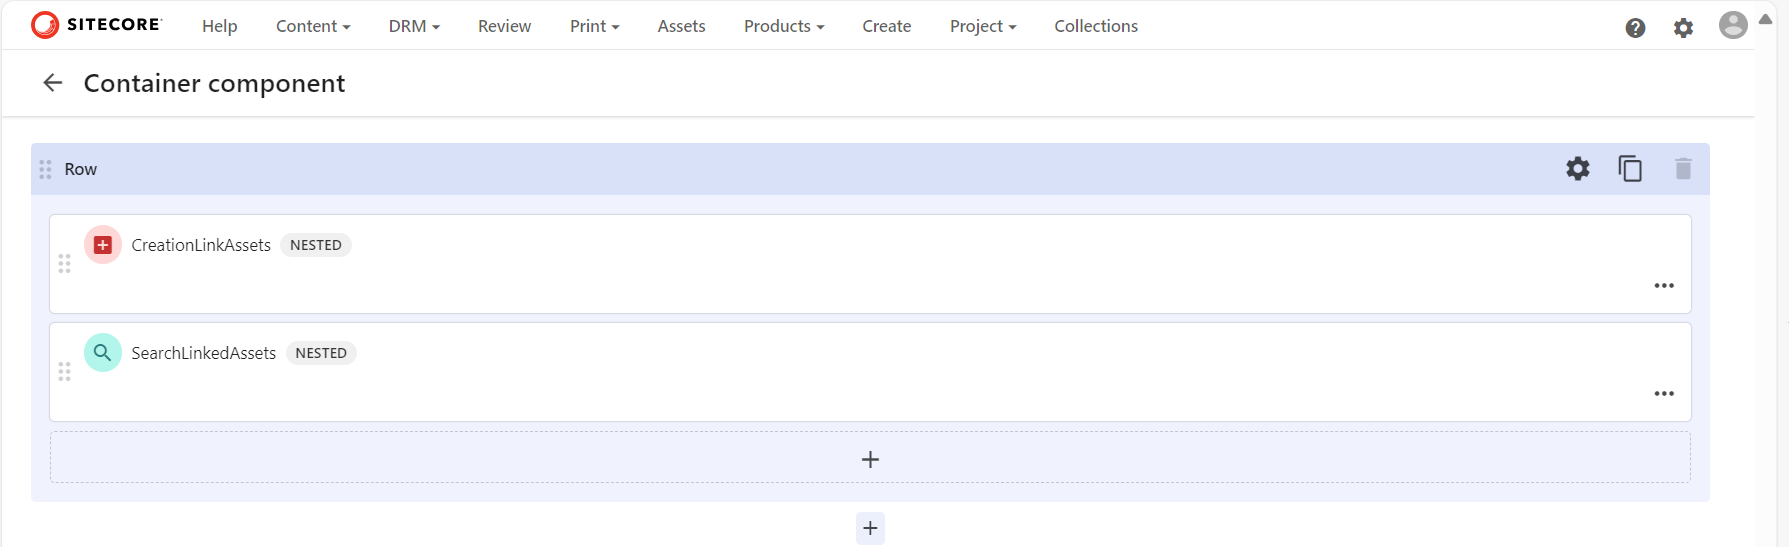
Let us look at the components within our ‘Linked assets’ panel.
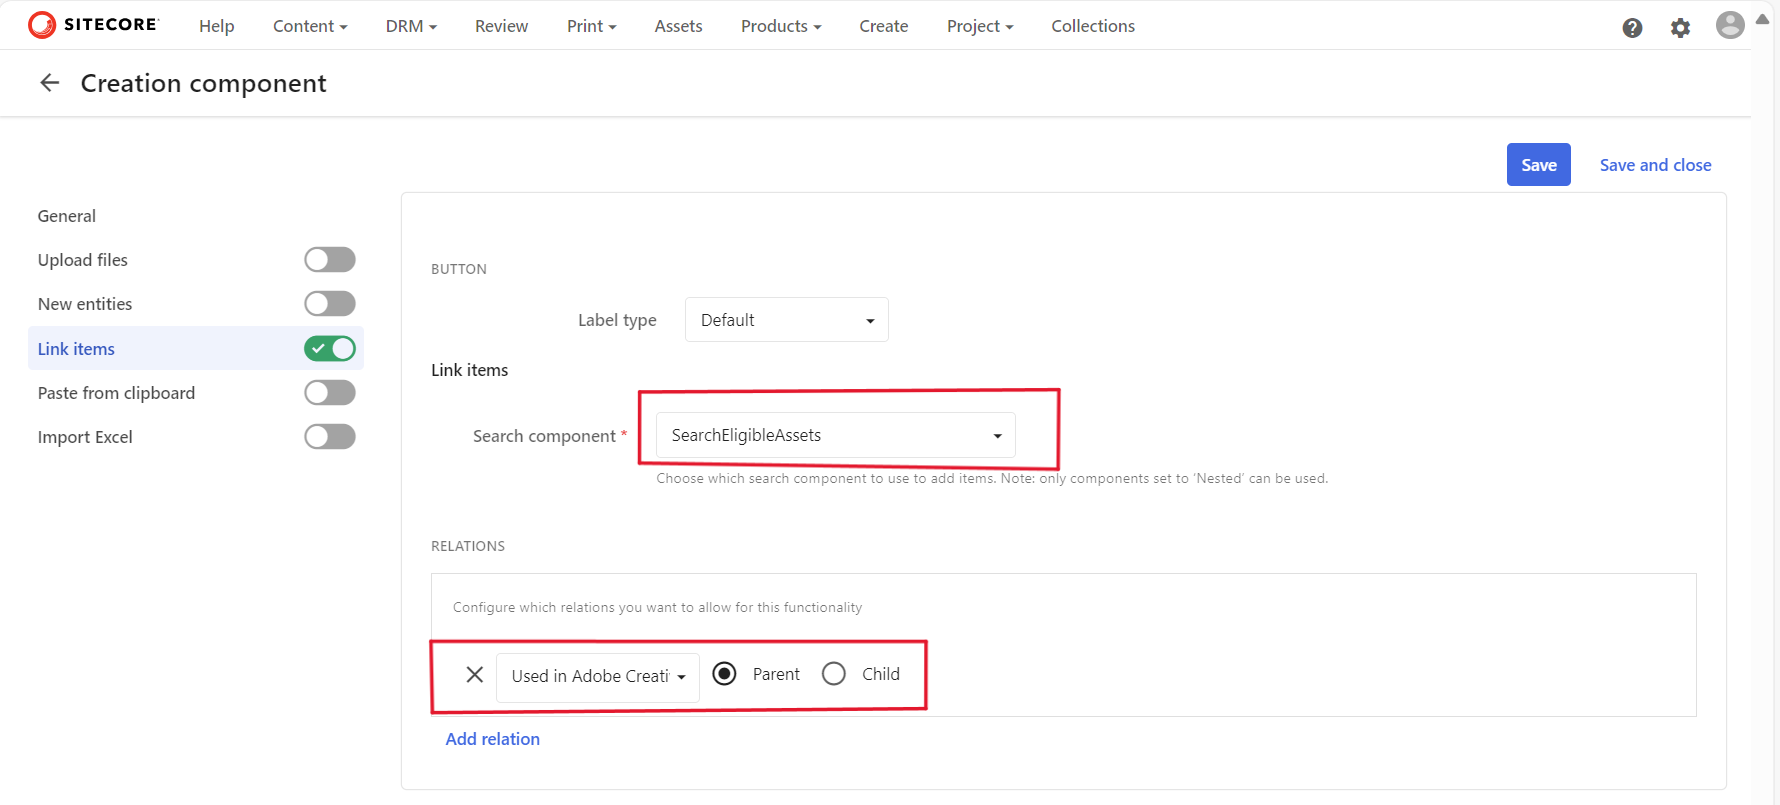
CreationLinkAssets – this is our Creation component, that will create new links based on the selected assets to our parent or master asset. Below is screenshot showing how we using it to link assets to the parent or master asset.
We need to link our ‘SeachEligibleAssets‘ Search component to the Creation component, as shown below
The assets to be linked are using our ‘AssetToLinkedAsset‘ relation, setting the Parent as shown above.
SearchLinkedAssets – is is our Search component that will display all existing and already linked assets to our parent or master asset. Below is configuration to achieve this
Ensure M.Asset is selected in ‘System’ filter
Then within the ‘Fixed’ filter, filter out using our ‘AssetToLinkedAsset’ relation as shown below
As specify we are displaying all assets which have the current asset (Page Entity) as their Parent using the self-referencing ‘AssetToLinkedAsset’ relation.
This is it. All done.
Next steps
In this blog post, we have done a deep-dive into how to create and populate self-referencing entities and link them up to create parent-child hierarchy and to display them within Content Hub.
Stay tuned and leave please us any feedback or comments.
In Content Hub data modeling, relations are used to define how entities are linked together. One of the entity in this relationship will be a parent and the other will be a child. The relation can either
be between two different types, say M.AssetType and M.Asset
be of the same type, say between M.Asset entities. This type of relation is known as self-referencing
In Content Hub, it is recommended to name relations using the notation ParentEntityToChildEntity. For example AssetTypeToAsset, is a relation where M.AssetType is Parent of M.Asset. Conversely, M.Asset is Child of M.AssetType
In this blog post, I will dive more into self-referencing relations, how to define them, how to create entities and link them up as well as display them within Content Hub.
Defining self-referencing relation
We typically use self-referencing relation where you want to define some form of parent-child hierarchy within your entities of the same type. Let say we have a use-case where have a ‘master’ asset and we need to link related or supporting files, so that we can easily find all related or supporting files to master asset.
To define this, you will follow the following steps:
From the dashboard, click on Schema and search and find M.Asset. Select to open the M.Asset definition management page.
Click on ‘New member‘ button to launch ‘New member‘ popup below. Select Create a new relation to a non-taxonomy definition option
This opens a window to capture the relation definition, conditions for the relation, whether it is mandatory among other configurations. This is similar to one below
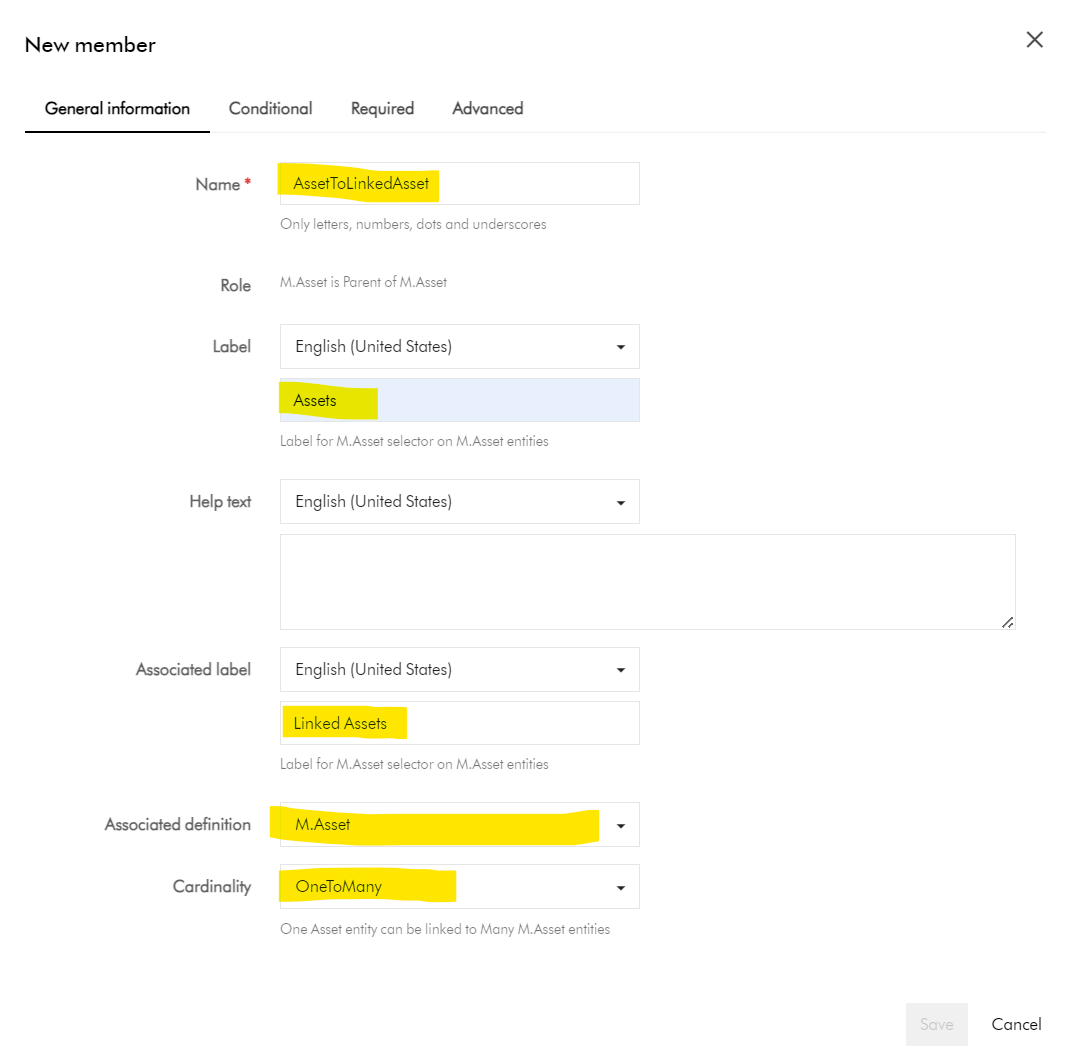
We will use the above dialog to define self-reference relation. As you can see, I have alread named my relation AssetToLinkedAsset, which mean M.Asset is Parent M.Asset, using the OneToMany cardinality. I will explain more about what is cardinality later in this blog.
We will ignore defining any Conditional, Required and Advanced settings for now, we are going to use the default values, as shown below.
Then click Save to create the relation. This will close the popup window and go back to the M.Asset definition management page.
That is it, we have defined self-referencing relation. Ensure you click on Apply changes to commit changes on the M.Asset definition management page.
If we refresh our M.Asset definition management page, you will notice we now have two relationships as shown below
Content Hub will automatically generate two relations shown above, where M.Asset is Parent of M.Asset as well as M.Asset is Child of M.Asset. In fact, these fields are AssetToLinkedAsset:Parent and AssetToLinkedAsset:Child respectively within the M.Asset schema
What is relation cardinality
In Content Hub, we make use of cardinality to describes how parent and children are related. All values are from Parent => Child. Below are the supported cardinalities
OneToOne One parent to one child.
OneToMany One parent to many children
ManyToMany Many parents to many children.
The choice depends on your use case. In my current use case, I would like my ‘master’ asset to have one or more linked or supporting files, hence I have used OneToMany
Next steps
In this blog post, I have looked at what are self-referencing relations in Content Hub. I walked through a sample use-case for them, how to define them, and steps to follow within Content Hub. In the next follow up post, I will walk you through how to create and populate self-referencing entities and link them up to create parent-child hierarchy and to display this within Content Hub.

 .
. button, which should prompt for emailing details. You can alternatively use the Copy link button to copy the URL and share it as well