Image credit: https://doc.sitecore.com/ch/en/users/40/content-hub/security–scale-units.html
Why data retention policies?
Proper data retention policies are a crucial component of any effective cybersecurity strategy. As per the above architecture, the data tier has the following capabilities.
- Redis Labs Enterprise provides data storage capabilities in Content Hub. This persistent storage is for the metadata of each Content Hub instance, including asset, product, and content details.
- Azure Blob Storage is used for Media assets and other important files used by the Content Hub application are stored securely for access when and where needed.
- Elastic Cloud Enterprise is a responsive service for users to find the desired content when they need it.
Which are the data backup rules?
| Resource | Description |
| Redis DB | Redis DB backups are scheduled to execute every night. They are retained daily for one month and weekly for 52 weeks. |
| ElasticSearch | ElasticSearch index backups are retained for three weeks since they hold append-only data. |
What are soft delete rules?
Below is the period the soft deletions are delayed:
- Production blobs are hard deleted after 30 days.
- QA blobs are hard deleted after 7 days.
- DEV blobs are immediately deleted.
How to configure maintenance settings?
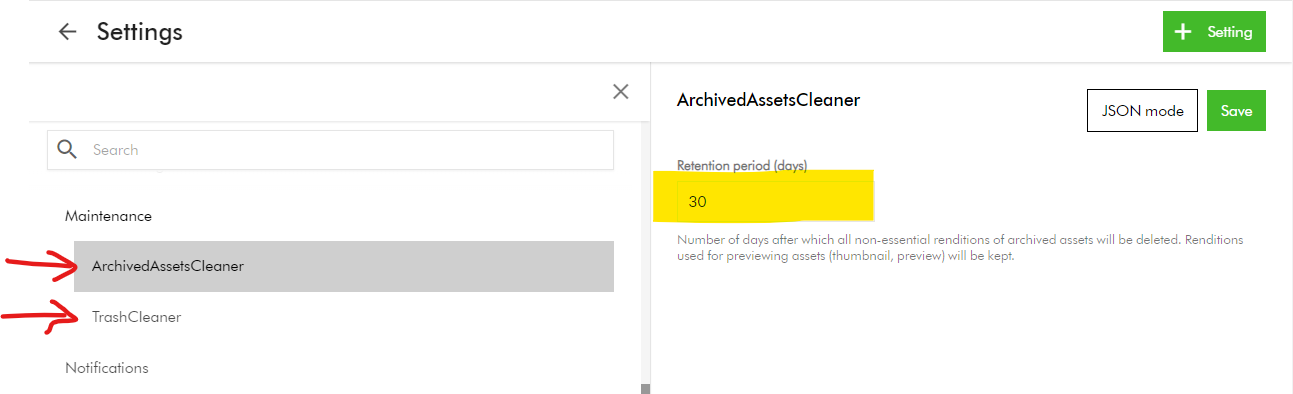
You can configure maintenance settings related to the archival and deletion of assets, including the following:
- ArchivedAssetsCleaner – Number of days after which all non-essential renditions of archived assets will be deleted. Renditions used for previewing assets (thumbnail, preview) will be kept.
- TrashCleaner – Number of days after which items in the trash will be deleted forever.
To configure these settings:
- On the menu bar, click Manage -> Settings
- On the Settings page, search and click Maintenace.
- Then, select ArchivedAssetsCleaner or TrashCleaner.
- Set Retention period (days) to a numerical value between 1 and 999.
- Click Save.
Content Hub Audit logs retention policy
Sitecore Audit logs provide a comprehensive record of all activities that occur within your Content Hub system. These includes:
- System events
- User actions
- Changes to data
Sitecore retains these audit logs for a “retention period” to meet regulatory compliance and accountability purposes.
Types of audit logs data retention
Below are the types of data retention policies used in Content Hub:
- Online retention: data is available through Content Hub search, reporting, or API.
- Offline retention: data is not available through Content Hub search, reporting, or API, but can be made available for download through a service request.
- Expired data: once the retention period ends, the data may be permanently deleted. To keep the data beyond this period, you must request and store it securely before it is deleted.
Retention policy – Production environments
| Audit log category | Online retention time | Offline retention time |
| User or security events | 2 years | 7 years |
| Audit events | 2 years | 7 years |
| Operational logs | 3 months | N/A |
Retention policy – Non-production environments
| Audit log category | Online retention time | Offline retention time |
| User or security events | 3 months | 2 years |
| Audit events | 3 months | N/A |
| Operational logs | 1 month | N/A |
Next steps
On this blog post, we have looked at how to configure your Content Hub data retention policies. Proper data retention policies are a crucial component of any effective cybersecurity strategy.
Stay tuned for future posts as well look and feel free to look around at my existing posts on Sitecore platform.