Today we will walk through steps about extending your Sitecore Identity Server 9.3 to work with Facebook sub-provider. We will be creating a Sitecore Host plugin, which you should be familiar if your have read my previous blog on Sitecore Host Plugins.
Why Facebook Logins?
The scenario is that you would like your front door visitor to your Sitecore based website to be able to authenticate using their Facebook logins.
The good news is that Sitecore Identity Server can be configured as a federation gateway which means we can leverage Facebook as external provider with little effort.
What steps are needed?
Register your Sitecore Application on the Facebook For Developers Portal. This process is to get an Application Identifier and Application Secret, that are needed in your Sitecore Instance. I will walk with you on how to do this process.
Create and deploy a Sitecore Host Plugin that extends Sitecore Identity Server to support Facebook Logins. I will walk with you on how to create this plugin, with full access to the source code in my GitHub Repository
Register your Sitecore Application
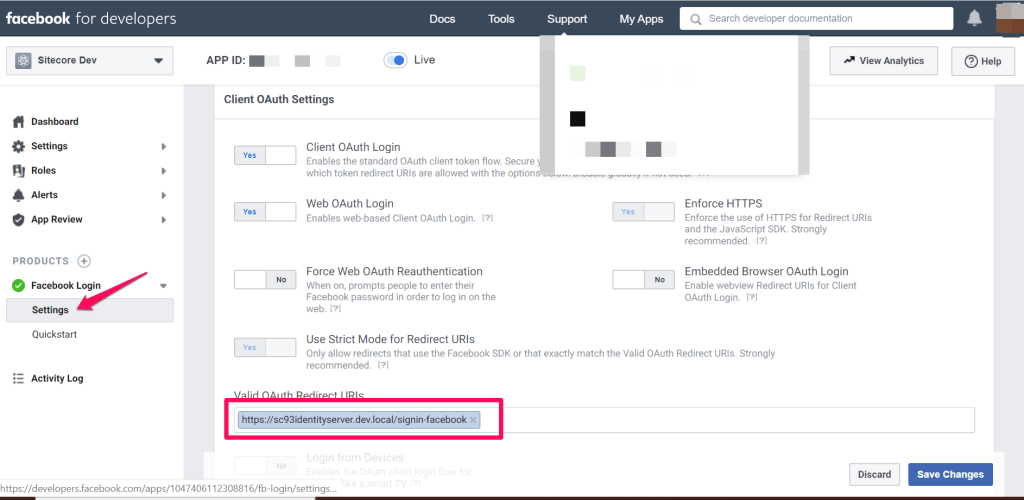
Head to Facebook for Developers portal. On the portal, follow the link to create a new application. This will require you to specify the application display name after which, you will get a dashboard similar to this below.
Application Dashboard
Ensure you configure a redirect URL for your Sitecore Identity Server instance and save your changes. This will be of the format below:
We need to reference the Microsoft.AspNetCore.Authentication.Facebook package needed for Facebook login functionality for ASP.NET core applications. This is it.
Facebook AppId and AppSecret configuration
Within our Sitecore Host Plugin configuration file, we will define two properties as follows:
AppId – This will be mapped to the Application Identifier available from Facebook for Developers portal
AppSecret – This will be mapped to the Application secret availabe form Facebook for Developer portal
Provide definition of ConfigureServices for the Plugin
As per Sitecore Host Plugin requirements, we need to configure services for the subprovider according to the instructions for this provider, and specify the SignInScheme setting as idsrv.external
To use authentication middleware, we must have an object of the type Microsoft.AspNetCore.Authentication.AuthenticationBuilder
To initialise this object, we must use
new Microsoft.AspNetCore.Authentication.AuthenticationBuilder(services)
instead of services.AddAuthentication()
Notice how we use AuthenticationBuilder(services).AddFacebook() pipeline below, which is available to us via the Microsoft.AspNetCore.Authentication.Facebook package we referenced earlier.
Facebook Plugin – ConfigureServices code listing
Facebook Plugin in Action
After successful deployment of this plugin to your instance of Sitecore Identity server, you should see the Sitecore Identity login screen below.
Please note you will need to re-start your IIS to pick the plugin changes.
Source code
This is it. You now have a working Facebook Plugin that you can deploy to your Sitecore Identity Server 9.3 instance. The full source code for this plugin is available on my public GitHub Repository.
Thank you for joining us for our first London Technical User Group of the year on February 26, 2020. This was my first technical talk at a Sitecore User Group event. And I would like to share my experience with you.
Blank Canvas
So, where do you start? Perhaps the most difficult part is finding out a topic to speak about. I could imagine this resonates with you too. I decided to talk about Sitecore Host because I believe it is an area that relatively new and has not been blogged about as much. It also gave me chance “learn by doing” as I needed to demonstrate one or two highlight features of Sitecore Host.
Nailing your topic
Having nailed the topic, I embarked on reviewing as much documentation as I could to get content for my own talk. I also planned out the various scenarios for my technical demos. Naturally, I went for Sitecore Horizon 9.3 being the new kid in the block in the Sitecore Host front. For comparison, I also went for Sitecore Identity Server, which also gave me the opportunity to demonstrate creating and extending Sitecore Host Plugin another highlight feature for me.
So, what is your story?
The next thing was to come up with a story on why I believe Sitecore Host is so cool. For me, what is interesting about Sitecore Host is as follows:
Sitecore have created a pluggable architecture that gives us a framework we can extend safely using .NET Core hosting bundle.
Sitecore is already doing cool stuff with this framework, Sitecore Horizon 9.3, Sitecore Identity and Universal Tracker Service
Sitecore Identity Server as a federation gateway can be extended to work with ADFS, and many more external providers
So, what is the big deal? Well, if you were to implement support for ADFS in a Sitecore version prior to Sitecore Identity Server, it won’t take you hours, we are talking weeks in fact. That is a big deal for me and my clients. So, I did an experiment and timed myself. The results are out – and it took me under 2 hours to create ADFS Host plugin!!!
I also got a chance to share my gotchas during my preparation, which are now available for you to view on my series of blog posts accompanying the talk.
Talking the talk
And on the actual event, how do you execute your talk? How do you keep the time? Oh well this was the tricky part as I had to restart my Sitecore instances in multiple occasions during the demos…and you know how slow the instances can be in your local dev environment. That is not very time efficient. Perhaps I needed to borrow a leaf from Jeremy Davis style of presenting with pre-recorded screen capture videos of demos. And with subtle pauses which allowed him to talk about the key points, without demo getting on his way. I think I will try this next time.
I also got some constructive feedback which I would like to share with you:
“Talking through code is tricky – Even though this is a technical user group, there are some non-technical people in the audience. Whilst it’s ok for them not to follow, you don’t want this to last too long or they get their phones-out.”
“Naturally when talking through code, you have to focus on what you are talking though – physically looking at your machine. This means you are dis-engaged from the audience (think about body language) – the aim is to be able to talk through code whilst barely even looking away from the audience.“
Happy my first talk is in my back pocket now. I can’t wait for another opportunity to do another presentation in future User Group event.
The second Sitecore User Group event will be in Manchester is on Wednesday March 11, 2020 week. Grab your ticket and join the Sitecore community over there who will be digging into testing personalization and optimization, using Docker with Sitecore and have a look at the new Horizon editor.
In this four part series of blog posts, we will examine in detail the Sitecore Host platform and what benefits this brings to Sitecore Experience Platform. We will also have a closer look at Sitecore Host Applications as well as the Sitecore Host plugins. I will encourage you to please read through these blog posts starting with part one, through part four. I have also provided links below if you would like to jump and have a peek on the other parts as well. All code snippets referenced in the blog posts can also be found on my public Github repo using the link provided below.
You can define a Sitecore Host Plugin as a feature or functionality that is dynamically loaded into Sitecore Host. As you will see later on, a plugin can contain Code, Configuration, Commands and Content. A plugin can also depend on another plugin, and therefore plugins are always loaded in a dependency order.
Definition of a Sitecore Host Plugin
Creating a Visual Studio Project
Ensure you have installed Visual Studio version 2017 and above. To create a Sitecore Host Plugin in Visual Studio, follow the steps below:
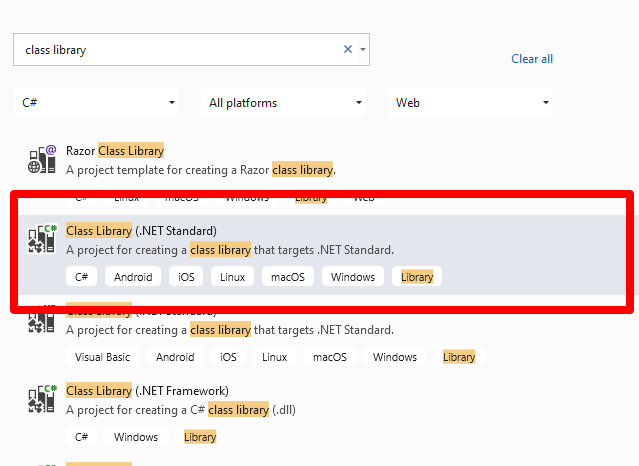
Create a Class Library project targeting .NET Standard 2.0 framework, as shown below. Simply filter project templates by language preference, platform and project type. There is also a text box where I have filtered by “class library”
Visual Studio 2019 – create new project dialog
Select the highlighted template and then assign the project a uniquely identifiable name (this will be the plugin unique name). After you have successfully created your project, it is time to verify the Target Framework has been set correctly. This can be done by viewing the project properties as shown below.
Right-click on the project name
Select the properties menu item
Which should open the dialog shown below. Adjust appropriately if this is different in your case.
Visual Studio – .NET Standard 2.0 target framework
Then create a global.json file at the root of the project. This will specify the version of Sitecore.Framework.Runtime.Build package, which is required when creating plugins. It provides MSBuild targets to support creating Sitecore plugins
Edit the csproj file and add this line below after the Project node
The final csproj file should look like the one below
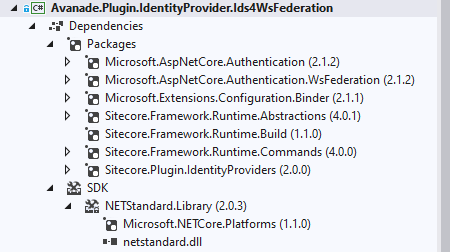
Then add necessary references to required Packages, such as shown below.
You will notice I am additionally referencing Microsoft.AspNetCore.Authentication.WsFederation package needed for Web Services Federation functionality for ASP.NET core applications.
Now that we have a Visual Studio project for a Sitecore Host Plugin, we are going to create a external provider to allow us to use Ws-Federation protocol such as Active Server Federation Services (ADFS) with Sitecore Identity Server.
Define Plugin Configuration
The Sitecore Identity Server Plugin requires an XML based configuration based on Sitecore Identity Server template as shown below. In your Visual Studio project, create a solution folder named “Config“. Then add an XML file using the naming convention {Plugin_name}.xml where {Plugin_name} is the name of this project. So in our case, we will name it Avanade.Plugin.IdentityProvider.Ids4WsFederation.xml
In this configuration we will define the following:
“Sitecore:ExternalIdentityProviders:IdentityProviders:Ids4WsFederation” – the configuration section name. Please note Ids4WsFederation is the section name for the xml tag.
AuthenticationScheme – this is IdS4-Ids4WsFederation The second part Ids4WsFederation much be same as the section name for the xml tag (by convention)
DisplayName – This is the caption for the Login button that will appear on Sitecore Identity login page
Enabled – This is the flag that enables the subprovider when set to true
Wtrealm – This is the Ws-Federation or ADFS Relying Party URI as configured on your ADFS instance.
ClaimTransformations – This section is used to place transformation rules for how source claims from Ws-Federation or ADFS will be mapped into Identity Server normalised claims. Sample claim transformations have been provided in the source code in my public GitHub Repo
Mapping Plugin Configuration into C# models
In your Visual Studio project, create a class named Ids4WsFederationIdentityProvider.cs that inherits from the Sitecore.Plugin.IdentityProviders.IdentityProvider. Notice the class name has a suffix of IdentityProvider as a recommended naming convention.
In this class we will define two properties of type string: MetadataAddress and Wtrealm. This are the additional properties we need from our configuration file above, the rest of the properties are defined in the base Sitecore.Plugin.IdentityProviders.IdentityProvider class.
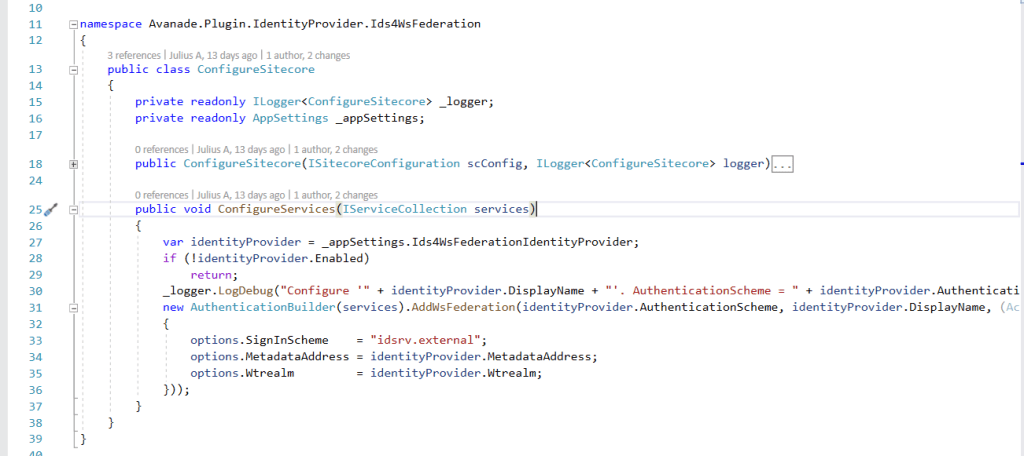
Provide definition of ConfigureServices for the Plugin
As per Sitecore Host Plugin requirements, we need to configure services for the subprovider according to the instructions for this provider, and specify the SignInScheme setting as idsrv.external
To use authentication middleware, we must have an object of the type Microsoft.AspNetCore.Authentication.AuthenticationBuilder
To initialise this object, we must use
new Microsoft.AspNetCore.Authentication.AuthenticationBuilder(services)
instead of services.AddAuthentication()
Notice how we use AuthenticationBuilder(services).AddWsFederation() pipeline below, which is available to us via the Microsoft.AspNetCore.Authentication.WsFederation package we referenced earlier.
Below is the full code listing of the required implementation
Configure Services code listing
Define Sitecore.Plugin.manifest file for the Plugin
Finally we need to define the Plugin manifest file, which looks like the screenshot below.
Sitecore.Plugin.manifest file definition
The manifest file defines the following properties for the plugin
PluginName – Unique and identifiable name for the plugin
AssemblyName – This is the name of the Class Librabary
Dependencies – a list of other plugins your plugin depends on. In our case, this is depending on Sitecore.Plugin.IdentityProviders version 4.0.0-r00257
Tags – This is by default set to “Sitecore”
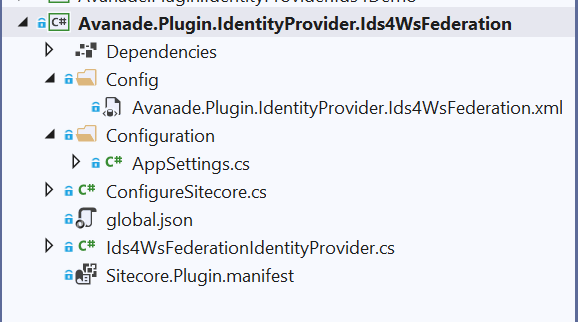
Your final Visual Studio Project structure should be similar to the one shown in the screenshot below. This code is also available on my public Github Repo
Building your Plugin Nuget package and deploying it
You can manually publish your project to generate a Nuget package for your plugin.
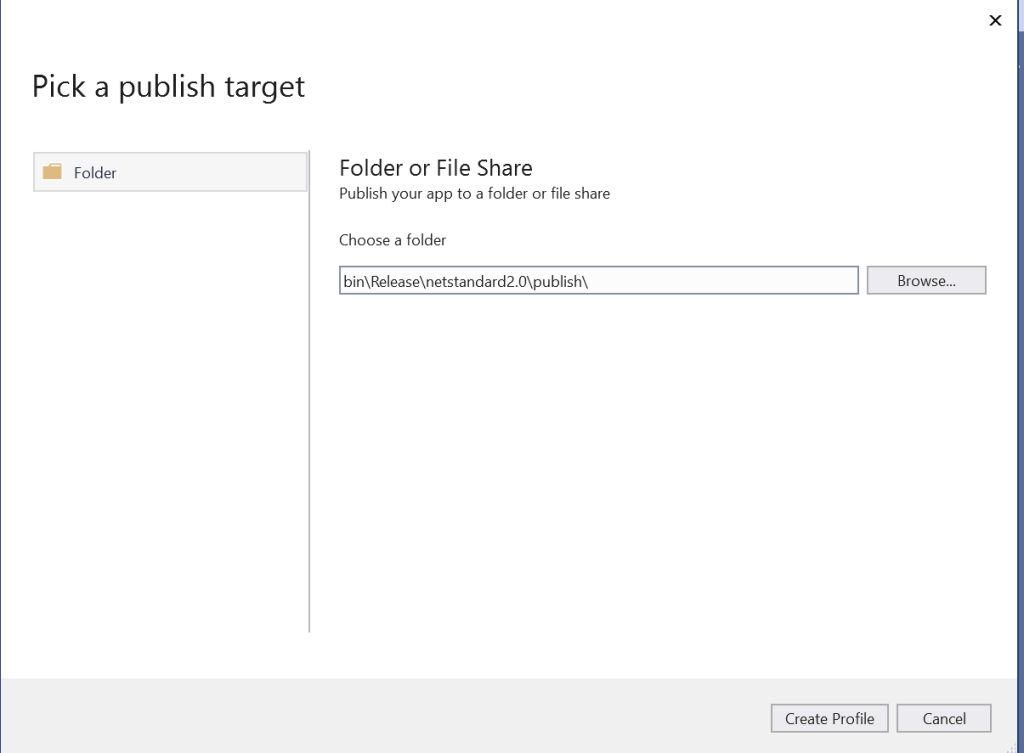
Right-click your project in Visual Studio, then choose Publish… menu item. Follow the steps to publish the code to a staging folder.
And then you will publish a standard Nuget package located within publish sub-folder shown below:
Deploying your Plugin Manually
Plugins are distributed as Nuget packages. To add a plugin to a host application so that it is loaded at runtime, the plugin must be unpacked and have its assets copied to the correct locations.
Create an environment folder
If you do not have one already, you need to create an environment folder under the sitecoreruntime folder. A Sitecore Host application will default its environment to Production. Unless a different environment is supplied at startup (via the –env command) it will look for the production folder first:
For example: hostapp/sitecoreruntime/production
Create a plugin folder
You need to create a folder for the plugin (in our case name it Avanade.Plugin.IdentityProvider.Ids4WsFederation) . This is where the plugin manifest, assets and configuration are located. This is located inside the sitecore folder, which is inside an individual environment folder
The sitecoreruntime/<env>/sitecore folder does not override files in the hosts sitecore folder. This is a unique folder used for loading plugin assets.
Runtime environment folders cannot contain a sitecoreruntime folder of their own.
Unpack plugin data from a Nuget package and deploy it
We have our plugin named Avanade.Plugin.IdentityProvider.Ids4WsFederation.1.0.0.nupkg
Unpack the plugin contents. You will notice our package contains special sitecore directory in the root of the nupkg package with additional things inside it. Everything else is the standard Nuget structure.
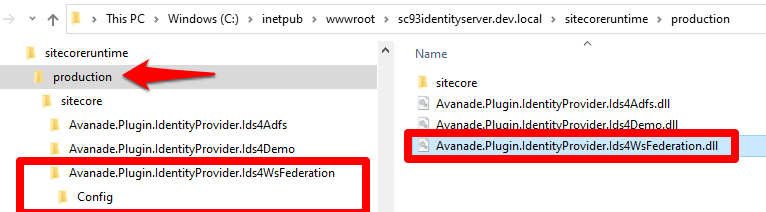
Copy the contents of the Nuget sitecore folder to the plugin folder you created previously (for example, sitecoreruntime/production/sitecore/Avanade.Plugin.IdentityProvider.Ids4WsFederation).
Our plugin package contains a lib folder, copy the assets from the correct target framework to the root of the sitecoreruntime/<env> folder (for example, sitecoreruntime/production/*.dll)
Our plugin package contains a content folder, copy the assets from this folder to the plugin folder created previously (for example, sitecoreruntime/production/sitecore/Avanade.Plugin.IdentityProvider.Ids4WsFederation)
The final folder structure will looks similar to this below
Ws-Federation subprovider in Action
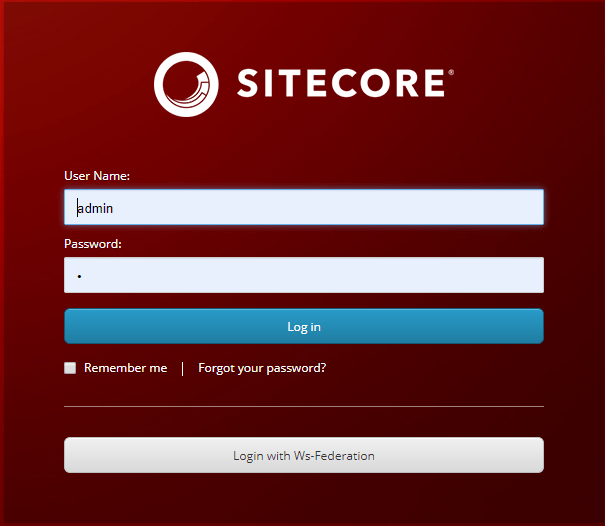
After successful deployment of this plugin to your instance of Sitecore Identity server, you should see the Login screen below.
Please note you will need to re-start your IIS to pick the plugin changes.
SI with additional provider for ADFS
Troubleshooting plugin
If you encounter any issues with your ADFS plugin, it is possible that the claims mappings have issues. Please refer to the Claims Troubleshooting section on previous blog post for some tips on resolving potential issues.
Conclusion
In this blog post, we examined creating and extending Sitecore Host plugins. We walked through the process of creating your .NET Core project in Visual Studio. We also walked through the actual code samples required to extend the Sitecore Identity with a new subprovider for Ws-Federation (ADFS). The code samples used in this blog post is also available in this GitHub Repo
This is the final blog post of this four-part series. I hope you found it useful and given you some motivation to go and start creating cool Sitecore Host Plugins.
Please feel free to leave us your feedback and/or comments below.